How To Maintenance :: Thermostat Change
#1
 06-28-2010, 07:43 AM


Maintenance :: Thermostat Change
Cooper S Thermostat Change
Jamie Fox, Alberta, Canada
This how-to describes the method I used to change out a leaking thermostat on an ’06 Cooper S JCW Competition Edition. I have done lots of automotive work, I have only worked on my Mini once or twice before. This procedure took me about 3 to 4 hours going slowly and carefully so as not to break anything. You may be faster.
As with most automotive jobs, it’s good to have spares. I mail-ordered a new thermostat with gasket, a new thermostat housing and picked up a jug of coolant at my local Mini dealer. You are going to lose some coolant so it’s good to have some available when you put it all back together. I chose to replace my thermostat housing, I figured that while I have it apart it would be a good idea. Better than doing the job twice. It turned out that the housing on my car was fine so I put it in my parts box as a spare should I need one in the future.
Warm up the motor
Warming the motor makes removing hoses and plastic parts easier because they are warm and soft. Don’t drive for a half-hour, I just run my cars until the temperature gauge just starts to move.
Put the car on ramps while it’s running or jack it up and put it on floor stands
Remove the Front Undertray
There are two Phillips screws at the rear corners and a 10mm bolt at the center front. Remove the fasteners and pull the tray rearward to release it. You’ve got to wiggle it around a bit to remove it.
Disconnect the Battery
Go in the back, empty your trunk area, lift up the carpet and disconnect the battery. I pulled the negative cable off.
Drain the coolant.
Slowly remove the expansion tank cap. Be careful not to burn yourself with steam or hot coolant.

Position a container under the left front corner under the lower rad hose. It doesn’t have to be big, you’ll only get a couple of liters of coolant when the rad is drained.

Pinch the hose clamp with Channellock pliers and slide it off the hose. Push the hose up and be ready to catch the coolant. I’ve had cars that have quite tight hose connections, the Mini slid off quite easily.

After the coolant starts to drain, go to the upper rad hose and loosen the air bleed screw a few turns. No need to remove it completely, it has a slot in it to allow air in or out.
Remove the Intercooler Cover

Using a Torx bit, remove the 4 screws on the Intercooler cover. Remove the cover.
Remove the Air Box Cover

Remove the clip on the hose on the air box cover front. Pull the hose back off the cover.

Remove the 2 front Torx screws.

Unclip the electrical connector at the back left. Push the air box cover back a bit then lift up at the back to release it from the clips at the back. Lift the cover forward, up and out.
Remove the Snorkel Tube

Remove the hose clamp at the rad cowl intake.

Rotate the snorkel up then pull it towards you to release it from the air box bottom.

Be careful not to break the pin that fits into the air box bottom.
Remove the Throttle Body Intake Hose

The Throttle Body intake hose doesn’t have to come off but it’s kind of in the way accessing the thermostat housing. I chose to remove mine to make life easier.

Pry the clip off the lower intake hose where it meets the throttle body. It’s tight but you can get a flat-blade screwdriver down there. Pry the clip teeth off the bump in the clamp with a flat-blade screwdriver. There may be special pliers for these, I don’t have any. This one is a little tough to get back on but it can be done.

Remove the small hose from the side of the intake pipe. Slide the clip off, rotate and pull.
Remove the ECM

In the engine compartment, pinch the clips of the ECM cover and remove the cover.

Pull the T-shaped connector release clips back (visible under the wire bundle), this will partially eject the connectors from the sockets. Wiggle the connectors while gently pulling up to remove them.

Lift out the ECM by just pulling it up and out of it’s retaining clips.

Place the ECM up somewhere where it won’t get dirty, damaged or have coolant spilled on it while you are doing the rest of the work.
Remove the air box bottom

Remove the bolt right front corner of the air box bottom (one on the right in this picture).

The air box mounts with two rubber rings that are inserted into the back of the air box and these rings push onto two pins that stick up at the rear of the air box. Pull the air box bottom piece up at the front, pull forward to pull the box off the rubber mounts at the back, or lift up on the back to remove the rubber mounts from their pins. I pulled mine forward then collected the rubber rings from the pins and put them back into the air box bottom so I could simply push down to reinstall the bottom easily.
You should now be able to gain access to the thermostat, wiring and MAP sensor bracket and connectors.
Remove the MAP sensor
You need to do this to gain access to one of the thermostat housing bolts and the sensor will not come off with the bracket, you must remove the sensor from the bracket first. The sampling hose is captive between the bracket and the MAP sensor and this will prevent you from removing the bracket.

Remove the MAP sensor connector. Pull the tab away from the body of the connector and pull up.

Push down on the release clip and pull the O2 sensor connector forward to remove it.
Remove the MAP sensor

The MAP sensor is held to the wiring bracket with 2 Torx screws.

Remove the screws.

Pull up on the MAP sensor to remove it from the bracket and from it’s sampling hose. Be careful with it, it’s fragile. Put it with the ECM to keep it safe.

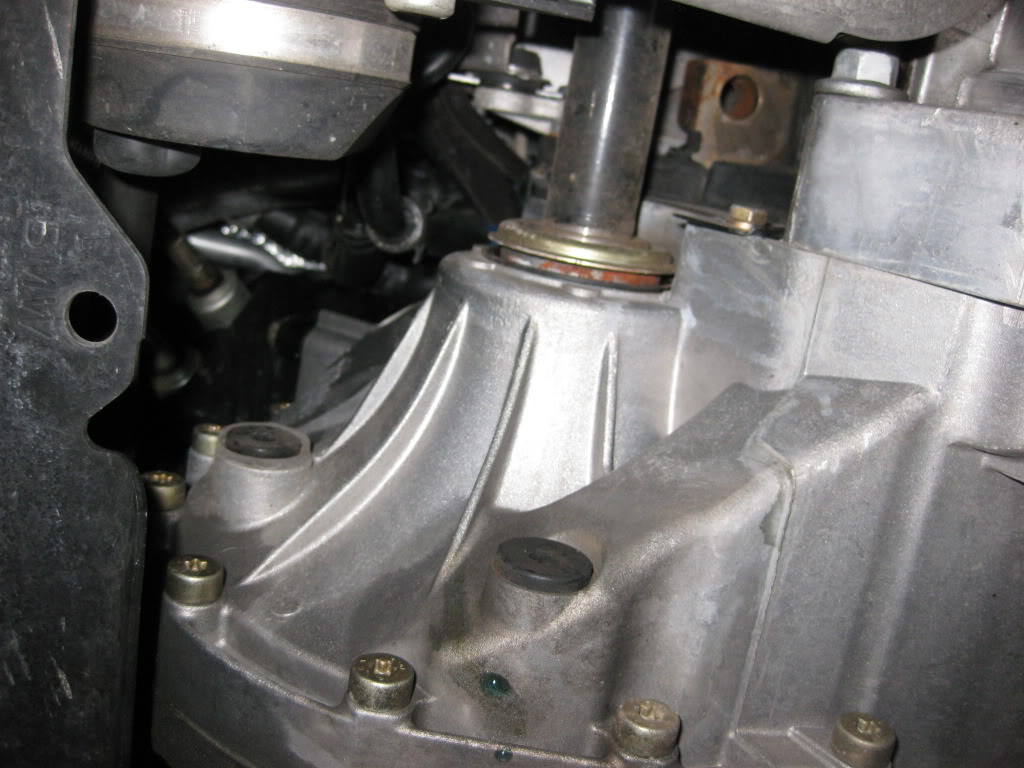
The hose with the MAP sensor (and bracket for clarity) removed, visible to the left of the orange-backed connector. The socket and extension is in place for removing the lower thermostat housing bolt. We’ll get to that.
Remove the Thermostat Hoses

Using Channellocks or Vice Grips, pinch the hose clamp and slide it down the rear hose. I used Vice Grips here, Channellocks don’t mark up the clamps as badly and are easier to use on the spring clamps. I’ve been using Vice Grips on these clamps for years but won’t anymore. They are also a pain releasing every time they slip off the clamp, which happens a lot.

Take the clamp off the larger front hose the same way.

Using a 10mm socket and extension, remove the upper two thermostat housing bolts. They are under the MAP sensor bracket. Lift the bracket up and off.

Once the bracket is off, you can move the O2 sampling pipe out of the way to gain access to the lower thermostat bolt. Remove it.
Leave your drain pan in place under the car. When you remove the thermostat housing, you’ll get coolant out of the head (or drain the block). I chose to just let mine run down and into my pan. The motor in my car is very clean though so it didn’t wash any gunk into the pan with it.

Lift the thermostat housing up and out.

The thermostat. You can see where the gasket has been leaking around the edges of the housing.

Remove the thermostat from the head. Mine had the old style white gasket. This is the cause of the leak.

The newer thermostat (rear) has an opaque gasket, the old style (front) is white.

Clean the housing seating area.

Insert the new thermostat into the housing and offer up the new stat and gasket to the head.
Start the lower bolt. Make sure the thermostat didn’t become separated from the housing.
Offer up the MAP sensor bracket and start the top two bolts.
Snug up the 3 housing bolts gently and evenly until they’re seated firmly.
Torque them to 9 ft. lbs. as per the Haynes manual spec.
Replace the MAP sensor pipe on top of the bracket.
Replace the MAP sensor.
Put the hoses onto the thermostat housing.
Replace the Throttle Body hose. The lower hose clamp can be closed with a pair of dags (diagonal cutters or side cutters), the best tool for doing this I find. If the clip won’t snap into place with just the dags, help it with your flat-blade screwdriver.

If you’ve got the Works air box, note that the rubber bellows on the air box lower piece that is facing the firewall is closed off. Why I’m not sure.

Mine had a round disk simply seated into one of the bellows folds. I removed it for some extra air into the air box. I previously had installed a universal K&N and did the de-flap job on the air box top. Why install the bellows, provide the hole into the cowl area then block it with a plate? Your guess is as good as mine.
Replace the air box bottom with your newly open bellows. Push the box down at the back to reseat the rubber mounts onto the pins.
Replace the box bottom mounting bolt.
Replace the ECM. Push it firmly into the recess in the air box bottom.
Replace the connectors. Go carefully when seating the connectors so as not to bend any pins.
Replace the ECM cover.
Replace the snorkel tube. Simply offer it up to the air box while rotating it down. It’ll pop into place into the air box bottom. Mind the pin again, guide it into the recess in the box bottom.
Replace the air box top.
Connect the Throttle Body hose to the air box. Use your dags again on this clip.
Replace the lower rad hose.

Refill the cooling system with new or your old coolant if it’s clean. Pour it into the expansion tank with the bleed screw on the upper hose open.
Reconnect the battery.
Start the car.
Add coolant to the expansion tank as needed to keep the level near normal while the motor is warming up. This is a good time to grab a beer while you wait.
Leave the air bleed screw loose until coolant (motor hot) starts to seep out.
Close the bleed screw.
Run the car until the cooling fan comes on the first time.
Have another beer while allowing the system to cool.
Check the coolant level again, top up as necessary.

Enjoy no more coolant leaks on your garage floor or driveway. Have another beer.
If you’ve got leaks, something is wrong. Say bad words then go back and do it all over again to find out what’s wrong.
Once you are sure you have no leaks, replace the front undertray.
Road test the car later or the next day, whenever you haven’t been drinking.
Cheers.
Jamie Fox, Alberta, Canada
This how-to describes the method I used to change out a leaking thermostat on an ’06 Cooper S JCW Competition Edition. I have done lots of automotive work, I have only worked on my Mini once or twice before. This procedure took me about 3 to 4 hours going slowly and carefully so as not to break anything. You may be faster.
As with most automotive jobs, it’s good to have spares. I mail-ordered a new thermostat with gasket, a new thermostat housing and picked up a jug of coolant at my local Mini dealer. You are going to lose some coolant so it’s good to have some available when you put it all back together. I chose to replace my thermostat housing, I figured that while I have it apart it would be a good idea. Better than doing the job twice. It turned out that the housing on my car was fine so I put it in my parts box as a spare should I need one in the future.
Warm up the motor
Warming the motor makes removing hoses and plastic parts easier because they are warm and soft. Don’t drive for a half-hour, I just run my cars until the temperature gauge just starts to move.
Put the car on ramps while it’s running or jack it up and put it on floor stands
Remove the Front Undertray
There are two Phillips screws at the rear corners and a 10mm bolt at the center front. Remove the fasteners and pull the tray rearward to release it. You’ve got to wiggle it around a bit to remove it.
Disconnect the Battery
Go in the back, empty your trunk area, lift up the carpet and disconnect the battery. I pulled the negative cable off.
Drain the coolant.
Slowly remove the expansion tank cap. Be careful not to burn yourself with steam or hot coolant.
Position a container under the left front corner under the lower rad hose. It doesn’t have to be big, you’ll only get a couple of liters of coolant when the rad is drained.
Pinch the hose clamp with Channellock pliers and slide it off the hose. Push the hose up and be ready to catch the coolant. I’ve had cars that have quite tight hose connections, the Mini slid off quite easily.
After the coolant starts to drain, go to the upper rad hose and loosen the air bleed screw a few turns. No need to remove it completely, it has a slot in it to allow air in or out.
Remove the Intercooler Cover
Using a Torx bit, remove the 4 screws on the Intercooler cover. Remove the cover.
Remove the Air Box Cover
Remove the clip on the hose on the air box cover front. Pull the hose back off the cover.
Remove the 2 front Torx screws.
Unclip the electrical connector at the back left. Push the air box cover back a bit then lift up at the back to release it from the clips at the back. Lift the cover forward, up and out.
Remove the Snorkel Tube
Remove the hose clamp at the rad cowl intake.
Rotate the snorkel up then pull it towards you to release it from the air box bottom.
Be careful not to break the pin that fits into the air box bottom.
Remove the Throttle Body Intake Hose
The Throttle Body intake hose doesn’t have to come off but it’s kind of in the way accessing the thermostat housing. I chose to remove mine to make life easier.
Pry the clip off the lower intake hose where it meets the throttle body. It’s tight but you can get a flat-blade screwdriver down there. Pry the clip teeth off the bump in the clamp with a flat-blade screwdriver. There may be special pliers for these, I don’t have any. This one is a little tough to get back on but it can be done.
Remove the small hose from the side of the intake pipe. Slide the clip off, rotate and pull.
Remove the ECM
In the engine compartment, pinch the clips of the ECM cover and remove the cover.
Pull the T-shaped connector release clips back (visible under the wire bundle), this will partially eject the connectors from the sockets. Wiggle the connectors while gently pulling up to remove them.
Lift out the ECM by just pulling it up and out of it’s retaining clips.
Place the ECM up somewhere where it won’t get dirty, damaged or have coolant spilled on it while you are doing the rest of the work.
Remove the air box bottom
Remove the bolt right front corner of the air box bottom (one on the right in this picture).
The air box mounts with two rubber rings that are inserted into the back of the air box and these rings push onto two pins that stick up at the rear of the air box. Pull the air box bottom piece up at the front, pull forward to pull the box off the rubber mounts at the back, or lift up on the back to remove the rubber mounts from their pins. I pulled mine forward then collected the rubber rings from the pins and put them back into the air box bottom so I could simply push down to reinstall the bottom easily.
You should now be able to gain access to the thermostat, wiring and MAP sensor bracket and connectors.
Remove the MAP sensor
You need to do this to gain access to one of the thermostat housing bolts and the sensor will not come off with the bracket, you must remove the sensor from the bracket first. The sampling hose is captive between the bracket and the MAP sensor and this will prevent you from removing the bracket.
Remove the MAP sensor connector. Pull the tab away from the body of the connector and pull up.
Push down on the release clip and pull the O2 sensor connector forward to remove it.
Remove the MAP sensor
The MAP sensor is held to the wiring bracket with 2 Torx screws.
Remove the screws.
Pull up on the MAP sensor to remove it from the bracket and from it’s sampling hose. Be careful with it, it’s fragile. Put it with the ECM to keep it safe.
The hose with the MAP sensor (and bracket for clarity) removed, visible to the left of the orange-backed connector. The socket and extension is in place for removing the lower thermostat housing bolt. We’ll get to that.
Remove the Thermostat Hoses
Using Channellocks or Vice Grips, pinch the hose clamp and slide it down the rear hose. I used Vice Grips here, Channellocks don’t mark up the clamps as badly and are easier to use on the spring clamps. I’ve been using Vice Grips on these clamps for years but won’t anymore. They are also a pain releasing every time they slip off the clamp, which happens a lot.
Take the clamp off the larger front hose the same way.
Using a 10mm socket and extension, remove the upper two thermostat housing bolts. They are under the MAP sensor bracket. Lift the bracket up and off.
Once the bracket is off, you can move the O2 sampling pipe out of the way to gain access to the lower thermostat bolt. Remove it.
Leave your drain pan in place under the car. When you remove the thermostat housing, you’ll get coolant out of the head (or drain the block). I chose to just let mine run down and into my pan. The motor in my car is very clean though so it didn’t wash any gunk into the pan with it.
Lift the thermostat housing up and out.
The thermostat. You can see where the gasket has been leaking around the edges of the housing.
Remove the thermostat from the head. Mine had the old style white gasket. This is the cause of the leak.
The newer thermostat (rear) has an opaque gasket, the old style (front) is white.
Clean the housing seating area.
Insert the new thermostat into the housing and offer up the new stat and gasket to the head.
Start the lower bolt. Make sure the thermostat didn’t become separated from the housing.
Offer up the MAP sensor bracket and start the top two bolts.
Snug up the 3 housing bolts gently and evenly until they’re seated firmly.
Torque them to 9 ft. lbs. as per the Haynes manual spec.
Replace the MAP sensor pipe on top of the bracket.
Replace the MAP sensor.
Put the hoses onto the thermostat housing.
Replace the Throttle Body hose. The lower hose clamp can be closed with a pair of dags (diagonal cutters or side cutters), the best tool for doing this I find. If the clip won’t snap into place with just the dags, help it with your flat-blade screwdriver.
If you’ve got the Works air box, note that the rubber bellows on the air box lower piece that is facing the firewall is closed off. Why I’m not sure.
Mine had a round disk simply seated into one of the bellows folds. I removed it for some extra air into the air box. I previously had installed a universal K&N and did the de-flap job on the air box top. Why install the bellows, provide the hole into the cowl area then block it with a plate? Your guess is as good as mine.
Replace the air box bottom with your newly open bellows. Push the box down at the back to reseat the rubber mounts onto the pins.
Replace the box bottom mounting bolt.
Replace the ECM. Push it firmly into the recess in the air box bottom.
Replace the connectors. Go carefully when seating the connectors so as not to bend any pins.
Replace the ECM cover.
Replace the snorkel tube. Simply offer it up to the air box while rotating it down. It’ll pop into place into the air box bottom. Mind the pin again, guide it into the recess in the box bottom.
Replace the air box top.
Connect the Throttle Body hose to the air box. Use your dags again on this clip.
Replace the lower rad hose.
Refill the cooling system with new or your old coolant if it’s clean. Pour it into the expansion tank with the bleed screw on the upper hose open.
Reconnect the battery.
Start the car.
Add coolant to the expansion tank as needed to keep the level near normal while the motor is warming up. This is a good time to grab a beer while you wait.
Leave the air bleed screw loose until coolant (motor hot) starts to seep out.
Close the bleed screw.
Run the car until the cooling fan comes on the first time.
Have another beer while allowing the system to cool.
Check the coolant level again, top up as necessary.
Enjoy no more coolant leaks on your garage floor or driveway. Have another beer.
If you’ve got leaks, something is wrong. Say bad words then go back and do it all over again to find out what’s wrong.
Once you are sure you have no leaks, replace the front undertray.
Road test the car later or the next day, whenever you haven’t been drinking.
Cheers.


#7
08-01-2010, 07:32 PM
Trending Topics

#12
09-30-2010, 08:16 AM

#14
11-08-2010, 06:21 PM

#16
11-12-2010, 07:04 PM
Got it done. Yep, it was the thermostat gasket. I skipped steps above, here's how I did it.
I did not mess with the ECU. I simply swung the airbox out of the way. There is a picture above. Be careful so you don't nick wires.
I did this whole thing with the engine cold because I knew I was going to get intimate with it, I didn't want to burn myself.
I drained NO coolant. Do NOT touch the overflow tank. Make sure the cap is tight on. I took the thermostat off and the only coolant that dripped was whatever was in the housing. IF you mess with the overflow cap and open it, coolant will flush out because you will break vacuum.
I also did not disconnect the throttle body hose, I was able to work around it just fine.
So, if you skip the steps above I think you can get it done much faster and easier.
The old gasket looked terrible. There were at least 2 spots I was able to identify where it started leaking.
#17
11-30-2010, 12:34 PM

To the OP (or anyone else) did the thermostat come with the new cover, or did you buy a new cover as well?


#20
12-01-2010, 07:17 PM

5th Gear
heads up, you do not need to drain the coolant. I did this for the second time the other weekend (first time i did) and it made no difference for me as with the exception of the expansion tank, the thermostat housing is the highest point in the coolant cycle. my car was jacked up non-level the first time which made have played a role, but when i did it the second time i placed the drain pan just behind the transmission on the ground and then unbolted the thermostat housing, and all the coolant in the head just dribbled down the tranny and into the pan, no mess. put it back together and topped off the expansion tank. ran for a minute, then re-topped it off.
makes the job into under 45 minutes for someone who knows how to get to it and take out everything.
makes the job into under 45 minutes for someone who knows how to get to it and take out everything.

#22
12-02-2010, 12:07 PM
#23
01-01-2011, 08:48 AM
1st Gear
Join Date: Nov 2006
Location: Chicago, IL
Posts: 34
Likes: 0
Received 0 Likes
on
0 Posts
This write-up is amazing! I'm wondering if there's anyone in the Chicagoland area that would be willing to help me change mine out?
I love cars & would like to get somewhat proficient under the bonnet (no pun intended) but haven't had the opportunity to learn. I'd love the chance to learn as well as save much of the $370 fee the dealer was quoting me to fix it...
Please let me know!
I love cars & would like to get somewhat proficient under the bonnet (no pun intended) but haven't had the opportunity to learn. I'd love the chance to learn as well as save much of the $370 fee the dealer was quoting me to fix it...
Please let me know!
#24
01-02-2011, 09:36 AM
The coolant was brand new, not a month old. My statement was not related to maintenance, it was strictly procedural for this gasket replacement. By not having to deal with the coolant in any capacity, you save up a significant amount of time.
#25
01-02-2011, 09:38 AM
heads up, you do not need to drain the coolant. I did this for the second time the other weekend (first time i did) and it made no difference for me as with the exception of the expansion tank, the thermostat housing is the highest point in the coolant cycle. my car was jacked up non-level the first time which made have played a role, but when i did it the second time i placed the drain pan just behind the transmission on the ground and then unbolted the thermostat housing, and all the coolant in the head just dribbled down the tranny and into the pan, no mess. put it back together and topped off the expansion tank. ran for a minute, then re-topped it off.
makes the job into under 45 minutes for someone who knows how to get to it and take out everything.
makes the job into under 45 minutes for someone who knows how to get to it and take out everything.