
How To Audio/Navigation :: Front/Rear Channel Swap


Thread Starter
|
4th Gear
Joined: Feb 2008
Posts: 447
Likes: 1
From: Silicon Valley

I've cleaned up the wiring some since this pic was taken...
I've also thought of mounting it in a more permanent/secure fashion, but it isn't really high on the priority list right now.
It works great!
yeah I asked b/c your gallery says temporary spot - I'm not going to tackle this until the weather gets better anyway when I can swap the speakers...do you have a pic of how you tapped of the x9331 connector? ...I forget which ones are the "high" inputs......and have you tried to mount the bass600 in the styrofoam under the floor with the tools?
I'm also thinking about tapping off the lighter plug in the boot but first taking off the side panel and just T-tapping the wires that run to the lighter plug so I don't have to worry about the plug coming loose if something hits it....I really don't want to run 8 gauge to the boot if it's not necessary.
I'm also thinking about tapping off the lighter plug in the boot but first taking off the side panel and just T-tapping the wires that run to the lighter plug so I don't have to worry about the plug coming loose if something hits it....I really don't want to run 8 gauge to the boot if it's not necessary.
Thread Starter
|
4th Gear
Joined: Feb 2008
Posts: 447
Likes: 1
From: Silicon Valley
Power wiring -- use the t-taps to the lighter plug! One of the nice things about the bass600 is it doesn't require heavy duty wiring (my opinion -- if you want to run 00 welding cable to the battery, be my guest). The thing draws less than 20 amps (20 amp fuse on the circuit). When I had it on my bench, I don't think I saw anything above 11 amps.
I'll look for pics of how I did the x9331 connector. I'm an electronics geek, so soldering is second nature to me. While I had the pins out of the connector to do the channel swap, I made a secure mechanical connection around the ends of the pins, and then soldered them. Stuffed the lot back into the connector body, and taped the new wire to the existing stuff to provide some strain relief.
have fun!
--bob
4th Gear
Joined: Dec 2008
Posts: 333
Likes: 1
From: Chesterfield, VA
POLL: to swap or not to swap
First off - thanks to everyone that has contributed to this thread.
I'd like opinions on whether to do the swap or not.
My situation:
'09 R56 with non hifi. I have replaced both fronts - lower with Infinity 6022si's, uppers with Infinity 3022cf's. The increase in clarity is astounding, and the bass reproduction is improved (especially fading mostly to the front). It's not "subwoofer" thumpa thumpa but it is clear and crisp.
I do not plan to replace the rears for a while (I just can't bring myself to tear into a brand new car like that).
I've read competing views on whether to do this with the stock 6X9's - so I sit here immobilized as I read this thread. I'm looking for those of you who have done this to chime in - should I swap or not?
Thanks in advance !
Last edited by euells; Feb 21, 2009 at 09:06 PM.
Thread Starter
|
4th Gear
Joined: Feb 2008
Posts: 447
Likes: 1
From: Silicon Valley
You only have to do it once!
A common refrain in dealing with those rear speakers --
Yes, it's a PITA, but you only have to do it once!
And really, it's not that hard.
(I just spent two hours replacing the 60gb disk drive in my wife's G4 iBook with a 160gb drive -- that was a PITA, involving many, many small screws. And that two hours doesn't include the time to update the backup of the old drive, partition the new one, and restore from the backup.)
The only difficult part, after you get over how hard you need to pull to get the trim pieces off, is learning the trick to removing the upper section of the back seats -- releasing the clip at the centre, then positioning the seat section at the proper angle so the outside end comes out. There are pictures detailing the process on othe threads. Done properly, it's quick, easy, and you don't need any "special words."
Unlike the front speakers, with most after market 6x9 speakers, such as the Polk ones I used, you don't even have to make new mounting holes.
You only have to do it once. You'll be glad you did.
But if you want thumpa-thumpa bass to make the rear-view mirror shake, you need a sub, and I really like the little boss audio bass600 (also sold under some other names).
have fun--
4th Gear
Joined: Dec 2008
Posts: 333
Likes: 1
From: Chesterfield, VA
As for the Bass600, where did you place it? How does it wire up?


3rd Gear
Joined: Feb 2009
Posts: 281
Likes: 0
As a long-time audio phreak, please allow me to add my 2 pence. I think the BEST sound quality is going to come from replacing ALL the speakers with more efficient after-market units. Powering mids and tweeters requires very little power, the bass speakers gobble up power.
If you don't want to mess with replacing the stock amp, your only solution is to find speakers that are more efficient. I'd like to obtain the specs for the stock speakers showing their output (in db) per volt of input. If you can find speakers that are 3db (or more) more efficient than the stockers, you have effectively upgraded your amp. The resulting increase in clarity and bass response should be easily audible.
Also, finding replacement speakers that allow you to direct the tweeter output (via swivel mounts or such) would go a long way towards improving the sound quality of the low-mounted speakers.
Soooo, does anyone know where I could find the electrical specs of the stock speakers?
And, BTW, you fellas have done a TERRIFIC job of sussing out the problems with the stock system and coming up with creative (and cheap) ways of improving the sound quality - GOOD ON YA!!!
Thread Starter
|
4th Gear
Joined: Feb 2008
Posts: 447
Likes: 1
From: Silicon Valley
I agree with your analysis -- and most folks have followed it (one way or the other) by replacing the OEM stuff with a set of speakers from the same family (Polk, JBL, etc.). Doing that keeps some semblance of balance.
One of the things a bunch of us would still like is a (software) tool that would let us talk to the radio and configure it, altering things such as channel roll-off, output levels, and the like. I suspect such a tool is out there (with a BMW part number on it) as the same part number head unit is used in both Hi-Fi and non-Hi-Fi vehicles.
Have fun!

OVERDRIVE
Joined: May 2005
Posts: 8,233
Likes: 128
From: San Francisco

1st Gear
Joined: May 2007
Posts: 47
Likes: 0
good to see this thread pop up AFTER I did my install and went on deployment :rofl:. But, I found that connector and basicly took it out of the loop. ran all my wiring from either side of the harness, back under the door trim, all the way to the rear seat...
Added a rear seat delete kit, stuffed my JL 500/5 and RF 3sixty.2 in the empty seat areas and my car is now booming...
Added a rear seat delete kit, stuffed my JL 500/5 and RF 3sixty.2 in the empty seat areas and my car is now booming...


4th Gear
Joined: Dec 2008
Posts: 333
Likes: 1
From: Chesterfield, VA
It's standing up on the driver's side of the boot, held in place by the netting.
I've cleaned up the wiring some since this pic was taken...
I've also thought of mounting it in a more permanent/secure fashion, but it isn't really high on the priority list right now.
It works great!
I've cleaned up the wiring some since this pic was taken...
I've also thought of mounting it in a more permanent/secure fashion, but it isn't really high on the priority list right now.
It works great!
Does your sub completely block the rear light? I have an '09, and the boot light is mounted on the indented panel, so the sub blocks almost all the light. When I wired it, I used connectors between the speaker leads and the stock connector / leads that came with the sub, So I can easily disconnect it. I was thinking about relocating it to the other side, which means hard wiring into the rear 12v outlet. How did you access this - did you remove the panel or can you get to it from the access door?
I also considered something like this. It could be spliced into the existing light's wiring, and if I could find a small enclosure I could relocate it up higher on the panel. It would have to be much brighter than the existing light.
That's a good question I was investigating today myself. I opened up the cover and felt around. My initial guess is that you can pop out that socket and tap off the connectors and snake it down the inside of the panel without needing to take off the actual panel. but if you're going to do that all the way to the other side you should use a different (much shorter) ground
I was also lookind around and it seems a bungee cord could be wrapped around to secure the uss8. I figured the two metal claps that hold the bottom of the cargo net in could be used on the bottom along with something (to be determined...maybe a big screw carefully into the uss8) up top
I was also lookind around and it seems a bungee cord could be wrapped around to secure the uss8. I figured the two metal claps that hold the bottom of the cargo net in could be used on the bottom along with something (to be determined...maybe a big screw carefully into the uss8) up top
4th Gear
Joined: Dec 2008
Posts: 333
Likes: 1
From: Chesterfield, VA
I was also lookind around and it seems a bungee cord could be wrapped around to secure the uss8. I figured the two metal claps that hold the bottom of the cargo net in could be used on the bottom along with something (to be determined...maybe a big screw carefully into the uss8) up top
The webbing that came with the MINI works perfect for me (just like K6rtm's photo shows) - it holds in nice and tight. Should work just as well on the other side.
I just did this using to torx bit to push out the female connectors. It was really easy once I figured out that the code for blue was missing on the instructions. Another point of confusion (for me) is that you only have to do the first 4 swaps listed (right?) Another benefit besides the increased bass response is that the annoying chime is now in the back and much less noticeable. Really glad I did this.
Thanks for the fix. I just finished the wire swap. What a difference.
I knew the factory R56 audio system needed work when I purchased the MINI. After researching the audio system I quickly realized what a difficult and expensive proposition it was going to be to fix it, until now. Now if you decide to add a sub to the rear speakers it will actually work.
It's like getting a new audio system for your MINI!!!
 Cost: $1.37 for the 5/32 brass tube.
I knew the factory R56 audio system needed work when I purchased the MINI. After researching the audio system I quickly realized what a difficult and expensive proposition it was going to be to fix it, until now. Now if you decide to add a sub to the rear speakers it will actually work.
It's like getting a new audio system for your MINI!!!
Cost: $1.37 for the 5/32 brass tube.
Last edited by scottab36; Mar 16, 2009 at 06:04 PM.


I stripped my interior this last weekend and threw in some 3-way Sony 6X9's for the rear and 3-way 6.5's in the lower door and wow what a difference with the channel swap. Both sets of speakers can be purchased at Walmart for under 50 bucks a set.
Just wanted to say thanks to everyone. Just did this mod. WOW, what a difference. Not the same as spending 2K on a new stereo but for the 30 minutes of time, a DEFINITE noticeable difference.
Thanks again,
Mark
Thanks again,
Mark
Thread Starter
|
4th Gear
Joined: Feb 2008
Posts: 447
Likes: 1
From: Silicon Valley
It's all about cost effective.
Upgraded the stereo in my 96 Jeep over the weekend (my son drives it). Talking with one of the guys about the Mini, what I've done there, how it sounds.
He asked what I'd do if money were not an issue.
Simple question, simple answer -- E55 AMG...
Upgraded the stereo in my 96 Jeep over the weekend (my son drives it). Talking with one of the guys about the Mini, what I've done there, how it sounds.
He asked what I'd do if money were not an issue.
Simple question, simple answer -- E55 AMG...
Remote lead
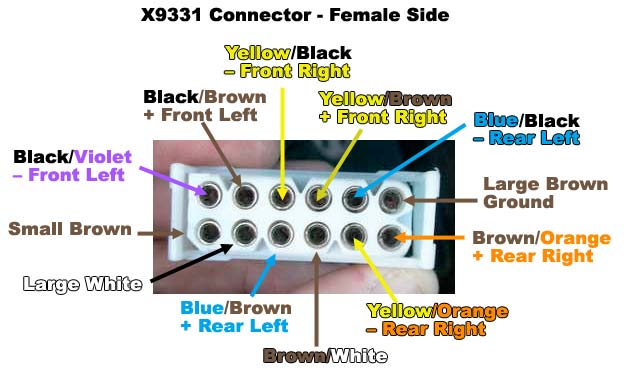
So, is this correct (main color first/stripe second)?
1: large brown -
2: blue/black - Rear Left Negative
3: yellow/brown - Front Right Positive
4: yellow/black - Front Right Negative
5: black/brown - Front Left Positive
6: black/violet - Front Left Negative
7: brown/orange - Rear Right Positive
8: yellow/orange - Rear Right Negative
9: brown/white -
10: blue/brown - Rear Left Positive
11: large white -
12: small brown -

Thread Starter
|
4th Gear
Joined: Feb 2008
Posts: 447
Likes: 1
From: Silicon Valley
There is no "remote" lead. Amp switching and such is done through the bus.
There are plenty of power lines that are tied to the ignition (the aux circuit in the dash and in the boot is one of those, that's what I use for my subwoofer), or those which come on when a door is opened and stay on for a few minutes after the car is closed up and locked (one of those I use for the radar detector). Look at one of the fuse threads for more details.
Have fun!

