
Engine Carbon Buildup Problem census count
#476
 05-24-2017, 06:46 AM

The degradation of performance from carbon buildup is a very slow process, so usually goes unnoticed. Typical responses from owners who were unaware of how much power loss they actually had before the walnut blasting include a few expletives like; Holy S^&*T I forgot how much power this MINI had when new....If codes are coming up and visual of valves shows buildup, it's time to be done or risk valve damage and costly head repair/replace.
#477
05-24-2017, 06:57 AM
The degradation of performance from carbon buildup is a very slow process, so usually goes unnoticed. Typical responses from owners who were unaware of how much power loss they actually had before the walnut blasting include a few expletives like; Holy S^&*T I forgot how much power this MINI had when new....If codes are coming up and visual of valves shows buildup, it's time to be done or risk valve damage and costly head repair/replace.

#478
05-25-2017, 06:20 AM

Platinum Sponsor
+1 , I had it on my 2007 and I could see a difference on the dyno before and after. But driving it day to day it's slow and you would not really notice it till its very bad and throws a CEL.
__________________

MINI Guru/ MINI Owner Since 2004 | NEW Lifetime Part Replacement | Local Pickup
Milltek | Genuine MINI | Forge Motorsport | NM Engineering | ECS Performance | M7 Speed
Customer Service Hours: 8am-8pm EST|Sales Team Hours: 8am-11pm | SAT 10am-7pm 800.924.5172
MINI Guru/ MINI Owner Since 2004 | NEW Lifetime Part Replacement | Local Pickup
Milltek | Genuine MINI | Forge Motorsport | NM Engineering | ECS Performance | M7 Speed
Customer Service Hours: 8am-8pm EST|Sales Team Hours: 8am-11pm | SAT 10am-7pm 800.924.5172
#479
05-25-2017, 07:20 AM
Carbon
My car is at the dealer for a timing chain and they reported that it had carbon build up. I mentioned that I haven't lost any performance and it definitely is not sluggish. He recommended the carbon cleaning based on a code. I'm going to wait until it affects the performance due to the high cost of the cleaning...roughly $900. It is not covered by the maintenance nor the extended warranty.
After having head reworked because of carbon build up I now use Seafoam reguarly & that was off warranty. They paid but thru class action two years later.
#480
05-25-2017, 08:01 AM

#481
06-02-2017, 03:15 PM


#482
06-16-2017, 05:21 AM

What do you do
What do you do to keep it so clean. I would like to know, because $50 seems very reasonable. Please let us in on the secret.

#484
09-27-2017, 07:21 AM
Platinum Sponsor
DIY is here: Might want to get it done before the CEL.
https://www.northamericanmotoring.co...-cleaning.html
https://www.northamericanmotoring.co...-cleaning.html
__________________
MINI Guru/ MINI Owner Since 2004 | NEW Lifetime Part Replacement | Local Pickup
Milltek | Genuine MINI | Forge Motorsport | NM Engineering | ECS Performance | M7 Speed
Customer Service Hours: 8am-8pm EST|Sales Team Hours: 8am-11pm | SAT 10am-7pm 800.924.5172
MINI Guru/ MINI Owner Since 2004 | NEW Lifetime Part Replacement | Local Pickup
Milltek | Genuine MINI | Forge Motorsport | NM Engineering | ECS Performance | M7 Speed
Customer Service Hours: 8am-8pm EST|Sales Team Hours: 8am-11pm | SAT 10am-7pm 800.924.5172
#485
11-05-2017, 04:19 PM

I 3D printed an adapter and made an easier to understand guide
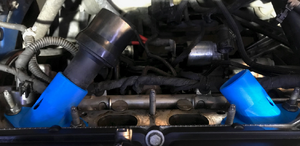
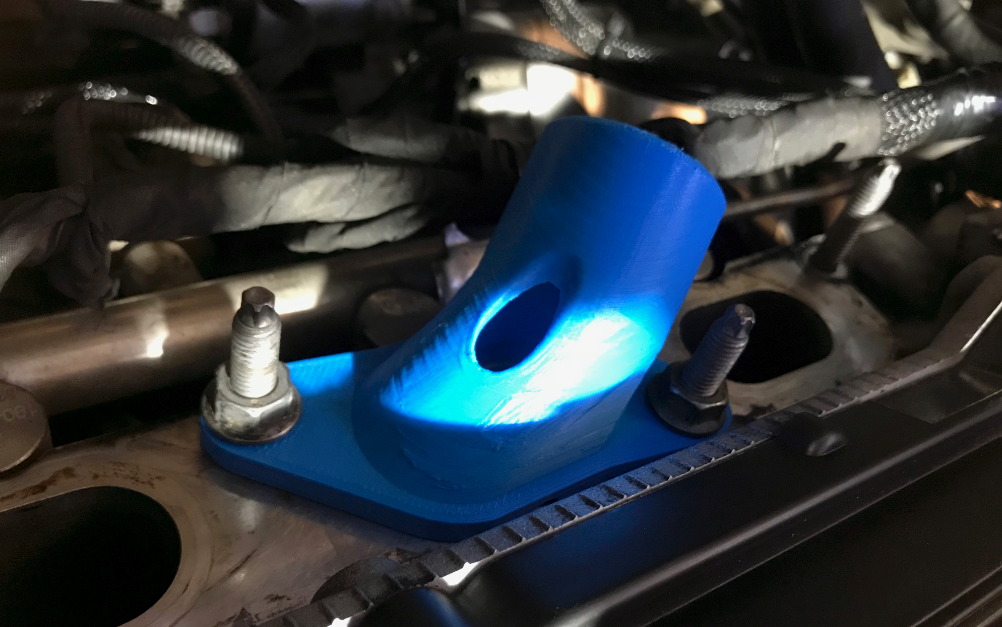
So I handmade an adapter out of PVC and wood and it worked, but using and making it was difficult. For my second cleaning I designed and 3D printed an adapter that is much easier to use. I also created a guide that I will copy and paste below. The file to print it yourself is here. If you don't have a 3D printer (aka most people) send me a PM and I can printer and ship you one.
Pictures:

The guide I created: (I couldn't transfer links so the properly formatted guide WITH LINKS IS HERE):
CLICK HERE TO GO TO THE BETTER VERSION OF THIS GUIDE (With links etc.):
About
This is an adapter to make carbon blasting the intake valves on a Mini Cooper R56 / N14 much easier. Normally you have to custom make you own, and that can be very difficult. This replaces a $90 adapter made by mini. If you do not have a 3D printer, you can order the part on various websites, or contact me and I can ship you one for cheap.
I designed this for the N14 engine (The R56 turbo), but it may fit other engines.
Designed for a 1-1/4" vac connection.
If I designed this as one part with 4 mounting holes it would not have fit on the intake ports on the far left and right. Thus, you need two versions. A normal one and a mirrored one.
I made this to fit a cheap homemade blaster. Directions on how to make the blaster are below.
Why carbon clean?
On the N14 engine (and many others) pressure from the crankcase is vented directly into the intake. This pressure includes gasses like oil vapor. This is called the PCV (positive crankcase ventilation) system. The PCV system does a poor job getting rid of the oil vapor before it is vented into the intake. In fact, if you take apart the intake ducting you will often find oil lining the pipes. As a result, these oil droplets hit the hot intake valves and quickly bake on and turn to carbon. In the direct injection engine the gas is injected directly into the cylinder, so nothing ever cleans the intake valves. Over time the carbon builds up on the intake valves and slowly chokes the engine resulting in poor overall performance, misfires, low MPG, and poor idling performance. It can even cause catastrophic failure by allowing the valves to heat up more than normal causing the valve to have a hole burned into the edge resulting in a loss of compression.
If you Mini is over 40K miles, chances are you need it done.
The procedure is done often by Mini, but you are looking at around $600 for that. You save a ton of money by doing it yourself, especially because you will likely have to do this every 40K miles or so to keep it clean and you will already have all of the tools and knowledge from the first time. The first time I did this took me a day because I didn�t know all of the tricks and had a TON of carbon to remove, but I have done it again recently and it only took a few hours.
What you need
Total cost for the whole project should be around $50 assuming you have an air compressor and shop vac. If you don't have an air compressor I bought this one and it worked perfectly. The blaster and media can be used for other projects. This should just take a trip to harbor freight and home depot/lowes.
Air compressor. Ideally 1.5 horse power or higher and 6 gallons or higher. Less is fine, but you will have to take more breaks for it to recharge.
Shop vac with 1-1/4 hose connector.
Socket set and torque wrench. Need up to 17mm socket.
These adapters, bother normal and mirrored.
Portable abrasive blaster kit from harbor freight.
25lbs Fine walnut shell media (Do NOT use sand). This should be almost double what you need.
Air Blow Gun with 2 ft. Extension from Harbor Freight. Item 68257.
Watts A-827 1/2-in x 1/4-in Brass Pipe Fitting or similar
Watts A-390 1/2-in x 1/2-in Barb Fitting or similar
Electrical tape
4 Intake manifold gaskets. Part# 11617528340 for the N14 as well as many other engines. Check realoem.com to find what part number you need. This is not required, but they are cheap and if you have a high mileage mini it�s a good idea to change them out.
If you are not very flexible a mirror is handy.
How to
If you are a DIY�er or someone mechanically savvy then this is a fairly straightforward project. Set aside one day for it, but it should only take an afternoon, especially if you have remove the intake manifold before.
(1. Make the blasting tool.
This is fairly easy. Download this guide and it shows how to make the tool. Here are some pictures of mine that shows how everything fits together. Test and make sure it works before use.
(2. Disconnect the battery.
(3. Remove the intake manifold.
This is the guide I use for removing the intake manifold. Here are some tips:
When removing the noise maker from the firewall (step 8) don�t worry about about breaking it. It�s tough. Just yank it off by hand.
When removing the ducting from the throttle housing (step 12), I leave the ducting connected to the throttle housing. It doesn�t get in the way when removing the manifold. I just remove the ducting connected to the angled ducting going into the throttle housing. This is much easier. The red line shows where I disconnect it.
When removing the purge solenoid tubing (step 13) don�t squeeze both sides of the connector. Only squeeze the top half of it. I use a set of pliers and a long flathead screwdriver to pop it off.
When removing the 10mm bolt bracing the manifold (step 14) I find it easiest to just remove the passenger tire and get to the bolt from that side instead of coming under the car. This is fairly easy so don�t over think it. You will have to remove the wheel later anyway. Here it is
Make sure when putting everything back together that both hoses are connected to EPPC solenoid (seen in step 21). They can fall off easily and you will have no boost if that happens.
(4. Check each intake port by eye or using a mirror to find what valves are closed. It is very important that you do NOT blast into a port that has valves that are open. Stuff a rag into all of the port except the one you are working on.
(5. Attach the 3D printed adapter to the engine head using one or two of the nuts you removed earlier. Make sure not to lose the nuts. Attach the vacuumed and blast for 10 seconds. I used 100 PSI. If there is a ton of carbon I found it helpful to stop blasting after a bit and then use a metal stick or similar to pick off big chunks of the carbon. This gave the walnut shell a better surface to attack. Before removing the wand pinch the media feeding hose so that you can just use the air pressure to blow away remaining walnut shell. Keep it pinched until it is removed so that the vacuumed doesn�t pull more walnut shell out.
(6. Once you have cleaned all of the ports with closed valves, you need to rotate the engine to close the other valves. The easiest / safest way to do this is to turn it by hand. Remove the passenger wheel as well as one of the expanding rivets holding the carpet wheel well liner so that you can get to the engine from inside the wheel well. You should see the serpentine belt attached to a pulley with a big bolt in it (16mm if my memory is correct.) Turn the bolt CLOCKWISE a few rounds. Do NOT turn it counterclockwise. This could lessen the bolt and then your timing will be off. This should not take much effort.
(7. Clean the remaining ports.
(8. Put everything back together. 14.7 ft/lbs for the intake manifold nuts and 100 ft/lbs for the wheel.
(9. When you start the engine. It will likely run rough or may take a while to turn over at all. This is because the engine ECU has slowly adjusted to running with the carbon, so now that it can breathe easier it is not used to that and has to adjust. Disconnecting and reconnecting the battery sometimes helps prevent this. It should run normal after 5 min or so, and then after a while should run much better than before the carbon cleaning.
Good luck and have fun saving around $500!
I copied some of this from this guide. I recommend reading it as well.
#486
12-15-2017, 08:52 PM

Adding to Census Count
I have a 2015 MINI Countryman S, 6 speed manual, purchased new. I've taken it to the dealer for engine oil changes every 5K miles since new (now wondering if they've actually been doing the oil changes). Recently noticed some sputtering and one lurch when I punched the gas on the highway. Took it in for it's 5K oil change (current mileage 35K). Dealer finds excessive carbon build up on the intake ports, removes manifold, and did the walnut blaster cleaning. All compression checks on cylinders were good. No charge since car still under warranty. Car has amazing power like it was when it was new & I had noticed that it had been losing power and seemed sluggish. Now I know why. Never got any check engine or other warning dash lights.
Dealer claimed this is a common problem & stated it wasn't due to type of gas, or style of driving. I asked about a fuel additive and was told that wouldn't help. Have seen others post that BK44 is helpful? Wondering why at such a low mileage this would happen, considering I've been getting frequent oil changes.
Thoughts or suggestions for keeping my MINI healthy??
Thanks!
#487
12-16-2017, 12:02 AM
I have a 2015 MINI Countryman S, 6 speed manual, purchased new. I've taken it to the dealer for engine oil changes every 5K miles since new (now wondering if they've actually been doing the oil changes). Recently noticed some sputtering and one lurch when I punched the gas on the highway. Took it in for it's 5K oil change (current mileage 35K). Dealer finds excessive carbon build up on the intake ports, removes manifold, and did the walnut blaster cleaning. All compression checks on cylinders were good. No charge since car still under warranty. Car has amazing power like it was when it was new & I had noticed that it had been losing power and seemed sluggish. Now I know why. Never got any check engine or other warning dash lights.
Dealer claimed this is a common problem & stated it wasn't due to type of gas, or style of driving. I asked about a fuel additive and was told that wouldn't help. Have seen others post that BK44 is helpful? Wondering why at such a low mileage this would happen, considering I've been getting frequent oil changes.
Thoughts or suggestions for keeping my MINI healthy??
Thanks!
Dealer claimed this is a common problem & stated it wasn't due to type of gas, or style of driving. I asked about a fuel additive and was told that wouldn't help. Have seen others post that BK44 is helpful? Wondering why at such a low mileage this would happen, considering I've been getting frequent oil changes.
Thoughts or suggestions for keeping my MINI healthy??
Thanks!
One way to prevent this is to filter out the vapors. This is why people install "oil catch cans".
Frequent oil changes have nil effect on this. The same amount of oil vapor will get sucked past the valves.
"stated it wasn't due to type of gas" This is true. The engine is direct injection so gas never touches the intake valves.
One could argue that small amounts of gas vapors and detergents in the gas blows by the piston seals and end up in the crankcase, where it gets sucked up by the PCV system and ultimately hits the valves, so a gas detergent could clean the valves. In reality this would have such an incredibly small effect, if any, that it is not worth considering.
"or style of driving" Also true.
"fuel additive and was told that wouldn't help" True for above stated reason. Fuel never directly touches the intake valves.
"Have seen others post that BK44 is helpful?" If they saw a difference it was because it cleaned up other stuff. Very unlikely that it had any effect at all on the intake valves. You could pour the BG44K or similar cleaner in a vacuum line to have it hit the intake valves directly, but there is usually so much carbon built up that it won't cut it. Even if it does, I wouldn't recommend it. You would have chunks of tar-like carbon getting sucked into the cylinders, turbo, and cat converters. That could be a recipe for disaster. You would just be moving the mess from the intake valves elsewhere. The turbo and cats are very sensitive so I wouldn't risk it.
I am not sure when it is normal for the first carbon cleaning to be due, but I have heard of plenty of others needing it at 35K miles.
In terms of preventing it, the only thing you can do to mitigate it is to install some good oil catch cans. This will only slow it down though. To get rid of it 100% you would need both catch cans and a meth injection kit.
In terms of cleaning it, the only thing you can really do effectively and safely is walnut blasting or maybe scraping it off by hand with chemical cleaners and brushes, but that is a major PITA.
See my above post on how to walnut blast yourself.
The following users liked this post:
TaylorP (12-20-2017)
#488
12-16-2017, 03:39 AM
My valves broke at 47 K with an expensive valve job by Mini, eventually BMW did pay after a class action suit.
Since then I use Seafoam sprayed into intake hot running engine & let it sit for a while.
Another member I met had 130 on mini with no such issues but he does spray Seafoam into intake & advised not to lug this engine it will just add to problems.
Since then I use Seafoam sprayed into intake hot running engine & let it sit for a while.
Another member I met had 130 on mini with no such issues but he does spray Seafoam into intake & advised not to lug this engine it will just add to problems.
#489
12-16-2017, 10:08 AM
OVERDRIVE
Very little anecdotal evidence posted online about N18 carbon issues with Countryman. Ours has 55000 miles not performance lag from when we bought it at 25000 miles. I don't see people posting about dumping large amounts of oil or water from N18 catch cans.
Think the post above has something else going on or a shady dealer.
Think the post above has something else going on or a shady dealer.
#490
12-16-2017, 10:56 AM
#491
12-18-2017, 11:37 AM
Platinum Sponsor
Most of it seems to be on the N14 2007-2010. In the N18 the systems valve in the cover seems to hold up longer thus not as much build up.
__________________
MINI Guru/ MINI Owner Since 2004 | NEW Lifetime Part Replacement | Local Pickup
Milltek | Genuine MINI | Forge Motorsport | NM Engineering | ECS Performance | M7 Speed
Customer Service Hours: 8am-8pm EST|Sales Team Hours: 8am-11pm | SAT 10am-7pm 800.924.5172
MINI Guru/ MINI Owner Since 2004 | NEW Lifetime Part Replacement | Local Pickup
Milltek | Genuine MINI | Forge Motorsport | NM Engineering | ECS Performance | M7 Speed
Customer Service Hours: 8am-8pm EST|Sales Team Hours: 8am-11pm | SAT 10am-7pm 800.924.5172

Thread
Thread Starter
Forum
Replies
Last Post
igzekyativ
MINIs & Minis for Sale
34
07-16-2020 12:54 PM
ECSTuning
Vendor Announcements
0
08-12-2015 01:24 PM

