When you click on links to various merchants on this site and make a purchase, this can result in this site earning a commission. Affiliate programs and affiliations include, but are not limited to, the eBay Partner Network.
General MINI TalkShared experiences, motoring minutes, and other general MINI-related discussion that applies to all MINIs, regardless of model, year or trim.
Removed a bunch of screws, opened the hvac assembly, then confirmed proper blend door function. Also confirmed no leaves or debris blocking the evaporator
The evap is definitely warmer on the driver's side than the passenger side with system running.
Last edited by dnsherrill; 05-09-2018 at 04:07 AM.
Whipped Mini's brakes into shape with the installation of some free to me carbon ceramic pads for the rear calipers which the stock pads were fried crispy and crunchy during the track event.
would you like them crispy and crunchy?
we then went for some cheap and good real Mexican food as an excuse for bedding in the new pads to celebrate Cinco de Mayo
Lucky! I am always envious of those that had their crank pulley last that long before dying. First one died at 45k miles for me (day Michael Jackson died oddly enough) and the second crossed over at 93k miles before I went with the ATI pulley.
Replaced a faulty driver's-side door lock actuator. With the remote/key, it would move downward and lock, but would not pop-up and unlock.
Considered buying new (+/- $170), but ended up purchasing a used unit on eBay for $60 (with 90-day warranty) from Allmag Auto Parts.
Overall, not too difficult a job - took about 45-minutes not rushing. Smaller hands would've been more helpful, as it's a tight squeeze. Mostly, I worked by feel after studying and understanding the removal process. I referred to THIS video for that understanding, but executed the process a bit differently than shown in the video.
Essentially, after disconnecting the electrical connection, the up/down door button lever, the mechanical connection to the door handle and two cables, it's a matter of pivoting the L-shaped actuator slightly counter-clockwise in order to slide out. Passenger-side would be rotated clockwise. Also need to temporarily adjust the rearward window tracking (via adjustment bolt on bottom of door) to facilitate removal.
Last edited by AoxoMoxoA; 05-11-2018 at 11:52 AM.
Reason: Clarification
I didn't get as much done as I had hoped this week, but I had other irons in the fire and couldn't commit full time, but I'm happy I guess to get this stuff taken care of --- haven't had much time at all this year due to intense work schedule and going back out this coming week, but all signs are pointing to a slowdown on that front and I'd be thankful for the extra free time.
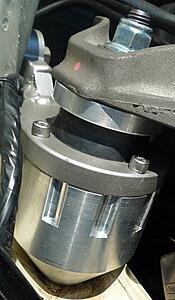
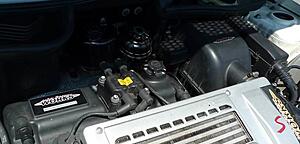
The motor mount was extremely easy and I was very pleased with the fact that after installation it tracked more straight and true, before it had a slight pull to the right but I suspected mushroom towers and didn't think that the mount would equate in that picture but it seems that it did --- my towers are slightly shroomed and I have some Craven STD's on the way and will rectify that problem soon enough...
...the WMW mount is quite beautiful and gives a sense of well-being as well:
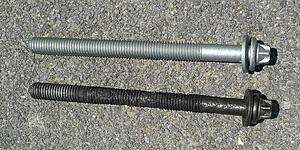
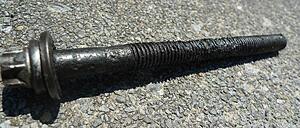
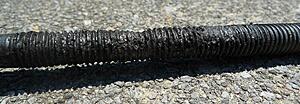
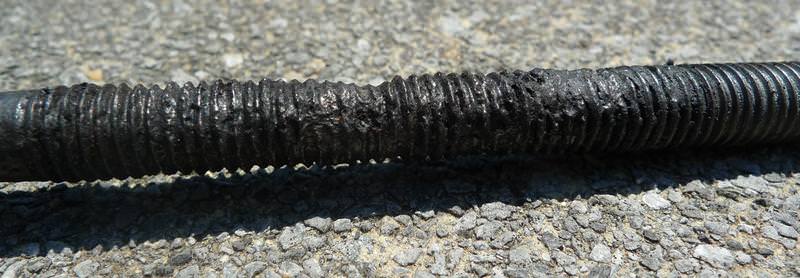
However, the old E12 bolt was a scary sight --- I had been forewarned of the possibilty of a corroded bolt thanks to reading here on NAM and was well-prepared with a new bolt on standby ready to go.
Research pays off and saves time!
Seriously spooky looking bolt:
On the cosmetic tip I installed some JCW door sills because I dig the black and I also dig the Mk.1 lowercase logo:
However, I failed to properly research and as such got a poor result --- it took a while to get all the old foam tape off and prep the surface, and I encountered those 4 little square tabs that didn't seem to sit quite right, and mistakenly I just sorta hammered down a bit and they seemed flush, but bubble pockets came anyway:
Then I would have known to sand it all down, and in fact I had the thought but then decided not to. I've ordered another set and will prep proper next time, and just keep the old ones for spares.
I was slightly disappointed that the JCW versions were flimsy plastic as compared to the stiff aluminium S sills which are much more robust in construction,
oh well.
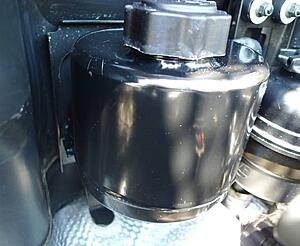
Got an aluminium coolant tank put on and I thought this'd be the easiest job, but I had problems with bleeding after refill and it took me a few times to get all the air out. I drained all the old coolant and replaced with Zerex G-48 which is easily available at O'Reilly, it was a bit pricey though and I might just go back to the green stuff like the previous owner used as it seemed okay.
Lots more to do, but I'm glad to get off to a good start!
**just finishing up some sound insulation. After stage2 flash and catless DP.. I wanted to be able to hear some of the rear speakers again. Overall its ~20-30% quieter now.. so much so, I had to increase the front bias on the fader due to the rears being so much more pronounced after install. Fronts next!
Lots of little things for my "new" 2009 JCW R55.
Transferred the Raceseng shift **** and compact spare from my totalled car,
compact spare foam tool tray to replace the mobility tray, new antenna,
new retaining clip for the cig lighter socket, tweaking alignment front and back,
got but haven't put in spark plugs, filters, mag oil pan bolt, assorted tools, etc.,
summer wheels and tires on order (Enkei PF01 17x7 + Michelin PS S4 215/45/17),
sunshade and sunroof shades, glove box organizer (fits pretty loosely, could have
been designed better), and more.
Will update my avatar and garage when I catch my breath.
- Had a custom tool made for flattening mushroomed strut towers (R53) Will likely offer this as a rental
- "Donald The Bonald" Undertower Plates
- VIP Upper Tower Plates
- ST-X Coilovers
- Team Dynamics Pro Race 1.2 in Gloss Anthracite (here this week)
- New UNI Filter
- Crankshaft Position Sensor O-Ring (did it without service mode and without 'the strap'...small hands and cursing)
- POR-15ed my door sill spots
- POR-15ed Control Arm seams and small spots on rear knuckle
- Removed bonnet stripes
- Cleaned undercarriage and wheel wells
- Scrubbed oxidation from rotor hats
- Coding to come this weekend.
Last edited by TheBigChill; 05-14-2018 at 08:35 AM.
#81 is back from paint and the new MC40 decals are on...
I had to have a few spots repaired I did not have the whole car painted.
Starting to look close to normal. Still need to replace the front and rear emblems (more than likely an ECS order), remove the window tint and get the front plate mount swapped out and the passenger seat fixed...
First clutch for the JCW, blew the clutch at the top of the dragon, limped home never going more than 5 % throttle or it slipped
back on the road now, went way faster than the last time I did an r53 clutch, put it on the lift saturday afternoon, got the clutch back in sunday afternoon and buttoned up tonight
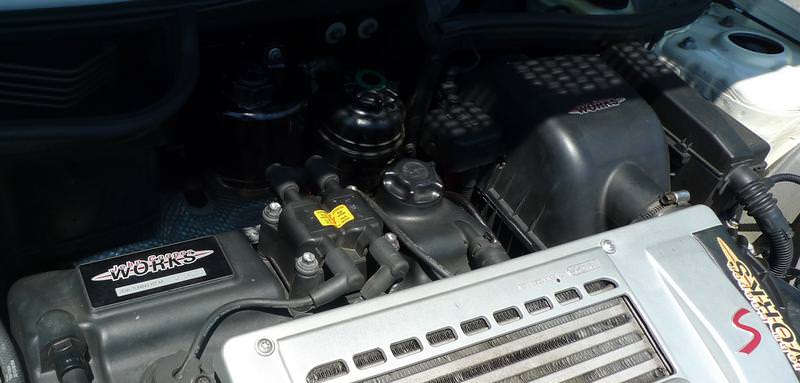
I made this today, followed it off of a YOU TUBE video..
All told ran me about $65. 1 3" tube with 16 degree bend 1 3" tube with 22 degree bend 1 3" coupler 1 3" to 2.5" coupler , main filter and 1 pvc filter.
I made this today, followed it off of a YOU TUBE video..
All told ran me about $65. 1 3" tube with 16 degree bend 1 3" tube with 22 degree bend 1 3" coupler 1 3" to 2.5" coupler , main filter and 1 pvc filter.
Pulls a lot better, and I also run the torque pro app, and my intake temp, has remained steady as if the stock air box is there. You do hear it suck pretty good, and you can really feel it when the boost gets going on the supercharger. From a dig, it is 2 pounds better over the stock airbox.
Installed rear Alta 22mm sway bar ..lots of knocking from front and rear over bumps. Replaced front and back sway bar end links with Alta's..Knocking gone. Replaced oil filter housing gaskets Oil feed and return lines. WHOOPIE no more leaks about that smoking down pipe. Also installed a NYPPD Billet Dogbone w/ Poly inserts...Nice no vibs
Now a clay bar and wax....Also need front rotors ..little shaking going on when braking, Any suggestions on rotors and where to buy?
I bought Centric rotors from tirerack. They had best prices and free 3 day shipping. Also good prices on Akebono pads. But I bought EBC Reds off Amazon.

 05-09-2018, 03:25 AM


 Overall its ~20-30% quieter now.. so much so, I had to increase the front bias on the fader due to the rears being so much more pronounced after install. Fronts next!


 I always like the K&H Typhoon.

