How do you swap out the trunk badge on MCS?
#1
 01-20-2017, 02:23 PM


Join Date: Jan 2017
Location: Delaware
Posts: 45
Likes: 0
Received 0 Likes
on
0 Posts
How do you swap out the trunk badge on MCS?
I am the second owner of my 2012 MCS R60 and the round MINI trunk hatch emblem/latch is scuffed up and I have obtained a brand new one to replace it with. I assume the inner trunk lid panel must be removed to access the mechanism. Is is screwed or glued on? If you have done this before any help would be gratefully appreciated. I ran a search but have not been able to locate anything specific to the R60 as far as this procedure is concerned. Thanks!
Last edited by AirHammer02; 02-16-2017 at 05:41 PM.

#3
01-20-2017, 04:06 PM

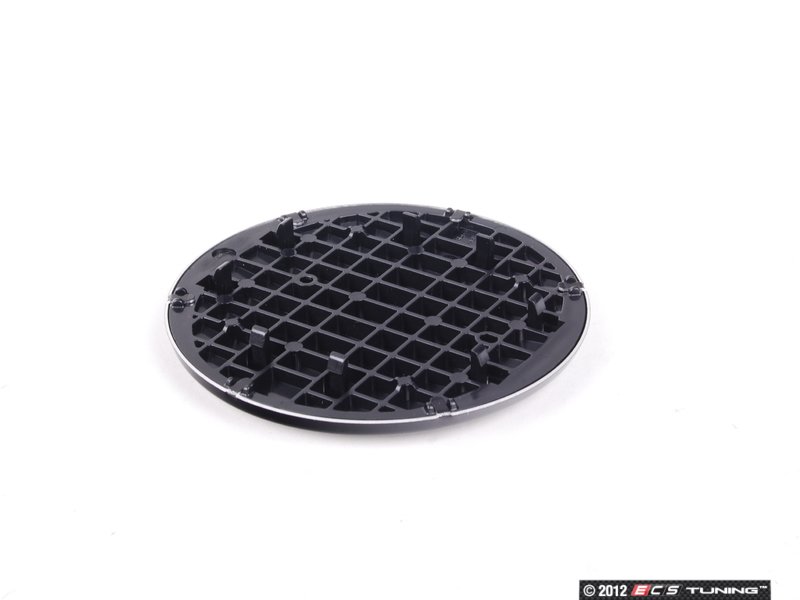
I see 8 tabs. Looks like it just snaps on. I think the hard part will be getting the old one off.
https://www.ecstuning.com/b-genuine-...r/51149811724/
http://www.realoem.com/bmw/enUS/show...90#51149811724

https://www.ecstuning.com/b-genuine-...r/51149811724/
http://www.realoem.com/bmw/enUS/show...90#51149811724
Last edited by rkw; 01-20-2017 at 04:11 PM.
#4
01-21-2017, 02:26 PM
Join Date: Jan 2017
Location: Delaware
Posts: 45
Likes: 0
Received 0 Likes
on
0 Posts
UPDATE - I figured it out today. A simple DIY job - Open the hatch and keep it at eye level. Lift up the latch and you will see small notches on both sides near the bottom of the latch at the 5 and 7 o'clock positions. Stick a small flat head screwdriver tip in one of them and gently pry up. Keep gently prying up and the whole emblem will just pop off its tabs. It just snaps into place and is not held down with any adhesive. Line up the notches and holes on your new emblem and gently press in the plastic holder and everything snaps back into place. Release the latch back into the closed position and gently press around the edges to be sure it is flush all the way around with the wings trunk emblem. About a 5 min job and I was taking my time.
Hope this helps anyone else out with a worn trunk latch emblem
Hope this helps anyone else out with a worn trunk latch emblem
Last edited by AirHammer02; 01-24-2017 at 01:07 PM.
#5
01-23-2017, 08:25 AM

Vendor
UPDATE - I figured it out today. A simple DIY - Open the hatch and keep it at eye level. Lift up the latch and you will see small tabs on both sides near the bottom of the latch. Stick a small flat head screwdriver in the tab and gently pry up. Keep gently prying and the whole emblem will just pop off its tabs. It just snaps into place is not held down with any adhesive. Line up the tabs and holes on your new emblem and gently press in the plastic holder and everything snaps back into place. About a 5 min job and I was taking my time.
Hope this helps anyone else out with a worn trunk latch emblem
Hope this helps anyone else out with a worn trunk latch emblem
__________________
Your Trusted Source For DIY and Parts
FREE SHIPPING over $99 click here
MINI Parts | DIY Help | Facebook | Twitter | Instagram | YouTube | Promos
888.280.7799 | 6am - 5pm PST

FREE SHIPPING over $99 click here
MINI Parts | DIY Help | Facebook | Twitter | Instagram | YouTube | Promos
888.280.7799 | 6am - 5pm PST
#6
01-24-2017, 12:55 PM
Join Date: Jan 2017
Location: Delaware
Posts: 45
Likes: 0
Received 0 Likes
on
0 Posts
If you took any photos or wrote the process down we'd love to add it to our tech article library! You can get details on that all here: http://www.pelicanparts.com/support/...95332-68520697.
The tabs are actually notches (post edited to reflect the wrong terminology) located at the 5 and 7 o'clock position and are easily seen. Insert your small flat head tip in either on (I'm right handed so I used the 7 o'clock notch) and gently pry up and it should pop off. Move your tip up a little and keep prying it and the rest should pop off easily.
Line up the tabs on the back of the new badge and gently press into place and the tabs should lock back on again. Release the latch back into the closed position and gently press around the edges to be sure it is flush and you're done.