Electrical F60 Auto Dim Homelink mirror retrofit
#1
F60 Auto Dim Homelink mirror retrofit
Hi, New Mini F60 owner. I bought it with the standard mirror and want to add the auto dim Homelink mirror. I was able to find the mirror and have everything I need to physically install it but I'm not sure on the wiring and I don't want to damage the mirror. The mirror has 4 wires like this:
3 - Red
6 - White / Black stripe
9 - Blue
10 - Brown
I'm sure the brown wire is ground but I am unable to find any detail on the other wires. Every wiring diagram I can find is different. I can find the same connector (X-18246) but all pinouts are different with either more wires or in completely different pin placements.
Does anyone have detail on what wires should be connected to what? My thought is I should have one constant hot +12 and one switched +12. But I don't know which wire would be which and then I don't know what the 4th wire would be used for.
Any help would be greatly appreciated.
Thanks!
#2
The following users liked this post:
Gavin Mazey (01-24-2019)
#3
#4
Thanks 6FT6!!!
Looks like the pins match (3,6,9,10) but not the colors. Well, 3 and 10 do, but not 6 and 9.
I do have rain sensing wipers. So you are saying to match the brown/blue wire from my rain sensor wire to the blue pin 9 on the mirror? Then what of the last pin that looks like it's for the alarm? Just leave it disconnected? Makes sense as I don't have an alarm but I want to verify with you.
To verify:
Mirror pins
3 - red = +12v constant power or switched power?
6 - white / black stripe = no connection
9 - blue = connect to rain sensor brown / blue wire
10 - brown = ground
Does that look right?
Thanks again!
#5

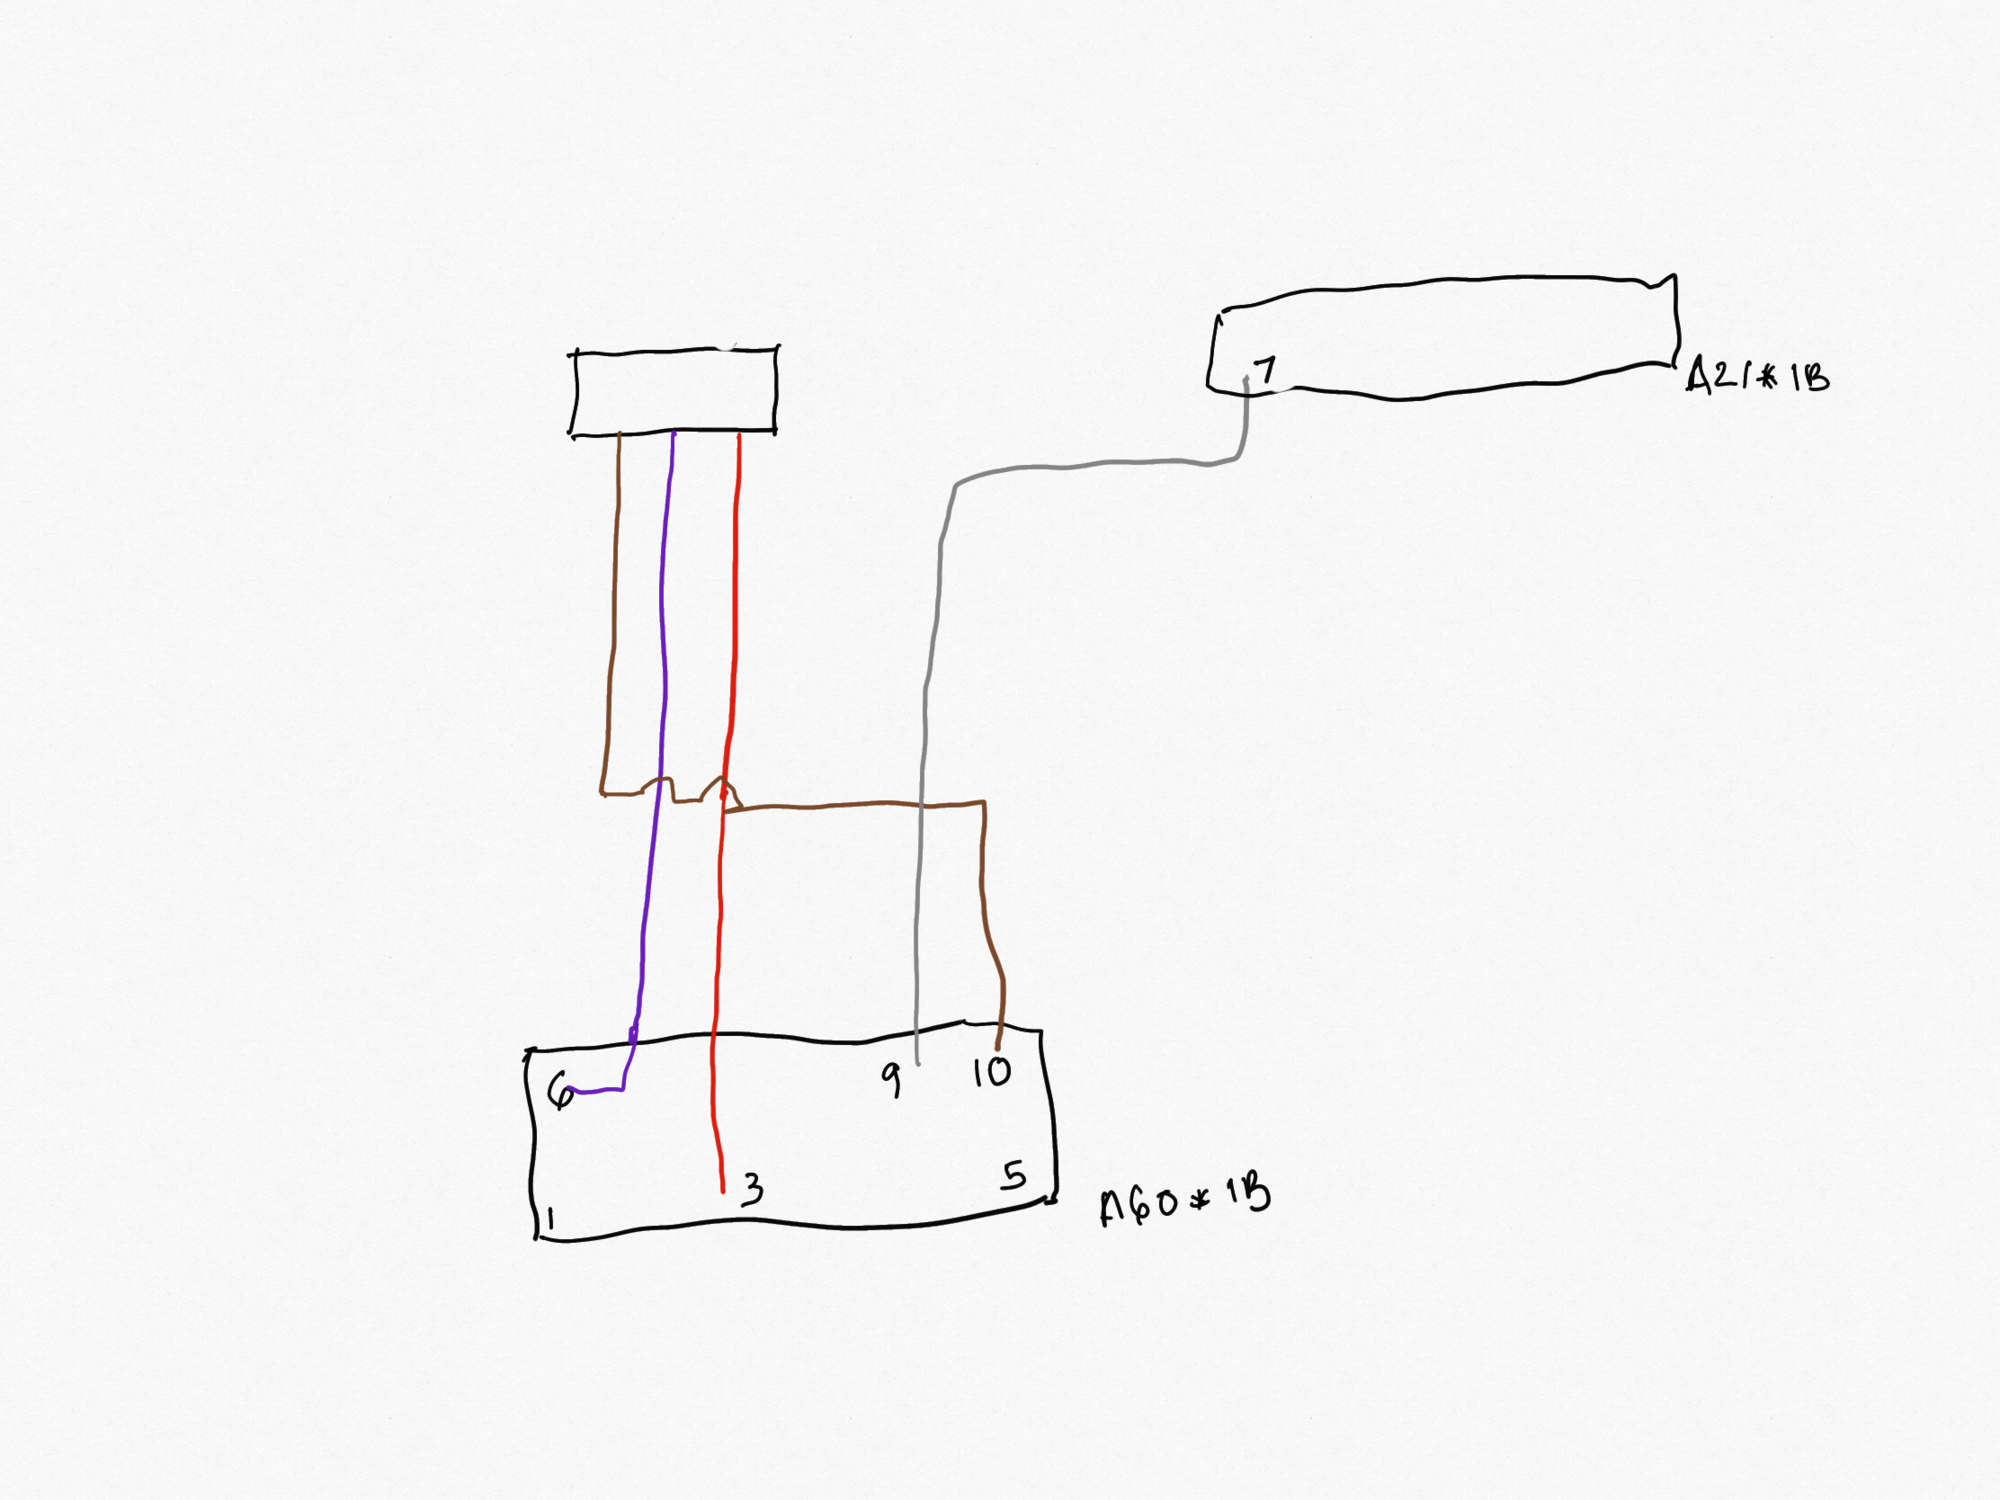
Pin 3-Red 12v switched goes to fuse52 in distribution box or to red at rain sensor
Pin 10-brown goes to ground or brown at rain sensor
Pin 6-blue goes to violet/yellow at rain sensor
pin 9-white/black goes to roof function centre pin 7 for alarm
pin 6 is important as that goes to the BDC for coding
see image above of my rain sensor wires

I’m trying to get the male plug for the mirror end, were you able to purchase one?
Last edited by 6FT6; 08-02-2018 at 12:22 AM.
#6
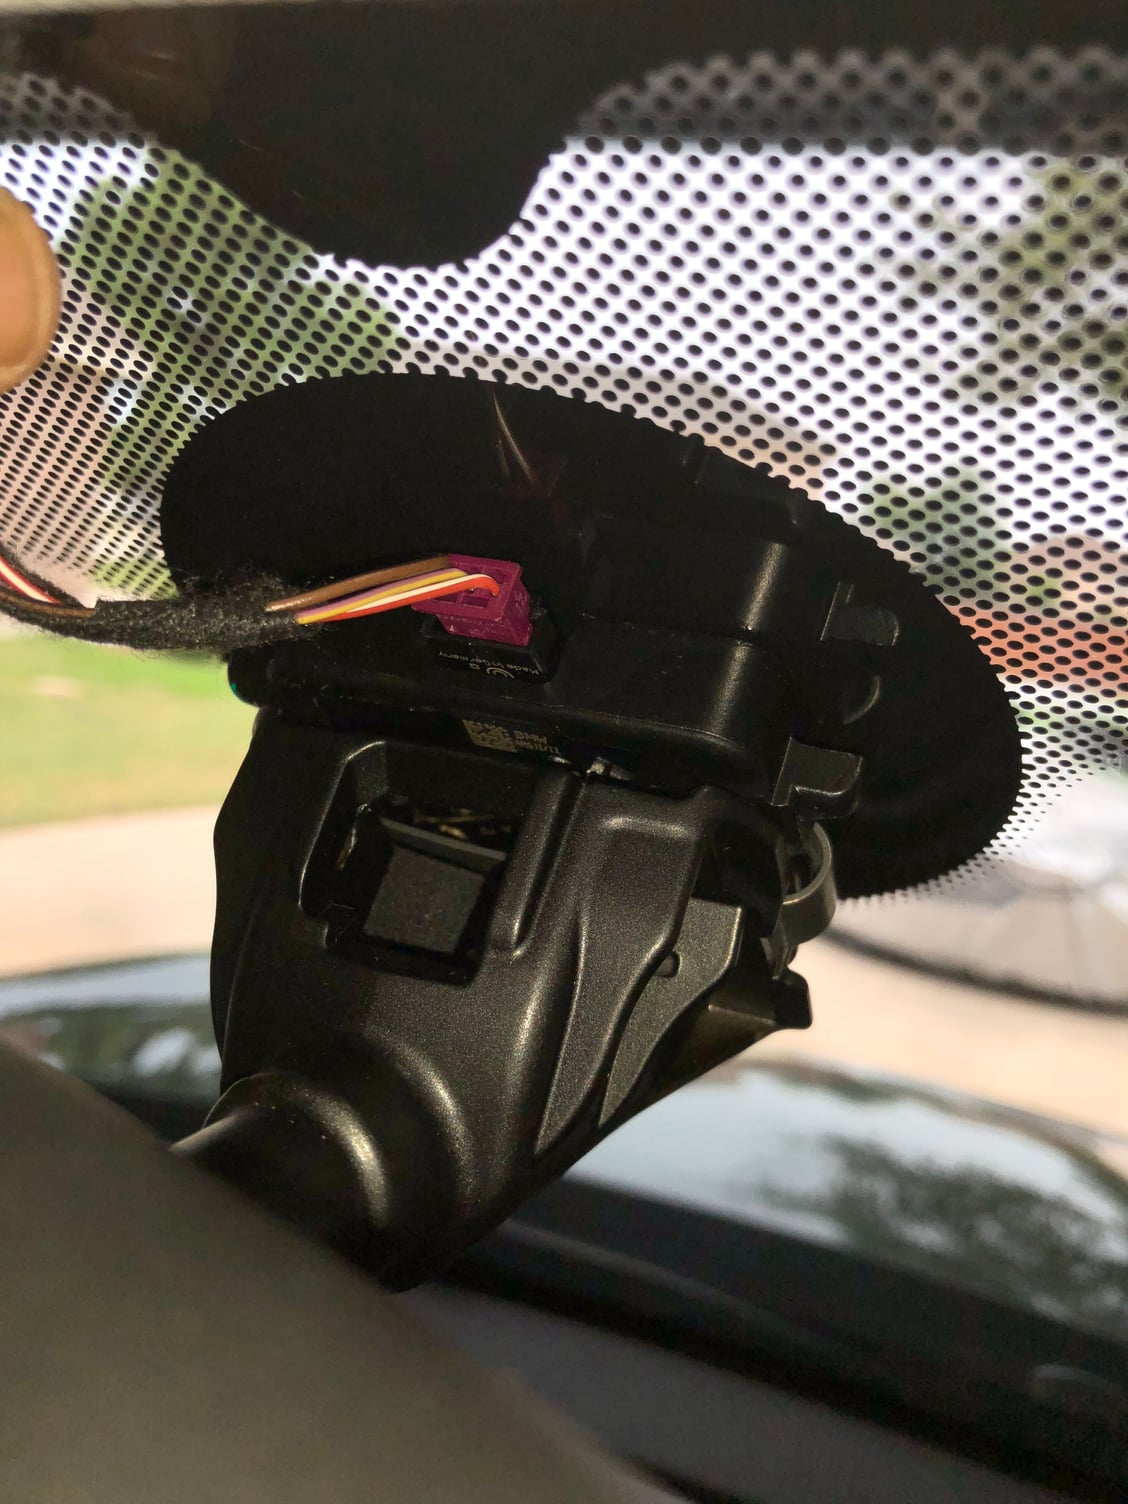
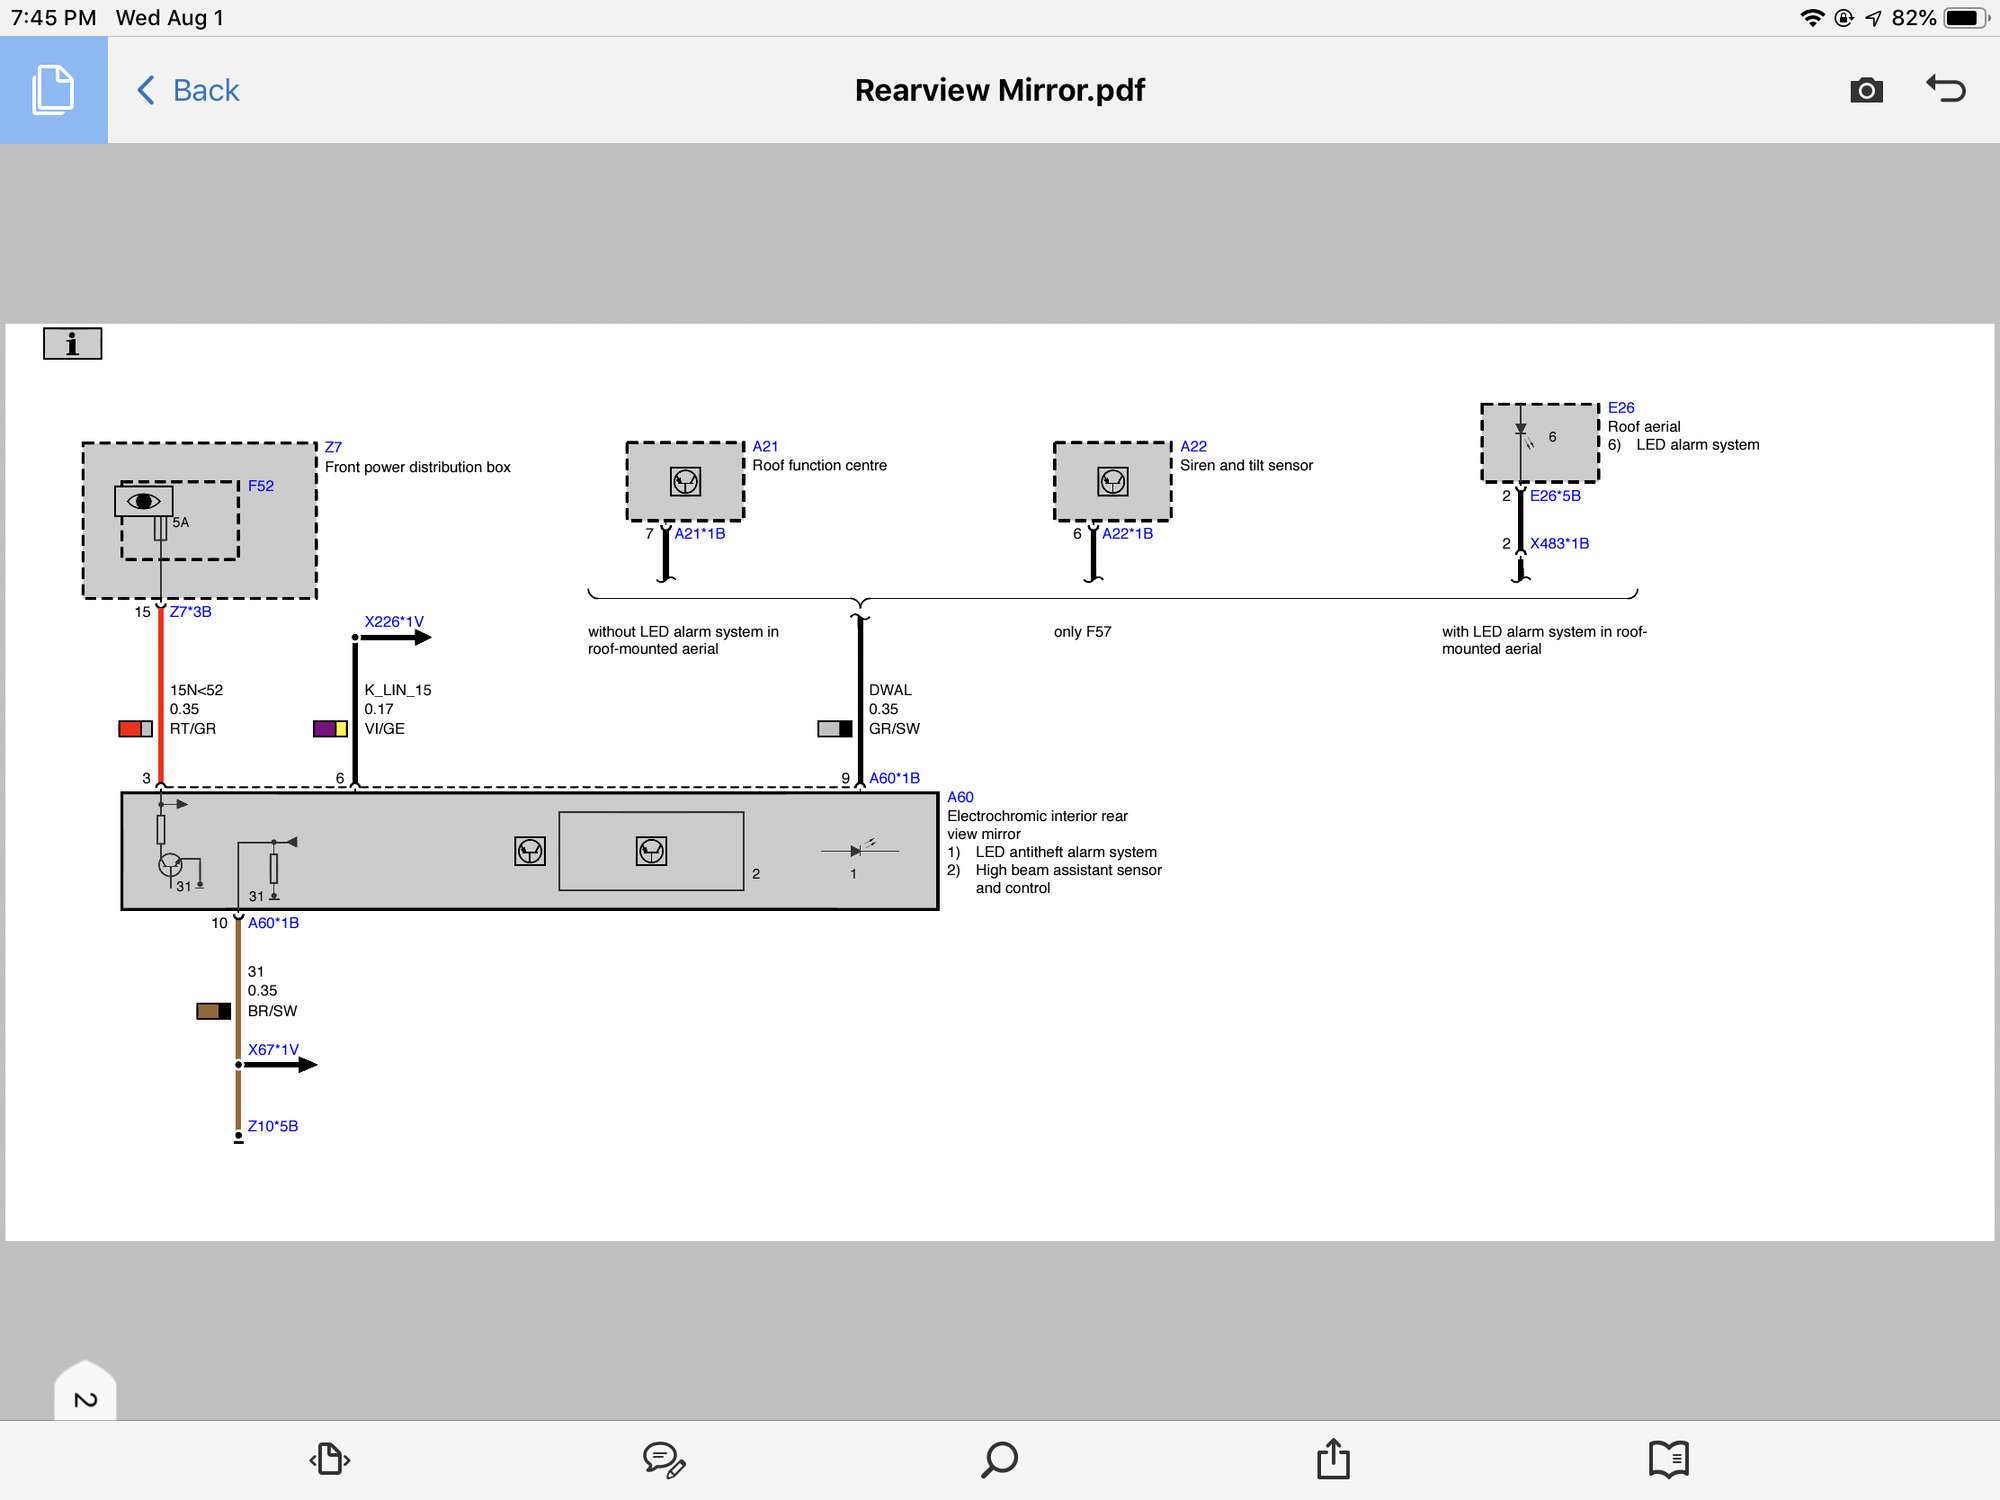
On my mirror the 6 and 9 colors are reversed from what you said. I understand what you are saying but based on the original pdf diagram you showed it looks like I should follow the pins and not worry about the colors. The diagram itself shows violet and gray as the colors. Here is a picture of my mirror pins.
#7
I did order the mirror plug, or what I think is the mirror plug as it hasn't come in yet. I ordered this: https://www.ecstuning.com/b-genuine-...t/61120140175/
From what I can tell this looks like the right connector and it's the only one I could find. It only has 3 wires but I have other wires and connectors I think I can use. I'll let you know when it comes in if it is the right one.
From what I can tell this looks like the right connector and it's the only one I could find. It only has 3 wires but I have other wires and connectors I think I can use. I'll let you know when it comes in if it is the right one.
Trending Topics
#8
On my mirror the 6 and 9 colors are reversed from what you said. I understand what you are saying but based on the original pdf diagram you showed it looks like I should follow the pins and not worry about the colors. The diagram itself shows violet and gray as the colors. Here is a picture of my mirror pins.
#9
And thank you for the wiring diagram. I couldn't find the right one. If you don't mind, where did you get that diagram? I'm always looking for additional web resources.
The connector came today and yes, it fits perfectly! Hopefully I can get this done this weekend.
Thank you for all your help!!!
The connector came today and yes, it fits perfectly! Hopefully I can get this done this weekend.

Thank you for all your help!!!
#10
And thank you for the wiring diagram. I couldn't find the right one. If you don't mind, where did you get that diagram? I'm always looking for additional web resources.
The connector came today and yes, it fits perfectly! Hopefully I can get this done this weekend.
Thank you for all your help!!!
The connector came today and yes, it fits perfectly! Hopefully I can get this done this weekend.

Thank you for all your help!!!
Iím going to tackle the folding heated outside mirrors once Iím done with the rear view (thatís gonna be some work).
Love tinkering with this car 😁
#11
The folding mirrors are something I'd like to do too. I saw they used to make a retrofit kit but can't find one for this generation. Please let me know what you find.
Thanks for the schematic info. It's funny I looked there but have trouble navigating the menus - not everything makes sense as to where it's located. Or maybe it's just me.
I want to get the alarm added so for now I think I'll leave the alarm wire coiled up under the headliner. Does your Mini already have the alarm or did you add that too? If you added the alarm let me know if you have any pointers.
Thanks again!
Thanks for the schematic info. It's funny I looked there but have trouble navigating the menus - not everything makes sense as to where it's located. Or maybe it's just me.

I want to get the alarm added so for now I think I'll leave the alarm wire coiled up under the headliner. Does your Mini already have the alarm or did you add that too? If you added the alarm let me know if you have any pointers.
Thanks again!
#13
I was able to complete adding the mirror over the weekend. It works fine for the compass, garage door opener, and the auto dim function. I had some wires from an old Audi harness laying around and added the needed wires. I actually added a red and violet wire like the wiring diagram since I was connecting with a shorter wire anyway. I connected to the three wires from the rain sensor which was right above the front light cluster. I then connected the 9 wire to the A21*1B using another Audi wire. Overall it went really well.
The only questions I now have are around the way the car keeps the ignition light and compass on for a long time. I never checked this before adding the mirror so I'm not sure if this is normal or not. When I leave the car unlocked, like it is in my garage I see that the compass and the ignition switch light stay on for a long time - more than 5 minutes. I have not timed it yet so I don't know the exact time. I made sure my key was not near the car and kept checking it. After a long while I looked and all lights were finally off. As soon as I open any door the compass and lights come back on and the garage door opener works even with the car off. This doesn't seem right to me but I could be wrong. Finally I rolled the drivers window down and waited long enough for the lights to all be off - I then reached in through the open window and tried the garage door openers. Nothing happened which I expected. However, as soon as I opened a door everything came back on including the garage door opener.
At this point I'm going to leave it as it seems like it's working correctly with everything else. My only thought is that I should've used a different power connection or maybe I need to make a change with coding which I haven't done. Do you know if there is coding needed when you add the mirror?
I'll post some pictures soon. Thanks for all your help!
#15
Fantastic that it all worked out. The coding needed is to turn off auto dim when in reverse gear, thatís about it. Give it a try and see.
The only other thing I can think of is running pin 3 to fuse 52 in the distribution box. Seems like the rain sensor power works in a delayed way.
Glad that we were able to prove everyone that said it couldnít be done wrong, kudos!
The only other thing I can think of is running pin 3 to fuse 52 in the distribution box. Seems like the rain sensor power works in a delayed way.
Glad that we were able to prove everyone that said it couldnít be done wrong, kudos!
Last edited by 6FT6; 08-06-2018 at 08:51 AM.
The following users liked this post:
Muxor (08-06-2018)
#16
Thanks!
#17
This is awesome guys! I have been wanting to do this for a while now, glad someone did it successfully. I am just waiting for the connector and Iíll get started but I just have a question, what did you guys use to tap into the rain sensor wires? I just wanna make sure I do it the right way. Thanks!
#18
#19
#21
minicooperjp im using these for now: Wire Connectors Set - Pack of 15 Low Voltage Solderless Wire Connectors with No Wire-stripping Required for Mid-span Branching Wires Connection 20/22 AWG Cable By brightfour https://www.amazon.com/dp/B07CRFTPGY..._-bfBBb5979BA4
Not sure what Muxor utilized.
Not sure what Muxor utilized.
#23
Hey guys, just wanted to thank you again for this post. I just finished the install on my car and everything went pretty smoothly, one thing I did have a bit of an issue was that the taps are a little too big for the back cover but the cable had more pull and was able to push most of them into the bigger part.
#25


