Electrical R60 manual AC into automatic air conditioning upgrade
#1
 05-04-2014, 10:03 AM

I have successfully completed the upgrade of manual AC (IHKS) into automatic AC (IHKA).
It took me 8 weeks of planning and collecting all required parts and 2 days in the workshop. Cost of parts was about $300. All the work I did myself. It required no coding to run this, however the codding is recommended - at least adding VO.
It is a king of challenge, but it is possible to be done. Unfortunately it is not 100% reversible, as it is needed to drill/cut two holes in the heating unit housing.
Here are pictures of required parts, below is the list:
(Pic. A) Control unit:

(Pic B) Covering center:

(Pic C) Heater unit modules

(Pic D) Solar sensor

Here are the list of required parts (part numbers in brackets - for ECE LHD version, index after that represents the picture name and part number from the pictures above):

As the parts separately might cost you more, I decided to buy used whole heater unit - the unit from 2013 CM cost was $100. It was a donor of C1, C2, C6 and C7. Solar sensor - I did not find from 2nd hand, so I bought new at dealer's shop for $60. Control unit together with covering center I bought from 2013 CM for $130.
The work is quite complex and requires preparations, which can be done at home. Preparations are to modify new wiring set, so it fits you old unit. I will add later the PIN numbers which needs to be taken out from donor wiring set.
Reserve 8-16 hours of work in the garage depending on your skills and trouble-shooting time.
It takes about 1-2 hours to release all required parts (I will add list of them later)
What you need to modify in your old heater unit housing is to drill/cut two holes:
1. For the additional temperature sensor C6
2. For the Blower regulator (blower ballast) C2
Ad 1 - it is easier one. Rectangle shape 10mm/16mm in the front of the housing
Ad 2 - challenging one. You need to enlarge the old hole from the old blower resistor. You need sharp knife or soldering unit to prepare a bigger whole. It is not easy to see it, so mirror is require to do it (like the dentist work ) I took me 1,5 hour to complete this part. The helping hand for me was, that I had a complete housing unit from donor's, so I might have prepare a paper template.
Then you need to upgrade wiring by adding prepared set from donor's and connecting pins in wiring plug (which goes from sensors into control module) and replacing pin 17 with donors 17. It is also required to change the plug housing from black (old) into white (donor's).
After that the installation of all elements begins, and after next 1-2 hours you can enjoy automatic AC
Who is ready to take a challenge?
It took me 8 weeks of planning and collecting all required parts and 2 days in the workshop. Cost of parts was about $300. All the work I did myself. It required no coding to run this, however the codding is recommended - at least adding VO.
It is a king of challenge, but it is possible to be done. Unfortunately it is not 100% reversible, as it is needed to drill/cut two holes in the heating unit housing.
Here are pictures of required parts, below is the list:
(Pic. A) Control unit:
(Pic B) Covering center:
(Pic C) Heater unit modules
(Pic D) Solar sensor
Here are the list of required parts (part numbers in brackets - for ECE LHD version, index after that represents the picture name and part number from the pictures above):
- Automatic air conditioning control [64119812027] A1
- Covering center [51459804938] B14
- Solar sensor [64113422212] D1
- Blower unit [64113422644] C1
- Blower regulator [depending of prod date, i.e. 64119286870] C2
- Temperature sensor, heater [64113422660] C6
- Heater/air conditioning wiring set [depending of prod date, i.e. 64119266885] C7
As the parts separately might cost you more, I decided to buy used whole heater unit - the unit from 2013 CM cost was $100. It was a donor of C1, C2, C6 and C7. Solar sensor - I did not find from 2nd hand, so I bought new at dealer's shop for $60. Control unit together with covering center I bought from 2013 CM for $130.
The work is quite complex and requires preparations, which can be done at home. Preparations are to modify new wiring set, so it fits you old unit. I will add later the PIN numbers which needs to be taken out from donor wiring set.
Reserve 8-16 hours of work in the garage depending on your skills and trouble-shooting time.
It takes about 1-2 hours to release all required parts (I will add list of them later)
What you need to modify in your old heater unit housing is to drill/cut two holes:
1. For the additional temperature sensor C6
2. For the Blower regulator (blower ballast) C2
Ad 1 - it is easier one. Rectangle shape 10mm/16mm in the front of the housing
Ad 2 - challenging one. You need to enlarge the old hole from the old blower resistor. You need sharp knife or soldering unit to prepare a bigger whole. It is not easy to see it, so mirror is require to do it (like the dentist work
) I took me 1,5 hour to complete this part. The helping hand for me was, that I had a complete housing unit from donor's, so I might have prepare a paper template.Then you need to upgrade wiring by adding prepared set from donor's and connecting pins in wiring plug (which goes from sensors into control module) and replacing pin 17 with donors 17. It is also required to change the plug housing from black (old) into white (donor's).
After that the installation of all elements begins, and after next 1-2 hours you can enjoy automatic AC
Who is ready to take a challenge?
#2
05-05-2014, 09:16 AM

#3
05-07-2014, 07:54 AM
To do wiring you need to know:
- auto AC has different power supply wire harness for ballast and blower, so you need to replace it with the new one, moreover you may forget about one of the plugs from the control unit, which was used to control blower motor
- auto AC needs two additional sensors - heating temp and solar - the wires for them need to be added to the current harness
1. remove the insulation from the donor's harness
2. Take out the white housing from 18-pin X610 plug - you will need it in your car's harness
2. from 18-pin plug (X610) unplug cables/connectors from the pins:
- (17) - control of the blower speed (black/white)
- (14) - Solar sensor / evaporator signal (green)
- (18) - Solar sensor / solar signal (yelow)
- (15) - temperature sensor (white)
3. there is a jump connection in the harness of negative signals (brown cables). Disconnect them, so you will be able to separate heating temperature sensor and solar sensor harness all together
4. Cable 17 is linking with ballast's plug - take out all of the harness for ballast, blower and power input.
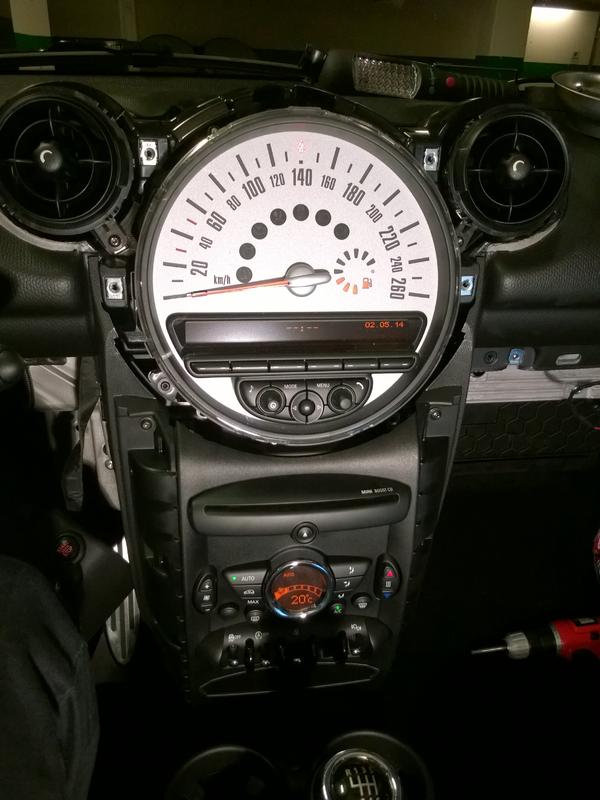
Now you are ready to prepare wire harness within your car. I assume, that you disassembly whole central console, remove radio, speedometer, plastic support clusters - one for air vents, second for speedometer and radio. Now you should see wiring harness going along the grey/silver metal dashboard support and below it the heater module. You should have disconnected 3 plugs from heating control unit.
The one plug with thick red cables will not be used anymore, but leave it behind.
The other, 18-pin X610 will be modified.
The third 12-pin (X1879) will not be changed - leave it as it is.
Modification of X610:
1. Remove black plug housing - you will not need it.
2. Unplug PIN 17 (red/yellow), insulate it and keep it behind
3. Plug in connectors you have removed from donor (14, 15, 18). DO NOT plug 17 now
4. Put on white plug housing from donor
Preparation of the heating module
1. Release plastic heater cover on the driver's side, to get access to ballast and blower
2. Unplug plugs from ballast and blower - they will not be needed, try to attach them to the harness next to them, so they will not disturb your further work
3. Release and remove blower
4. Remove ballast
5. MOST TRICKY PART - enlarge the whole where ballast was placed, so new ballast for automatic AC will be placed. The good guidance is to take a look and grab paper template from the donor heater housing. To enlarge the opening I used a drill and sharp knife.
6. Guide the donors ballast and blower harness (power distribution plug and cable with PIN 17) from blower/ballast side into central console
7. plug in the power plug and put connector PIN 17 into plug X610.
8. Connect plugs to ballast and blower
9. Connect negative cables (brow) from the new sensors into cable from X610 PIN 7 (sensor's negative/ground signal)
10. Guide solar sensor cable to the top vent hole
11. Prepare the hole for the heater temperature sensor. I used a 9mm drill and sharp knife to prepare a 10x16 mm whole.
12. Secure added cables into old harness with straps or insulation.
13. Connect sensors, control panel, battery and test the system before assembling.
If it works fine, you can start assembling everything back together.
NOTE: before assembling speedometer/radio, make sure that the harness for hazard switch is pulled upper, so it will be possible to connect to the switch in the 'mickey mouse' speedometer trim.
- auto AC has different power supply wire harness for ballast and blower, so you need to replace it with the new one, moreover you may forget about one of the plugs from the control unit, which was used to control blower motor
- auto AC needs two additional sensors - heating temp and solar - the wires for them need to be added to the current harness
1. remove the insulation from the donor's harness
2. Take out the white housing from 18-pin X610 plug - you will need it in your car's harness
2. from 18-pin plug (X610) unplug cables/connectors from the pins:
- (17) - control of the blower speed (black/white)
- (14) - Solar sensor / evaporator signal (green)
- (18) - Solar sensor / solar signal (yelow)
- (15) - temperature sensor (white)
3. there is a jump connection in the harness of negative signals (brown cables). Disconnect them, so you will be able to separate heating temperature sensor and solar sensor harness all together
4. Cable 17 is linking with ballast's plug - take out all of the harness for ballast, blower and power input.
Now you are ready to prepare wire harness within your car. I assume, that you disassembly whole central console, remove radio, speedometer, plastic support clusters - one for air vents, second for speedometer and radio. Now you should see wiring harness going along the grey/silver metal dashboard support and below it the heater module. You should have disconnected 3 plugs from heating control unit.
The one plug with thick red cables will not be used anymore, but leave it behind.
The other, 18-pin X610 will be modified.
The third 12-pin (X1879) will not be changed - leave it as it is.
Modification of X610:
1. Remove black plug housing - you will not need it.
2. Unplug PIN 17 (red/yellow), insulate it and keep it behind
3. Plug in connectors you have removed from donor (14, 15, 18). DO NOT plug 17 now
4. Put on white plug housing from donor
Preparation of the heating module
1. Release plastic heater cover on the driver's side, to get access to ballast and blower
2. Unplug plugs from ballast and blower - they will not be needed, try to attach them to the harness next to them, so they will not disturb your further work
3. Release and remove blower
4. Remove ballast
5. MOST TRICKY PART - enlarge the whole where ballast was placed, so new ballast for automatic AC will be placed. The good guidance is to take a look and grab paper template from the donor heater housing. To enlarge the opening I used a drill and sharp knife.
6. Guide the donors ballast and blower harness (power distribution plug and cable with PIN 17) from blower/ballast side into central console
7. plug in the power plug and put connector PIN 17 into plug X610.
8. Connect plugs to ballast and blower
9. Connect negative cables (brow) from the new sensors into cable from X610 PIN 7 (sensor's negative/ground signal)
10. Guide solar sensor cable to the top vent hole
11. Prepare the hole for the heater temperature sensor. I used a 9mm drill and sharp knife to prepare a 10x16 mm whole.
12. Secure added cables into old harness with straps or insulation.
13. Connect sensors, control panel, battery and test the system before assembling.
If it works fine, you can start assembling everything back together.
NOTE: before assembling speedometer/radio, make sure that the harness for hazard switch is pulled upper, so it will be possible to connect to the switch in the 'mickey mouse' speedometer trim.
#4
01-12-2015, 08:15 AM

Neutral
Join Date: Nov 2008
Location: Maryland
Posts: 5
Likes: 0
Received 0 Likes
on
0 Posts
R56 manual to auto AC success, Thanks to Heiker
Following heiker's instructions to a T, I successfully retrofitted auto ac into my 2009 R56. I found all of the necessary parts on eBay and everything works like a charm WITHOUT any coding. I will however modify the VO and update all ECU's in the near future.
I can't begin to tell you how many times I've read the forums and seen others being told that this upgrade as well as others is nearly impossible, or would require a complete exchange of nearly the entire ac system and or other parts.
Well, thats simply not the case, at least not for a 2009 R56. FWIW, with help from other members of this fantastic forum (big shout out to strobeyproby), I've also retrofitted, MFSW, Navigation Pro, and Bluetooth ULF Hi. All of which set me back less than $1,100 total NAM Rocks!
I can't begin to tell you how many times I've read the forums and seen others being told that this upgrade as well as others is nearly impossible, or would require a complete exchange of nearly the entire ac system and or other parts.
Well, thats simply not the case, at least not for a 2009 R56. FWIW, with help from other members of this fantastic forum (big shout out to strobeyproby), I've also retrofitted, MFSW, Navigation Pro, and Bluetooth ULF Hi. All of which set me back less than $1,100 total
NAM Rocks!


#7
03-18-2015, 06:53 AM
Neutral
Join Date: Nov 2008
Location: Maryland
Posts: 5
Likes: 0
Received 0 Likes
on
0 Posts
Trending Topics
#8
03-18-2015, 07:13 AM
Center dash removal
Thank you but that doesn't help. The countryman 2013 hasn't the same layout. I manage to remove the side corners, the spedo/vent cover. There is a couple of torx screws, but i'm not able to remove the center console and have access to the climate control nor the radio.
Any idea?
Any idea?
#9
03-19-2015, 03:38 AM
The following users liked this post:
eric.noir@me.com (01-03-2020)
#10
01-17-2019, 08:00 PM

Hey- sorry to bump an old thread, but I'm not quite sure where the additional temperature sensor goes. Anyone have an idea/picture of how it fits? The instruction says that the cutout for it goes on the front of the housing. I assume this to be the front of the housing beneath the replacement controls. Thanks!
#11
02-08-2019, 08:03 PM

#12
02-09-2019, 03:31 AM
I successfully completed this job. Overall, the instructions were very good. The job took a little longer since I made the regulator hole too large, and had to do additional modifications. I used a rubber gasket to seal the regulator, and then a Velcro strap to hold it in place. I did not want to permanently affix it to the car in case I ever wanted to remove it. Also, when cutting the hole, keep a vacuum running to get the plastic shards. They will fall down and get wedged in the heat exchanger. I tried to clean as best as I could but some are still down there.
Two observations- it wasn�t clear to me how the solar sensor got wired. From a shop manual it appeared as though the wire just goes up and over the dash, crossing the air intake. There�s no easy way to string the wire this way. I ended up loosening the upper dash pad. It takes about 5 minutes to release the screws (don�t forget the t30 for the airbag) and the solar wire went right in.
If you have ISTA P you can perform a conversion to upgrade to automatic controls. As others mentioned, this is not required as the system works without.
In 2019 the parts are even cheaper. All in I spent maybe $200 total.
#13
09-21-2019, 07:53 AM

#14
09-21-2019, 10:18 AM
When I did the conversion I bought an entirely new panel with the fascia and both the ac controls and the lower panel with that has the window controls. It took some digging but eventually I was able to find the exact match on eBay. My car has heated seats but no rear fog lights. I believe that the two units are connected. While the wiring connectors are separate, they both connect to the upper part with the ac controls. In other words, I don’t think you can use the lower part from your car.
#15
12-27-2019, 10:57 AM

just managed to do this retrofit on my R56. Thanks for documenting the process above. My car was RHD model so the process was a bit different. To get the blower motor out on the RHD model the entire dash has to come out which was a bit frustrating. With the dash out I was able to swap the loom with the one I got from the donor car rather modifying the existing one.
One issue I am having is that on the highest speed setting the blower motor seems to run too fast and the dash vibrates. Has anyone experienced this? I have another R56 with climate control from the factory and the fan doesn't seem to run that fast on the highest setting. The bower motor I got could be defective also. I might check the voltage going to the blower at the highest speed setting to check if it is is too high.. I was also wondering if I code the car will it sort out the fan speed and solve the issue.
Has anyone carried out the coding? did they code all the car modules or just specific ones? Do I just need to add S534 to the VO in the CAS and FRM and do sg codieren to all modules?
#16
02-12-2020, 03:56 AM

Heater modules.
I have successfully completed the upgrade of manual AC (IHKS) into automatic AC (IHKA).
It took me 8 weeks of planning and collecting all required parts and 2 days in the workshop. Cost of parts was about $300. All the work I did myself. It required no coding to run this, however the codding is recommended - at least adding VO.
It is a king of challenge, but it is possible to be done. Unfortunately it is not 100% reversible, as it is needed to drill/cut two holes in the heating unit housing.
Here are pictures of required parts, below is the list:
(Pic. A) Control unit:
(Pic B) Covering center:
(Pic C) Heater unit modules
(Pic D) Solar sensor
Here are the list of required parts (part numbers in brackets - for ECE LHD version, index after that represents the picture name and part number from the pictures above):
As the parts separately might cost you more, I decided to buy used whole heater unit - the unit from 2013 CM cost was $100. It was a donor of C1, C2, C6 and C7. Solar sensor - I did not find from 2nd hand, so I bought new at dealer's shop for $60. Control unit together with covering center I bought from 2013 CM for $130.
The work is quite complex and requires preparations, which can be done at home. Preparations are to modify new wiring set, so it fits you old unit. I will add later the PIN numbers which needs to be taken out from donor wiring set.
Reserve 8-16 hours of work in the garage depending on your skills and trouble-shooting time.
It takes about 1-2 hours to release all required parts (I will add list of them later)
What you need to modify in your old heater unit housing is to drill/cut two holes:
1. For the additional temperature sensor C6
2. For the Blower regulator (blower ballast) C2
Ad 1 - it is easier one. Rectangle shape 10mm/16mm in the front of the housing
Ad 2 - challenging one. You need to enlarge the old hole from the old blower resistor. You need sharp knife or soldering unit to prepare a bigger whole. It is not easy to see it, so mirror is require to do it (like the dentist work) I took me 1,5 hour to complete this part. The helping hand for me was, that I had a complete housing unit from donor's, so I might have prepare a paper template.
Then you need to upgrade wiring by adding prepared set from donor's and connecting pins in wiring plug (which goes from sensors into control module) and replacing pin 17 with donors 17. It is also required to change the plug housing from black (old) into white (donor's).
After that the installation of all elements begins, and after next 1-2 hours you can enjoy automatic AC
Who is ready to take a challenge?
It took me 8 weeks of planning and collecting all required parts and 2 days in the workshop. Cost of parts was about $300. All the work I did myself. It required no coding to run this, however the codding is recommended - at least adding VO.
It is a king of challenge, but it is possible to be done. Unfortunately it is not 100% reversible, as it is needed to drill/cut two holes in the heating unit housing.
Here are pictures of required parts, below is the list:
(Pic. A) Control unit:
(Pic B) Covering center:
(Pic C) Heater unit modules
(Pic D) Solar sensor
Here are the list of required parts (part numbers in brackets - for ECE LHD version, index after that represents the picture name and part number from the pictures above):
- Automatic air conditioning control [64119812027] A1
- Covering center [51459804938] B14
- Solar sensor [64113422212] D1
- Blower unit [64113422644] C1
- Blower regulator [depending of prod date, i.e. 64119286870] C2
- Temperature sensor, heater [64113422660] C6
- Heater/air conditioning wiring set [depending of prod date, i.e. 64119266885] C7
As the parts separately might cost you more, I decided to buy used whole heater unit - the unit from 2013 CM cost was $100. It was a donor of C1, C2, C6 and C7. Solar sensor - I did not find from 2nd hand, so I bought new at dealer's shop for $60. Control unit together with covering center I bought from 2013 CM for $130.
The work is quite complex and requires preparations, which can be done at home. Preparations are to modify new wiring set, so it fits you old unit. I will add later the PIN numbers which needs to be taken out from donor wiring set.
Reserve 8-16 hours of work in the garage depending on your skills and trouble-shooting time.
It takes about 1-2 hours to release all required parts (I will add list of them later)
What you need to modify in your old heater unit housing is to drill/cut two holes:
1. For the additional temperature sensor C6
2. For the Blower regulator (blower ballast) C2
Ad 1 - it is easier one. Rectangle shape 10mm/16mm in the front of the housing
Ad 2 - challenging one. You need to enlarge the old hole from the old blower resistor. You need sharp knife or soldering unit to prepare a bigger whole. It is not easy to see it, so mirror is require to do it (like the dentist work
) I took me 1,5 hour to complete this part. The helping hand for me was, that I had a complete housing unit from donor's, so I might have prepare a paper template.Then you need to upgrade wiring by adding prepared set from donor's and connecting pins in wiring plug (which goes from sensors into control module) and replacing pin 17 with donors 17. It is also required to change the plug housing from black (old) into white (donor's).
After that the installation of all elements begins, and after next 1-2 hours you can enjoy automatic AC
Who is ready to take a challenge?
Thank you.
The following users liked this post:
giancarlo pertile (05-10-2020)

#18
05-14-2020, 05:14 PM

HELP Upgrade air conditioning manual to automatic
Hi guy,
I need help, I upgrade my can air conditioning from manual to automatic, substitute the main wire and the all new parts but when I connect everything nothing start and work... may I need to code or change something at the wire connection?
please someone help meeeee
I need help, I upgrade my can air conditioning from manual to automatic, substitute the main wire and the all new parts but when I connect everything nothing start and work... may I need to code or change something at the wire connection?
please someone help meeeee
#19
05-15-2020, 04:55 PM
#20
12-31-2020, 09:55 AM

Hi guy,
I need help, I upgrade my can air conditioning from manual to automatic, substitute the main wire and the all new parts but when I connect everything nothing start and work... may I need to code or change something at the wire connection?
please someone help meeeee
I need help, I upgrade my can air conditioning from manual to automatic, substitute the main wire and the all new parts but when I connect everything nothing start and work... may I need to code or change something at the wire connection?
please someone help meeeee
#21
12-01-2021, 01:58 PM


#22
12-01-2021, 02:02 PM
#23
06-28-2023, 03:08 AM


Thread
Thread Starter
Forum
Replies
Last Post
scarabbrian
R56 :: Hatch Talk (2007+)
5
09-02-2016 02:53 PM
Eric5150
R56 :: Hatch Talk (2007+)
7
01-05-2015 08:26 AM