When you click on links to various merchants on this site and make a purchase, this can result in this site earning a commission. Affiliate programs and affiliations include, but are not limited to, the eBay Partner Network.
Interesting issue, well, not really. Kind of annoying really but the small proximity sensors, on the front corners of the Countryman are attached with what looks like two faced tape,
It's okay to use that if it was actually easy to get to, because eventually the tape will fail & it will need to be replaced. I think the whole sensor thing was a last minute 'add on', and the hole is drilled rolling down the assembly line and they just stick the sensors on the inside facia. Maybe the 2018 models have a better attachment of the sensors : ).
Washing the car in the drive way Sunday morning, because I refuse the scratch-O-rama spinner car washes, I found this:
Kind of crazy right? This is passenger side. Sensor is just inside the hole. It you start the car, that sensor is going Bat Guano crazy! We're not driving the car right now.
I had the same thing happen to the drivers side a couple years ago and had to partially remove that black plastic facia and re-stick the sensor. I will have to try to remember how I did that, but I think there are plastic rivets that might
need to be replaced? Can't remember for sure.
You have to remove the clips in the wheel well and underside. Then it is attached to the front bumper, right below it. and pry it out of the blue parts, very carefully. I don't like pulling and forcing.
I don't think I got the driver side back in place perfectly, there is a small gap. If it gets larger, It will be epoxy for the win, and the next owner can clip the wires or deal with it.
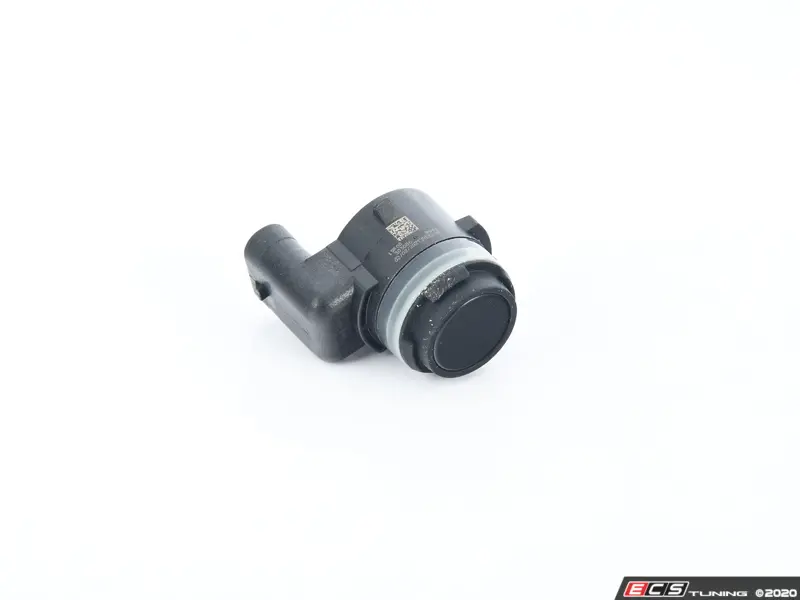
The sensor itself is circular and fits the hole. The sensor is in the middle of a square piece of plastic that just sticks to the inside plastic front facia. It's attached to wires and there is not enough slack to move it around much.
There is no indent on the inside, indicating the sensor is located correctly. You just kind of guess.
I'd like to fill the inside of that area with foam to hold that sensor thing in place, permanently! LOL.
That is this coming weekend job. 'maybe'. It depends. I'll try to take some pics, if anyone is interested.
It's always something,
All the BMW are like this also and even the side marker lens in the arches are double sided tape. ON MINI ONLY they used to be snap in with a bracket molded to the bumper at the factory. BMW was the first to use that simple design and install. Not the best design lol
Best stuff to use is that 3M heavy duty thin double side tape. Its the stuff that's grey and has the red backer on it. They use that for emblems and moldings at body shops all the time. Clean the old tape off. Clean surface and forget.
Those PDC sensor over time can fail themselves if you use a high pressure hose and point it at the sensor. It blow water pass the seals. So watch cleaning the car.
All the BMW are like this also and even the side marker lens in the arches are double sided tape. ON MINI ONLY they used to be snap in with a bracket molded to the bumper at the factory. BMW was the first to use that simple design and install. Not the best design lol
Best stuff to use is that 3M heavy duty thin double side tape. Its the stuff that's grey and has the red backer on it. They use that for emblems and moldings at body shops all the time. Clean the old tape off. Clean surface and forget. https://www.ecstuning.com/b-3m-parts...15-ft/3614~3m/
or https://www.ecstuning.com/b-3m-parts...15-ft/3616~3m/
Bumper lip PDC: https://www.ecstuning.com/b-genuine-...t/51117478630/
I was even thinking betalink might work also. But onces it on its not coming off for the bracket and its messy. https://www.ecstuning.com/Search/SiteSearch/betalink/
Awesome !
Yes, avoid the high pressure washes. That one on the drivers side was flapping in the breeze at one time, LOL . You could poke it and it would swing in, and I knew I had to fix it.
I am trying to think what I used to attach the drivers side when I had it apart. I may have used some kind of Permatex silicon sealant and attached to the inside black spoiler. Then covered it with gorilla tape. It was some kind of elaborate process I had come up with on a Saturday afternoon repair trying to avoid having to go to O'Reilly's!
. Like two or three years ago. Worked good ever since.
That's cool you have the spoiler, it's all one piece too. I always thought it was two separate pieces.
I guess I can't complain. Countryman will be 8 years old this August, and I have just replaced maintenance things. Still running original battery. Even the hatch has settled down and has not gone nutso since we started keeping the key fobs in a faraday cage, 'Christmas cookie tin' here at home a couple month after we brought it home : )
Thank you for posting the front spoiler and sensors! That's a good to know. "Best stuff to use is that 3M heavy duty thin double side tape. Its the stuff that's grey and has the red backer on it. They use that for emblems and moldings at body shops all the time. Clean the old tape off. Clean surface and forget."
Yeah, I agree, now that I am thinking clearly. I saw that 3M tape with the red backing over at Lowes last week. I almost bought it but was distracted and forgot. Yeah, wifee was with me at Lowes. (that's always a mistake.)
If I get that sensor mounted, and it is still going whacko, I'll be ordering one or two of them from you!
I really appreciate it !
Will let you know how it goes,
Last edited by Seabiscuit; May 6, 2025 at 08:19 PM.
Reason: spelling fix
All the BMW are like this also and even the side marker lens in the arches are double sided tape. ON MINI ONLY they used to be snap in with a bracket molded to the bumper at the factory. BMW was the first to use that simple design and install. Not the best design lol
Best stuff to use is that 3M heavy duty thin double side tape. Its the stuff that's grey and has the red backer on it. They use that for emblems and moldings at body shops all the time. Clean the old tape off. Clean surface and forget.
I’ve had the same issue with the front sensors being overly sensitive or giving false alerts. Sometimes it feels like finding the right balance is as tricky as choosing a good platform from https://gamblingorb-it.com/casino-de...3-euro-casino/ you want reliable performance without overpaying or dealing with glitches. A quick recalibration or software update might help!
Those PDC sensor over time can fail themselves if you use a high pressure hose and point it at the sensor. It blow water pass the seals. So watch cleaning the car.
You made it easy for me, Thank you so much.
Last edited by LindaHernandez; May 20, 2025 at 01:57 AM.
Happy Memorial Day everyone and you have some time off to relax and reflect today.
It's been a quiet day at the 'House of Biscuit'. Yesterday afternoon, the sky became somewhat cloudy & not so hot, so I attempted to take the passenger side front spoiler off just a little to tape back my sensor into place.
Two eight MM screw & two plastic 'plugs' in the front wheel well.
I think I took another four 8mm screws off the bottom and two push-pin type plastic retainers on the bottom. Hardest part was separating the spoiler from the fender flair.
It had two secure clips and I really don't know how that thing comes loose. I could get my hand in there good and could move what I thought was a retainer clip up and then back. Luckily the fender flare came out of the 'fender' the first two clips to give me enough slack, and I was able to separate the spoiler from the black fender flare.
Chaos.
The clip that holds the spoiler to the 'blue' plastic trim of the bottom of the bumper area, one tab broke and the other would not budge.
The one that broke gave me some slack to get in behind the spoiler with my left hand.
Peeled the old two face tape off the inside of the spoiler. It came off pretty good. I just rolled itself over until I had it all off.
Then left hand blind, (I'm not a left handed) I tried to put new two faced tape around the hole. I had small squares. The original tape must have been custom cut to fit around the hole in the spoiler.
Mine had a couple gaps of no tape area. And I used a lot of squares because the first ones I tried to attempt to stick in place, would stick to my fingers way better than the back side of the spoiler.
Eventually the tape cleaned the area on the back side of the spoiler : )
I had wifee come out and start the engine and turn the wheels to the left so I could see in the area behind the spoiler. I couldn't get my head in there enough to see behind the spoiler before.
Now I could see a little. It looked like the sensor was sticking to the tape. It was flush on the out- side of the spoiler and it looked good. Back in it's original place.
Cool, let's reassemble. Just getting started, a stupid Yellow Jacket comes buzzing around and I swat at it with my rag and then it comes at me. I swat again and set my elbow squarely through my sensor. The hole is back!
The yellow jacket left but I had to find my sensor down below that hole again behind the spoiler. Fished it out and had to clean some dust off it so the tape would stick. Got it in place again, but it wasn't sticking as good this second time around. So, I brought out some foam squares I cut from old computer packing material I had saved, I couldn't get one to wedge in behind the sensor to hold it in place, no matter how I cut it.
I then brought out some Permatex silicon RTV. I put a little bead around the outside edges of the sensor to seal and hold the edge with the tape. It's not between the sensor and the tape. It's just along that outer ring ridge, of the sensor about 3/4 of the way around it. Hope the tape holds that last little bit.
It looked good. Didn't mess with it for about 45 minutes till the rtv set up some. then reassembled.
Got all the tabs to line up, the two plug fasteners in the wheel well were a pain, but I got them in. All the screws lined up correctly.
Had to fight the tab that the spoiler goes into on the bottom middle, where it meets the silver part of the bottom spoiler. That was annoying.
They two plastic push pins fasteners one went in easy and was posited perfectly. The other was not going in at all. It fought me for 30 minutes I know!
I came in the house and went through my assortment of Jeep plastic fasteners. Found one that matched pretty close. It went in and I pulled the plunger on it, and it grabbed hold like a plastic rivet. Perfect!
It looked great, I will take a pic after the rain.
so guess what I did wrong ?
The sensor is looking at the side now, not to the front! Dammit!
Sometimes I really do stupid stuff, and here is one!
Now when you roll up to a stop sign, the sensor goes off. If there is anything there to reflect back, Annoying!
It looks good, just not pointed in the right direction. I could kick myself.
I'll see how it does. I hate to take everything apart again. Plastic clips get weaker each time you take them apart. Luckily there is a lot of screws in this thing, so That part is good.
we laughed at it at dinner, so that helped.
I need to just go buy some new tires for it, and that will help me feel better. Unless they scratch up the wheels then we start all over.