Difficulty compressing the rear brake piston (while rotating). Why?
#1
 03-10-2009, 03:45 PM


Difficulty compressing the rear brake piston (while rotating). Why?
OK, I read OctaneGuy's excellent guide on replacing brake pads and attended a stlmini club session on brake pad replacement and did my front pads and rotors without any problem. (Thanks guys!). I have driven quite a bit since the job and everything is fine.
Then I attempted the rears. I read all the threads I could and did the following:
- used the Harbor Freight tool
- loosened the cap of the brake fluid reservoir (made sense to me, although others say it isn't necessary).
- hand brake disengaged (not detached though).
There are several threads discussing the difficulty (or ease!) in compressing the piston back with various contradictory experiences:
- some found it easy, others difficult with the reservoir cap either open or closed
- some had to remove the brake cable others did not
- some have been able to compress the piston with just a needle-nose plier and simple pushing (!)
I made sure (I thought) I understood the brake system before attempting this, but with all these variations in difficulty/ease I am wondering what's going on. If the rear piston is rotated properly while compressing, why would it be so much more difficult compared to the front pistons when they share the same hydraulic line?
Please help me understand the variety in results people are getting.
(Oh, I was intending to bleed the system tomorrow, but was just seeing how easy it would be for me to do the compression after reading about all the variations people where getting.)
The following users liked this post:
930 Engineering (12-19-2020)
#2
03-10-2009, 04:40 PM

3rd Gear
Join Date: Sep 2008
Location: Los Angeles
Posts: 188
Likes: 0
Received 0 Likes
on
0 Posts
Are you using the correct insert for the Harbor Freight tool?
I know the one I picked up recently doesn't require any insert to fit the rear calipers on my R53.
What happens when you attempt to press them in with the tool?
I found that my tool would bind up on the adjustment nut, if I had it too tight before starting to turn... could that be the issue?
While they may all share the same hydraulics, the pistons are different... hence the "ease" with the front and "trouble" with the back.
I haven't read anything about the rear calipers binding. Did you use the tool on the front calipers as well?
If the tool becomes extremely tight, I'd check to see if your adjusting nut is binding up on the caliper... I know I fought with the first rear brake for a while before realizing I was fighting myself.
Once I got the adjustment nut a bit looser, I was able to hold it in place with one hand and turn the crank with the other.
#3
03-10-2009, 05:10 PM
Are you using the correct insert for the Harbor Freight tool?
I know the one I picked up recently doesn't require any insert to fit the rear calipers on my R53.
What happens when you attempt to press them in with the tool?
I found that my tool would bind up on the adjustment nut, if I had it too tight before starting to turn... could that be the issue?
While they may all share the same hydraulics, the pistons are different... hence the "ease" with the front and "trouble" with the back.
I haven't read anything about the rear calipers binding. Did you use the tool on the front calipers as well?
If the tool becomes extremely tight, I'd check to see if your adjusting nut is binding up on the caliper... I know I fought with the first rear brake for a while before realizing I was fighting myself.
Once I got the adjustment nut a bit looser, I was able to hold it in place with one hand and turn the crank with the other.
I know the one I picked up recently doesn't require any insert to fit the rear calipers on my R53.
What happens when you attempt to press them in with the tool?
I found that my tool would bind up on the adjustment nut, if I had it too tight before starting to turn... could that be the issue?
While they may all share the same hydraulics, the pistons are different... hence the "ease" with the front and "trouble" with the back.
I haven't read anything about the rear calipers binding. Did you use the tool on the front calipers as well?
If the tool becomes extremely tight, I'd check to see if your adjusting nut is binding up on the caliper... I know I fought with the first rear brake for a while before realizing I was fighting myself.
Once I got the adjustment nut a bit looser, I was able to hold it in place with one hand and turn the crank with the other.
I have to check the tool to see what you mean about the binding, but just thinking about it, I'm not sure how that would happen. The nut sits 'inside' the caliper with the plate part to allow the screw part to push forward, so ...
#4
03-10-2009, 05:17 PM

3rd Gear
Join Date: Sep 2004
Location: San Diego
Posts: 297
Likes: 0
Received 0 Likes
on
0 Posts
Yes the rear brakes can be tricky or "simple"...
Perhaps, if you share where you are located, one of the many helpful people here on NAM stop by and lend a hand. I have experienced both types of rear brake issues (easy & fighting all the way), my advise is..
- when using the Harbor Freigh tool -which I do too - I found focusing more on twisting the pistion vs pressing the piston works better. If you press to hard it will bind up.
- If the piston is over extended - i.e. worn the pads down very low - the piston might have disengaged from the threads. Now the piston has to be "restarted" in the threads. You will need to press lightly and twist to get the threads to line up and start. Then see my guidance above.
If you are at step 2, it takes time to find the proper rotation on the piston to line up with the threads again and start twisting back into place. Imagine trying to start a nut on a fine threaded bolt - blind folded . It can be done.. it just takes time.
Hope that helps.. Good Luck..
Perhaps, if you share where you are located, one of the many helpful people here on NAM stop by and lend a hand. I have experienced both types of rear brake issues (easy & fighting all the way), my advise is..
- when using the Harbor Freigh tool -which I do too - I found focusing more on twisting the pistion vs pressing the piston works better. If you press to hard it will bind up.
- If the piston is over extended - i.e. worn the pads down very low - the piston might have disengaged from the threads. Now the piston has to be "restarted" in the threads. You will need to press lightly and twist to get the threads to line up and start. Then see my guidance above.
If you are at step 2, it takes time to find the proper rotation on the piston to line up with the threads again and start twisting back into place. Imagine trying to start a nut on a fine threaded bolt - blind folded
. It can be done.. it just takes time. Hope that helps.. Good Luck..
#5
03-10-2009, 07:18 PM

The binding they're referring to is between the threaded rod on the tool (the part you're turning with the handle) and the nut or threaded part the rod turns in.
Loosen that part up a bit with a wrench, and the handle will turn freely again. You may have to do this a couple of times before you get the piston all the way back in.
I also spray a little bit of silicone spray where the boot rides in the lip on the piston, this allows the boot to slip in that groove while you rotate the piston, otherwise sometimes you'll see the boot starting to twist. If you don't have any silicone spray, you can use a little brake fluid, just wipe it up when you're done. If you do, don't panic, just pull the boot back straight again.
The reason they loosen the cap on the master cylinder is because as you push the piston back in the fluid transfers back to the master cylinder. If it's already full when you start pushing it back, there's no where for the fluid to go. The better way is to loosen the bleed screw at the caliper, put a hose on the nipple and drain the fluid into a bottle as you screw the piston back in. That way you can't overfill the master cylinder and get fluid all over your engine compartment.
Let us know how you make out, OK?
BTW, water is a natural solvent for brake fluid, if you get some on anything painted, rinse it off with clear water immediately and it won't damage the paint.
#6
03-10-2009, 07:22 PM
Not sure what you mean by this statement. Did you take the hand brake cable off the caliper? If not that may be the problem.
I agree with the prior response to get a MINI friend to give a hand. I have done rear brakes on 4 MINIs with friends and have not had many issues yet.
I agree with the prior response to get a MINI friend to give a hand. I have done rear brakes on 4 MINIs with friends and have not had many issues yet.
#7
03-10-2009, 09:06 PM
... when using the Harbor Freigh tool -which I do too - I found focusing more on twisting the pistion vs pressing the piston works better. If you press to hard it will bind up.
- If the piston is over extended - i.e. worn the pads down very low - the piston might have disengaged from the threads. Now the piston has to be "restarted" in the threads. You will need to press lightly and twist to get the threads to line up and start. Then see my guidance above.
If you are at step 2, it takes time to find the proper rotation on the piston to line up with the threads again and start twisting back into place. Imagine trying to start a nut on a fine threaded bolt - blind folded. It can be done.. it just takes time.
Hope that helps.. Good Luck..
- If the piston is over extended - i.e. worn the pads down very low - the piston might have disengaged from the threads. Now the piston has to be "restarted" in the threads. You will need to press lightly and twist to get the threads to line up and start. Then see my guidance above.
If you are at step 2, it takes time to find the proper rotation on the piston to line up with the threads again and start twisting back into place. Imagine trying to start a nut on a fine threaded bolt - blind folded
. It can be done.. it just takes time. Hope that helps.. Good Luck..
Trending Topics
#8
03-10-2009, 09:08 PM
Not sure what you mean by this statement. Did you take the hand brake cable off the caliper? If not that may be the problem.
I agree with the prior response to get a MINI friend to give a hand. I have done rear brakes on 4 MINIs with friends and have not had many issues yet.
I agree with the prior response to get a MINI friend to give a hand. I have done rear brakes on 4 MINIs with friends and have not had many issues yet.
#9
03-10-2009, 09:18 PM
The binding they're referring to is between the threaded rod on the tool (the part you're turning with the handle) and the nut or threaded part the rod turns in.
Loosen that part up a bit with a wrench, and the handle will turn freely again. You may have to do this a couple of times before you get the piston all the way back in.
I also spray a little bit of silicone spray where the boot rides in the lip on the piston, this allows the boot to slip in that groove while you rotate the piston, otherwise sometimes you'll see the boot starting to twist. If you don't have any silicone spray, you can use a little brake fluid, just wipe it up when you're done. If you do, don't panic, just pull the boot back straight again.
The reason they loosen the cap on the master cylinder is because as you push the piston back in the fluid transfers back to the master cylinder. If it's already full when you start pushing it back, there's no where for the fluid to go. The better way is to loosen the bleed screw at the caliper, put a hose on the nipple and drain the fluid into a bottle as you screw the piston back in. That way you can't overfill the master cylinder and get fluid all over your engine compartment.
Let us know how you make out, OK?
BTW, water is a natural solvent for brake fluid, if you get some on anything painted, rinse it off with clear water immediately and it won't damage the paint.
Loosen that part up a bit with a wrench, and the handle will turn freely again. You may have to do this a couple of times before you get the piston all the way back in.
I also spray a little bit of silicone spray where the boot rides in the lip on the piston, this allows the boot to slip in that groove while you rotate the piston, otherwise sometimes you'll see the boot starting to twist. If you don't have any silicone spray, you can use a little brake fluid, just wipe it up when you're done. If you do, don't panic, just pull the boot back straight again.
The reason they loosen the cap on the master cylinder is because as you push the piston back in the fluid transfers back to the master cylinder. If it's already full when you start pushing it back, there's no where for the fluid to go. The better way is to loosen the bleed screw at the caliper, put a hose on the nipple and drain the fluid into a bottle as you screw the piston back in. That way you can't overfill the master cylinder and get fluid all over your engine compartment.
Let us know how you make out, OK?
BTW, water is a natural solvent for brake fluid, if you get some on anything painted, rinse it off with clear water immediately and it won't damage the paint.
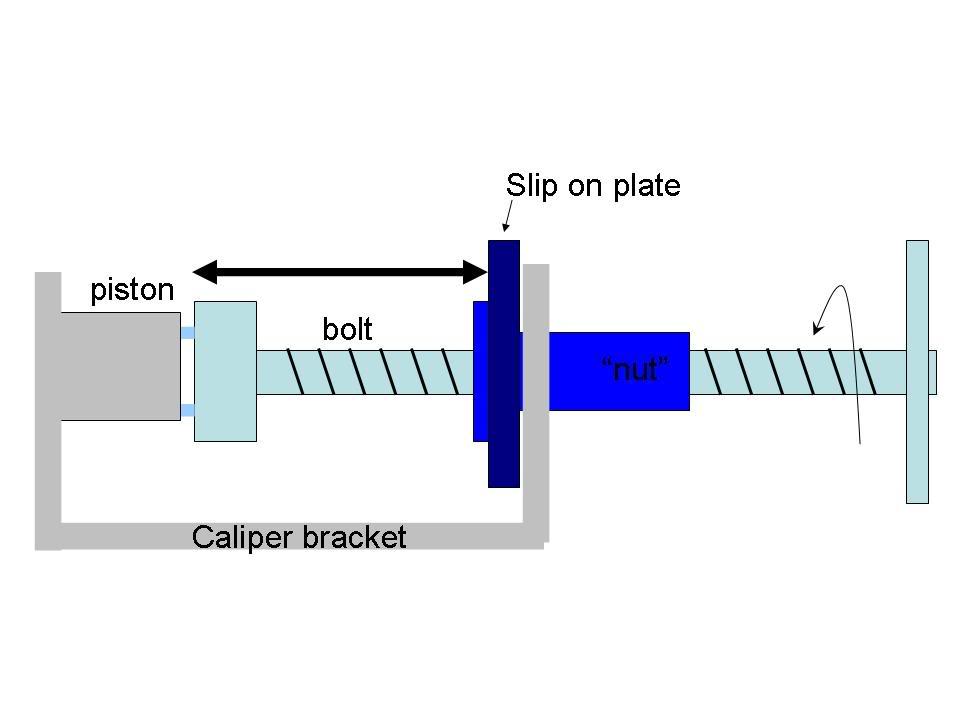
OK, I drew up this quick cartoon in ppt and by the binding you are saying the tightening up of the plate and nut against the caliper bracket as you turn the bolt (i.e., the length of the doubke-headed arrow expands), is that right.
I figured that was what you want to happen because that allows the bolt to screw into/push the piston back. Thinking about it now I guess things would get stuck if the piston itself is screwing into its housing with a different threading than the HF tool bolt, right? That makes sense! Now I see why some folks can simply turn the piston with needle-nose pliers.
So, just to be sure--does the piston retract by rotating like a screw, or does it rotate independently of being pushed in?
I'll attempt it again tomorrow and let you know what happens.
Last edited by ofioliti; 03-11-2009 at 05:07 AM. Reason: clarification
#10
03-11-2009, 05:52 AM
I am not sure why to remove the cable but I did in all cases and did not have any trouble with the piston. I don't think I would want to work on the rears with the cable on with removal so easy. I can't think of a logical reason for why the two are associated but it may be something to check.
#11
03-11-2009, 06:13 AM
When I did my brakes a couple years ago, one side on the rear pushed in
and rotated easily (HF tool) and the other side took me about an hour,
I finally had success alternating between the HF tool and pushing and turning
with needle nose pliers. Some pistons are just more finicky than others, I guess.
I didn't remove the hand brake cable.
and rotated easily (HF tool) and the other side took me about an hour,
I finally had success alternating between the HF tool and pushing and turning
with needle nose pliers. Some pistons are just more finicky than others, I guess.
I didn't remove the hand brake cable.
#12
03-11-2009, 06:36 AM

The reason they loosen the cap on the master cylinder is because as you push the piston back in the fluid transfers back to the master cylinder. If it's already full when you start pushing it back, there's no where for the fluid to go. The better way is to loosen the bleed screw at the caliper, put a hose on the nipple and drain the fluid into a bottle as you screw the piston back in. That way you can't overfill the master cylinder and get fluid all over your engine compartment.
#13
03-11-2009, 06:49 AM
#14
03-11-2009, 02:00 PM

5th Gear
Join Date: Jun 2007
Location: Aurora, IL
Posts: 852
Likes: 0
Received 0 Likes
on
0 Posts
I'm experiencing the EXACT same problem with doing the rears on my 04 MCS as well. I got the fronts done with no issues this weekend.
However, on the rears, using the Harbor Freight tool with the adjustment nut "loose", I can get the piston to spin, but it will not retract. When I tighten up the adjustment nut on the tool to secure the plate to the caliper, it will no longer spin. I can also get the piston to spin with the needle nose pliers method, but it will not retract. My pads are very low, so
I suspect the pistons may have overextended and need to be "threaded" (as described above) because of the way each freely spins without retracting for me. I've also loosened the reservoir cap, made sure the handbrake wasn't set, etc...
I work part time at NTB, and am going to look at it up on the rack in the shop with a service tech to try to figure it out. I'll post back with my solution if you don't get it figured out first! Good luck to you!
#15
03-11-2009, 03:23 PM
I'm experiencing the EXACT same problem with doing the rears on my 04 MCS as well. I got the fronts done with no issues this weekend.
However, on the rears, using the Harbor Freight tool with the adjustment nut "loose", I can get the piston to spin, but it will not retract. When I tighten up the adjustment nut on the tool to secure the plate to the caliper, it will no longer spin. I can also get the piston to spin with the needle nose pliers method, but it will not retract. My pads are very low, so
I suspect the pistons may have overextended and need to be "threaded" (as described above) because of the way each freely spins without retracting for me. I've also loosened the reservoir cap, made sure the handbrake wasn't set, etc...
I work part time at NTB, and am going to look at it up on the rack in the shop with a service tech to try to figure it out. I'll post back with my solution if you don't get it figured out first! Good luck to you!
However, on the rears, using the Harbor Freight tool with the adjustment nut "loose", I can get the piston to spin, but it will not retract. When I tighten up the adjustment nut on the tool to secure the plate to the caliper, it will no longer spin. I can also get the piston to spin with the needle nose pliers method, but it will not retract. My pads are very low, so
I suspect the pistons may have overextended and need to be "threaded" (as described above) because of the way each freely spins without retracting for me. I've also loosened the reservoir cap, made sure the handbrake wasn't set, etc...
I work part time at NTB, and am going to look at it up on the rack in the shop with a service tech to try to figure it out. I'll post back with my solution if you don't get it figured out first! Good luck to you!
 ). The job will have to wait till next week.
I hope you find out how that piston works, i.e., whether it is spinning freely only because it is unthreaded already or whether it spins regardless.
 (Does anyone know?)
If the spinning is independent of the retraction, can anyone explain in mechanical terms why it is much more difficult than the fronts? Thanks!
#16
03-12-2009, 03:32 PM

No I can't explain it...here's what I've experienced doing GEN1 rears on about a half dozen cars (I do tech days in my garage)
The turn vs push is not what I would call closely coupled. Sometimes I turn a few turns, than push a little, then repeat.....while other times things seem to happen together.
I use the HF tool.....while it works it is not what one would call high quality and the tendency of the parts to bind just may account for what I described... btw, the more I use the HF tool, the less this problem seems to occur (binding)...it's wearing in? Or I'm learning?
To previous post: The reason the rears is more difficilt than the fronts is that the fronts do NOT have the parking brake, which is the component requireing this entire 'turn push' process. The fronts you just shove back in and all is fine; as with many other vehicles....only SOME vehicles have this e-brake system that needs this push-turn process. I recently replaced the rear pads on my ELEMENT with none of this nonsense required. Took about 5 minutes a wheel. Doesn't make me like my MINI less....but I recognise there are engineering options out there.
#17
03-13-2009, 07:07 PM
5th Gear
Join Date: Jun 2007
Location: Aurora, IL
Posts: 852
Likes: 0
Received 0 Likes
on
0 Posts
We got it to compress, finally! Two different methods worked:
1). When everything is tightened up and it won't otherwise move, use the handle from a floor jack as a breaker bar extension on the HF tool to get more leverage for turning the bolt.
OR
2). Back off the adjustment nut a little bit so that it isn't seized up against the caliper and the "slip on" plate. Then, use a large pipe wrench to keep the adjustment nut from rotating while you turn the HF tool to allow it to push in while rotating.
Hope this helps, and good luck!
#18
03-17-2009, 07:44 PM
Thanks again for the tips, folks.
I haven't had a chance to get to the rears (maybe this weekend), but in the meantime, I was able to finally find a diagram of the interior of a rear caliper with the self-adjusting piston/hand brake mechanism.
A description of the mechanism and how it works is here:
http://www.autoshop101.com/forms/brake06.pdf
This is the figure from that document:
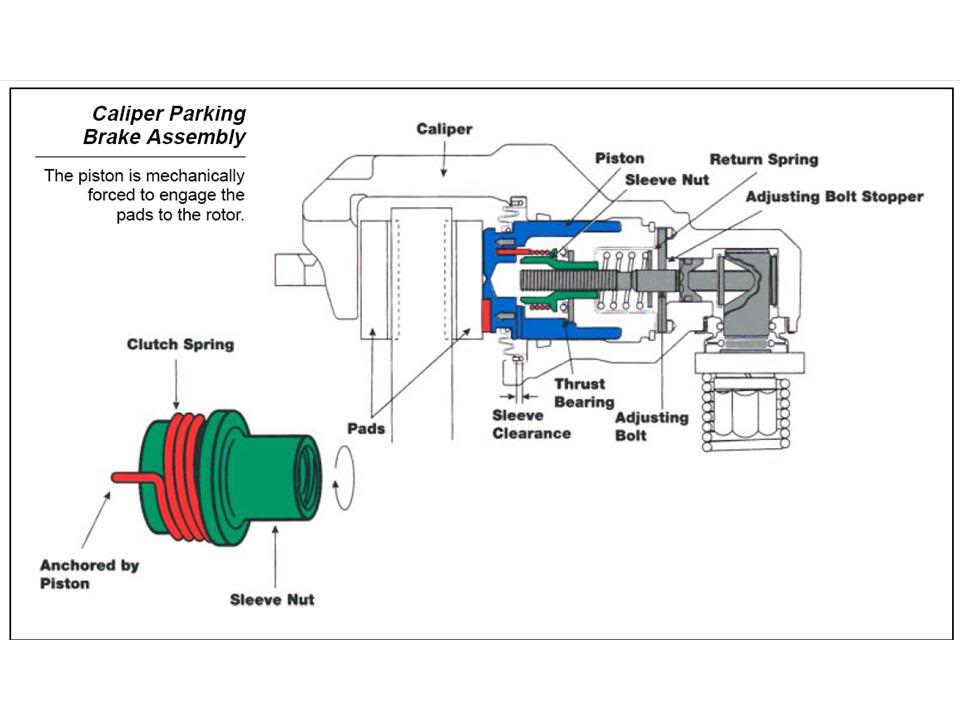
Apparently this is for a Toyota, but I suspect the basic mechanism is similar.
In short, the green sleeve nut is the part that needs to be rotated back along the central bolt to provide space for the piston to be pushed back. It appears that the torque you apply to the piston as you rotate it is transferred to that nut via the spring.
Everything that people are describing seems to make sense now. You would have to rotate the piston a bit until that spring opens up completely and starts to rotate the nut. After the nut has been screwed in a bit, then the piston can be pushed back a bit as well. Then the process has to be repeated.
The seizing of the tool would indeed happen because the threading of the nut-bolt is probably not the same as the threading of the Harbor Freight tool., i.e, the HF tool might be pushing in faster than the nut can be screwed in.
Comments?
I haven't had a chance to get to the rears (maybe this weekend), but in the meantime, I was able to finally find a diagram of the interior of a rear caliper with the self-adjusting piston/hand brake mechanism.
A description of the mechanism and how it works is here:
http://www.autoshop101.com/forms/brake06.pdf
This is the figure from that document:
Apparently this is for a Toyota, but I suspect the basic mechanism is similar.
In short, the green sleeve nut is the part that needs to be rotated back along the central bolt to provide space for the piston to be pushed back. It appears that the torque you apply to the piston as you rotate it is transferred to that nut via the spring.
Everything that people are describing seems to make sense now. You would have to rotate the piston a bit until that spring opens up completely and starts to rotate the nut. After the nut has been screwed in a bit, then the piston can be pushed back a bit as well. Then the process has to be repeated.
The seizing of the tool would indeed happen because the threading of the nut-bolt is probably not the same as the threading of the Harbor Freight tool., i.e, the HF tool might be pushing in faster than the nut can be screwed in.
Comments?
The following users liked this post:
930 Engineering (12-19-2020)
#19
03-18-2009, 07:53 AM
You are correct in that every time I have done the rears I have to turn the piston in a few turns and then the HF tool is out of sync.
#20
03-28-2009, 08:56 AM

2nd Gear
Join Date: May 2007
Location: Farmington Hills, MI
Posts: 59
Likes: 0
Received 0 Likes
on
0 Posts
I am having the same difficulty compressing the rear brake piston. I can get it to decompress but it will not compress with the HF tool. any schools of thought on this (i know what i need to do now to get it to compress)
Also, i have a tear in the rubber "condom" does this mean i need to replace the entire brake shoe?
Also, i have a tear in the rubber "condom"
does this mean i need to replace the entire brake shoe?
#21
03-28-2009, 03:19 PM

I think everybody is stumbling over a very simple principle. I don't know what is going on inside the caliper, but the brake piston is on some kind of threading - in fact, if you turn the piston without compressing it, it will still retract. That's the reason people are able to compress the rear pistons with nothing more than a pair of needle-nose pliers. If you can get it to turn, it will retract by itsellf without any pressure.
When you use the HF tool, the threading of the tool competes with the threading of the piston and it binds up. The HF tool thread is more aggressive, so you can turn it 1/2 to a full turn Okay, but at this point, the HF tool wants the piston to be further retracted than it is. So it binds up. You can get it to work again by loosening the lock nut, backing off the adjustments, and starting over.
Now that I undestand how all this works, I'd have a tendency just to use needle-nose pliers. No muss, no fuss.
- Mark
#22
03-28-2009, 04:43 PM
I think everybody is stumbling over a very simple principle. I don't know what is going on inside the caliper, but the brake piston is on some kind of threading - in fact, if you turn the piston without compressing it, it will still retract. That's the reason people are able to compress the rear pistons with nothing more than a pair of needle-nose pliers. If you can get it to turn, it will retract by itsellf without any pressure.
When you use the HF tool, the threading of the tool competes with the threading of the piston and it binds up. The HF tool thread is more aggressive, so you can turn it 1/2 to a full turn Okay, but at this point, the HF tool wants the piston to be further retracted than it is. So it binds up. You can get it to work again by loosening the lock nut, backing off the adjustments, and starting over.
Now that I undestand how all this works, I'd have a tendency just to use needle-nose pliers. No muss, no fuss.
- Mark
When you use the HF tool, the threading of the tool competes with the threading of the piston and it binds up. The HF tool thread is more aggressive, so you can turn it 1/2 to a full turn Okay, but at this point, the HF tool wants the piston to be further retracted than it is. So it binds up. You can get it to work again by loosening the lock nut, backing off the adjustments, and starting over.
Now that I undestand how all this works, I'd have a tendency just to use needle-nose pliers. No muss, no fuss.
- Mark
#23
03-28-2009, 08:20 PM

I am having the same difficulty compressing the rear brake piston. I can get it to decompress but it will not compress with the HF tool. any schools of thought on this (i know what i need to do now to get it to compress)
Also, i have a tear in the rubber "condom" does this mean i need to replace the entire brake shoe?
Also, i have a tear in the rubber "condom"
does this mean i need to replace the entire brake shoe?
The following users liked this post:
930 Engineering (12-19-2020)
#24
04-05-2009, 09:40 PM
Conclusion
Well, I finally got to finish this 'project.'
It was the rear right piston that was giving me problems, so I decided to start on the left rears. I used the Harbor Freight tool. I rotated an PUSHED while rotating (with muscle power; not the screwing in action of the HF tool). After about 15 minutes of this (with breaks to find a more comfortable position to get more leverage!) this darn thing finally started to move in. Once it began moving in, it was actually not too difficult to push and twist. I switched over to needle nosed pliers (just for fun) and got it pushed in all the way! Whew! Got the new pads and rotors on and took a break.
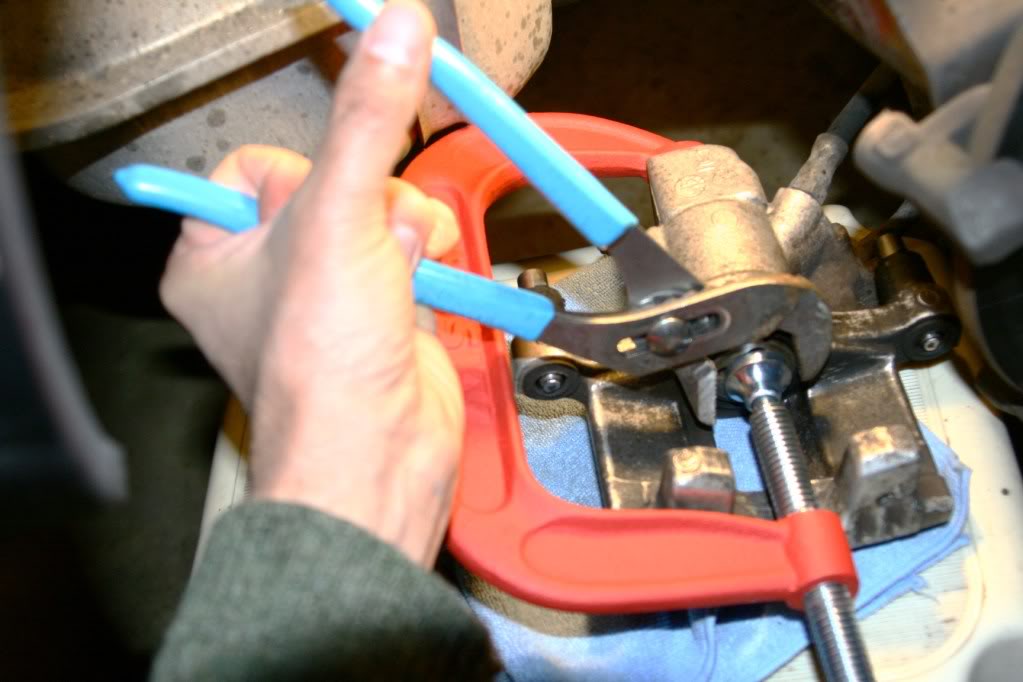
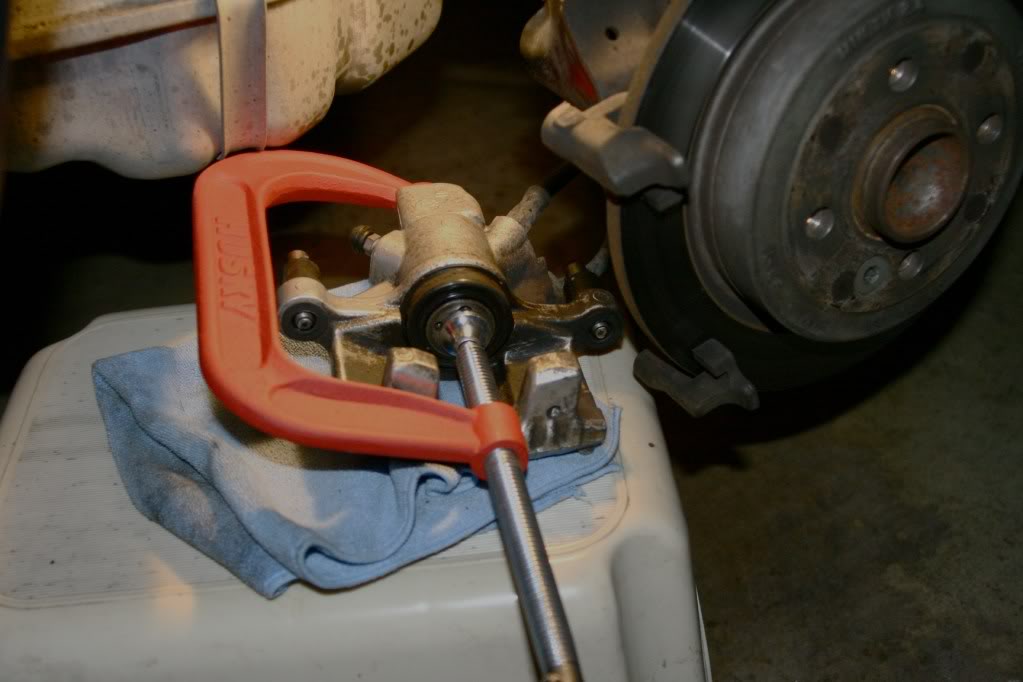
Then I returned for the right rear piston. Worked on it for an hour with HF tool. I turned the heck out of it but it would not move back at all! I figured I just did not have the strength to push the darn thing in. So, I decided to try one more method described by Dr. Obnxs in one of his MC2 articles: Compress with a C-clamp and rotate with channel lock pliers. It worked like a charm!
I tightened up the clamp and even without rotating the piston, it moved back slightly. After I could not tighten it anymore, I took the pliers and gently grasped the end of the piston (careful not to catch the rubber) and rotated 1/4 turn. Then, tightening the c-lamp pushed back the piston some more. After about 4 turns with the pliers (1 full turn of the piston) I was able to push the piston all the way back in the with c-clamp alone. As it tightened the rotating disc at the end began to rotate as well and rotated the piston with it until the piston was completely retracted.
So, my experience was:
1. The rotating and pushing are indeed "independent."
2. Once you cannot push in, you need to rotate.
3. Rotating alone will not retract the piston (I tried for an hour!). (Markjenn, I am guessing that when you rotate, you may be also pushing in slightly on a less resisting piston.)
4. Even if the piston is ready to be pushed back (i.e. the 'sleeve nut' has been rotated back enough--see picture in post above), it may require some force especially at the beginning. That's where the c-clamp helped me.
5. I did this without dealing with the hand brake cable; no cracking open the bleeder valve; I did crack open the brake fluid reservoir and checked the level as the piston(s) compressed (had to remove a bit of fluid to prevent overflowing).
Next weekend (hopefully), fluid change.

It was the rear right piston that was giving me problems, so I decided to start on the left rears. I used the Harbor Freight tool. I rotated an PUSHED while rotating (with muscle power; not the screwing in action of the HF tool). After about 15 minutes of this (with breaks to find a more comfortable position to get more leverage!) this darn thing finally started to move in. Once it began moving in, it was actually not too difficult to push and twist. I switched over to needle nosed pliers (just for fun) and got it pushed in all the way! Whew! Got the new pads and rotors on and took a break.
Then I returned for the right rear piston. Worked on it for an hour with HF tool. I turned the heck out of it but it would not move back at all! I figured I just did not have the strength to push the darn thing in. So, I decided to try one more method described by Dr. Obnxs in one of his MC2 articles: Compress with a C-clamp and rotate with channel lock pliers. It worked like a charm!
I tightened up the clamp and even without rotating the piston, it moved back slightly. After I could not tighten it anymore, I took the pliers and gently grasped the end of the piston (careful not to catch the rubber) and rotated 1/4 turn. Then, tightening the c-lamp pushed back the piston some more. After about 4 turns with the pliers (1 full turn of the piston) I was able to push the piston all the way back in the with c-clamp alone. As it tightened the rotating disc at the end began to rotate as well and rotated the piston with it until the piston was completely retracted.
So, my experience was:
1. The rotating and pushing are indeed "independent."
2. Once you cannot push in, you need to rotate.
3. Rotating alone will not retract the piston (I tried for an hour!). (Markjenn, I am guessing that when you rotate, you may be also pushing in slightly on a less resisting piston.)
4. Even if the piston is ready to be pushed back (i.e. the 'sleeve nut' has been rotated back enough--see picture in post above), it may require some force especially at the beginning. That's where the c-clamp helped me.
5. I did this without dealing with the hand brake cable; no cracking open the bleeder valve; I did crack open the brake fluid reservoir and checked the level as the piston(s) compressed (had to remove a bit of fluid to prevent overflowing).
Next weekend (hopefully), fluid change.
#25
04-06-2009, 07:09 AM
I forgot to mention ...
I was prompted to do the brakes when my brake wear warning light came on. The wear sensor that triggered it was the rear one, not the front. The rear pistons were extended out much more than the front. Not sure though whether this might affect the difficulty in compressing the piston initially.
If I had to do it again, I would just purchase the $10 C-clamp. The nice Harbor Freight tool carrying case looks nice on my garage shelf though.
If I had to do it again, I would just purchase the $10 C-clamp. The nice Harbor Freight tool carrying case looks nice on my garage shelf though.