Low Speed Fan Resistor - we need solution
#926
 07-09-2013, 08:04 PM


1st Gear
Join Date: Jun 2013
Location: New York
Posts: 15
Likes: 0
Received 0 Likes
on
0 Posts
Hi all,
I swapped out the resistor on my 02 MCS a few weeks ago. All runs fine with the $6.50 Ebay resistor from China.
For those looking for detailed instructions on how to do the swap, I found the instruction on this site from GERLDOC on how to remove the bumper and put the car in service mode to be exceptionally good.
The actual resistor repair once you have the car in service mode is simple. Taking the fan out is pretty easy, just remove the plastic plugs on the upper right and left of the fan/radiator and then lift out the fan.
On my car the wire wrap was clearly broken in one spot on the factory resistor.
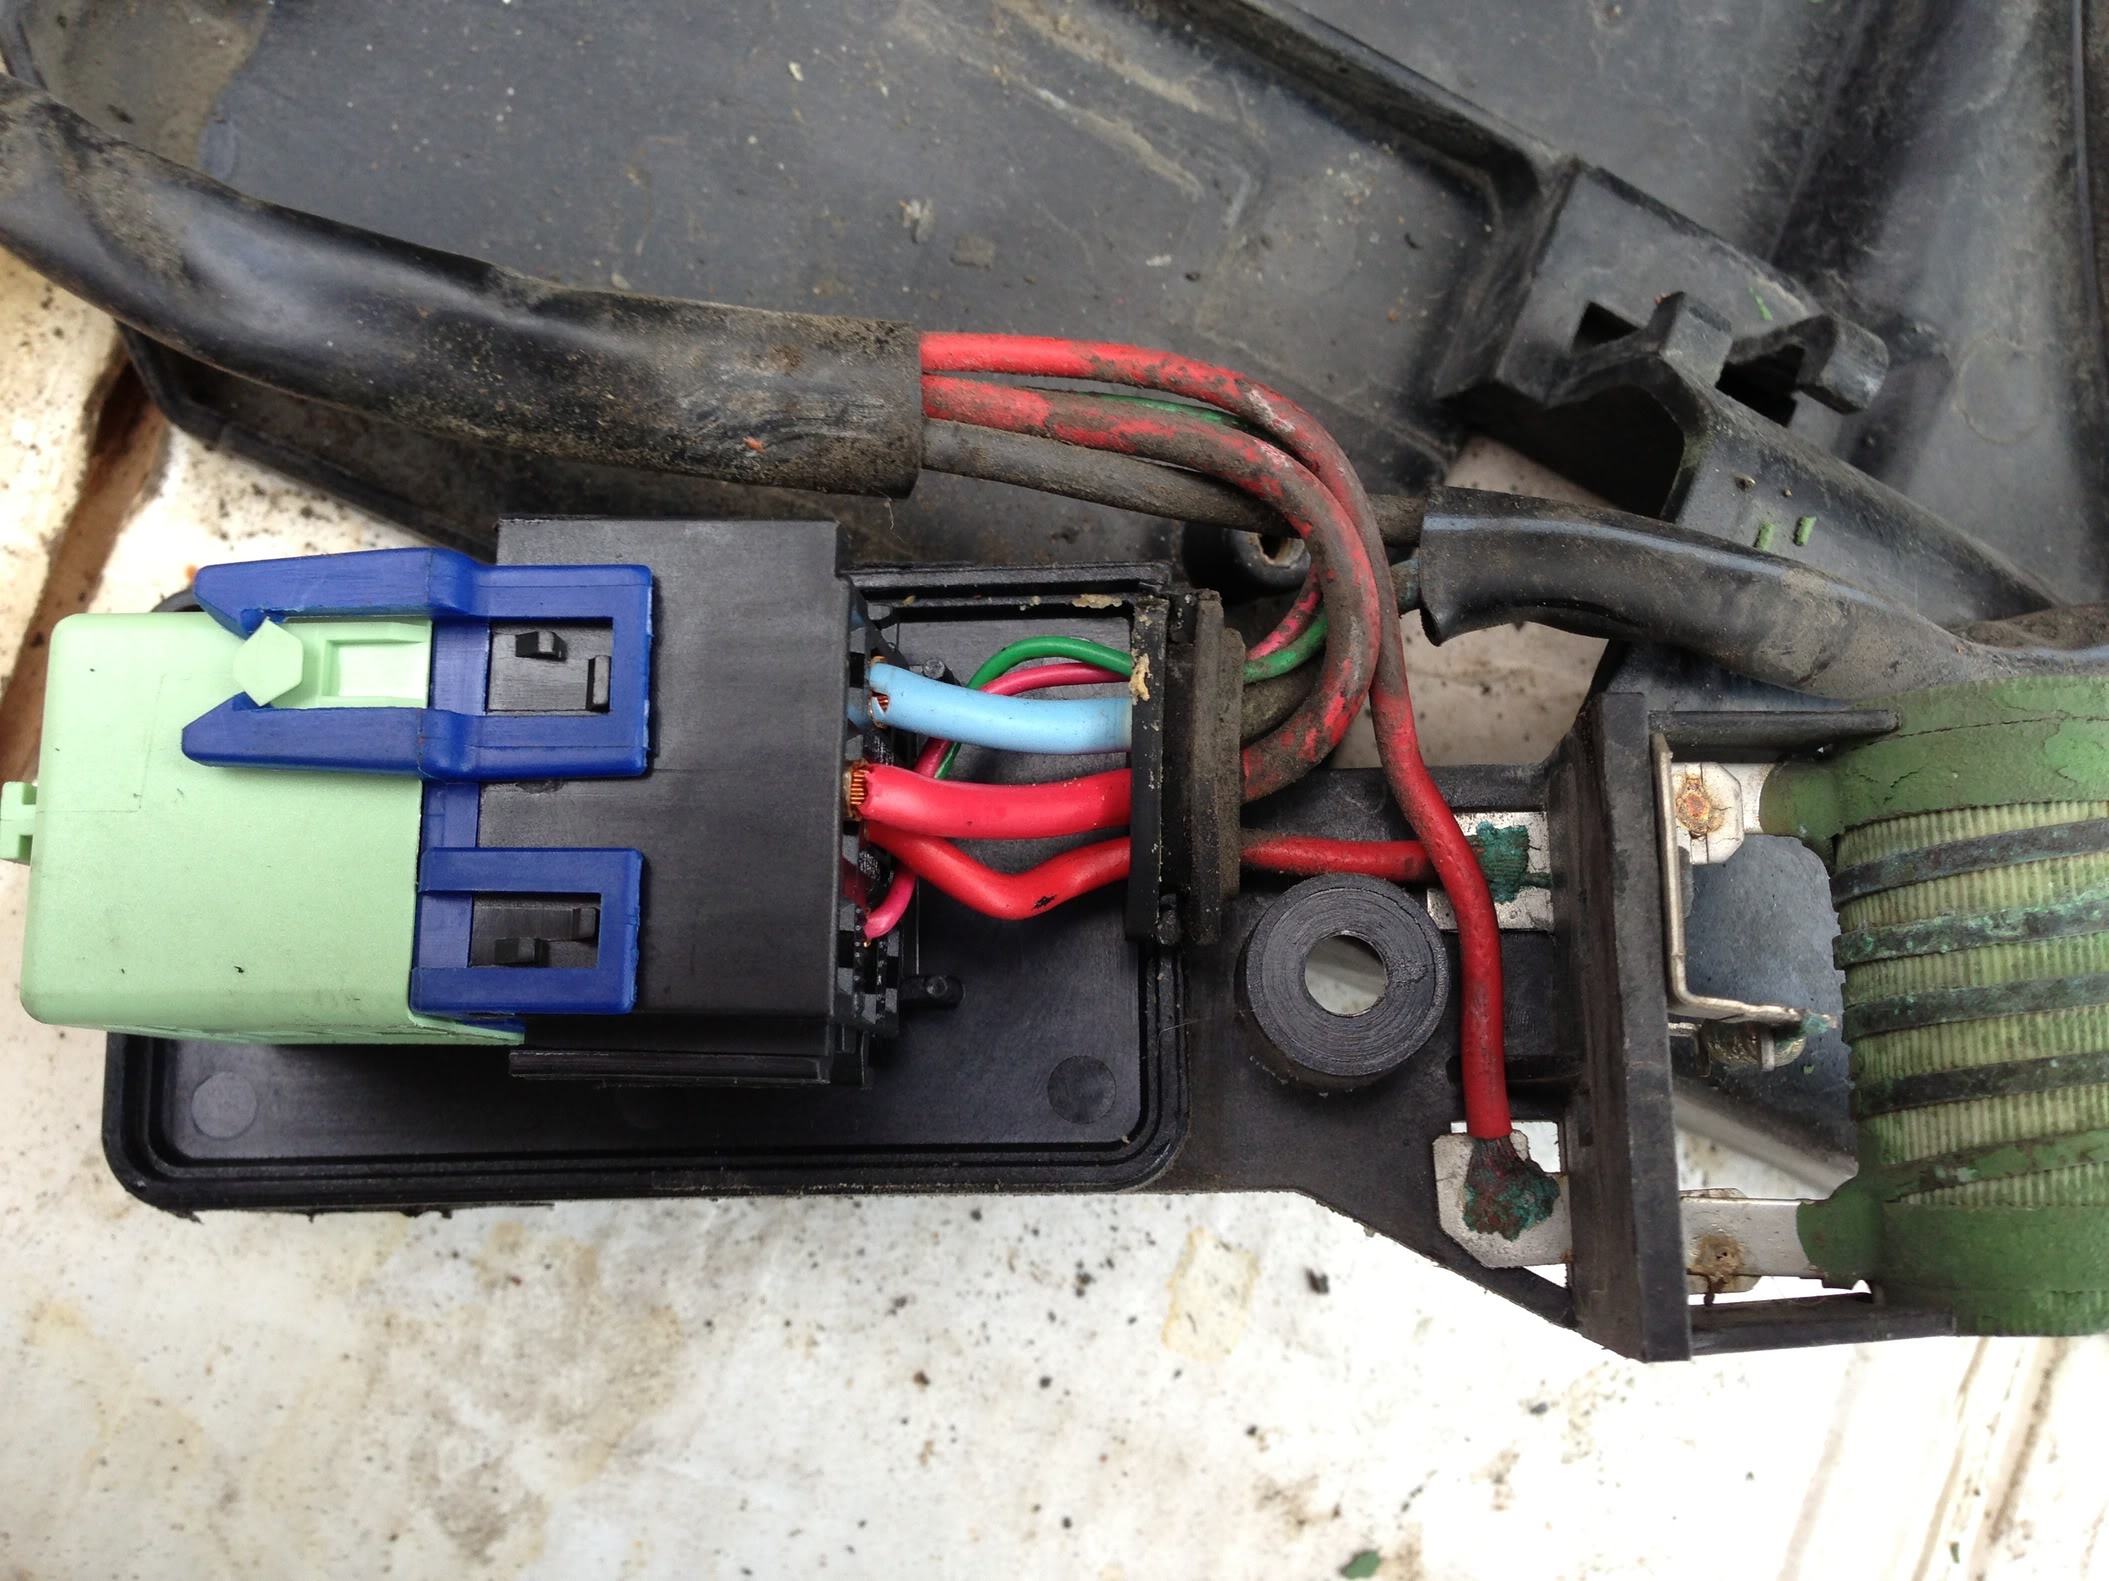
Below is the electrical unit that is bolted to the fan housing. It has the resistor and relay all built into on non-replaceable unit.

After taking a hack saw to the terminals the broken resistor has been surgically removed!!

I next drilled small holes in the tabs to make a better connection to solder new wires from the tabs to the new resistor location on the bumper.
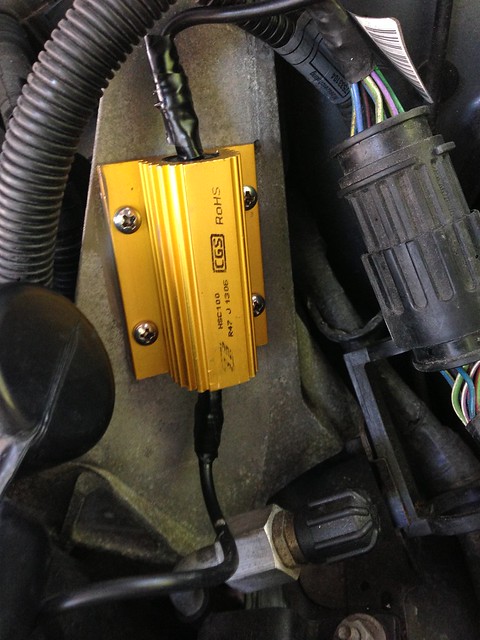
Next I drilled holes in the aluminum bumper support that would line up with the new 100 watt resistor mounting holes.

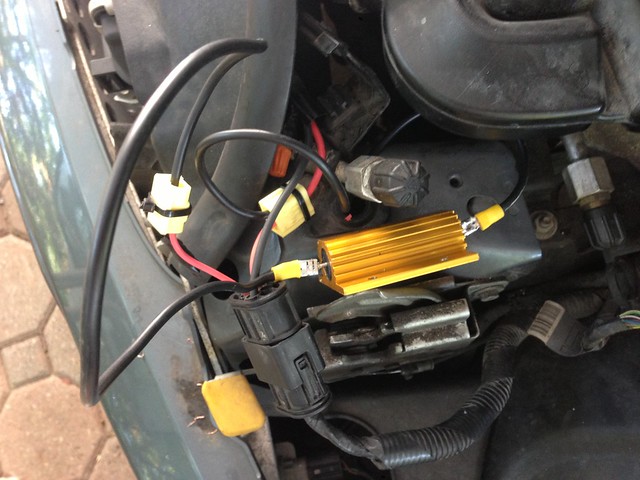
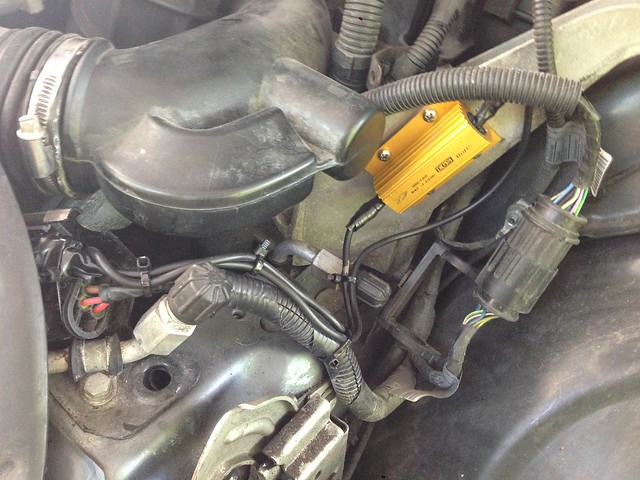
This is a picture of the resistor in place. I used standard heat transfer paste between the resistor and the bumper. With such a large heat sink I am hoping the resistor never burns out. Even if it does, either by-passing it or replacing it will be a very simple job.
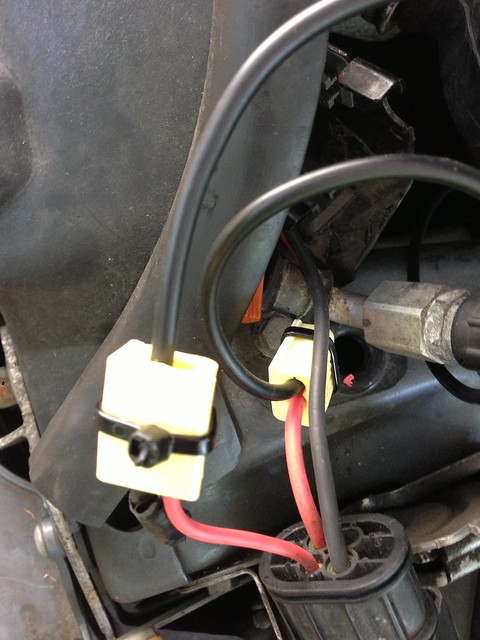
The connection from the fan housing to the resistor is through a 2 wire connector that uses standard 1/4 tabs. This way if I have another failure, I can jump the connection pretty easily.

I have already put 1000 miles on the car including a few hours stuck in stop and go traffic with 90+ degree heat. So far so good.
Steven

I swapped out the resistor on my 02 MCS a few weeks ago. All runs fine with the $6.50 Ebay resistor from China.
For those looking for detailed instructions on how to do the swap, I found the instruction on this site from GERLDOC on how to remove the bumper and put the car in service mode to be exceptionally good.
The actual resistor repair once you have the car in service mode is simple. Taking the fan out is pretty easy, just remove the plastic plugs on the upper right and left of the fan/radiator and then lift out the fan.
On my car the wire wrap was clearly broken in one spot on the factory resistor.
Below is the electrical unit that is bolted to the fan housing. It has the resistor and relay all built into on non-replaceable unit.
After taking a hack saw to the terminals the broken resistor has been surgically removed!!
I next drilled small holes in the tabs to make a better connection to solder new wires from the tabs to the new resistor location on the bumper.
Next I drilled holes in the aluminum bumper support that would line up with the new 100 watt resistor mounting holes.
This is a picture of the resistor in place. I used standard heat transfer paste between the resistor and the bumper. With such a large heat sink I am hoping the resistor never burns out. Even if it does, either by-passing it or replacing it will be a very simple job.
The connection from the fan housing to the resistor is through a 2 wire connector that uses standard 1/4 tabs. This way if I have another failure, I can jump the connection pretty easily.
I have already put 1000 miles on the car including a few hours stuck in stop and go traffic with 90+ degree heat. So far so good.
Steven
Last edited by an5sprite; 07-09-2013 at 08:05 PM. Reason: misspelling
#927
07-10-2013, 05:07 AM

Nice install! I just got the identical resistor, but discovered in the process that my OEM resistor is fine. (I have a 02/03 build date). I've done as much detective work as I can and the fan relay isn't being activated (yes, power at all fuses). Unfortunately the last stop appears to be the output signal from the DME (pin 7). If I can't find a break in the wire, I'll have to come up with a workaround. I did use the occasion of having the resistor out to solder in some pigtails so that adding my new resistor at a later date will be easier.
#928
07-10-2013, 07:47 AM
Nice install! I just got the identical resistor, but discovered in the process that my OEM resistor is fine. (I have a 02/03 build date). I've done as much detective work as I can and the fan relay isn't being activated (yes, power at all fuses). Unfortunately the last stop appears to be the output signal from the DME (pin 7). If I can't find a break in the wire, I'll have to come up with a workaround. I did use the occasion of having the resistor out to solder in some pigtails so that adding my new resistor at a later date will be easier.
Mine looked good, but was open.
#930
07-11-2013, 11:00 AM


I just replaced my resistor (2-plug car) with the Dorman part. Pretty straightforward, but soldering that thick wire is tough. I had to buy a 100/150 watt gun to do it. You also put so much heat into the wire that heat shrink tubing didn't work; it shrunk itself onto the wire before I could slide it into place. Ended up using liquid electrical "tape". I also removed the relay to keep from heating that up too much.
My symptoms were no low-speed and the high would cycle on for a few seconds then off for maybe 30 seconds. The engine also bogged a bit at idle when the high fan kicked-on. Probably too much electrical load at once.
Here's a little diagram I made. The relay numbers I added are not correct (the Blue should be 87 and the red wire from the resistor should be 30) but it still works the same.
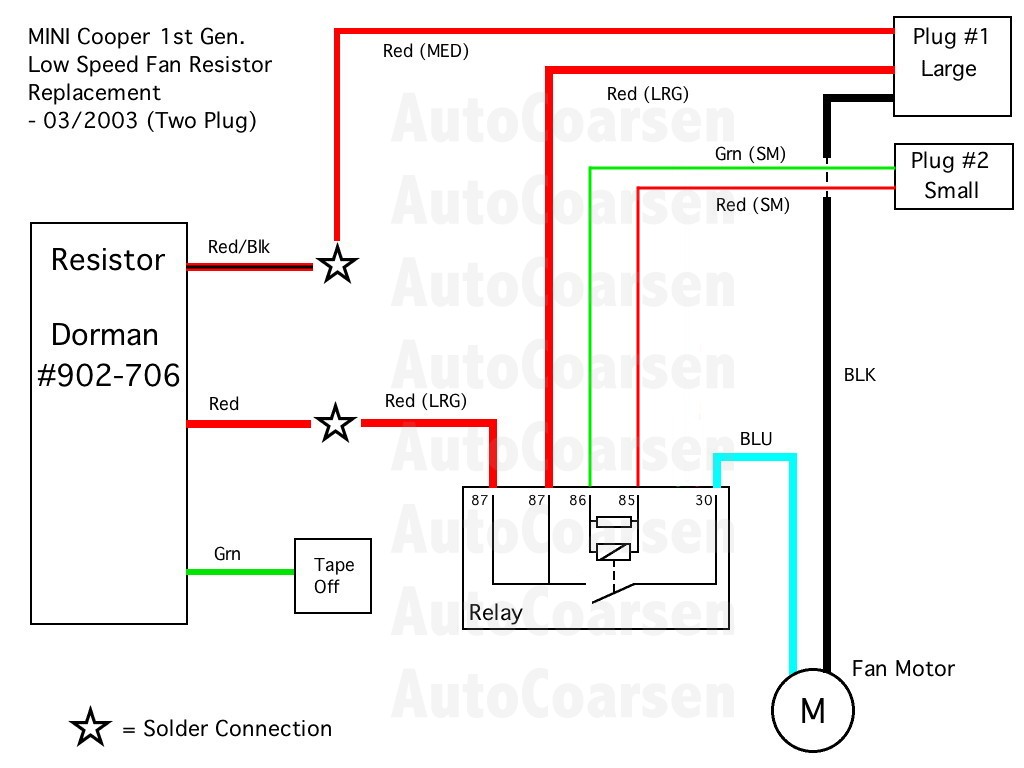
Last edited by AutoCoarsen; 07-11-2013 at 04:54 PM.
#932
07-18-2013, 12:05 PM

I just did this to my 2006 GP.
Low speed fan was out.
Voltmeter showed open circuit on the thinner red wire to ground.
I bought this TE 0R47 100W resistor from Newark.com:
http://www.newark.com/jsp/search/pro...sp?SKU=16R5345

I bought 5 of them and it cost $70 so $14 per resistor.
Here's my parts list:
1 roll of 12 gauge black wire (20')
$11
Pack of 12ga quick connects (I only used two of the female ones to connect to the resistor)
$3
Black electrical tape
Zip ties
12ga wire taps - tried to use the 14 ga but it wouldn't work with the thicker wire when trying to bridge to the thinner low speed wire (14ga). Used the other one to tap into the thicker high speed wire
Soldering iron (because I can't find the one I have)
Solder
Thermal paste - .24g of artic silver 5. This was expensive but one tube was the perfect amount as a little bit oozed out of the sides.
$22 - pack of two but only used one.
#8 screws (3/8" length) stainless steel
$6.50 (pack of like 50)
#8 tap - $2.50
#8 drill bit for tapping purposes (.1360" I believe)
For those of you hesitant to tap it's really easy...JUST MAKE SURE YOU USE OIL WHEN YOU DRILL AND TAP!!!!
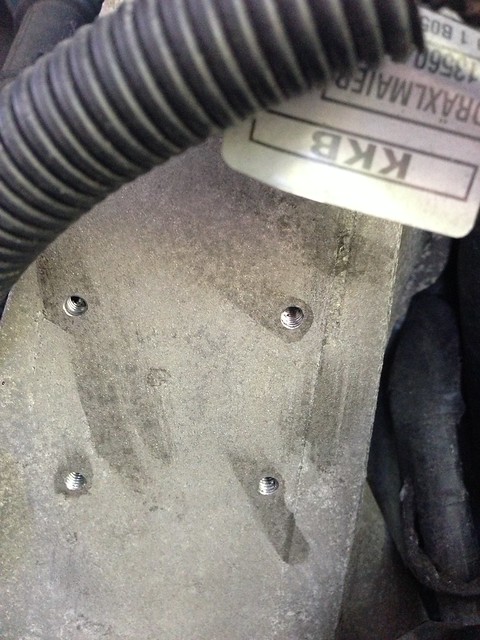
3 of the 4 holes were through the thin part of the motor mount.
I used a clamp to hold the resistor in place and then drilled.
Without the resistor actually mounted it got pretty darn hot. Even mounted it gets pretty hot. Definitely be careful.
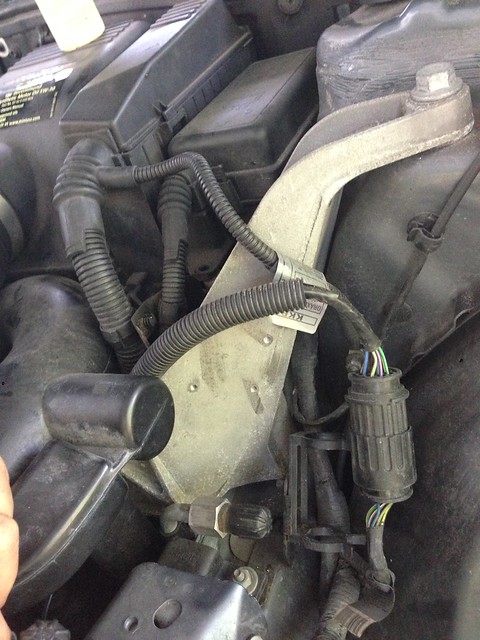
Here are some pics:
Total time 45 minutes of taking my time in this blazing heat. Thank goodness I have my pop up tent.
Started the car up (before finaling everything of course) and even without the A/C the low speed fan did kick in because it's damn near 100 out today here in NY.
When I maxed the AC the high speed came out after a while and stayed on for a while too.
I had my compressor, condensor, and refrigerant all replaced under CPO warranty right before it ran out...and I suspect it was mainly due to the low speed fan being out.
Thank you so much to Chris Lamb and others who posted about this. I have to do this on two of my buddy's cars too (another GP in fact).
Low speed fan was out.
Voltmeter showed open circuit on the thinner red wire to ground.
I bought this TE 0R47 100W resistor from Newark.com:
http://www.newark.com/jsp/search/pro...sp?SKU=16R5345
I bought 5 of them and it cost $70 so $14 per resistor.
Here's my parts list:
1 roll of 12 gauge black wire (20')
$11
Pack of 12ga quick connects (I only used two of the female ones to connect to the resistor)
$3
Black electrical tape
Zip ties
12ga wire taps - tried to use the 14 ga but it wouldn't work with the thicker wire when trying to bridge to the thinner low speed wire (14ga). Used the other one to tap into the thicker high speed wire
Soldering iron (because I can't find the one I have)
Solder
Thermal paste - .24g of artic silver 5. This was expensive but one tube was the perfect amount as a little bit oozed out of the sides.
$22 - pack of two but only used one.
#8 screws (3/8" length) stainless steel
$6.50 (pack of like 50)
#8 tap - $2.50
#8 drill bit for tapping purposes (.1360" I believe)
For those of you hesitant to tap it's really easy...JUST MAKE SURE YOU USE OIL WHEN YOU DRILL AND TAP!!!!
3 of the 4 holes were through the thin part of the motor mount.
I used a clamp to hold the resistor in place and then drilled.
Without the resistor actually mounted it got pretty darn hot. Even mounted it gets pretty hot. Definitely be careful.
Here are some pics:
Total time 45 minutes of taking my time in this blazing heat. Thank goodness I have my pop up tent.
Started the car up (before finaling everything of course) and even without the A/C the low speed fan did kick in because it's damn near 100 out today here in NY.
When I maxed the AC the high speed came out after a while and stayed on for a while too.
I had my compressor, condensor, and refrigerant all replaced under CPO warranty right before it ran out...and I suspect it was mainly due to the low speed fan being out.
Thank you so much to Chris Lamb and others who posted about this. I have to do this on two of my buddy's cars too (another GP in fact).

#934
07-24-2013, 06:59 AM

Hi All, I just realized that I too am in the same boat ... dead resister .. low speed fan doesn't come on and the high speed cycles. I was able to confirm with an Ohm meter and by touching the fan relays. I am fairly competent mechanically but so so with electrical understanding. My question is can I do the fix (using the external resistor) as defined in this wonderful thread if my resistor on the fan is dead or do I need to remove the fan assembly to bypass that resistor first to have this work? Or, do I need to replace the fan and resistor and then attempt to bypass the resistor? Thanks so much for your help. I have a 2005 MCS with 95K miles on it. First real major problem. Thx
#935
07-24-2013, 07:06 AM

I don't know why everyone is so gung ho about replacing the resistor. I think I've said this before but just replace the whole fan assembly. they are ~$70 shipped off ebay or $75 from amazon. It's way easier to do than all the rewiring, cutting, splicing and drilling. I know because I've done both. My resistor failed after a month(not it's fault, fan was jammed by debris). Second go round I replaced the whole fan and kicked myself for not going that route to start with.
#936
07-24-2013, 07:07 AM
It has been posted numerous times already. For later model year cars you don't have to take out the fan. The whole beauty of Chris lamb's fix is that you bypass the existing resistor by doin all the work at the wiring harness that is accessible from the top.
If your hi speed fan works then you don't need to replace the fan.
You should do this splicing on the fan side of the harness so that in case the fan ever fails you can just plug a new harness in with no ill effect.
If your hi speed fan works then you don't need to replace the fan.
You should do this splicing on the fan side of the harness so that in case the fan ever fails you can just plug a new harness in with no ill effect.
#937
07-24-2013, 07:09 AM
I don't know why everyone is so gung ho about replacing the resistor. I think I've said this before but just replace the whole fan assembly. they are ~$70 shipped off ebay or $75 from amazon. It's way easier to do than all the rewiring, cutting, splicing and drilling. I know because I've done both. My resistor failed after a month(not it's fault, fan was jammed by debris). Second go round I replaced the whole fan and kicked myself for not going that route to start with.
#938
07-27-2013, 02:44 AM

Many thanks to Chris Lamb, an5sprite and Lord of the Flies for the detailed instructions, photos, and work on this.
We have the Air Con light flashing and a noise from the the front if we have to sit in traffic with our '02 MSC. Shop said the fan was not cycling correctly. It is fine if we don't have to sit in traffic. So I am assuming this is the famous lousy fan resistor problem so many others have. It only has about 70K miles on it but it is after all 11 years old now.
In Lord of the Flies post the link for the resistor to:
http://www.newark.com/jsp/search/pro...sp?SKU=16R5345
This is fantastic since there is a country link in the top right that will take you to just about every country in the world, including France. I have spent days trying to find the same resistor with the required specs on this side of the pond and finally just thought I would try and order it from the US and used the link.......wish I had thought of that last week.
Is the Thermal paste necessary for this installation?
I assume it is spread on the back of the resistor.
And must this type of resistor be installed on the frame or body work?
Would one of the ceramic tube wrapped type of replacement resistors need to be mounted on the frame or just anywhere you could find space?
Thanks for any insight or suggestions.
jj, Geneva, Switzerland
#939
07-27-2013, 04:10 AM
Bonjour monsieur.
For a 2002 I think you are going to have to pull the fan out and either cut the old resistor out from there....and add pigtails to the connections to remote mount it...or you have to replace the fan.
You can't just do it from the top because the relay is located at the fan down below.
For a 2002 I think you are going to have to pull the fan out and either cut the old resistor out from there....and add pigtails to the connections to remote mount it...or you have to replace the fan.
You can't just do it from the top because the relay is located at the fan down below.
#940
07-27-2013, 04:11 AM
#941
07-27-2013, 07:48 AM
Thanks again LTF.
I don't see the thank you check box other forums seem to have or I would have used it.
I was going on the theory that if the resistor is blown then the circuit is open and it doesn't really matter where you put the patch resistor in the line since it will run the relay from any where. Any thoughts on this approach?
Obviously I am trying to avoid having to pull the fan not to mention the expense....over here they are quoting €400/$530 US!! for the fan assembly.
There is a cute trick the French customs guys pull all the time....they charge 40% tax/import duties....on the total including shipping costs in Euros on what ever the dollars are....so $100 plus $80 shipping works out to tax in Euros on 180 Euros not dollars...so it works out to 72 Euros instead of the correct amount so it ends up costing 250 euros. No chance to argue it because it is just the delivery guy at the door and they say they have to do what the customs guys told them......aggravating, not to mention the delay in getting it shipped over here. Better than 400 but now we are having a heat wave and I don't really want to wait three weeks for it to get here.
And yes there there is the puzzle of where the relay is in an '02...in the fan resistor housing, on the body in the engine bay, or mounted on the back of radiator....I have seen all three in the forums.
Thanks again for all the help.
jj
#942
07-27-2013, 05:39 PM
Hi All, This is driving me crazy. I did the fix this afternoon. Tapping the holes in the aluminum was very easy. Got the resistor inplace with the paste but for some strange reason, it's not working? I cut the low speed fan wire on the fan side and used the splice-lock to connect it to one side of the resistor. Than I used another splice-lock to tap into the high speed fan line and that was tied into the other side of the resistor. I started the engine and ran the AC. The fans still cycles and the resistor did not get hot. I had soldered the 14guage wires to each side of the resistor and it seemed to hold fine. Any suggestions?
#943
07-27-2013, 06:07 PM
1st Gear
Join Date: Jun 2013
Location: New York
Posts: 15
Likes: 0
Received 0 Likes
on
0 Posts
Hi All, This is driving me crazy. I did the fix this afternoon. Tapping the holes in the aluminum was very easy. Got the resistor inplace with the paste but for some strange reason, it's not working? I cut the low speed fan wire on the fan side and used the splice-lock to connect it to one side of the resistor. Than I used another splice-lock to tap into the high speed fan line and that was tied into the other side of the resistor. I started the engine and ran the AC. The fans still cycles and the resistor did not get hot. I had soldered the 14guage wires to each side of the resistor and it seemed to hold fine. Any suggestions?
From your description it is not clear if you bridged over the old broken resistor. What you did sounds correct but if the old broken resistor is still connected in the circuit you will not get any current flowing to the fan at low speed.
If you did bridge over the resistor, then you need to check the fuse and if you are getting current to the low speed circuit at the plug.
Steven
#944
07-27-2013, 06:24 PM
1st Gear
Join Date: Jun 2013
Location: New York
Posts: 15
Likes: 0
Received 0 Likes
on
0 Posts
Lordoftheflies.
I just looked closely at your pictures and I am having trouble understanding the connections. It looks like you connected the resistor between the low speed wire and high speed wire. If low speed is called for the current will flow from the smaller red wire through the resistor to the larger red wire.
In my car there is also a relay on the fan housing that is used to switch between the low and high speed mode. If the relay has the low speed contacts energized then the high speed will be open (no connection). However, if the high speed is open then the current will not flow down the thicker wire to the fan.
I know I must be missing something since you got it working.
Thanks,
Steven
#945
07-27-2013, 06:29 PM
#949
07-28-2013, 10:48 AM
1st Gear
Join Date: Jun 2013
Location: New York
Posts: 15
Likes: 0
Received 0 Likes
on
0 Posts
I think I just answered my own question. I have an 02 MCS and in that car the relay on the fan housing just makes the contact on the high speed wire. The 06 wiring must be different. Attached is the wiring for the 02 Mini's.
Last edited by an5sprite; 07-28-2013 at 10:51 AM. Reason: image did not stay attached
#950
07-28-2013, 07:23 PM

Guys, I just wanted to pass some info on since I just did the fix on my car (02 MCS); didn't see this mentioned anywhere, but I didn't read every single page.
I have the 2 plug setup with the relay inside the housing on the fan. I ordered the Dorman kit from Amazon ($26) and swapped it out. While I was in the middle of it, I recalled reading where some of the relays have gotten sticky over time and people have resorted to whacking the assembly with a screwdriver to get it to work right; so it seemed like the ideal time to just go ahead and do some preventive maintenance by installing a new relay. Picked up a standard 5 pin relay from O'Reilly's and swapped it out. Put the car back together, and the fan didn't spin. Checked the fuse, it was blown; replaced it, the fan still didn't spin. Checked the fuse again, and the new one was blown. I pulled the fan back out, scratched my head for a long time while I did some troubleshooting, everything looked good. Then I happened to look at the old relay and something seemed off, so I pulled the new one off an checked it against the old one. The BMW relay has a different pinout than the one from the auto parts store; the layout is the same so that it will plug in, and the numbers are the same (30, 85, 86, 87, 87a), but they go to different connectors on the relay. Once I figured that out, I just got rid of the plug completely and used crimp connectors to plug each wire into the proper plug on the relay. Works just fine that way, but just keep in mind that you can't grab a relay from the local Autozone and swap it out for the OEM.
I have the 2 plug setup with the relay inside the housing on the fan. I ordered the Dorman kit from Amazon ($26) and swapped it out. While I was in the middle of it, I recalled reading where some of the relays have gotten sticky over time and people have resorted to whacking the assembly with a screwdriver to get it to work right; so it seemed like the ideal time to just go ahead and do some preventive maintenance by installing a new relay. Picked up a standard 5 pin relay from O'Reilly's and swapped it out. Put the car back together, and the fan didn't spin. Checked the fuse, it was blown; replaced it, the fan still didn't spin. Checked the fuse again, and the new one was blown. I pulled the fan back out, scratched my head for a long time while I did some troubleshooting, everything looked good. Then I happened to look at the old relay and something seemed off, so I pulled the new one off an checked it against the old one. The BMW relay has a different pinout than the one from the auto parts store; the layout is the same so that it will plug in, and the numbers are the same (30, 85, 86, 87, 87a), but they go to different connectors on the relay. Once I figured that out, I just got rid of the plug completely and used crimp connectors to plug each wire into the proper plug on the relay. Works just fine that way, but just keep in mind that you can't grab a relay from the local Autozone and swap it out for the OEM.