Front seat back cover removal
#1
 03-17-2024, 09:22 AM

Front seat back cover removal
Anyone have a definitive technique to remove the plastic shell from the back of the front seats. I’ve scoured the internet, and tried different ways, but it still won’t let go without a lot of pulling. Some say pull up first, then out. Some say pull down first, then out. I’ve already loosened the bottom of each side.
#2
03-17-2024, 09:56 AM

6th Gear
Hey there Jonny,
I replaced both seat backs almost exactly a year ago as outlined in post # 389 of my (sig) topic, with subsequent reply to related questions. Within that, I found it helpful to invert ("turtle", which led to some humorous comments) the assembled seat to visibly view engagement of the retention hooks. This link is one found online and reviewed before I proceeded:
DIY: Remove the rear seat cover and recover it

#4
03-17-2024, 12:37 PM
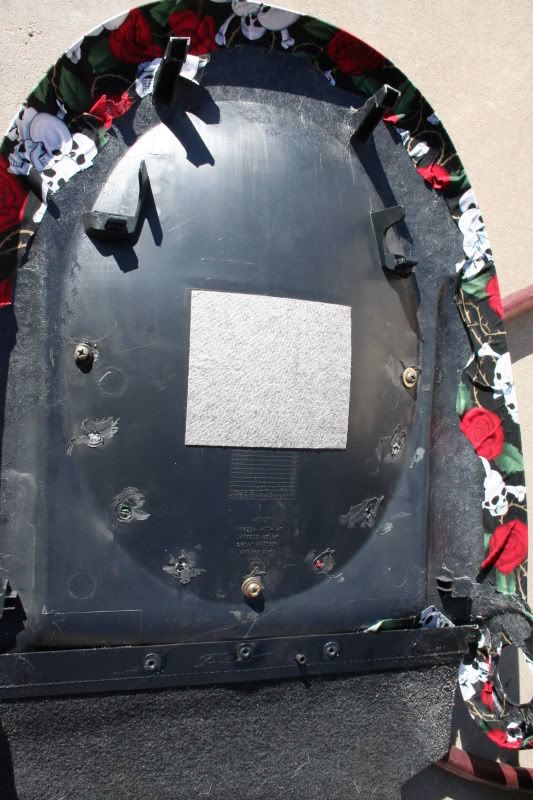
I had previously reviewed the MA thread you referenced. I guess my issue is getting the metal clips to release with breaking them off the seat back, as I will be swapping those to another set of seats. I’m under the assumption that the covers you removed were not being reused, so that was probably not important to you. It looks like the clip actually broke off upon removal, is that correct?
#5
03-17-2024, 12:59 PM
6th Gear
Zooming in on circled areas of my removed back cover shows no breakage as compared to pics in the MA DIY article. Despite those being destined for the landfill, I was careful to avoid damage to the mating seat assembly attachment points upon removal. Once removed, latching functionality becomes much more clear but then, its been a year since I did that. Looking again at that MA article shows the top "hooks" which must be lifted slightly for release from the slotted receptacles in the (top) horizontal bar. IIRC, I first popped the lower attachments clear which then allowed raising those hooks and gently pulling rearward for complete removal...
#6
03-17-2024, 01:13 PM
#7
03-17-2024, 01:28 PM
6th Gear
No yankee-doodle method done by me!  I recall I started below the clipped hooks so that I could look up underneath with a flashlight to better see the upper attachment points. Once unclipped below, the upper hooks are free to rise as necessary for removal clearance from the horizontal bar slots. I went slow enough to ensure no damage in the process with the original back covers fully reusable if not for the cosmetic scratch blemishes done by the rookie MINI tech during fuel pump and filter replacement.
I recall I started below the clipped hooks so that I could look up underneath with a flashlight to better see the upper attachment points. Once unclipped below, the upper hooks are free to rise as necessary for removal clearance from the horizontal bar slots. I went slow enough to ensure no damage in the process with the original back covers fully reusable if not for the cosmetic scratch blemishes done by the rookie MINI tech during fuel pump and filter replacement.
The following users liked this post:
Jonny (03-17-2024)
Trending Topics
#10
03-17-2024, 02:12 PM
#11
03-18-2024, 10:55 AM
Well, another day, another fail. From your description, you started at the bottom (seat base) unhooked the clips, lifted the shell and push up on the top clips. I can’t seem to even unhook the bottom after pulling pushing up down side to side. From this description (park lane seats) they advise to start at top, pull out, and then lift up to release bottom of shell. I would prefer to use your method because the top clips will definitely deform or break if I just pull from the top. Any other advise on releasing the bottom first?
#12
03-18-2024, 12:18 PM
maybe of no help...
Forgive me in advance if you've already tried this -
Although my memory is a bit vague (I also used the same video you posted) while disassembling a seat at the salvage yard. After all the bottom bits and straps were removed/released, I think I grabbed and pushed upwards from the bottom while pulling back on the top and gently pulling backwards while still lifting upwards.
Again I'm not sure if that'll work.
I do remember, that even though I wasn't in need of that seatback (worse condition than mine), I was lucky/successful in not breaking any clips - knowing that I'd have to repeat the same exercise on my own good one.
Please keep us updated.
I'm going to have to contend with this myself at some point.
Best of luck!
The following users liked this post:
Jonny (03-18-2024)
#13
03-18-2024, 12:24 PM
Yeah, I’m thinking by the diagram, seems as though the bottom needs to be lifted up to detach. Though they specify to do top first, and that’s looking dicey with 20year old plastic unless the clips can be pushed up. Already got a coat hanger in the to no avail 😩 also, I don’t think the 06 had the fabric piece attached at the bottom with the strap clipped to the seat bottom.
Last edited by Jonny; 03-18-2024 at 12:30 PM.
#14
03-18-2024, 01:45 PM
6th Gear
#15
03-18-2024, 04:54 PM
This thread has really piqued my interest.
My driverside seat has been worn and cracked and duct taped for the past 2wo years.
As stated previously; I have a perfect condition OEM seat cover (skin) that I pulled from a salvage Mini and I think it's about time I tackle this job to re-skin my seat.
Like Jonny, I've been searching the internet for more info on properly removing the back plastic seat cover without damage or breaking the hidden securing clips.
I keep seeing/reading references on various Mini related sites to just wedge your fingers in at both sides at the top and just pull hard. I don't think that's how I did it at the salvage yard.
I'm certainly wanting to use the proper method with due caution on my current seat backs.
I will be joining Jonny in attempting to remove the front rear back panel in hopes to re-cover my original.
I'll post any further results in my attempt...hopefully not breaking any clips during the process.
BTW have you seen this guy's method? (0:20 mark) - Barbaric to say the least...BUT no broken clips!

#17
03-18-2024, 05:49 PM
I can tell you first hand, when replacing the skins (covers) you need to be extra careful with the plastic clips that hold the cover down to the sides of the frame. They are very brittle thin plastic and will snap easily if you look at them the wrong way. To make it worse, they are sewn onto the cover, so if they do snap, there’s no easy way to remove and replace. As far as the plastic shell goes, I’m going to try one more method of fishing some string around the top clips and pull up to see if they release. I can feel the clip by putting my fingers down there, so they are close to the top. Just from the attempts I’ve made so far, it has made the shell a little loose, where it wiggles around a bit, not what I want when I put the newer ones on, so I really need to figure out the correct method so I don’t end up with a nice shell…that doesn’t fit snugly. This simple project is really frustrating me, I thought it would be straightforward. And yeah, the guy in that video used the primitive caveman method, probably how most body shops would do it lol. Removing the shell that way would really make it not suitable for reuse.
#18
03-19-2024, 03:07 PM
Success! If needed, mark approximate location of top clips. Use a sturdy (thick) trim removal tool that has a good curve. Wedge in from side. Pull back tool so it’s guided to front of clip. Angle (pivot) up with some force while slightly pulling back on shell. Kind of a no brainer to be honest.
Last edited by Jonny; 03-19-2024 at 03:17 PM.
#20
03-20-2024, 08:24 AM
I had the hood and hatch open on the Mini this morning thinking I could pull the front seat and perform the work/recover in the motel room.
The office manager came out. He felt I was up to something (I was), and asked that I not do any work on my car in the parking lot.
Glad I didn't even get as far as unplugging the battery yet alone having started pulling the seat...
#21
03-20-2024, 08:57 AM
EDIT: Scratch that.
I had the hood and hatch open on the Mini this morning thinking I could pull the front seat and perform the work/recover in the motel room.
The office manager came out. He felt I was up to something (I was), and asked that I not do any work on my car in the parking lot.
Glad I didn't even get as far as unplugging the battery yet alone having started pulling the seat...

#22
03-25-2024, 01:36 PM
Platinum Sponsor
Yep the top snap on and the bottom have that tab.
https://www.ecstuning.com/b-genuine-...h/52107131644/
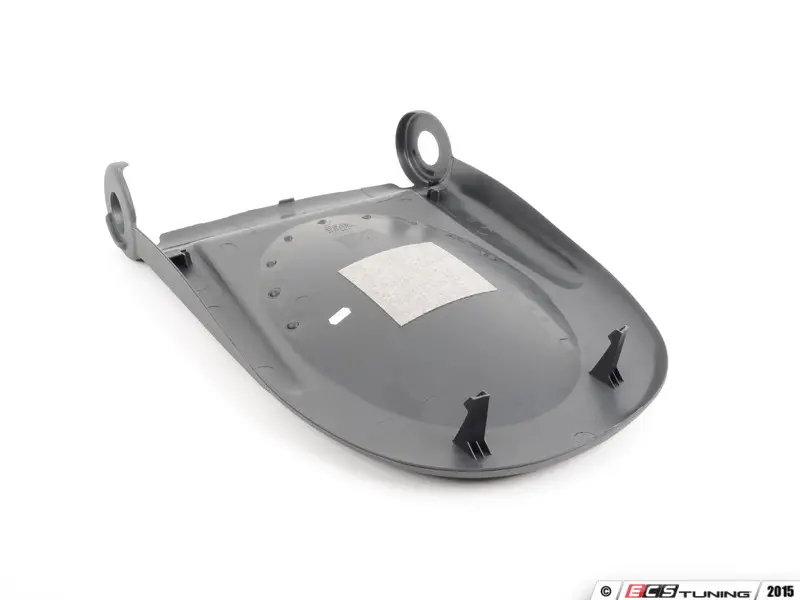
https://www.ecstuning.com/b-genuine-...t/52107124053/

https://www.northamericanmotoring.co...l-removal.html post # 3.
https://www.ecstuning.com/b-genuine-...h/52107131644/
https://www.ecstuning.com/b-genuine-...t/52107124053/
https://www.northamericanmotoring.co...l-removal.html post # 3.
__________________

MINI Guru/ MINI Owner Since 2004 | NEW Lifetime Part Replacement | Local Pickup
Milltek | Genuine MINI | Forge Motorsport | NM Engineering | ECS Performance | M7 Speed
Customer Service Hours: 8am-8pm EST|Sales Team Hours: 8am-11pm | SAT 10am-7pm 800.924.5172
MINI Guru/ MINI Owner Since 2004 | NEW Lifetime Part Replacement | Local Pickup
Milltek | Genuine MINI | Forge Motorsport | NM Engineering | ECS Performance | M7 Speed
Customer Service Hours: 8am-8pm EST|Sales Team Hours: 8am-11pm | SAT 10am-7pm 800.924.5172

Thread
Thread Starter
Forum
Replies
Last Post
F55/F56 Rear seat back removal anyone?
flyers47
F55/F56 :: Hatch Talk (2014+)
17
07-27-2020 02:38 PM
Interior/Exterior Seat and a-pillar cover removal instructions needed
chinarider
Interior/Exterior
1
06-28-2010 10:08 AM