Light trifecta: ABS, DSC, tire pressure
#76
 08-03-2011, 03:57 PM


6th Gear
Join Date: Jul 2008
Location: New Yawk
Posts: 17,379
Likes: 0
Received 0 Likes
on
0 Posts
My dilemma.. My ABS/Brake/DSC lights came on too.. Took it to the dealer today..Just heard back from them, the ABS control module is bad, an internal fault, meaning the electrical component failed. I have an 08 Clubman with 62K miles. Part Cost: 1165.00 (choke)
Labor: 1230. (double choke)
The dealer said that MINI will cover the part but NOT the labor. Does this sound excessive, should MINI cover the labor IF they're covering the part. The part failed. Please, can someone have this make more sense to me.. Thanks!!
Labor: 1230. (double choke)
The dealer said that MINI will cover the part but NOT the labor. Does this sound excessive, should MINI cover the labor IF they're covering the part. The part failed. Please, can someone have this make more sense to me.. Thanks!!
#77
08-03-2011, 07:41 PM

My dilemma.. My ABS/Brake/DSC lights came on too.. Took it to the dealer today..Just heard back from them, the ABS control module is bad, an internal fault, meaning the electrical component failed. I have an 08 Clubman with 62K miles. Part Cost: 1165.00 (choke)
Labor: 1230. (double choke)
The dealer said that MINI will cover the part but NOT the labor. Does this sound excessive, should MINI cover the labor IF they're covering the part. The part failed. Please, can someone have this make more sense to me.. Thanks!!
Labor: 1230. (double choke)
The dealer said that MINI will cover the part but NOT the labor. Does this sound excessive, should MINI cover the labor IF they're covering the part. The part failed. Please, can someone have this make more sense to me.. Thanks!!
#78
08-03-2011, 08:55 PM

#79
08-03-2011, 10:32 PM

2nd Gear
Join Date: Apr 2008
Location: Pittsburgh, Pa
Posts: 55
Likes: 0
Received 0 Likes
on
0 Posts
Ugh. The trifecta came on when I was pulling out of the parking lot at work last night.
If I shut off the vehicle and start it back up, only the ABS and DSC lights remain on. And if I am able to just drive straight, the ABS/DSC lights shut off. The moment I turn the steering wheel, the trifecta pops back on again.
In my case, it's the !@#$%^^& left front sensor AGAIN. Figured this one out by getting the lights to shut off as described above, then going out and shaking the ABS wires at each wheel. The lights reliably pop back on any time the wiring at the left front wheel is disturbed, and I've even got it narrowed down to the point where the loom is molded into the sensor itself...
#80
08-04-2011, 02:21 AM
6th Gear
Join Date: Jul 2008
Location: New Yawk
Posts: 17,379
Likes: 0
Received 0 Likes
on
0 Posts
I have 2 other dealers I can check with plus I also have an independant MINI certified tech that does work on my car when needed.. Awaiting his call.. will you keep you updated. Thanks guys, I appreciate it!
#81
05-31-2013, 11:23 AM

I found the part for $15 here: http://www.miparts.com/oem/34%2052%206%20756%20384
Is this a reliable online store?
Is this a reliable online store?
#82
06-25-2013, 12:21 PM
3rd Gear

#84
07-06-2013, 11:09 AM
3rd Gear
Ok just finished my test drive lights are off 
Thoughts to add
The left and right front sensors mount differently. the drivers side sensor wire mounts to the brake pad sensor wires (which have rubber clips attached ). they are easy to unclip and reclip pics below
Also it is clear that the mounting position left and right are different. The picture posted above in post 82 show the drivers side where the blue end of the cable sits in a white C-clip. On the belt side of the engine the blue end is held in by a zip tie attached to a gromit as posted above in the pics of this thread.
Don't be confused if you do both sides, sensors are the same they just mount differently.
The most challenging (difficult ) part of this procedure is actually getting the old sensor out of the hub carrier. By no means was removal easy. Pull straight up was not doing it.
My strategy was to use a vice grip along with two flat blade screw drivers to shimmy the sensor up. each side took 10-15 minutes. Insertion of the new sensor was far easier.
Have patients they will come out.
here is a good view of the sensor head in the hub carrier (located behind the disk at 12 noon)
great info here as always if it were not for removing the old sensors this would be easy smeary
#85
08-04-2013, 05:48 PM

I finally buckled down and made the time to address my own "trifecta problem" using advice from this great thread. Using only the jack that came with my 2004 S (just to affirm how uncomplicated the inspection was), I inspected individually both front, and one rear, sensor cables, hoping to find some obvious fraying or other damage. Found none, unfortunately. Decided to, similar to others on this thread, just go ahead and purchase two well-priced front sensors and go with the odds that the issue is one or both front sensors and hopefully be done with the issue by replacing both. One hassle that I encountered was removal of the plastic wheel shrouds that make accessing the full length of the sensor cable a bit awkward. I tried unscrewing the center of the plastic screw-clips, with a proper-sized Philips screwdriver, and the plastic heads easily and quickly stripped so badly that I could no longer turn them. What the heck?! Can I just yank these suckers out without the shroud being wobbly when I replace it? Is it possible to get replacement clips? Thanks to all for the pictures and advice.
#86
08-05-2013, 09:26 AM
I hate those stupid clips. I used some pliers to grab the screw head - most of them came out with a firm tug. Once you get the 'screw' part of the plastic clip, the remaining bit of the clip left in the fender should just pull right out. The shroud will be wobbly without these fasteners...but I was lucky enough that most of mine came out normally. The remaining ones held the shroud well enough to get me to the auto parts store and get replacements.
#87
08-05-2013, 09:32 AM
#88
08-05-2013, 12:55 PM
I just had a sample with me when I went to the parts store. They had a binder full of them and I just purchased the ones that most closely matched the original one. The replacements I picked up were of a better (IMHO) design - no screwdriver needed. Just pull on the center 'screw' part with pliers and they come right out. If memory serves, the ones I bought were labeled as "Honda" fasteners.
I just asked to see their selection of plastic body panel fasteners.
I just asked to see their selection of plastic body panel fasteners.
#90
08-16-2013, 10:09 AM
Just wanted to provide an update on what happened (good and bad) after I decided to work on this common problem by using this forum and a YouTube video. The overall message is that this is a situation that can be addressed by an owner with only moderate experience, skill and resources (such as myself).
First, the URL for the video that I watched:
. It was helpful, just as were the great photos provided in this thread.
Proceeding entirely on belief, based upon statements made in this thread, that the "trifecta" of warning lights would probably disappear if I were to replace one or both of the front wheel speed sensors, I purchased two of the sensors from "fast_parts2u" on Ebay at an amazing price of $16.39 each! Yeah, I know, this seemed too good to be true, and I prepared myself for the possibility that the goods would be worthless.
I jacked up the right-front end using just the jack that came with the car and a jack stand that I own. Out of impatience, I did not remove the plastic splash guard that obscures the inner attachment point of the sensor. I recommend, if you have the time, buying some replacement clips for the guard and then removing it. My attempts to remove the guards when I first investigated the problem started to mangle the inner (screw) part of the clips, and I believed that I would have to replace many of them, if I tried to remove the guards. So I just dealt with the awkwardness of working around them.
The space that you have to work in makes the job awkward, requiring that you hunch your back, stick your head in a hole (with fun surfaces to hit it on), and look at stuff that requires reading glasses for an old guy like me. A flashlight is needed. I recommend using a headlamp.
The bolt holding the sensor in place came out pretty easily with a 5mm allen key (using the long end) held tight and turned using vise grips. A ratchet with an extender and 5mm bit would have been better, but I had all of those things, except for the 5mm end/bit, so I improvised. After unsuccessfully trying to rock and wiggle the sensor up and out, using the same vise grips, I used a hammer to drive a short, standard screwdriver under the plastic sensor body. As I attempted to pry the plastic body up with the screwdriver, I eventually "succeeded" in breaking the plastic body in two and then snapping off the plastic at the very top of the sensor. This required that I use a drill (which did not fit easily into the space) to drill out the hole. I was not a happy boy. Mess from the drilling was sucked up with a shop vac. The other end of the sensor easily separated from its mate, even when working around the plastic guard. The new sensor had to be tapped in (gently) with a hammer and flat-end screwdriver (only short screwdrivers work in this space). Reattachment at the other end of the sensor was awkward, with the plastic shield in the way, and the fit of the new sensor end in its mate was so tight that I thought I may have had the wrong part. I used wire to pull the inside attachment junction and wires away from the pulley that has rubbed against others' sensor wires.
Replacing the right-front sensor did not solve the problem. Started to worry. Bad parts? Human error? Moved on to the left-front.
For the left-front, I tried a new sensor extraction technique: I secured large vise grips to the top of the sensor. Then I used a large flat-end screwdriver (end facing up, placed against the inside of the vise grips' adjustment screw) and hammer to tap with an upward motion, driving up the vise grips, and hopefully the sensor with it. It worked! No drill or F-bombs needed this time! The sensor did not go in as easily this time as did the front-right sensor. I had to lubricate it a bit and then tapped it in gently with screwdriver and hammer. Reattachment on the other end of the sensor was similarly awkward, as with the right-front (working around plastic shield and with a very tight-fitting electrical junction). I again used wire to secure wires away from the engine.
With front-left sensor (and wheel, etc.) replaced, I climbed in the car and started it. Just one light (low tire pressure) was off. Darn! Then drove the car for about 200 yards, and the remaining two lights went off and stayed off. Yes! Looks like the problem has been solved. Thanks to all who contributed to the thread. Hope this account helps someone.
First, the URL for the video that I watched:
Proceeding entirely on belief, based upon statements made in this thread, that the "trifecta" of warning lights would probably disappear if I were to replace one or both of the front wheel speed sensors, I purchased two of the sensors from "fast_parts2u" on Ebay at an amazing price of $16.39 each! Yeah, I know, this seemed too good to be true, and I prepared myself for the possibility that the goods would be worthless.
I jacked up the right-front end using just the jack that came with the car and a jack stand that I own. Out of impatience, I did not remove the plastic splash guard that obscures the inner attachment point of the sensor. I recommend, if you have the time, buying some replacement clips for the guard and then removing it. My attempts to remove the guards when I first investigated the problem started to mangle the inner (screw) part of the clips, and I believed that I would have to replace many of them, if I tried to remove the guards. So I just dealt with the awkwardness of working around them.
The space that you have to work in makes the job awkward, requiring that you hunch your back, stick your head in a hole (with fun surfaces to hit it on), and look at stuff that requires reading glasses for an old guy like me. A flashlight is needed. I recommend using a headlamp.
The bolt holding the sensor in place came out pretty easily with a 5mm allen key (using the long end) held tight and turned using vise grips. A ratchet with an extender and 5mm bit would have been better, but I had all of those things, except for the 5mm end/bit, so I improvised. After unsuccessfully trying to rock and wiggle the sensor up and out, using the same vise grips, I used a hammer to drive a short, standard screwdriver under the plastic sensor body. As I attempted to pry the plastic body up with the screwdriver, I eventually "succeeded" in breaking the plastic body in two and then snapping off the plastic at the very top of the sensor. This required that I use a drill (which did not fit easily into the space) to drill out the hole. I was not a happy boy. Mess from the drilling was sucked up with a shop vac. The other end of the sensor easily separated from its mate, even when working around the plastic guard. The new sensor had to be tapped in (gently) with a hammer and flat-end screwdriver (only short screwdrivers work in this space). Reattachment at the other end of the sensor was awkward, with the plastic shield in the way, and the fit of the new sensor end in its mate was so tight that I thought I may have had the wrong part. I used wire to pull the inside attachment junction and wires away from the pulley that has rubbed against others' sensor wires.
Replacing the right-front sensor did not solve the problem. Started to worry. Bad parts? Human error? Moved on to the left-front.
For the left-front, I tried a new sensor extraction technique: I secured large vise grips to the top of the sensor. Then I used a large flat-end screwdriver (end facing up, placed against the inside of the vise grips' adjustment screw) and hammer to tap with an upward motion, driving up the vise grips, and hopefully the sensor with it. It worked! No drill or F-bombs needed this time! The sensor did not go in as easily this time as did the front-right sensor. I had to lubricate it a bit and then tapped it in gently with screwdriver and hammer. Reattachment on the other end of the sensor was similarly awkward, as with the right-front (working around plastic shield and with a very tight-fitting electrical junction). I again used wire to secure wires away from the engine.
With front-left sensor (and wheel, etc.) replaced, I climbed in the car and started it. Just one light (low tire pressure) was off. Darn! Then drove the car for about 200 yards, and the remaining two lights went off and stayed off. Yes! Looks like the problem has been solved. Thanks to all who contributed to the thread. Hope this account helps someone.
The following users liked this post:
Teh_Burninator (11-26-2023)
#91
08-24-2013, 08:01 AM

#92
08-25-2013, 12:18 PM
Too good to be true? After a few days of experiencing no "trifecta", I took the car to a local place for a combo oil change/tire rotation. The next day, the low-tire-pressure light came on with a "bling!" and has been flashing ever since. Took note of the air pressure in each tire. Average was about 30psi, and the max the tires will take is 50psi, so I just inflated all to approx. 42psi and took the little darling for a short spin. Light still flashing. Cr$#! Now I will search for a thread that addresses just the flashing light.
#93
08-26-2013, 03:11 PM

I had the quad-fecta of warning lights due to a frayed sensor wire from rubbing the harmonic balancer. I just installed a $16.00 sensor from eBay. My low tire psi light went out for a minute or two and is now back on. I test drove the car for 5 minutes and the lights remained on. Shut off the car for 10 minutes and then test drove again, low tire light went off for a minute and then back on I addition to the ABS, Brake, and DSC
Perhaps it will still reset itself with a few more miles
For now I have a total of 6 lights when you add the SES and airbag light.
SES is on due to the evaporator trouble code. That's my next project.
Any suggestions on getting the lights to reset???
Perhaps it will still reset itself with a few more miles
For now I have a total of 6 lights when you add the SES and airbag light.
SES is on due to the evaporator trouble code. That's my next project.
Any suggestions on getting the lights to reset???
Last edited by JRhea; 08-26-2013 at 04:30 PM.
#94
02-02-2014, 11:24 AM


#95
05-04-2014, 01:24 PM

Fasteners
I finally buckled down and made the time to address my own "trifecta problem" using advice from this great thread. Using only the jack that came with my 2004 S (just to affirm how uncomplicated the inspection was), I inspected individually both front, and one rear, sensor cables, hoping to find some obvious fraying or other damage. Found none, unfortunately. Decided to, similar to others on this thread, just go ahead and purchase two well-priced front sensors and go with the odds that the issue is one or both front sensors and hopefully be done with the issue by replacing both. One hassle that I encountered was removal of the plastic wheel shrouds that make accessing the full length of the sensor cable a bit awkward. I tried unscrewing the center of the plastic screw-clips, with a proper-sized Philips screwdriver, and the plastic heads easily and quickly stripped so badly that I could no longer turn them. What the heck?! Can I just yank these suckers out without the shroud being wobbly when I replace it? Is it possible to get replacement clips? Thanks to all for the pictures and advice.
here's a link to replacement clips... http://parts.miniofsouthatlanta.com/...130702966.html
Last edited by hangupndrive; 05-04-2014 at 03:06 PM.
#96
05-13-2014, 06:11 PM
My dilemma.. My ABS/Brake/DSC lights came on too.. Took it to the dealer today..Just heard back from them, the ABS control module is bad, an internal fault, meaning the electrical component failed. I have an 08 Clubman with 62K miles. Part Cost: 1165.00 (choke)
Labor: 1230. (double choke)
The dealer said that MINI will cover the part but NOT the labor. Does this sound excessive, should MINI cover the labor IF they're covering the part. The part failed. Please, can someone have this make more sense to me.. Thanks!!
Labor: 1230. (double choke)
The dealer said that MINI will cover the part but NOT the labor. Does this sound excessive, should MINI cover the labor IF they're covering the part. The part failed. Please, can someone have this make more sense to me.. Thanks!!
 they told me they do one a month.... Can't complain too much after 125k miles but... My advice - don't steam clean the engine bay, be extra careful disconnecting the battery ... Mine arced a couple times as the leads tapped the battery post one - of these two may have torched my ASC ...
#97
06-07-2014, 10:30 AM

I have to replace ABS sensors too (thanks for all the info here). Priced around a bit
Mini Stealer - $175
NAPA - $155 (Pex)
Autopartsway.ca - $46 plus $19 shipping - also Pex (bought 2 so shipping works out to $9.50 each)
All prices plus tax. Something tells me someone is making a huge profit???
Mini Stealer - $175
NAPA - $155 (Pex)
Autopartsway.ca - $46 plus $19 shipping - also Pex (bought 2 so shipping works out to $9.50 each)
All prices plus tax. Something tells me someone is making a huge profit???


#99
02-01-2015, 12:06 PM

2nd Gear
Join Date: Dec 2014
Location: Canoe, BC
Posts: 56
Likes: 0
Received 0 Likes
on
0 Posts
Too good to be true? After a few days of experiencing no "trifecta", I took the car to a local place for a combo oil change/tire rotation. The next day, the low-tire-pressure light came on with a "bling!" and has been flashing ever since. Took note of the air pressure in each tire. Average was about 30psi, and the max the tires will take is 50psi, so I just inflated all to approx. 42psi and took the little darling for a short spin. Light still flashing. Cr$#! Now I will search for a thread that addresses just the flashing light.
#100
04-06-2016, 10:48 AM

Is this going to be on the front driver side tire or rear driver side tire?
I just hit several pot holes at once, and my traction control and tpms lights went on (no flashing) constant light. I have a 2003 mini cooper s (R53)
I just hit several pot holes at once, and my traction control and tpms lights went on (no flashing) constant light. I have a 2003 mini cooper s (R53)
As I mentioned earlier, I did the driver's side first (supposed to be the most common side to go bad), so I'll show it. This job was EXTREMELY easy. In fact, my dominant arm is broken, so I did the entire thing with a cast. I think anybody can do it... Nobody should have to pay a mechanic more than $50 in labor to do this.
First,
- Raise the front of the vehicle and support it safely.
- Remove the wheel (don't judge me on cleanliness of the car. It's the middle of winter here and I do drive my car)

- I then removed the entire inner plastic wheel shroud, although I've heard it's possible to do this job without removing the entire thing. As you can see, by removing the whole shroud you have a pretty open view of the sensor (which is about 18" long):

- Clip the tie wrap that is holding the BLUE sensor plug to the sub-frame and then unplug it. You can insert a new tie wrap right now, if you think you might forget later.
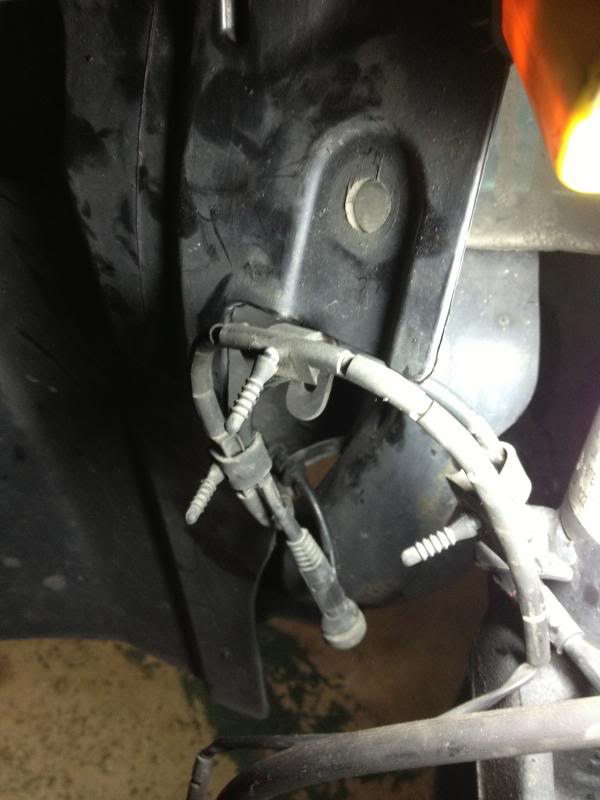
- Gently pull the wire out of the three retaining clips. One of them is hidden from view on the pic above (just behind the red sheet metal). If you pull down gently on the wire, it will come out. You can see that grommet in the pic below if you look where the wire is hanging down from behind the red sheet metal. The wire can then be removed from the other two retaining clips (one on sub-frame and one on the MacPherson Strut) by gently pushing a small flat blade screw driver between the wire grommet and the clip and prying it out, as shown below:


- The wire should now be free from all of the retaining clips as shown:

- Before proceeding to the next step, clean the top of the wheel bearing housing. Remove as much debris as possible to decrease the chances of dirt falling down into the sensor hole once the sensor is removed.
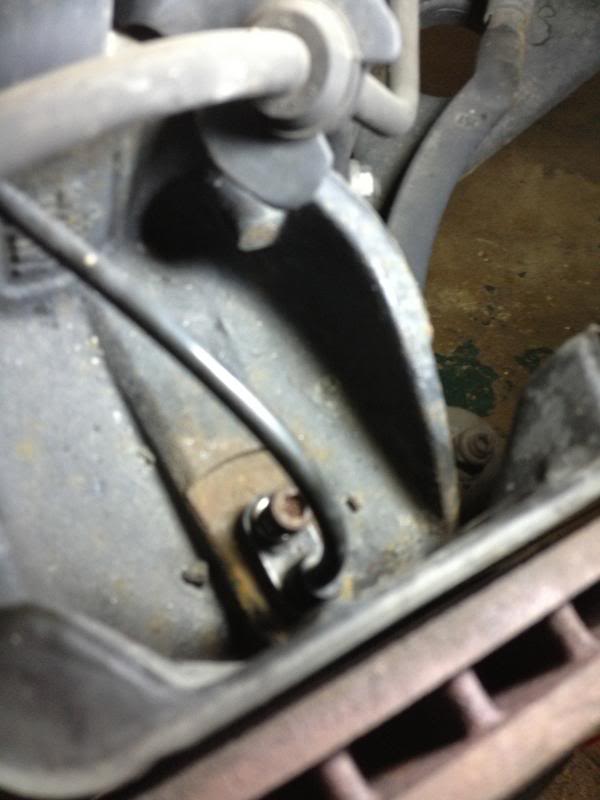
- Next, working at the top of the wheel bearing housing, remove the wheel speed sensor mounting screw. The first pic below, shows using an allen wrench to get to the screw. The second is a better view of the top of the wheel bearing housing and the screw itself.


- After removing the screw, gently pull straight up on the sensor to remove it from the wheel bearing housing.

- Clean the wheel speed sensor mounting pad and hole (on top of the wheel bearing housing). Apply a coating of grease or anti-seize compound.
- Installation is reverse of removal. A new tie wrap can be inserted into the retaining clip that holds the blue plug (orange in the pic below):

- Per Bentley manual, the screw that holds the wheel speed sensor to the wheel bearing housing is torqued to 8Nm (6 ft-lb)
- Prior to reinstalling the inner plastic wheel shroud, you might be able to convince one of your kids to come down and clean it for you...
Anyway, that's the write up. If nothing else, I hope it shows you just how easy this job is, so you'll do it yourself instead of paying somebody.
First,
- Raise the front of the vehicle and support it safely.
- Remove the wheel (don't judge me on cleanliness of the car. It's the middle of winter here and I do drive my car)
- I then removed the entire inner plastic wheel shroud, although I've heard it's possible to do this job without removing the entire thing. As you can see, by removing the whole shroud you have a pretty open view of the sensor (which is about 18" long):
- Clip the tie wrap that is holding the BLUE sensor plug to the sub-frame and then unplug it. You can insert a new tie wrap right now, if you think you might forget later.
- Gently pull the wire out of the three retaining clips. One of them is hidden from view on the pic above (just behind the red sheet metal). If you pull down gently on the wire, it will come out. You can see that grommet in the pic below if you look where the wire is hanging down from behind the red sheet metal. The wire can then be removed from the other two retaining clips (one on sub-frame and one on the MacPherson Strut) by gently pushing a small flat blade screw driver between the wire grommet and the clip and prying it out, as shown below:
- The wire should now be free from all of the retaining clips as shown:
- Before proceeding to the next step, clean the top of the wheel bearing housing. Remove as much debris as possible to decrease the chances of dirt falling down into the sensor hole once the sensor is removed.
- Next, working at the top of the wheel bearing housing, remove the wheel speed sensor mounting screw. The first pic below, shows using an allen wrench to get to the screw. The second is a better view of the top of the wheel bearing housing and the screw itself.
- After removing the screw, gently pull straight up on the sensor to remove it from the wheel bearing housing.
- Clean the wheel speed sensor mounting pad and hole (on top of the wheel bearing housing). Apply a coating of grease or anti-seize compound.
- Installation is reverse of removal. A new tie wrap can be inserted into the retaining clip that holds the blue plug (orange in the pic below):
- Per Bentley manual, the screw that holds the wheel speed sensor to the wheel bearing housing is torqued to 8Nm (6 ft-lb)
- Prior to reinstalling the inner plastic wheel shroud, you might be able to convince one of your kids to come down and clean it for you...
Anyway, that's the write up. If nothing else, I hope it shows you just how easy this job is, so you'll do it yourself instead of paying somebody.