Intermittent P0442
#1
 06-02-2008, 08:19 PM


Intermittent P0442
This has been intermittent since Dec. and I have to fix it for inspection.
Little or no internet information on any good Mini Fix.
This is what I've done so far:
Replaced the tank vent valve.
Made an additional gas cap gasket from gasket material for solid seal.
Removed extra gasket and greased gas cap o-ring gasket
Checked all plastic lines and connections for leaks
Removed leak detection pump with canister and examined for cracks
Cleaned pump filter
Reinstalled unit and cleared error; started engine: pump started up and ran for several minutes. Started to check plastic lines in engine compartment and pump started up again. Error 0442 was set. It didn't appear to be anything I did in engine bay. Reset error and it didn't come back, but it will.
I have AutoEnginuity laptop scan for Mini & BMW but it hasen't helped.
Parts are real expensive so I haven't mass swapped. Little old pump air filter was $60 and not stocked. A Delphi part made in Canada. I use a air compressor to clean it.
I have the Bentley manual, and it's not a complicated assy. I need to isolate the problem or if there's a known fix.
Thanks for any help.
JWC w/400 inj and other M7 upgrades.
#2
06-02-2008, 10:12 PM

6th Gear
Join Date: Feb 2007
Location: Washington. No, the other one.
Posts: 1,517
Likes: 0
Received 3 Likes
on
3 Posts
Good news/bad news:
Had the same problem and fought with it for months. Dealer no help, so I did some diagnostic thinking. Other than the gas cap (which I changed -no joy), there are really only two components that effect the system. The fuel tank vent valve on the right side of the engine and the diagnostic leak detection pump under the right rear fender liner.
Like you, I pulled them off and looked for cracks, etc. Nuthin'. So I pulled both and capped off the various connections. When I applied vacuum with my pump, it wouldn't hold. Leaked down from 10 in. of vac to 0 in a matter of seconds. The valve leaked down a little slower than the pump, but not by much.
Kept trying it, while using a stethescope to listen for leakage, and -whaddaya know?- both were leaking where the electrical connector plugged into the units.
Used a dremel tool to 'disassemble' the valve and discovered that the connection inside the unit is sealed by a pretty cheesy O ring, or not sealed in this case. When assembled, part of the inner housing is supposed to press against the little O ring and seal the unit vacuum tight.
The valve has to be cut open at the top where it is sealed (easy to see) with an X-acto knife and a dremel, but the pump has a snap on cap that can be pried off with a couple of very small screwdrivers.
Coated the O rings with dielectric grease. It was a pain in the a$$, but since it worked I don't care.
Reassembled the valve using a good epoxy. Snapped the cap back on the pump. This was a couple of months ago, and the problem has not returned.
Hope this helps.
Last edited by Ancient Mariner; 06-02-2008 at 10:48 PM.
The following users liked this post:
jmjgarrity (02-07-2020)
#3
06-03-2008, 08:52 AM
I used a vac tool to check the fuel vent tank valve and saw some leakage. Bought a new one for $36 (Delphi part) and the Vac held. Still had the error. Yesterday pulled the assy out of the rear tirewell. I started to take the top off the pump, saw the blue o-ring and 2 or 3 springs and was afraid to go any further least I ruin the pump. Based on your experience, I'll go back and grease the o-ring. I didn't want to buy a new pump if it still worked but I was getting desperate.
Thank you mucho! for your help . It's the first good solution I've come across.
Thank you mucho! for your help
. It's the first good solution I've come across.
#4
06-03-2008, 10:48 AM
6th Gear
Join Date: Feb 2007
Location: Washington. No, the other one.
Posts: 1,517
Likes: 0
Received 3 Likes
on
3 Posts
The pump is hard to damage. Don't worry too much about hurting it, it's a very simple unit. There are actually two o-rings; the large blue one that seals the top cap, and a (very) small blue one that seals the electrical connection. Mine was leaking at the electrical connection, although I did the 'belt and suspenders' thing and greased both. Hope this helps.
-skip-
-skip-
#5
06-03-2008, 10:58 AM
I just came back to check which end of the pump to work on. I did the top and will start the bottom. I'm not sure where that small o-ring is located. Do I open up the cap where you plug the cable wires, or is it the bottom where the pump resides. I don't want to pull any internal wires loose. The bottom half of the pump is proving to be a bear to unhook, how do you release all the retaining clips. I'll wait for your reply, Thanks.
I had to put it back together but before I reassembled it, I checked the vac nipple and it held at 21 in. Hg; knocked it around and it was stable, then ever so slowly started to bleed off. Later, drove it around and no error yet.
I had to put it back together but before I reassembled it, I checked the vac nipple and it held at 21 in. Hg; knocked it around and it was stable, then ever so slowly started to bleed off. Later, drove it around and no error yet.
Last edited by 67/327; 06-03-2008 at 08:20 PM.
#6
06-04-2008, 09:21 AM
If possible, would the Ancient Mariner give me a little more information on accessing the small o-ring. If I have to split the lower half of the pump, just how did you keep all the retaining hooks back far enough to break it apart. Or should I be accessing the smaller electrical compartment where the plug is inserted. Also, do think there might be a relay in that housing. Thanks.
Last edited by 67/327; 06-04-2008 at 01:33 PM.
#7
06-04-2008, 11:15 PM
6th Gear
Join Date: Feb 2007
Location: Washington. No, the other one.
Posts: 1,517
Likes: 0
Received 3 Likes
on
3 Posts
Sorry, been away.
I'll do the best I can from memory, so bear with me.
The disassembly was a pain -a few small screwdrivers to pry the clips down while at the same time pulling up on the cap to keep them from locking back again. I clamped the pump in a vise to hold it while I did it. Took three or four tries. If memory serves, everything is accesable once the top is off. Take your time with it, and keep track of where everything goes.
I honestly don't remember any complications once I got it apart, although getting the little o-ring to go back after I greased it was a little frustrating. That stuff (dielectric grease) is slippery, and the o-ring would try to climb back up out of it's seat. Tweezers did the trick.
Don't remember any relay inside the housing itself. Just the pump unit.
The whole unit is pretty simple
Trending Topics
#8
06-05-2008, 09:09 AM
I can see that your a busy contact on this form. That was just the information I needed. I had 4 small screwdrivers that kept popping out and decided there had to be another way; some type of shim to slip in the slot. Since the vac stayed pretty steady, I put the assy back and the check hasn't returned yet. I'll have another go at it if the error returns.
Thanks again.
TW
Thanks again.
TW
#10
03-02-2009, 09:08 AM

#11
03-05-2009, 06:22 AM

I am reviving this old thread, with the p0442 code on my 04 MCS. I have disassembled the pump, and lubed the top and bottom o-rings with gasket seal. I will vacuum test it before I put it back in, after giving it some time to seal up. Full pics from start to end will be posted.
Thanks.
#12
03-05-2009, 11:51 AM

#13
03-05-2009, 03:57 PM

Be careful with the smoke test, I believe its recommended to use nitrogen to pressurize the system so as not to create an oxygen rich environment; else sparks from the fuel pump could make the vehicle explode!
#15
04-06-2009, 12:02 PM
I have found my leak to be the gaskets around the fuel pump/fuel filter which I replaced in june of 08. I got the code two months later, and never suspected this repair to be my issue. After pulling the rear seat, the top of my tank seemed moist. One of my gaskets on the fuel pump side was kinked, causing my vapor leak. After replacing the seals with new ones (and lubed them this time with vaseline) I have had zero issues, and passed my NY inspection. I never even thought to lube them the first time, as I was stuck roadside in Georgia and needed to get running after my fuel pump was clogged, leaving me stranded otherwise. Note for the future: if you get this code, check parts of the fuel system you have/had serviced, even if it was so long ago you initially rule it out.
#16
04-22-2011, 06:46 AM

I am also getting a P0442 code.
I already replaced the vent valve and had no luck.
I took the pump out and greased the 2 o-rings mentioned, but I could not get the pump to split apart in the middle. It was too hard to get apart, and I wasn't sure if there was a seal there or not.
I'll post back if this fixes my problem.
I already replaced the vent valve and had no luck.
I took the pump out and greased the 2 o-rings mentioned, but I could not get the pump to split apart in the middle. It was too hard to get apart, and I wasn't sure if there was a seal there or not.
I'll post back if this fixes my problem.
#17
11-19-2012, 03:47 PM

Thanks!
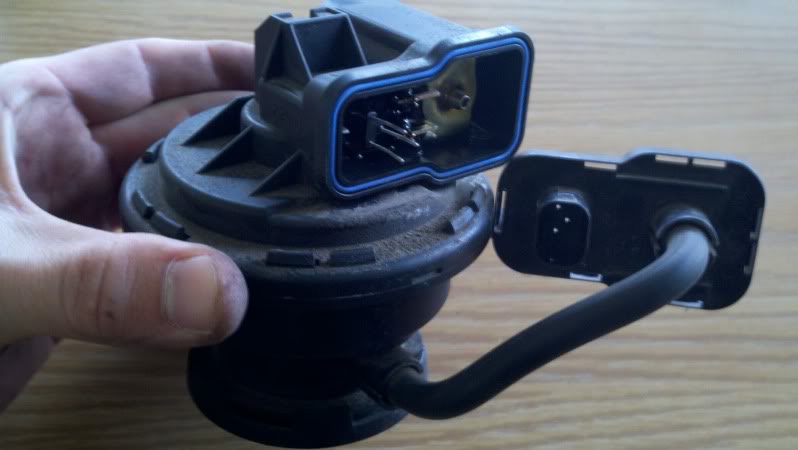
Thanks Mariner. I have an '02 Cooper S and had the P0442 code for some time. State inspection being due is what got me off my butt to go after the pump. I disassembled the pump in a few ways. In the picture above you can see the tabs by the guy's thumb. I popped them lose along with the end piece (bottom of pic). Instead of contact grease, I used blue glue (Permatex Blue RTV). I ran a bead around all of the o-rings and the large diaphram. For the small 3 pin connector with the cable, I didn't want to glue it, so I did use grease there. Re-assembled, reset check engine light with my CarChip and the light has stayed off for now. Got it inspected, so I'm good for two more years in Maryland. Great post. Thanks again!!
PS. I did not cut anything with a dremel or Xacto. Just the joints that are meant to come apart.
PS. I did not cut anything with a dremel or Xacto. Just the joints that are meant to come apart.
Last edited by hoodmeister; 11-19-2012 at 03:57 PM.
#18
12-16-2012, 05:01 AM

Neutral
Join Date: Dec 2012
Location: Wilkesboro NC
Posts: 1
Likes: 0
Received 0 Likes
on
0 Posts
I am also getting a P0442 code.
I already replaced the vent valve and had no luck.
I took the pump out and greased the 2 o-rings mentioned, but I could not get the pump to split apart in the middle. It was too hard to get apart, and I wasn't sure if there was a seal there or not.
I'll post back if this fixes my problem.

I already replaced the vent valve and had no luck.
I took the pump out and greased the 2 o-rings mentioned, but I could not get the pump to split apart in the middle. It was too hard to get apart, and I wasn't sure if there was a seal there or not.
I'll post back if this fixes my problem.
Thanks Mariner. I have an '02 Cooper S and had the P0442 code for some time. State inspection being due is what got me off my butt to go after the pump. I disassembled the pump in a few ways. In the picture above you can see the tabs by the guy's thumb. I popped them lose along with the end piece (bottom of pic). Instead of contact grease, I used blue glue (Permatex Blue RTV). I ran a bead around all of the o-rings and the large diaphram. For the small 3 pin connector with the cable, I didn't want to glue it, so I did use grease there. Re-assembled, reset check engine light with my CarChip and the light has stayed off for now. Got it inspected, so I'm good for two more years in Maryland. Great post. Thanks again!!
PS. I did not cut anything with a dremel or Xacto. Just the joints that are meant to come apart.
PS. I did not cut anything with a dremel or Xacto. Just the joints that are meant to come apart.
#19
11-01-2014, 05:08 PM

#20
06-07-2020, 11:38 AM

Added some super glue and silicone to seal the pin, and problem solved! Not sure if it will last forever, but worst case is I'll have to change the pump later.
thanks!
dan

Thread
Thread Starter
Forum
Replies
Last Post
embiggenedmini
R56 :: Hatch Talk (2007+)
11
10-15-2015 12:36 PM
asmasm
R50/R53 :: Hatch Talk (2002-2006)
5
09-21-2015 08:23 AM