How To Interior/Exterior :: Replace mirror covers (WITHOUT breaking the clips!)
#1
 04-04-2007, 06:00 PM

Interior/Exterior :: Replace mirror covers (WITHOUT breaking the clips!)
AUTHORS NOTE: If you have a 2nd Generation MINI (2008+ for the hard top, 2009+ for the cabrio), THE MIRRORS SEEM TO BE DIFFERENT on that car and are prone to breaking if you use this technique. This post is in "1st Gen MINIs" for a reason! Some people have reported success in using this technique on 2nd Gen MINIs, but be warned tha tthe mirror glass seems to be attached with firmer clips on that model, and this technique may lead to broken glass. if you have a 1st Gen MINI (2002-2007 for hard top, 2008 for cabrio) then this is the thread for you!) OK, on to the technique:
I've read all the other How-To's out there that talk about using a dental tool, screwdriver or other tool to remove the mirror covers... Usually one breaks one or more of the very fragile plastic securing clips in the process.
So I tried it that way. 25 minutes later I still hadn't got the first cover off. I'd release one clip only to have it pop back on when I released a second. I'd already broken one clip and another one was making ominous cracking noises. Much cursing ensued. I was not a happy camper.
Then, quite by accident, I hit on the correct way to swap out the covers - you have to remove the mirror! Following this process is not only much faster than any other method (you can have the covers off and replaced in less than 5 minutes) but also guarantees that you will not break any of the clips!
Tools:
Your hands
Towel
That's it. Seriously.
Process:
1. Spread the towel on the floor under the mirror. This way if the cap pops off and falls to the ground, it won't scratch.
2. Push the upper edge of the mirror in all the way.
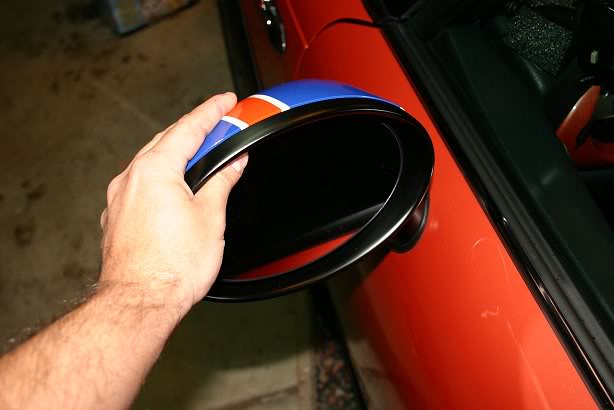
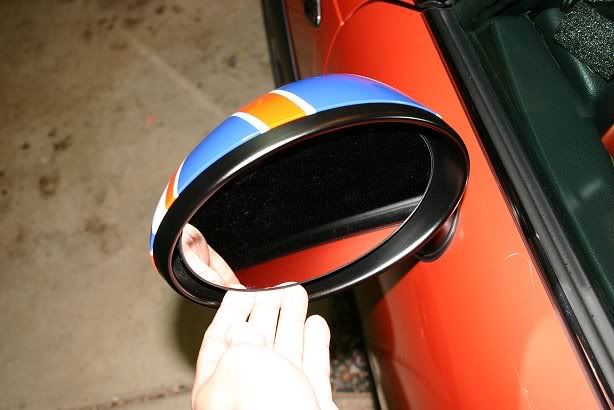
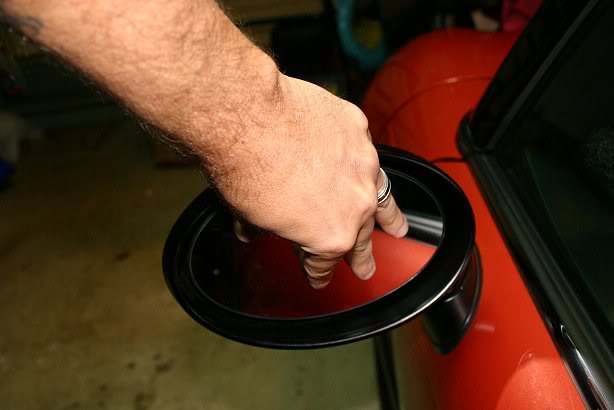
3. Hook your fingertips under the lower edge of the mirror and pull outwards. You'll feel the clips securing the mirror pop free. Let the mirror dangle from the wires - there's no need to disconnect it.
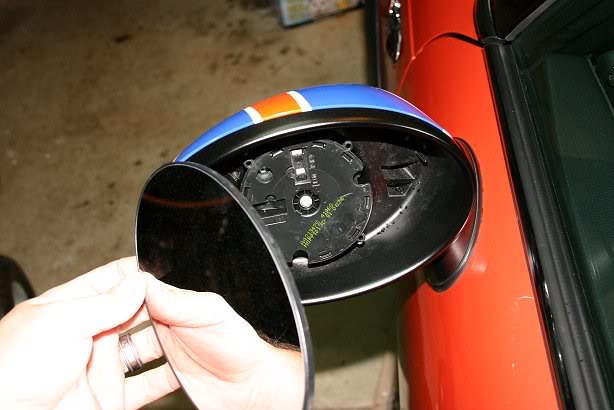
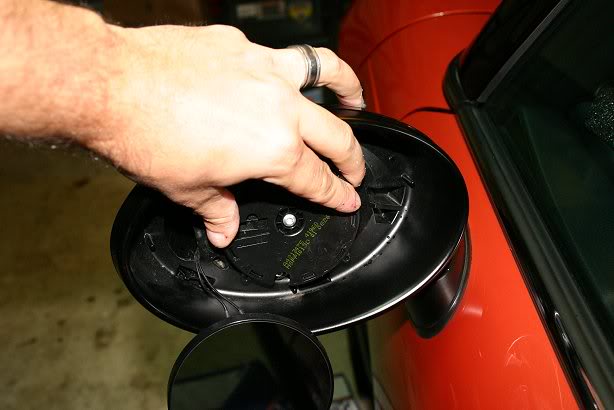
4. Here's a shot of the circular "puck" that the mirror clips to - this is the thing that moves when you adjust your mirror. You'll see a matching ring of clips on the back surface of the mirror glass. the clips are quite durable and will bend, not break. I've also pointed out the 5 securing clips that hold the mirror cover to the frame.
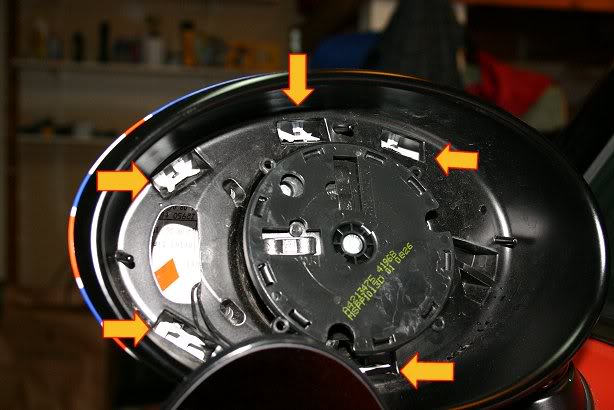
5. Using two fingers, release the clips. I find it easier to free the two bottom clips first, then push upwards on the three clips on top. Be careful- the cap can pop free unexpectedly (but hey, that's why you spread a towel on the floor - you DID follow step #1, right?) The old cover is now free. NOTE: If you can't get your fingers into the clips, feel free to use a butter knife or any flat tool to lift them. Be careful if you use a tool - it's hard to break the clips with just your fingers, but if you use a metal tool you can apply too much force. The clips are obviously designed to be removed with two fingertips.
6. Press the new cover to the frame. Check to see that all 5 clips are engaged.

7. Re-center the "puck" with your fingers.
8. Press the glass straight back onto the "puck". Wiggle it a bit and you'll feel it "snick" back into place.
That's it! You replaced your mirror covers and didn't break any of the clips in the process! Give yourself a big pat on the back and enjoy your car's new look!
I've read all the other How-To's out there that talk about using a dental tool, screwdriver or other tool to remove the mirror covers... Usually one breaks one or more of the very fragile plastic securing clips in the process.
So I tried it that way. 25 minutes later I still hadn't got the first cover off. I'd release one clip only to have it pop back on when I released a second. I'd already broken one clip and another one was making ominous cracking noises. Much cursing ensued. I was not a happy camper.
Then, quite by accident, I hit on the correct way to swap out the covers - you have to remove the mirror! Following this process is not only much faster than any other method (you can have the covers off and replaced in less than 5 minutes) but also guarantees that you will not break any of the clips!
Tools:
Your hands
Towel
That's it. Seriously.
Process:
1. Spread the towel on the floor under the mirror. This way if the cap pops off and falls to the ground, it won't scratch.
2. Push the upper edge of the mirror in all the way.
3. Hook your fingertips under the lower edge of the mirror and pull outwards. You'll feel the clips securing the mirror pop free. Let the mirror dangle from the wires - there's no need to disconnect it.
4. Here's a shot of the circular "puck" that the mirror clips to - this is the thing that moves when you adjust your mirror. You'll see a matching ring of clips on the back surface of the mirror glass. the clips are quite durable and will bend, not break. I've also pointed out the 5 securing clips that hold the mirror cover to the frame.
5. Using two fingers, release the clips. I find it easier to free the two bottom clips first, then push upwards on the three clips on top. Be careful- the cap can pop free unexpectedly (but hey, that's why you spread a towel on the floor - you DID follow step #1, right?)
The old cover is now free. NOTE: If you can't get your fingers into the clips, feel free to use a butter knife or any flat tool to lift them. Be careful if you use a tool - it's hard to break the clips with just your fingers, but if you use a metal tool you can apply too much force. The clips are obviously designed to be removed with two fingertips.6. Press the new cover to the frame. Check to see that all 5 clips are engaged.
7. Re-center the "puck" with your fingers.
8. Press the glass straight back onto the "puck". Wiggle it a bit and you'll feel it "snick" back into place.
That's it! You replaced your mirror covers and didn't break any of the clips in the process! Give yourself a big pat on the back and enjoy your car's new look!
Last edited by ImagoX; 09-05-2009 at 02:39 PM.


#5
04-04-2007, 10:18 PM

So I spent thirty minutes carefully prying the mirror off of the 'puck' (aka power mirror actuator) when all I needed to do was tug?:impatient
I'll be curious to see if there are any mirror clip failures. (hopefully not!)
Note that ImagoX shows a heated mirror (with the two black wires on the outside edge) non CWP cars may not have these.
Nice job, Matt!
I'll be curious to see if there are any mirror clip failures. (hopefully not!)
Note that ImagoX shows a heated mirror (with the two black wires on the outside edge) non CWP cars may not have these.
Nice job, Matt!

#7
04-04-2007, 10:29 PM

Trending Topics

#9
04-05-2007, 06:40 AM
Yep - I feel your pain. Hopefully the next time will be easier on you. Glad this was helpful.
#10
04-05-2007, 07:14 AM


#11
04-05-2007, 07:21 AM

2nd Gear
Join Date: Jan 2007
Location: Ft Polk, LA
Posts: 149
Likes: 0
Received 0 Likes
on
0 Posts
Pulling from the bottom of the mirror is important I've seen someone removing it by pushing the inside all the way in an pulling on the outside. the mirror flexed and shattered. I guess there is too much glass between the outside edge and the clips.
Ill definately be passing on this technique
Ill definately be passing on this technique
#12
04-05-2007, 07:24 AM
I actually removed the mirror by accident the first time - I was pulling on the lower edge to try to get a bit more clearance for my tool and it just popped free! Freaked me out, let me tell you. 
After seeing how it was secured, it was obvious that the engineers designed the glass to simply pop free when the proper pressure was applied.
After seeing how it was secured, it was obvious that the engineers designed the glass to simply pop free when the proper pressure was applied.
#13
04-05-2007, 07:44 AM

Matt - excellent write-up and photos, thanks!
The mirrors are actually very easy to pop off and on. I did this when I installed my Convex Mirrors so I could caulk them with silicone. I also don't think it matters which wires plug in to the two receptacles for those of you with heated mirrors. I was careful to plug them in the way they came out, but unless someone has any other thoughts I don't think it matters.
The mirrors are actually very easy to pop off and on. I did this when I installed my Convex Mirrors so I could caulk them with silicone. I also don't think it matters which wires plug in to the two receptacles for those of you with heated mirrors. I was careful to plug them in the way they came out, but unless someone has any other thoughts I don't think it matters.
#14
04-05-2007, 08:54 AM

5th Gear
Join Date: Nov 2006
Location: Union, NJ
Posts: 839
Likes: 0
Received 0 Likes
on
0 Posts
#15
04-05-2007, 01:16 PM
Former Vendor
Join Date: Dec 2002
Location: Olympia, WA
Posts: 1,026
Likes: 0
Received 0 Likes
on
0 Posts
#16
04-05-2007, 01:28 PM
I took a pic but forgot to put it online - I'll do it later. the Union Jack covers were fun, but a bit too "busy" for everyday use. The new black ones look fantastic - very agressive IMHO. totally completes the look of the car, I think. I love that I can simply take tmy more "fun" covers with me to places like MINI meets and the Dragon and just swap them out in minutes - it's like changing the car's hat or something for a slightly different look.
#17
04-05-2007, 01:32 PM
I've had my mirrors off 4 times now and so far they look as good now as they did the first time. That's probably more than most people will ever have them off. Given the plastic they used for the actual glass clips (which is that rubbery, flexible stuff - not the brittle kind used on the mirror cover clips) I'd be comfortable pulling them off a dozen more times.
This method makes sense - it's got to come off somehow, and the 'prying the clips from the back' method was JCW (crap.)

Matt is my hero!

#19
04-22-2007, 02:59 PM

There is another way--quick, easy, and you don't have to remove the mirror...This is an old post of mine from the Mini2 forums:
http://www.mini2.com/forum/faq.php?f...ng_mirror_caps
The first part of the faq is good--you do want to put the mirror down, at start at the clip closest to the window. But doing these one clip at a time is darned near impossible. Instead, get three old butter knifes for the top clips (you don't have to worry about the bottom two clips). Slide the first butter knife through the gap in the mirror underneath the first clip, slide it in underneath the clip until the clip is elevated. Repeat for the remaining two top clips (The knives will stay in place once they're in properly). Pull off the cap (It will release fairly easily with a good tug now; if it's not releasing easily, push down gently on the three knives and it should slide off--again, you don't have to do anything with the bottom clips).
Done, and it takes literally a minute to do, and you don't have to worry about dropping the cap on the floor.
I think it's probably a safer way to do it too, as very little torque is required to pop the cap off doing this (I was concerned I was going to scratch the edge of the mirror doing it the faq way). I struggled with the method in the FAQ for about ten minutes, which I couldn't get to work for me. Since it was only supposed to take ten minutes, I figured it was time to give up and try something else.
Don't know if this will ever be of any use to anyone, but this is a much quicker and easier way than the faq, at least for my mechanically disinclined self!
Last edited by cct1; 04-22-2007 at 03:05 PM.

#21
04-24-2007, 08:51 PM
Man that's the most helpful advice I've used from NAM yet. My mirror popped off a while back when the door was slammed (4 yr old daughter ) and when I re-attached it it was upside down (it may look symmetrical but trust me it's not). The gap at the top was a little wider than before. I tried in vain for an hour or so trying to get to the clips to bend them open to no avail and finally gave up. After seeing this method I went out to the garage and bam- off in 15 seconds and reattached correctly. Thanks much ImagoX .
) and when I re-attached it it was upside down (it may look symmetrical but trust me it's not). The gap at the top was a little wider than before. I tried in vain for an hour or so trying to get to the clips to bend them open to no avail and finally gave up. After seeing this method I went out to the garage and bam- off in 15 seconds and reattached correctly. Thanks much ImagoX .
#23
05-15-2007, 11:33 AM

Thanks so much for this thread ImagoX!
I went down to Irvine Mini this morning and bought my caps. After reading your thread, 10 minutes later and I was done. I would have had no idea how to install these and of course the dealer didn't know but said they'd do it for me, for a price. They said it is very difficult. Ha!

Next up, the checkered side panel decals for the turn signal area.
I went down to Irvine Mini this morning and bought my caps. After reading your thread, 10 minutes later and I was done. I would have had no idea how to install these and of course the dealer didn't know but said they'd do it for me, for a price. They said it is very difficult. Ha!
Next up, the checkered side panel decals for the turn signal area.
Last edited by RonP; 05-15-2007 at 02:26 PM.

