
R56 Removing OEM shift knob


#4
 03-31-2015, 10:36 AM

#7
03-31-2015, 11:11 AM
Don't forget keep your face, and other sensitive body parts out of the way 
If you wiggle/twist the shift **** while using increasing force, you should be able to feel it start to release, then you can start backing off and it should come off without any drama. Brute force is definitely not recommended.
If you wiggle/twist the shift **** while using increasing force, you should be able to feel it start to release, then you can start backing off and it should come off without any drama. Brute force is definitely not recommended.
Trending Topics
#8
04-01-2015, 05:49 AM

Platinum Sponsor
Yea, pull up, if you have a sunroof , open it so you don't pull up and hit it. Two hands will be needed.
Also watch you face, so you dont punch yourself.
Also watch you face, so you dont punch yourself.
__________________

MINI Guru/ MINI Owner Since 2004 | NEW Lifetime Part Replacement | Local Pickup
Milltek | Genuine MINI | Forge Motorsport | NM Engineering | ECS Performance | M7 Speed
Customer Service Hours: 8am-8pm EST|Sales Team Hours: 8am-11pm | SAT 10am-7pm 800.924.5172
MINI Guru/ MINI Owner Since 2004 | NEW Lifetime Part Replacement | Local Pickup
Milltek | Genuine MINI | Forge Motorsport | NM Engineering | ECS Performance | M7 Speed
Customer Service Hours: 8am-8pm EST|Sales Team Hours: 8am-11pm | SAT 10am-7pm 800.924.5172
#10
04-01-2015, 08:29 AM
#11
04-01-2015, 01:15 PM

6th Gear

#13
04-02-2015, 03:31 PM

#14
04-20-2015, 03:30 PM

4th Gear
I just replaced my stock 2012 shift boot and shift ****. I'll list a couple of tips.
1) I used a very slim nylon trim lever to slip own inside the silver trim ring that holds the bottom of the leather boot onto the surrounding console. There are clips that secure the ring into the console. I was very slow and methodical and the ring worked out well.
2) Once the bottom of the shift boot was released from the console, I positioned my self over the gear shift **** and pulled straight up and the **** came loose with the shift boot.
3) Once the shift **** and boot were released I worked at removing the shift ****. The shift boot is held in place by two interlocking plastic rings at the base and one black plastic ring at the top of the shift boot. The top ring is secured to the inside lining of the shift boot. The gear shift **** slips down into the shift boot and top ring and is held in place by four beveled prongs on the gear shift ****. Using a flat screw driver covered with electric tape I worked on levering the gear shift **** tabs, working slowly until they were able to free away from the shift boot and plastic ring. The shift **** eventually slid off.
4) I slipped the new JCW gear shift **** into the top of the shift boot and plastic trim ring. I then slid the assembled shift boot and **** over the gear stick. I firmly pushed the **** down onto the gear stick. Once the **** was secured I slowly and gently pressed the bottom shift boot trim ring back into the console.

#16
04-21-2015, 10:41 AM
Platinum Sponsor
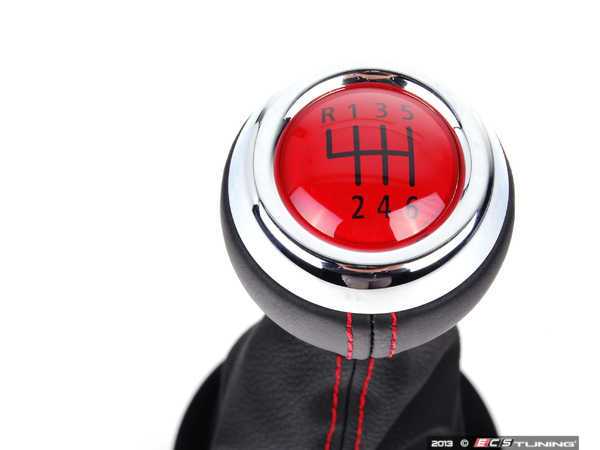
That's the JCW shift **** ( regular one ): Its has the Red double H pattern.
JCW Gear Shift **** 6 Speed - Leather / Red / Chrome Part # 25117607582
http://www.ecstuning.com/Search/SiteSearch/25117607582/
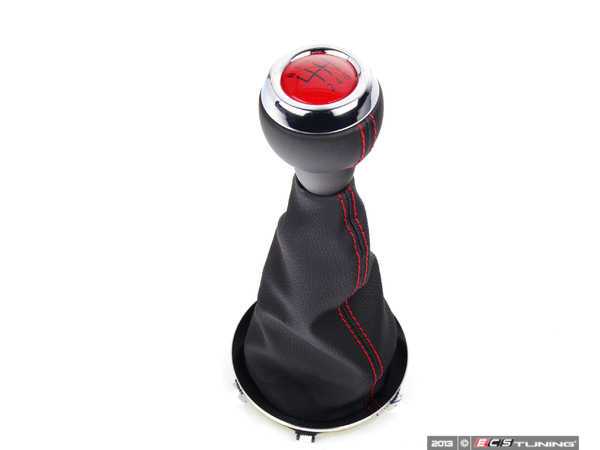
Or you could change it up with the JCW GP 2 Shift ****. Same adapter and fit. First un-clip the boot / base ring ( see pics ). Use a plastic card and work it around till it pops out , then grab the **** with both hand , (watch the glass sunroof if you have it) ; Don't pull towards your face. Then pull up , it will be on there tight.
Repeat and reverse for install.
JCW GP 2 Shift **** W/ Boot - Black / Red Part # 25117638583
http://www.ecstuning.com/Search/SiteSearch/25117638583/ES2607800/
Thanks
JCW Gear Shift **** 6 Speed - Leather / Red / Chrome Part # 25117607582
http://www.ecstuning.com/Search/SiteSearch/25117607582/
Or you could change it up with the JCW GP 2 Shift ****. Same adapter and fit. First un-clip the boot / base ring ( see pics ). Use a plastic card and work it around till it pops out , then grab the **** with both hand , (watch the glass sunroof if you have it) ; Don't pull towards your face. Then pull up , it will be on there tight.
Repeat and reverse for install.
JCW GP 2 Shift **** W/ Boot - Black / Red Part # 25117638583
http://www.ecstuning.com/Search/SiteSearch/25117638583/ES2607800/
Thanks
__________________
MINI Guru/ MINI Owner Since 2004 | NEW Lifetime Part Replacement | Local Pickup
Milltek | Genuine MINI | Forge Motorsport | NM Engineering | ECS Performance | M7 Speed
Customer Service Hours: 8am-8pm EST|Sales Team Hours: 8am-11pm | SAT 10am-7pm 800.924.5172
MINI Guru/ MINI Owner Since 2004 | NEW Lifetime Part Replacement | Local Pickup
Milltek | Genuine MINI | Forge Motorsport | NM Engineering | ECS Performance | M7 Speed
Customer Service Hours: 8am-8pm EST|Sales Team Hours: 8am-11pm | SAT 10am-7pm 800.924.5172
#17
04-21-2015, 11:40 AM
That's the JCW shift **** ( regular one ): Its has the Red double H pattern.
JCW Gear Shift **** 6 Speed - Leather / Red / Chrome Part # 25117607582
http://www.ecstuning.com/Search/SiteSearch/25117607582/
Or you could change it up with the JCW GP 2 Shift ****. Same adapter and fit. First un-clip the boot / base ring ( see pics ). Use a plastic card and work it around till it pops out , then grab the **** with both hand , (watch the glass sunroof if you have it) ; Don't pull towards your face. Then pull up , it will be on there tight.
Repeat and reverse for install.
JCW GP 2 Shift **** W/ Boot - Black / Red Part # 25117638583
http://www.ecstuning.com/Search/SiteSearch/25117638583/ES2607800/
Thanks

#18
04-21-2015, 11:45 AM
Platinum Sponsor
Welcome. 
__________________
MINI Guru/ MINI Owner Since 2004 | NEW Lifetime Part Replacement | Local Pickup
Milltek | Genuine MINI | Forge Motorsport | NM Engineering | ECS Performance | M7 Speed
Customer Service Hours: 8am-8pm EST|Sales Team Hours: 8am-11pm | SAT 10am-7pm 800.924.5172
MINI Guru/ MINI Owner Since 2004 | NEW Lifetime Part Replacement | Local Pickup
Milltek | Genuine MINI | Forge Motorsport | NM Engineering | ECS Performance | M7 Speed
Customer Service Hours: 8am-8pm EST|Sales Team Hours: 8am-11pm | SAT 10am-7pm 800.924.5172
#19
05-05-2015, 07:27 PM
I have an used JCW shift **** (regular one, black base with red letters) in my hands!
It is OK, as new, with the white tab OK and the two black rings on it OK.

When trying to remove the OEM shift **** ... it was very very very very very easy. No brutal force. No force! Easier than changing the antenna!
May be that it was not never fully pressed. Maybe luck? Yes, may be.
Now, I have the OEM shift **** supported only by the black leather:
What is the correct way to remove the OEM shift **** from this point to install the new one without cutting the leather?
I could read something related to separate the two black rings and then separate the lower ring from the white tabs ...

It is OK, as new, with the white tab OK and the two black rings on it OK.
When trying to remove the OEM shift **** ...
it was very very very very very easy. No brutal force. No force! Easier than changing the antenna!May be that it was not never fully pressed. Maybe luck? Yes, may be.
Now, I have the OEM shift **** supported only by the black leather:
What is the correct way to remove the OEM shift **** from this point to install the new one without cutting the leather?
I could read something related to separate the two black rings and then separate the lower ring from the white tabs ...
#20
05-05-2015, 07:32 PM
I have an used JCW shift **** (regular one, black base with red letters) in my hands!
It is OK, as new, with the white tab OK and the two black rings on it OK.
When trying to remove the OEM shift **** ... it was very very very very very easy. No brutal force. No force! Easier than changing the antenna!
May be that it was not never fully pressed. Maybe luck? Yes, may be.
Now, I have the OEM shift **** supported only by the black leather:
What is the correct way to remove the OEM shift **** from this point to install the new one without cutting the leather?
I could read something related to separate the two black rings and then separate the lower ring from the white tabs ...
It is OK, as new, with the white tab OK and the two black rings on it OK.
When trying to remove the OEM shift **** ...
it was very very very very very easy. No brutal force. No force! Easier than changing the antenna!May be that it was not never fully pressed. Maybe luck? Yes, may be.
Now, I have the OEM shift **** supported only by the black leather:
What is the correct way to remove the OEM shift **** from this point to install the new one without cutting the leather?
I could read something related to separate the two black rings and then separate the lower ring from the white tabs ...
I'm not sure how you're looking at the boot/**** but it's easiest to do when it is inside out (that's where you'll see those 4 white tabs.
Hope that helps.
#21
05-06-2015, 03:54 AM
4th Gear
The shift boot has two rings on its bottom that clip together and into the console. Be careful on removing this as it is easy to break the clips. Once the shift boot is removed you can gain access to the how the shift **** plugs into the plastic ring at the top of the shift boot. Once it is removed you will see how it is joined.
I gently used a thin screwdriver from underneath to gently pry the OEM shift **** loose from the ring it connects into. My OEM also looked like it had a small bit of adhesive that once broke free the **** was able to slip up and out of the shift boot/underneath trim ring at the top.
Hope that helps too.
#22
05-06-2015, 05:56 AM
Platinum Sponsor
+1 on install of the clips.
Here is the boot.:
http://www.ecstuning.com/News/MINI_Cooper_S_Coupe_Clubman_Convertible_Roadster_J CW_R55_Through_R59_GP2_Shift_Knob_2007_2008_2009_2 010_2011_2012_2013_2014/

Now you can see those taps on the bottom.
Here is the boot.:
http://www.ecstuning.com/News/MINI_Cooper_S_Coupe_Clubman_Convertible_Roadster_J CW_R55_Through_R59_GP2_Shift_Knob_2007_2008_2009_2 010_2011_2012_2013_2014/
Now you can see those taps on the bottom.
__________________
MINI Guru/ MINI Owner Since 2004 | NEW Lifetime Part Replacement | Local Pickup
Milltek | Genuine MINI | Forge Motorsport | NM Engineering | ECS Performance | M7 Speed
Customer Service Hours: 8am-8pm EST|Sales Team Hours: 8am-11pm | SAT 10am-7pm 800.924.5172
MINI Guru/ MINI Owner Since 2004 | NEW Lifetime Part Replacement | Local Pickup
Milltek | Genuine MINI | Forge Motorsport | NM Engineering | ECS Performance | M7 Speed
Customer Service Hours: 8am-8pm EST|Sales Team Hours: 8am-11pm | SAT 10am-7pm 800.924.5172
#23
05-06-2015, 06:09 AM
The white tabs (should be 4 of them) need to be pressed inward to slip the old **** out from the boot. The new **** should go in the same way and is much easier to get in than it is to get the old one out.
I'm not sure how you're looking at the boot/**** but it's easiest to do when it is inside out (that's where you'll see those 4 white tabs.
Hope that helps.
I'm not sure how you're looking at the boot/**** but it's easiest to do when it is inside out (that's where you'll see those 4 white tabs.
Hope that helps.
Thank you for your comment and yes, there is 4 white tabs.
Since I have the 2 black rings on the "new" shift ****, I'm trying to separate the lower black ring from the 4 white tab. It is not easy, it seems the tabs are very very very strong (not flexible)
I don't want to break the lower ring nor any of the withe tabs!

It seems to do it, I will need brute force in this case.
For OEM shift **** I believe is the same way that separating the lower black ring on the "new" shift **** BUT the task should be done under the leather.
It seems the problem is the non flexible white tabs.


Last edited by miniuy; 05-06-2015 at 07:31 AM.
#24
05-06-2015, 06:25 AM
The shift boot has two rings on its bottom that clip together and into the console. Be careful on removing this as it is easy to break the clips. Once the shift boot is removed you can gain access to the how the shift **** plugs into the plastic ring at the top of the shift boot. Once it is removed you will see how it is joined.
I gently used a thin screwdriver from underneath to gently pry the OEM shift **** loose from the ring it connects into. My OEM also looked like it had a small bit of adhesive that once broke free the **** was able to slip up and out of the shift boot/underneath trim ring at the top.
Hope that helps too.
I gently used a thin screwdriver from underneath to gently pry the OEM shift **** loose from the ring it connects into. My OEM also looked like it had a small bit of adhesive that once broke free the **** was able to slip up and out of the shift boot/underneath trim ring at the top.
Hope that helps too.
Thank your for you clear explanation!
My situation is exactly as you are saying. The shift **** is out, and now just "attached" to the leather. It was not necessary to remove the gear shift base.
BUT, I'm playing with the "new" shift **** (the lower ring) in my hands and I can't remove the lower black ring from the white tabs. It seems the white tabs were done in very very strong plastic and it is not possible press the tabs (is like trying to press a metalic stuff).
I think I need to remove the lower black ring on the "new" shift **** and then, insert the white tabs in the old lower black ring and then put the shift **** on it original position (by pressing it hardly).
My main fear: to break the lower black ring and/or one white tab (or all the white tabs!). I could break both things in both cases (OEM and "new" shift **** black rings and white tabs).
#25
05-06-2015, 06:28 AM