When you click on links to various merchants on this site and make a purchase, this can result in this site earning a commission. Affiliate programs and affiliations include, but are not limited to, the eBay Partner Network.
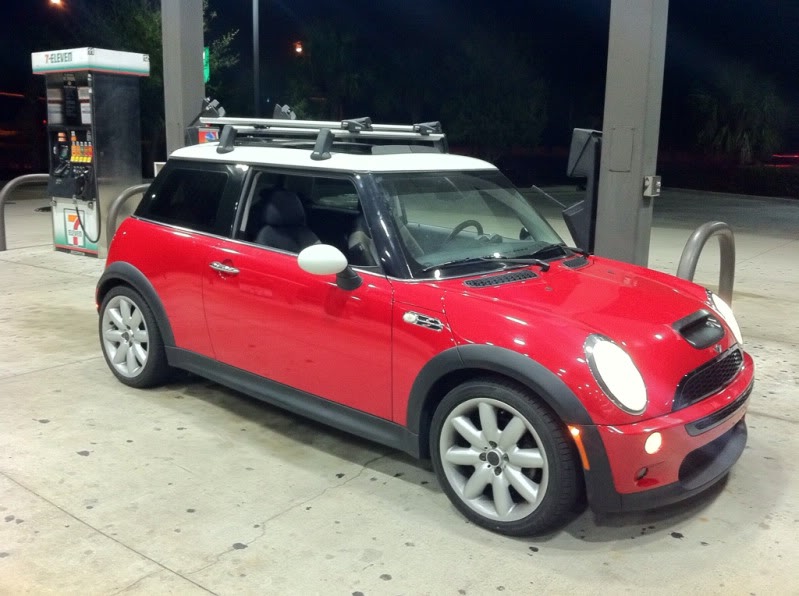
i believe that the roof has to be drilled to install the R53 factory roof racks (please confirm). if that is the case, i wouldn't feel confident doing it myself, and would just have the dealer or outside vendor (eg. Rack-n-Road) to do it.
So I got a Mini roof rack but I'm not sure if I want to drill the holes myself... It comes with papers that show where to drill but how do you know exactly where to put the paper on the roof?
thinking of Thule racks? I've got them on my R50 and they work perfect. much better alternative then paying over a grand for factory racks. let me know if I can help in any way
My '05 MCS has the factory roof rack mounts on it already. They're covered by these little slide on plastic caps. I actually got an OEM factory rack for xmas two years ago. I put the rack on in preparation for my trip last summer to Mini Meet West up in British Columbia, Canada. I ran with it for a while but didn't like the amount of noise it creates so I took it back off and put the covers back on the mounts.
I'm located up in the north bay (Novato) and run with the Shasta Minis - Bay Area Group.
I can take some pics of my mounts if that would help you...
So I just installed the roof rack and it actually wasn't too bad. It was very nerve racking (no pun intended) drilling into the roof. I did the back holes first because the paper they give you lines up the back templates with the back and sides so its easy to do. then when it came to the front I got very nervous and couldn't find anywhere that showed or explained what to do as far as front to back and seems like others have the same issue.
After staring at the templates for an hour I realized that the holes with the arrows facing front to back and side to side were measured distances between the templates for lining them up. I didn't bother checking left to right because you trim the paper for that but it's not a bad idea if your not sure where the paper goes(the cut line sits against the rain guard, not in it). I just measured between the two points marked 715mm and figured I would give that a shot to see what happened with a small bit first. It went in and i could feel the threaded hole, what a relief! I do have to admit i converted it to inches and measured at least ten times per side, I recommend doing the same thing to make sure it fits.
Another piece of advice I can give is start drilling small holes and then they should get progressively bigger until you can fit the stainless steel guide in. Once the guide fits in you need a dremel to edges of the hole until it can thread into the threaded hole down below without touching the sides or binding up. Once that fits in, use the supplied hole saw and guide to make the hole in the right spot, and to fix any ovalness you made trying to get the guide in.
Now when installing the screws i ran into another issue, they didn't fit into the holes. Its very close though so a few passes around with a dremel on each of them and the slid right in. There depth gauge they gave was also very poor, when i used it the bolts were no where need lined up with the roof. I just screwed them in with a 1mm washer and if it pushed on the roof i added more, or if it didn't touch the roof i swapped the 1mm for a .5mm or removed the washer. i then took them all out added gobs of silicone, screwed them all in and wiped up the extra silicone.
Thanks for posting. I just placed my order with Outmotoring so Im looking forwarding to getting it and installing. Did you have to buy a stepped drill for the 10mm holes?
Thanks
Andy
BTW, is that grill the one that Outmotoring carries? It looks really good!
I did not use a stepped drill and I'm not sure there is enough space to fit a stepped drill in, the hole doesn't go deep. I had a set of bits and just went progressively larger through the set until I could fit the drill that came with the installation kit in there. The drill bit that comes with the set was not large enough though, I needed another millimeter or two and didn't have a bit large enough so I used a dremel to make the hole slightly larger.
Yes it's the grill from out motoring. It looks better than stock but there are a few things I wish they would change. The plastic is gloss and the stock grill below is matte and the cross pattern on the grill doesn't match the cross pattern on any of the other grills on the car. It fits and looks a lot better than the chrome and colored pieces though.
Since everyone on here has been very helpful with the information they have posted, I figure I can share a bit of insight back here in my first post.
So here is the rundown on how to install the OEM roof rack on an R53.
What you need from Mini:
Rack Support (Feet and Crossbars): 82710024992 $144.74
Install Kit ( Bolts, Shim Washers, Guide Pin, and Covers for when rack is off)
-----White: 82790139366 - $30.57
-----Black: 82790136426 - $30.57
Test Arbor (Shim Height Tool, Not in install kit): 82790140429 - $4.13
-----Prices from an online mini dealer at the time of post-----
Other things you need:
Patience and Beers! Masking Tape
Metric Measuring Tape
Automatic Center Punch
1/8" and 3"8" Drill Bits
9/16" Hole Saw
Dremel
Touch Up Paint
Sealant Adhesive.
And Go....
Step 1. Clean Roof, Assemble Items, Trim all the templates they give you right to the black line as best as possible.
Step 2. Take some masking and double it up and apply to the rear of cars roof in between the hatch and roof. Stick it to the roof side to give you a 90 degree reference for the template to touch as the roof is rounded on the back edge.
Step 3. Line up both back templates to the tape you set up and right on the roof moulding on the sides. Tape in place and measure the cross distance of 996mm to the lines on the template. I was off a few mm the first time and pretty close the second. About 2mm to wide to be exact. Close enough on that more later.
Step 4. Use a Measure to set up the front two templates 715mm from the lines on back templates and again the side to the molding. If you trimmed the template right to the line, just slide the paper down the roof until it hits the rubber molding.
Step 5. Measure front cross distance of 997mm and adjust if off.
Step 6. Commitment Time. Center Punch your Back Marks (In my case I moved the punch 1mm towards the center line as they were taped 2mm to wide overall.)
Step 7. Tape the front templates down like there is no tomorrow, you will be removing the rear and will lose your reference points.
Step 8. Drill 1/8" hole for all the rear locations. You Will be able to take a smaller bit and feel the threaded hole underneath. It is down in the roof 11mm for reference. Once you are confident you are over the holes move on to step 9.
Step 9. Center punch and drill the front locations. Double check your handy work that you can feel the threaded hole under your 1/8" drill locations.
Step 10. Enlarge all holes to 3/8" or better yet 10mm if you have one. However the 3/"8 with the overcut from hand held drilling works fine.
Step 11. With a tiny grider/sander bit on your dremel tool enlarge the hole to allow the guide pin to be threaded in BY HAND. You will likely have missed your target a bit and will have to enlarge the hole only on one side to allow for the pin to be centered and screwed in by hand. If you need a screwdriver, your hole is not centered yet, dremel some more on the side where the pin touches the roof.
Step 12. Once all the holes can support the guide pin. Take the guide pin and wrap with the tape of your choice to allow a snug fit on the 9/16" hole saw as you will NOT be using a center drill, but riding it on the guide pin. Note: packing tape seemed best at first but made a melted mess, the remaining 7 holes were done using automotive 3m masking tape.
Step 13. Gingerly drill out all of the holes to the 9/16" size. These will still be a hair undersize even with the play in the bit i used so you still have some back up wiggle room so to say.
Step 14. Gently Dremel the burr off the hole and fine tune to fit the shoulder bolt that will reside in this hole, get all 8 to where you can start by hand and the first shoulder on the bolt fits in the hole.
Step 15. Paint exposed metal in holes.
Step 16. Use gauge on each hole to get shim size needed. They include .5mm and 1mm shims. I did not have this said tool and used a micrometer instead. It was kind of a pita, but worked. The bolt from mounting shoulder to flange is 11mm, most of mine needed a .5mm or 1mm whike two holes were under 11mm and used no shims.
Step 17. Dab sealant on shim and affix to bolt. Lay a good 1/8" give or take bead of sealant adhesive of your choice and install bolt until it bottoms out. I snugged by hand. They go give you a torque spec if you feel it is necessary.
Step 18. Clean up all exposed sealant even under outer flange taper as that is how the roof caps install when the rack is off.
Step 19. Install Rack.
Step 20. Step back admire your handwork and get a new cold beer.
All said and done, not all that bad, took 2-3 hours most of which is lining everything up and making that commitment to the first center punch from there it is just fine tuning and time.
Disclaimer: You're on your own, its your car, you decide what you should and should not do to it.
EDIT: It appears they sell the hole saw specific for this for about 40 bucks: 83310141898
Last edited by LimitlessADV; 05-26-2016 at 02:18 PM.
Yep, we can get the black caps kit which is in our kit. MINI just reopened the kits up. The white caps we can get also on there own.
We only have a couple of the black caps lefts, less then 4. Once those are gone those individuals are nla, but you can still get them in that hardware kit.
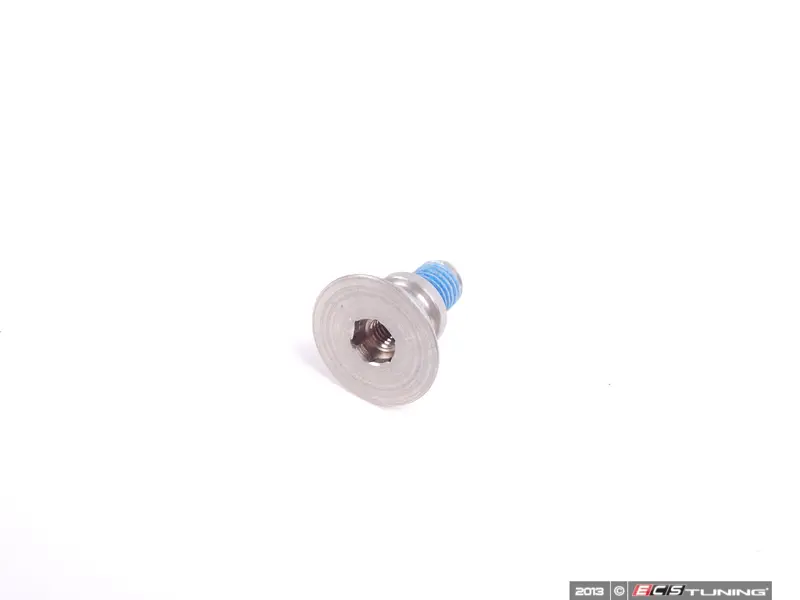
Here is a question that I can't seem to find an answer to: once the bolts are installed into the roof - how does the rack attach to the bolts? Is the necessary hardware for that step part of the 82790136426 kit?
Here is a question that I can't seem to find an answer to: once the bolts are installed into the roof - how does the rack attach to the bolts? Is the necessary hardware for that step part of the 82790136426 kit?
Those go into the top of those stud wide head screw w/blue threadlock on the threads. They hold the rack mount itself to the studs that mount in the roof.
 01-04-2008, 05:21 PM