Navigation & Audio HK Replacement With New Components
#1
 09-10-2015, 01:25 AM

HK Replacement With New Components
Yeah, I know others have written ad nauseum about the removal and replacement of their HK "Hi-Fi" sound systems. And I've read them all. But now that I've done the deed, I feel it's my responsibility to share what I learned and my perspectives during my Mini's audio transformation.
I have/had a 2004 R53 w/HK (obvs) that worked perfectly, but was 11 years ago's technology. I had recently added a Mediabridge to the system (Bluetooth, AUX, USB, MFSW controls, etc). It worked well but because of my stock Boost HU (the year produced) I couldn't read any of the music info. I was just adding a "patch" to update an outdated system.
I knew my HK components were/are valuable to the right person, so I planned to remove the entire HK system (with harnesses and all) so that someone else could update their stock base audio system. That was my plan anyway... I was also trying to stay on a budget, knowing I could recoup most of the new parts' expense by selling off the HK parts.
My goals:
I wasn't interested in whomping bass in the boot, nor any kind of "kick-***" amp(s) to drive the drivers, so no sub-woofer was needed. The Mini is a small car. I don't need nor want that kind of volume or shake. But I did want something more than most aftermarket head units provided (15-20W per channel). I also wanted to retain my MFSW radio controls, no front USB or AUX ports, and I insisted on changeable HU colors to be able to match the Mini's gauges. With all of this in mind, I started digging. Crutchfield does a good job of putting systems together that work with your car, and they include some odds and ends at no extra charge. But I also have Amazon Prime, eBay, etc. to choose from. And after looking at everything I needed and what was available, I settled on:
Pioneer DEH-X8700BS head unit
Clarion XC1410 mini-amp
SiriusXM SXV300v1 tuner module
PAC SWI-RC MFSW interface
Polk Audio DB6501 components in the doors (mids, tweets and crossovers)
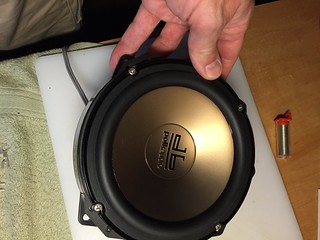
Performance Teknique 6X9s in the rear side panels
GTMat Pro 50mil sound deadener (like Dynamat)
BOSS Audio 8-gage amp install kit (wires, fuse, etc.)
Metra 40-EU10 antenna adapter
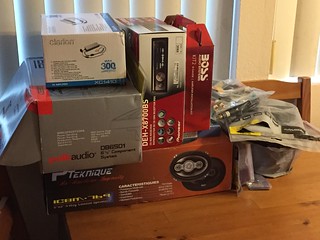
New boxes! Christmas!
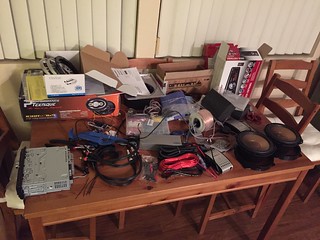
Scary, but doable.
And so began the transformation...
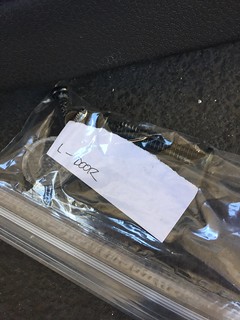
Side note: DO THIS! Bag and tag everything - even if you think it doesn't matter. You think it takes too much time while taking everything apart? Think how much time it will take trying to remember and find all of the correct hardware you took out/off...
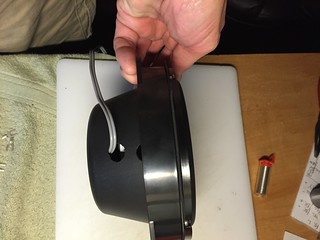
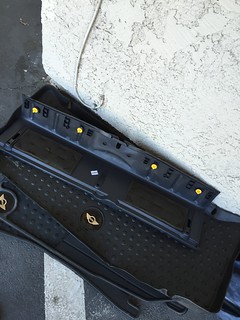
After removing the interior panels (and rear seats) I found, sadly, that the HK amp wiring harness really is buried within the factory main harness, which runs below the passenger door frame, and then up inside the dash to the speakers (and from the HU). Although there is rumored to be a new stand-alone HK harness available from Mini, I don't know if they're out of stock. So I left the amp plug alone and removed the amp, leaving the plug and harness in situ. At that point, I didn't need to save any of the HK wiring for the new HK owner, so I wasn't worried about cutting speaker wires.
Amp, plug & harness - heading forward into the main harness. Un-separatable.
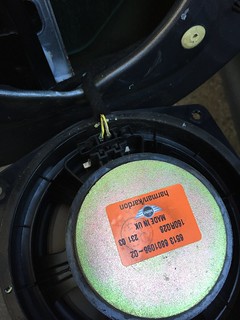
Factory HK speakers, wiring harness and plug - driver's (left) side.
I pulled the dual-coil rear 6X9s and cut off the connectors from the TWO pairs of wires. (So complicated.) And I pulled the OEM speaker wires out of the rubber grommets so I could easily feed the new wires inside the panels to the backs of the speakers. Inside those hollow panels I found some decent factory foam padding and a rectangle of sound deadener, so I wasn't worried about laying in any aftermarket GTMat. I had planned on using some 6X9 speaker baffles (Metra 81-6900) to contain some of the vibration, but they were a bit too large for the stock speaker cutouts, and I wasn't interested in cutting away any factory metal. Didn't use them after all. Ran the LS rear wires behind the rear seat hinge points (under the rear carpet) to join the RS, then inside some plastic wiring loom, behind the passenger side threshold trim and up inside the kick panel.
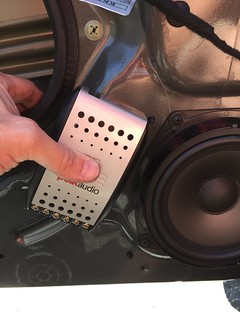
The Polk DB6501 front door components were a strong consideration. Highly recommended by both Crutchfield and Mini installers and I ultimately went there. But I had to figure out a way to attach the tweeters into the Mini factory HK housings. (Which I believe are the same for non-HK systems, btw.) Further, I had to figure out a place to mount the included crossovers - in the doors? Inside the dash, then run the 4 wires into the doors...?
To mount the tweeters, I simply used the included surface-mount cups and epoxied (JB Weld) them into the tweeter housings. The tweeters snap right into the cups and fit behind the door grilles. Done.
^ The tweeter mounting cups holding, being epoxied in place.
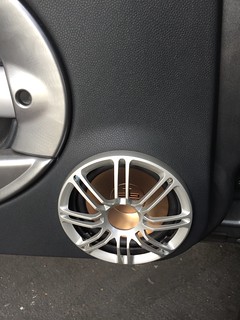
Ultimately, they look like this:
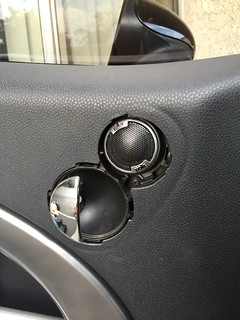
and the covers fit over them perfectly. (NOTE: I did remove the thin plastic support behind the factory tweeter grille - the X - but it wasn't necessary.)
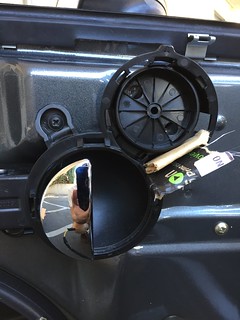
The 6.5-inch "woofers" had to be spaced away from the door metal so that they cleared the inner-door mechanics. I also bought 6.5-inch speaker baffles for these - which fit without interfering with that steel track right behind them! (Get the Metra BMW/Mini speaker adapters.) I drilled two 1/2" holes in the lower portion of the baffles: 1) to allow the speaker to "breathe", and 2) to get the wires to the speakers.
Based on pics from other installers, I saw that the crossovers might fit if attached to the door right next to the 6.5-inchers. I laid down some deadener mat, and drilled two holes for each crossover. And held my breath... to find out if the door panel/cards would fit over them.
So I now had both door speakers connected to the crossovers. If you're thinking of doing this upgrade, you've probably read that the door harness wiring plug (in the door jamb) is a b!t@#! And that is 100%, totally correct. It has also been said that the inside-door wiring harnesses are the same whether or not HK is installed. But (and I say BUT) I've also read that the speaker plugs are different...? And since I don't have a non-HK door to compare, I can't say for sure. I DO know that the speaker wiring colors change from before the door plug (HK wiring harness) to AFTER the door plug. I didn't want to drill through either the door or plug or door jamb so to feed the crossovers I decided that the original door tweeter wiring would suffice - but I had no idea what color HK speaker wires went into the damn door plug from inside the car, before they changed at the plug. Ultimately, here's what I found:
HK tweeter front right: +=blu/bk
HK tweeter front right: -=blu/brn
HK tweeter front left: +=yel/bk
HK tweeter front left: -=yel/brn
I tapped into each of these wires (from my amp) just inside the rubber grommets for their respective door plugs. After which (inside the doors) they change to...
Door tweeter front right:-=yel/gry
Door tweeter front right:+=yel/bk
Door tweeter front left: -=yel/brn
Door tweeter front left: +=yel/bk
Yes, it's strange that both positive (+) speaker signals have a black stripe (you would think that that means ground), but it is what it is.

You can also see the sound-deadening material - GTMat Pro - I used. Cost something like $20 and makes the door slam sound like a much heavier sedan. I also used a little bit of the deadener under the crossovers to limit vibration.
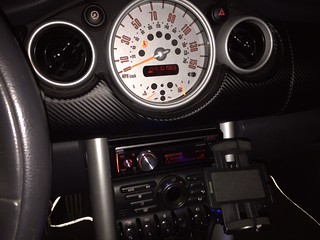
So going backwards from the speakers, the 8 wires join above the passenger kick panel. I mounted the Clarion XC1410 mini amp just above and behind the glove box, in that space next to the cabin filter intake box. Positive (power) feed to the amp goes all the way back to the battery in the boot. I also installed the in-line amp fuse in the boot next to the battery. I grounded the amp to a torx-head bolt attached to the metal dash structural frame, which tested good for ground. Had to run a solid blue signal wire from the amp to the HU harness so it would turn on when the stereo came on. (More on this in your HU wiring details.)
To the amp from the Pioneer HU:
RCA, line-level (NOT speaker-level output from the HU); four cables for front/rear, right/left. Speaker wires from the HU harness were not used. 12V constant (battery), 12V accessory (key on), ground (brown), illumination and remote "on" (blue wire to amp) only were used in HU harness. Used the Metra 99-9302 single-din adapter to mount the Mini's single-din HU space.
Plugged into the back of the HU are:
USB extension (goes to inside glove box)
AUX-in (male-to-male cable goes down to grille behind switch stack)
4 RCA cables (to amp)
HU harness
SirusXM tuner
PAC-SWI steering wheel buttons adapter
Bluetooth microphone (mic installed behind grate next to sunroof button)
Yes, it's friggin' CRAY back there.
I still, as of yet, have to connect the PAC-SWI so my steering wheel buttons work with the HU. But other than that, this new system sounds AWESOME!!!! It can be louder than I'd ever want it to be.
I'll update with more info as it comes to me. Right now I'm wasted (emotionally) and drifting away to sleep.
ETA: I realize that I never mentioned how nicely the door panels fit over the new speakers. Here's the deal...
As I used the Metra BMW/MINI speaker adapters for the 6.5" door woofers, I was wondering how close they would come to the factory speaker openings, and if they would come in contact there. Further, I wasn't interested in keeping the HK speaker grilles. I took the plunge and drilled off the four melted contact points from the back:
... and was left with screwing on the Polk speaker grilles. Of course those screws would absolutely come in contact with the speakers behind them, so I dragged out my Dremel and cut-off wheel to cut the speaker grille screws off from the back. The result is this:
Yes, you can still see the original door card material in there, but I wanted to do some test-fitting before cutting anything more away. Ideally, I'd like to find some industrial mesh material that I can fit behind the speaker grilles (like the factory tweeters use). But for now, there's nothing I have to do to them, and they don't look out of place.
Something else I forgot to add: since I FUBAR'd the center console 12V lighter outlet while I was jacking around with the console, and the outlet in the boot was already loose and flopping around, I bought new parts from the Mini dealer - surprisingly inexpensive. They sell the orange plastic and the metal can separately, but they're only $4+ each. So both front and rear cost under $20. To install, the plastic part needs to go into the hole first (with the little light attached for the front console one), then the metal can goes in and presses out the tabs on the plastic, holding it all in. If your outlet is loose or flopping around, the plastic tabs are broken.
I have/had a 2004 R53 w/HK (obvs) that worked perfectly, but was 11 years ago's technology. I had recently added a Mediabridge to the system (Bluetooth, AUX, USB, MFSW controls, etc). It worked well but because of my stock Boost HU (the year produced) I couldn't read any of the music info. I was just adding a "patch" to update an outdated system.
I knew my HK components were/are valuable to the right person, so I planned to remove the entire HK system (with harnesses and all) so that someone else could update their stock base audio system. That was my plan anyway... I was also trying to stay on a budget, knowing I could recoup most of the new parts' expense by selling off the HK parts.
My goals:
I wasn't interested in whomping bass in the boot, nor any kind of "kick-***" amp(s) to drive the drivers, so no sub-woofer was needed. The Mini is a small car. I don't need nor want that kind of volume or shake. But I did want something more than most aftermarket head units provided (15-20W per channel). I also wanted to retain my MFSW radio controls, no front USB or AUX ports, and I insisted on changeable HU colors to be able to match the Mini's gauges. With all of this in mind, I started digging. Crutchfield does a good job of putting systems together that work with your car, and they include some odds and ends at no extra charge. But I also have Amazon Prime, eBay, etc. to choose from. And after looking at everything I needed and what was available, I settled on:
Pioneer DEH-X8700BS head unit
Clarion XC1410 mini-amp
SiriusXM SXV300v1 tuner module
PAC SWI-RC MFSW interface
Polk Audio DB6501 components in the doors (mids, tweets and crossovers)
Performance Teknique 6X9s in the rear side panels
GTMat Pro 50mil sound deadener (like Dynamat)
BOSS Audio 8-gage amp install kit (wires, fuse, etc.)
Metra 40-EU10 antenna adapter
New boxes! Christmas!
Scary, but doable.
And so began the transformation...
Side note: DO THIS! Bag and tag everything - even if you think it doesn't matter. You think it takes too much time while taking everything apart? Think how much time it will take trying to remember and find all of the correct hardware you took out/off...
After removing the interior panels (and rear seats) I found, sadly, that the HK amp wiring harness really is buried within the factory main harness, which runs below the passenger door frame, and then up inside the dash to the speakers (and from the HU). Although there is rumored to be a new stand-alone HK harness available from Mini, I don't know if they're out of stock. So I left the amp plug alone and removed the amp, leaving the plug and harness in situ. At that point, I didn't need to save any of the HK wiring for the new HK owner, so I wasn't worried about cutting speaker wires.
Amp, plug & harness - heading forward into the main harness. Un-separatable.
Factory HK speakers, wiring harness and plug - driver's (left) side.
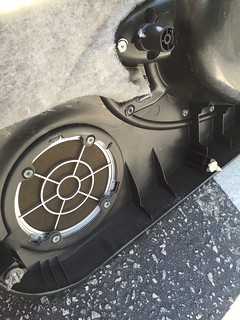
I pulled the dual-coil rear 6X9s and cut off the connectors from the TWO pairs of wires. (So complicated.) And I pulled the OEM speaker wires out of the rubber grommets so I could easily feed the new wires inside the panels to the backs of the speakers. Inside those hollow panels I found some decent factory foam padding and a rectangle of sound deadener, so I wasn't worried about laying in any aftermarket GTMat. I had planned on using some 6X9 speaker baffles (Metra 81-6900) to contain some of the vibration, but they were a bit too large for the stock speaker cutouts, and I wasn't interested in cutting away any factory metal. Didn't use them after all. Ran the LS rear wires behind the rear seat hinge points (under the rear carpet) to join the RS, then inside some plastic wiring loom, behind the passenger side threshold trim and up inside the kick panel.
The Polk DB6501 front door components were a strong consideration. Highly recommended by both Crutchfield and Mini installers and I ultimately went there. But I had to figure out a way to attach the tweeters into the Mini factory HK housings. (Which I believe are the same for non-HK systems, btw.) Further, I had to figure out a place to mount the included crossovers - in the doors? Inside the dash, then run the 4 wires into the doors...?
To mount the tweeters, I simply used the included surface-mount cups and epoxied (JB Weld) them into the tweeter housings. The tweeters snap right into the cups and fit behind the door grilles. Done.
^ The tweeter mounting cups holding, being epoxied in place.
Ultimately, they look like this:
and the covers fit over them perfectly. (NOTE: I did remove the thin plastic support behind the factory tweeter grille - the X - but it wasn't necessary.)
The 6.5-inch "woofers" had to be spaced away from the door metal so that they cleared the inner-door mechanics. I also bought 6.5-inch speaker baffles for these - which fit without interfering with that steel track right behind them! (Get the Metra BMW/Mini speaker adapters.) I drilled two 1/2" holes in the lower portion of the baffles: 1) to allow the speaker to "breathe", and 2) to get the wires to the speakers.
Based on pics from other installers, I saw that the crossovers might fit if attached to the door right next to the 6.5-inchers. I laid down some deadener mat, and drilled two holes for each crossover. And held my breath... to find out if the door panel/cards would fit over them.
So I now had both door speakers connected to the crossovers. If you're thinking of doing this upgrade, you've probably read that the door harness wiring plug (in the door jamb) is a b!t@#! And that is 100%, totally correct. It has also been said that the inside-door wiring harnesses are the same whether or not HK is installed. But (and I say BUT) I've also read that the speaker plugs are different...? And since I don't have a non-HK door to compare, I can't say for sure. I DO know that the speaker wiring colors change from before the door plug (HK wiring harness) to AFTER the door plug. I didn't want to drill through either the door or plug or door jamb so to feed the crossovers I decided that the original door tweeter wiring would suffice - but I had no idea what color HK speaker wires went into the damn door plug from inside the car, before they changed at the plug. Ultimately, here's what I found:
HK tweeter front right: +=blu/bk
HK tweeter front right: -=blu/brn
HK tweeter front left: +=yel/bk
HK tweeter front left: -=yel/brn
I tapped into each of these wires (from my amp) just inside the rubber grommets for their respective door plugs. After which (inside the doors) they change to...
Door tweeter front right:-=yel/gry
Door tweeter front right:+=yel/bk
Door tweeter front left: -=yel/brn
Door tweeter front left: +=yel/bk
Yes, it's strange that both positive (+) speaker signals have a black stripe (you would think that that means ground), but it is what it is.
You can also see the sound-deadening material - GTMat Pro - I used. Cost something like $20 and makes the door slam sound like a much heavier sedan. I also used a little bit of the deadener under the crossovers to limit vibration.
So going backwards from the speakers, the 8 wires join above the passenger kick panel. I mounted the Clarion XC1410 mini amp just above and behind the glove box, in that space next to the cabin filter intake box. Positive (power) feed to the amp goes all the way back to the battery in the boot. I also installed the in-line amp fuse in the boot next to the battery. I grounded the amp to a torx-head bolt attached to the metal dash structural frame, which tested good for ground. Had to run a solid blue signal wire from the amp to the HU harness so it would turn on when the stereo came on. (More on this in your HU wiring details.)
To the amp from the Pioneer HU:
RCA, line-level (NOT speaker-level output from the HU); four cables for front/rear, right/left. Speaker wires from the HU harness were not used. 12V constant (battery), 12V accessory (key on), ground (brown), illumination and remote "on" (blue wire to amp) only were used in HU harness. Used the Metra 99-9302 single-din adapter to mount the Mini's single-din HU space.
Plugged into the back of the HU are:
USB extension (goes to inside glove box)
AUX-in (male-to-male cable goes down to grille behind switch stack)
4 RCA cables (to amp)
HU harness
SirusXM tuner
PAC-SWI steering wheel buttons adapter
Bluetooth microphone (mic installed behind grate next to sunroof button)
Yes, it's friggin' CRAY back there.
I still, as of yet, have to connect the PAC-SWI so my steering wheel buttons work with the HU. But other than that, this new system sounds AWESOME!!!! It can be louder than I'd ever want it to be.
I'll update with more info as it comes to me. Right now I'm wasted (emotionally) and drifting away to sleep.
ETA: I realize that I never mentioned how nicely the door panels fit over the new speakers. Here's the deal...
As I used the Metra BMW/MINI speaker adapters for the 6.5" door woofers, I was wondering how close they would come to the factory speaker openings, and if they would come in contact there. Further, I wasn't interested in keeping the HK speaker grilles. I took the plunge and drilled off the four melted contact points from the back:
... and was left with screwing on the Polk speaker grilles. Of course those screws would absolutely come in contact with the speakers behind them, so I dragged out my Dremel and cut-off wheel to cut the speaker grille screws off from the back. The result is this:
Yes, you can still see the original door card material in there, but I wanted to do some test-fitting before cutting anything more away. Ideally, I'd like to find some industrial mesh material that I can fit behind the speaker grilles (like the factory tweeters use). But for now, there's nothing I have to do to them, and they don't look out of place.
Something else I forgot to add: since I FUBAR'd the center console 12V lighter outlet while I was jacking around with the console, and the outlet in the boot was already loose and flopping around, I bought new parts from the Mini dealer - surprisingly inexpensive. They sell the orange plastic and the metal can separately, but they're only $4+ each. So both front and rear cost under $20. To install, the plastic part needs to go into the hole first (with the little light attached for the front console one), then the metal can goes in and presses out the tabs on the plastic, holding it all in. If your outlet is loose or flopping around, the plastic tabs are broken.
Last edited by Filmy; 09-15-2015 at 04:29 PM.
#2
09-12-2015, 04:12 PM
A frustrating update...
Everything was installed and working well. Great sound and power, no funky noises, SiriusXM station 001 (sample) was clear and strong. And then I started trying to program the PAC SWI-RC for the steering wheel buttons. By the way, this model supersedes the SWI-Jack and the SWI-PS (Pioneer/Sony), I have discovered.
3 simple wires: yellow to white/red/yellow dots in steering column; black to ground; red to key-on circuit, then plug the feed cable into the jack on the back of the HU. I resisted cutting off any of the extraneous wires (or tying it up out of the way) until I had it working properly.
So the damn thing would take and remember Program #5 (for the Mini), but was wonky with further programming the steering wheel buttons. The directions - both on paper and online - told of how to wire it up, and it seemed like they wanted to have the signal feed cable plugged into the back of the HU before programming. Because I couldn't be sure, and what I was doing wasn't working, I was forced to pull the HU out a bit and unplug the 3.5mm SWI plug. No change. In fact, it made the LED on the SWI go crazy. I came back in the house and emailed PAC customer service about what I might be doing wrong. (That was 2 days ago, btw, and no answer yet. Sad.)
So I go back out and try again: I get the plug stuck back into the rear of the HU and give it another go. It programmed perfectly this time (not sure about the phone button, but the VOL+, etc worked fine). I cut extra wires, zippy'd it up out of the way and played with my new stereo.
And then it stopped working.
When I turned off the engine (directions are confusing about whether or not the engine is supposed to be running while programming - certainly the key should be at least turned to ACCESSORY) the steering wheel buttons stopped working again. I was also having problems with the HU display, as it was changing rapidly when in selection mode, it also would not stay on SiriusXM channel 000 to get the code. Instead of smashing something in frustration, I came in the house and tried to deal with Sirius on the phone. (Siruis update in the next posting.)
I gave it one last try later in the evening and it again programmed fine. This time I just left it the hell alone hoping that it needed to sit awhile to remember the new program.
Next morning (Friday) I went out and everything seemed to be correct - finally. But by Saturday morning (today) I had no steering wheel input to the HU. To say I was pissed is an understatement. And before I could think about pulling it out...
tl;dr? PAC SWI-RC is so far unstable and ridiculous. They should not be selling this if it's this difficult for so many people.
Last edited by Filmy; 09-13-2015 at 09:52 AM. Reason: ETA
#3
09-12-2015, 04:57 PM
SiriusXM Woes
Bought the SXV300v1, which is plug-n-play for HU's that are Sirius-ready. Magnetized the antenna pod just in front of the center of the windshield and ran the cable inside the weatherstripping (down under the edge of the glass) to the A-pillar trim, underneath the door seal, inside the dash opening, over the glove box and behind the HU, where it attaches to the small tuner box (which fits easily under the HU); the tuner box has a cable that attaches to the rear of the HU.
So the deal with Sirius is that you get 3 free months of unlimited everything. The catch is that to start up an account with them, you have to give them your billing info first. Which is ludicrous. It's free, right? Why would they need any credit card and/or address billing info?
The answer, of course, is that they want to nail you for the full payment the second your free trial has expired. Which is a shady way of doing business, and I don't like doing business with greedy-bastard companies. I guess my other option(s) are to not get free everything and just pay the base $11/month for limited (80 channels) satellite radio from the start. Not exactly "free." So since I refused to give out my credit card info, the Sirius module is useless to me. I went out to the car and proceeded to remove it. (I even started the return process with the Amazon seller.) I pulled the antenna and wire, opened up the side of the dash, fed everything through... But that frickin' plug wouldn't come out of the rear of the frickin' HU. I had to AGAIN pull the HU out - completely this time - to pry the cable out of the Sirius jack. And to do that, I had to pull all 4 RCA cables, the AUX cable, wire harness...
I then had to plug everything back in... but I had tucked and zip-tied all of the cables after the install, so I didn't have the slack I needed - including the frickin' SWI feed cable - to plug it all in before shoving the HU back in place. To release some slack for the SWI cable, I cut one of the zip ties and... (you see what's coming here?) ... cut the SWI feeder cable in half; a cable that is TRS (tip, ring, shield) 3-strand, and not easily repaired. Further, it's hard-wired into the SWI box. Absolutely my own fault because I was pissed and being careless.
And after all of that, I realized that I had shaved a little of the Sirius antenna wire insulation while pulling it out. It was now non-returnable. I wrapped the bare cable and re-installed everything. So I guess I'll be forced to pay Sirius their filthy $11/month after all.
ETA: I still get the free 3 months of everything, even though I will only use the $10.99 limited service when I start getting billed. Sirius' ads are purposely misleading - they're as bad as any internet/cable companies' ads, which lead you to believe one thing while you're not getting what you think you're paying for. /rant
Still no word from PAC about the SWI, but it looks like I have the correct version. So I ordered another one.
Oh, and now that I have the HU back in (sans SWI cable) I have a new engine whine in my speakers that wasn't there before I pulled the HU back out. I think I'll just walk away from it for a couple of days until my new PAC SWI-RC arrives. I'm starting drinking early today.
tl;dr? Sirius is a pushy, false-advertising company. But they're the only game in town so you have to pay to play.
PAC has lousy customer service and crappy, unclear programming instructions. (And they're an American company - it's not like the instructions are translated from Chinese to English)
I have to re-check my ground connections.
Bulleit Rye Whiskey from Trader Joe's is good stuff.
Last edited by Filmy; 09-14-2015 at 09:59 PM.
#4
09-14-2015, 04:30 PM
Epilogue (I hope)...
The new PAC SWI-RC arrived today just as I was putting the finishing touches on:
1) new RCA cables
2) removing the glove box (again)
3) cutting zip-ties to loosen HU cables
The RCA cables I had originally purchased were simply too heavy-duty, and too long at three feet. I bought that length because I wasn't sure where the amp was to reside. But once it was tucked up behind the glove box area there was too much cable. Further, the cable's plugs were a bit too long and chunky, making getting the HU back into it's space difficult. Bottom line: today I bought two pairs of 1.5' cables that are lighter-duty. (They're only taking low-level preamp signals from the HU to the amp anyway.) This also cured my engine whine problem, since I believe one or more of my original RCA cables wasn't fully into the rear of the HU. This, again, because I didn't have enough slack, and they were too large. Two problems solved.
The PAC SWI-RC programming went well this time around - mostly because I'm a pro at it by now. For those of you looking for programming tips, here are my observations. You DO need the 3.5mm plug inserted into the HU. You DO NOT need to have the engine running to program the SWI.
(NOTE: I used a broken-off pencil eraser end to push the SWI programming button, as it's recessed a little in the housing):
1) my SWI dial had to be on 7 for Pioneer - turn yours accordingly
2) my SWI program had to be #5 for Mini Cooper. This is the first thing you program:
2a) press and hold the SWI programming button
2b) turn key on to accessory (LED will light on)
2c) release button (LED still on)
2d) push button five times in succession
2e) do nothing else - LED will then flash five times to confirm that it's in program 5)
2f) turn key off - you are now in program 5
3) without touching the SWI, turn key back on to acc: LED will flash five times to confirm program five
4) push SWI programming button once quickly: LED will light and stay on, showing it's now in (steering wheel button) program mode
5) start pushing your steering wheel buttons based on the given list and instructions. (You MUST push the buttons in order.) Push a steering wheel button, the LED will go out, release button, LED comes back on for next steering wheel button.
5a) you will skip some numbers. To do this press the SWI button instead of a steering wheel function button; the LED will do a quick blink and you can move on to the next function button, or another skipped number.
5b) my programmed buttons are:
1 - VOL UP
2 - VOL DN
3 - skip
4 - skip
5 - skip
6 - skip
7 - right arrow (next song)
8 - left arrow (previous song, etc)
9 - skip
10 - skip
11 - skip
12 - phone button (answer call)
6) IMPORTANT: you don't have to go on pressing the SWI button to skip the remaining numbers (13 & 14) - just wait and don't push anything, and the LED will start flashing in a few seconds. It should do three kind of slow flashes to show that it's programmed correctly, then five more quick flashes again confirming that it's in program #5. Turn the key off. You have WON!
7) If the SWI LED doesn't do the 3-then-5 flashes, something went wrong. If so, the LED will probably be flashing nonstop instead. You'll have to start over, but first check if the SWI is still in #5 program mode. Turn the key back on to acc: if the SWI flashes five times, proceed again from my #3. If no five flashes, you'll have to start over again from #2 above. And if so, it seemed to work better if you give the SWI a few minutes to recover from the previous programming attempt. Or overnight.
Final Observations
I hope the SWI stays programmed. But if it doesn't, I have it zip-tied up behind the knee bolster for easy access. It's been four days since I wrote to PAC technical help. Still no answer. Sad...
The SWI doesn't seem to control the SiruisXM radio channels. If I'm on, say, Sirius Channel 6 and I hit the "next" steering wheel button, it takes me to Siruis Channel 1 - Demo. Volume up and down works great, but that's a HU thing, not Sirius. The Pioneer HU came with a wireless IR (I assume) remote. I'll have to see if the remote moves the Sirius channels or not, seeing as the HU was per-ordained to work with Sirius.
There's not as much space behind the HU as you might think. Underneath it, yes, but consider getting a HU that doesn't play CDs unless you really, really need it. Those HUs are substantially shorter and will leave you with lots more room for wiring back there.
The Clarion mini-amp does exactly what it's supposed to do. It claims 50W RMS to each channel. I wouldn't want the music any louder than it is at the moment. The Mini is small inside. Don't waste your money (and limited boot space) on things like large amps and subs. My replacement 6X9's in the rear panels have all the crunch I would ever want or need, and the Pioneer HU has some nice EQ features. And I left the amp on the Clarion-recommended settings for line-level (RCA) inputs. Sounds just fine.
The Sirius antenna is really picky about having a clear signal straight above the car. Their radio tuner dies instantly when pulling into anything underground, or even under my apartment overhang in the parking lot. It sounds great though, as advertised.
The Polk DB6501 speakers: I left the crossovers on the "flat" setting, as the tweets sounded just a little too tinny with the high-pass on, and the rears are working most of the bass. I can always change those settings by pulling off the door panels.
I ran my AUX cable down under the HU and out that little grate area behind the 12V cigarette lighter socket, so it's out of the way, not in the glovebox, and will plug easily into my iPhone 6 to use as an AUX input.
If you have the inner rear side panels out (to get to the rear 6X9s) you likely have the rear rubber seal and hatch threshold trim out as well.
Rear threshold and four yellow pin-clips. Clips are about $1.50 @ Mini dealer. I stole these four to get the side panels back on, then got eight new ones from Mini to re-install the threshold (and have a few for future panel-bashing).
Be very careful climbing in and out of the hatch opening. That hatch catch/locking mechanism is now exposed and is held together with a snap-on cover... which I broke off. Replacement part is only $55 or so at the dealer (cheaper online) but I think I fixed mine by gluing that cover back on (with black RTV). It is again protected with the panel back in place, but I'm not convinced that it won't come apart again. Thank god for that hatch release cable under the back seat.
Whoever at Mini designed the knee bolster and/or glovebox installations should be fired. Or shot.
Last edited by Filmy; 09-15-2015 at 04:30 PM.
#5
09-14-2015, 09:41 PM
And finally, the finished product.
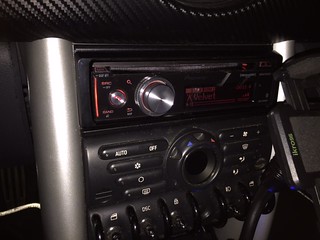
Hard to tell with the flash, but that color is pretty dead-on to the Mini dash red-orange.
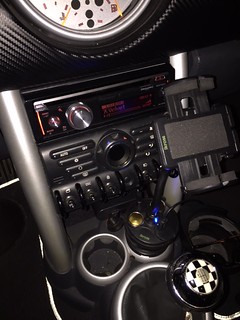
The entire array: iKross cupholder iPhone mount (has 2 USB and 3 12V sockets, plugs into existing 12V lighter socket for power). It's great, I just wish that gooseneck was 2" longer. I have another 90* power adapter down there, so that I can get my TomTom nav and new dash cam working. (They have huge 12V plugs!)
Closer. Doesn't look at all out of place here.
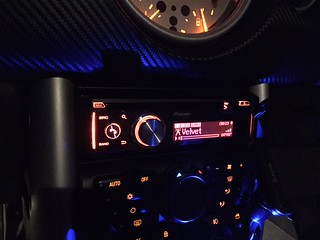
No camera flash on this one. The blue is from the 12V power plugs (LEDs), and are nowhere <i>near</i> this bright at night.
Hard to tell with the flash, but that color is pretty dead-on to the Mini dash red-orange.
The entire array: iKross cupholder iPhone mount (has 2 USB and 3 12V sockets, plugs into existing 12V lighter socket for power). It's great, I just wish that gooseneck was 2" longer. I have another 90* power adapter down there, so that I can get my TomTom nav and new dash cam working. (They have huge 12V plugs!)
Closer. Doesn't look at all out of place here.
No camera flash on this one. The blue is from the 12V power plugs (LEDs), and are nowhere <i>near</i> this bright at night.
Last edited by Filmy; 09-14-2015 at 09:47 PM.
#6
09-30-2015, 04:33 PM
Long(ish)-term update:
The SWI-RC has now stayed programmed for a couple of weeks. It's looking less and less like I'll have an ongoing problem with it. Phone button, though programmed to answer calls, doesn't function and I'm not about to go messing with re-programming it.
PAC customer service/install/tech support never returned my email request.
#7
11-16-2015, 09:10 PM
And as a final, long-term update...
The SWI has now forgotten its programming again on a few occasions. Luckily, it remembered said programming with a key-off restart of the car. In which case, I would recommend that you don't play with the stereo controls immediately after starting the car, as it seems like the SWI needs a moment to "converse" with the HU.
I still do not recommend the SWI-RC as a steering wheel button interface. It's been a major PITA, and it shouldn't be. Good luck!
Trending Topics
#8
12-01-2015, 09:00 AM

Great job on the write up! Much appreciated! I'm about to do a similar install on my 2003 MCS. However, I have the factory navigation. Reading through your post, it seems your setup is an isolated system. Any thoughts on how to incorporate the nav system to be able to hear voice prompts through the speakers? I know the 03 MCS nav system is quite outdated but I'd like it to function properly as it should.
Thanks!
Thanks!
#9
12-05-2015, 10:08 PM
#10
12-20-2015, 03:28 PM
Great write up! I'm about to embark on the SWI-RC install as well, with my harness all connected at the stereo for power, etc. I have the steering wheel control wire run but cannot fine what wire I am supposed to tap at the steering wheel harness. Since mine is an '06, I'm guessing that your wire will be different than mine. Where did you source your info on where to tap so I can figure mine out?
Thanks in advance!
Thanks in advance!
#11
12-20-2015, 05:10 PM
I think your '06 wire's the same: white with red stripe plus yellow dots. It's thin, but pretty noticeable. I no longer have the link with pics of how I found the wire, but it was easier than I thought it would be. Here's how I remember it:
Remove the lower steering column cover and look on the left-hand side of the wiring up near the wheel itself. IIRC there's two or three bundles of wires (for plugs, maybe) there and the needed wire runs in one of them. Follow the wire and cut it farther down the column, leaving room to crimp on the SWI-RC wire; connect it to the steering wheel end of your cut wire. Zip tie everything up and you're golden. Just leave the new module where you can get at it for programming.
Remove the lower steering column cover and look on the left-hand side of the wiring up near the wheel itself. IIRC there's two or three bundles of wires (for plugs, maybe) there and the needed wire runs in one of them. Follow the wire and cut it farther down the column, leaving room to crimp on the SWI-RC wire; connect it to the steering wheel end of your cut wire. Zip tie everything up and you're golden. Just leave the new module where you can get at it for programming.
#12
12-20-2015, 06:30 PM
I think your '06 wire's the same: white with red stripe plus yellow dots. It's thin, but pretty noticeable. I no longer have the link with pics of how I found the wire, but it was easier than I thought it would be. Here's how I remember it:
Remove the lower steering column cover and look on the left-hand side of the wiring up near the wheel itself. IIRC there's two or three bundles of wires (for plugs, maybe) there and the needed wire runs in one of them. Follow the wire and cut it farther down the column, leaving room to crimp on the SWI-RC wire; connect it to the steering wheel end of your cut wire. Zip tie everything up and you're golden. Just leave the new module where you can get at it for programming.
Remove the lower steering column cover and look on the left-hand side of the wiring up near the wheel itself. IIRC there's two or three bundles of wires (for plugs, maybe) there and the needed wire runs in one of them. Follow the wire and cut it farther down the column, leaving room to crimp on the SWI-RC wire; connect it to the steering wheel end of your cut wire. Zip tie everything up and you're golden. Just leave the new module where you can get at it for programming.

#14
09-10-2021, 06:03 AM
Hello!
I know this is a very old Thread, but I just want to give it a try.
I am the owner of a Mini Cooper s convertible from 2009 (R57)
I really want to add bluetooth and phone support to the mini in a original way.
So by adding the phone/bluetooth/ULF module.
Has anyone done this and more information than already is provided above?
Because I am really looking for which parts I need and where/how to install them.
Very much thanks.
#15
06-05-2023, 11:50 PM

Mini countryman 2011

Controls wiring need help
Hi,
I have just purchased MFSW controls for my mini countryman, I have the paddle shift controls on my steering wheel so I have the extra plug on the clock spring.
it is a 5 pin plug and it is using pins 2.3.4
2. yellow
3. red
4. Brown
I am hoping to wire up my steering wheel controls to my new head unit I have installed. It is a 2 wire system KEY 1 KEY 2 (third party head unit) for the steering wheel controls, I am hoping to setup volume controls only as I would like to adjust volume while driving.
any help much appreciated, photos are awesome..
Thanks in advance, Dino
#16
06-06-2023, 06:27 AM


5th Gear

Thread
Thread Starter
Forum
Replies
Last Post
Navigation & Audio Door speakers with no sound. Help.
Captin Hook
Navigation/Audio
4
04-10-2021 12:08 PM
Navigation & Audio Hit a Bump, Stereo Shuts Off and/or Crackles
digitalsabre
Navigation & Audio
2
01-27-2012 11:55 AM
Navigation & Audio Yet another audio system install...madness..
peporter
Navigation & Audio
11
02-13-2011 10:07 PM
Navigation & Audio Stereo upgrade in a leased Mini
willahlborn
Navigation & Audio
3
12-30-2010 05:03 PM