Navigation & Audio Audio Build Log
#1
 08-08-2012, 09:23 AM


Join Date: May 2012
Location: Burien, WA
Posts: 108
Likes: 0
Received 0 Likes
on
0 Posts
Audio Build Log
Hello everyone
I like to make build logs when I do major installs on my vehicles. If you like Mustangs, here is my 68 with a 2.3T:
http://forums.vintage-mustang.com/vi...-68-coupe.html
Anyway, I'm going to keep track of my audio build here. The car is a 2009 MCSa.

The build might take a while, but I am starting with the hard stuff. First off, subwoofer boxes. As we all know, space is at a premium in these cars. I am re-using an amp I already own, and it is huge. There is no way it will fit anywhere except the trunk, which would leave almost no room for an in-floor sub. At first I thought I would be able to fit two 8" subs on one side of the trunk, but after measuring I was not happy with some of the compromises I would have to make. But, I already bought the subs, these Infinity's:

These have pretty good reviews online, and meet two of my main criterea: Perform in a small sealed box and able to handle a decent ammount of power. They will be getting about 300 watts RMS each. However, the motors on these are pretty big, and I want to save as much trunk space as possible.
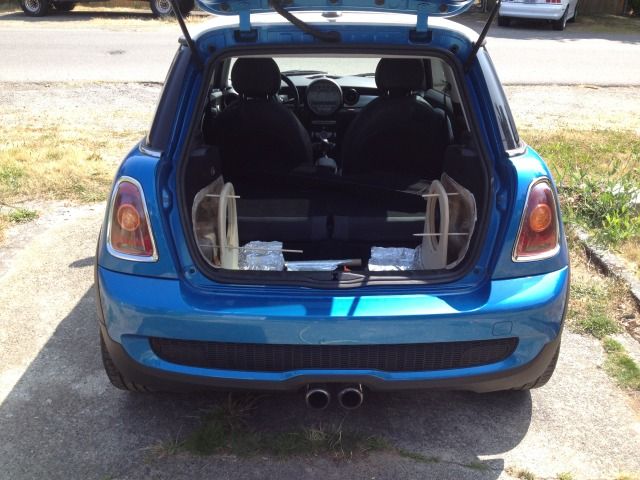
The trunk:

Access panels removed. The drivers side is much better than the passengers as far as space.
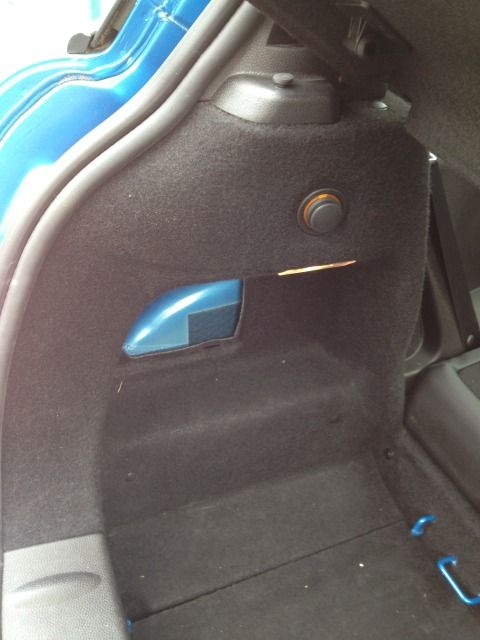
I noticed that the factory wiring runs through here. I will be doing the same with my stereo wiring, but that makes corner boxes kind of tricky.
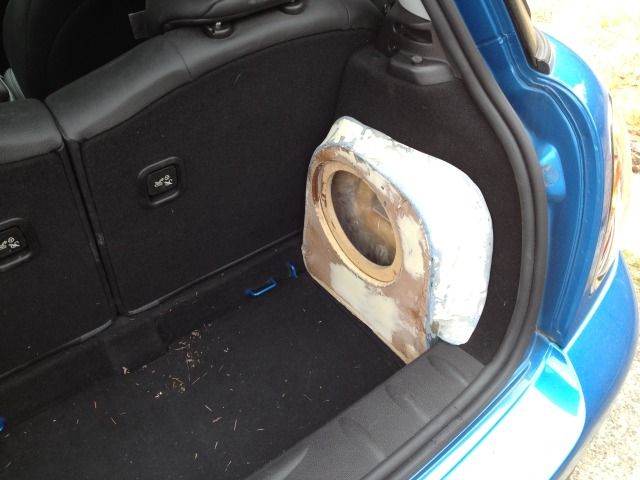
I decided on a fiberglass box on each side. The front face of the box will end at the factory jack access panel, which makes them very slim. I will have to use the space inside the side access panels not only for airspace, but for the magnets of the subs to slide into.
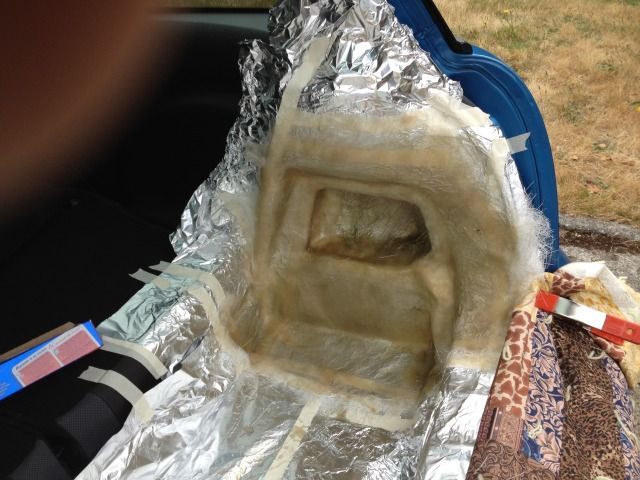
Here is one side foiled up:
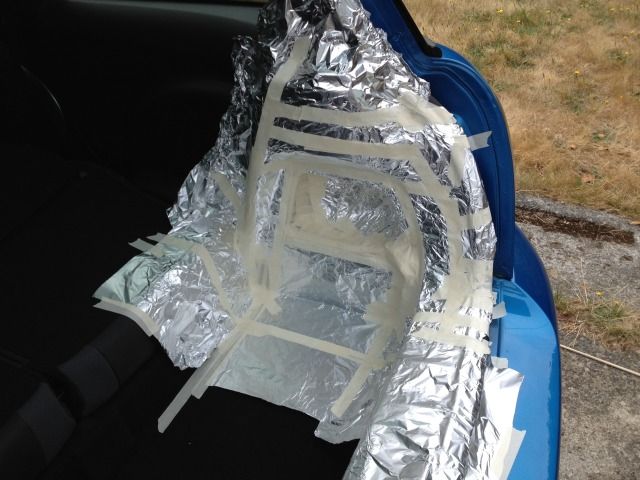
Notice in the mass of tape in the right hand corner. I ran a tube behind there that goes from the access hole down to the trunk floor. My plan is that once I glass over it, it will create a void that I can use to run all my wiring and keep it hidden.
Trunk all foiled up:
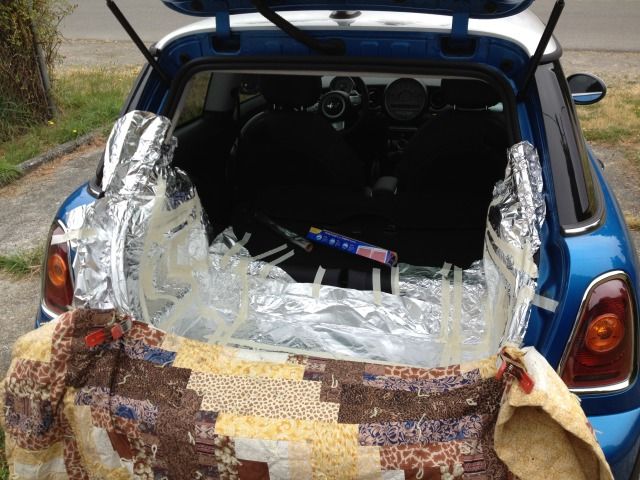
This took a long time, but I wanted to make sure I didn't get any glass on the car or carpet.
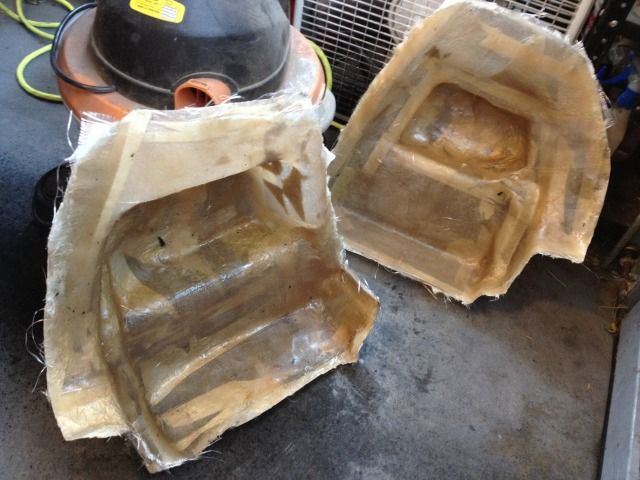
Here is one side with two layers of glass.
I haven't made a fiberglass box in about 10 years, I forgot what a PITA it can be. Anyway, notice how I went into that passenger side cavity as far as possible. There will be just enough room for the sub magnet to slide in there, tucking them way in. You can also see the "channel" I have made for the wiring, I did this on both sides.
More glassing tonight!
I like to make build logs when I do major installs on my vehicles. If you like Mustangs, here is my 68 with a 2.3T:
http://forums.vintage-mustang.com/vi...-68-coupe.html
Anyway, I'm going to keep track of my audio build here. The car is a 2009 MCSa.
The build might take a while, but I am starting with the hard stuff. First off, subwoofer boxes. As we all know, space is at a premium in these cars. I am re-using an amp I already own, and it is huge. There is no way it will fit anywhere except the trunk, which would leave almost no room for an in-floor sub. At first I thought I would be able to fit two 8" subs on one side of the trunk, but after measuring I was not happy with some of the compromises I would have to make. But, I already bought the subs, these Infinity's:
These have pretty good reviews online, and meet two of my main criterea: Perform in a small sealed box and able to handle a decent ammount of power. They will be getting about 300 watts RMS each. However, the motors on these are pretty big, and I want to save as much trunk space as possible.
The trunk:
Access panels removed. The drivers side is much better than the passengers as far as space.
I noticed that the factory wiring runs through here. I will be doing the same with my stereo wiring, but that makes corner boxes kind of tricky.
I decided on a fiberglass box on each side. The front face of the box will end at the factory jack access panel, which makes them very slim. I will have to use the space inside the side access panels not only for airspace, but for the magnets of the subs to slide into.
Here is one side foiled up:
Notice in the mass of tape in the right hand corner. I ran a tube behind there that goes from the access hole down to the trunk floor. My plan is that once I glass over it, it will create a void that I can use to run all my wiring and keep it hidden.
Trunk all foiled up:
This took a long time, but I wanted to make sure I didn't get any glass on the car or carpet.
Here is one side with two layers of glass.
I haven't made a fiberglass box in about 10 years, I forgot what a PITA it can be. Anyway, notice how I went into that passenger side cavity as far as possible. There will be just enough room for the sub magnet to slide in there, tucking them way in. You can also see the "channel" I have made for the wiring, I did this on both sides.
More glassing tonight!
#2
08-08-2012, 09:43 AM

Join Date: Apr 2010
Location: Oakland Bay Area
Posts: 165
Likes: 0
Received 0 Likes
on
0 Posts
#3
08-08-2012, 05:50 PM
Join Date: May 2012
Location: Burien, WA
Posts: 108
Likes: 0
Received 0 Likes
on
0 Posts
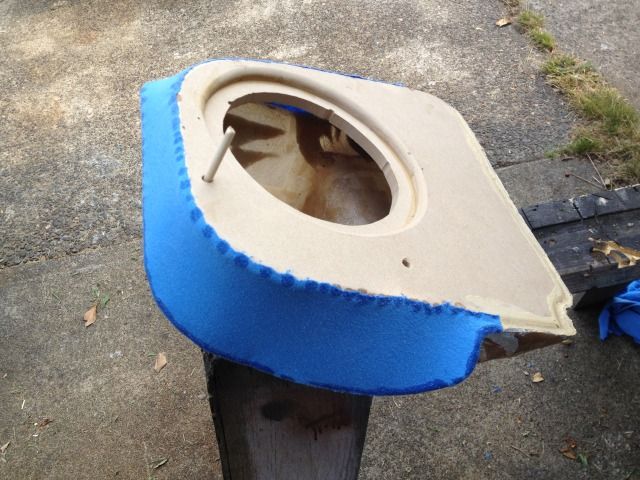
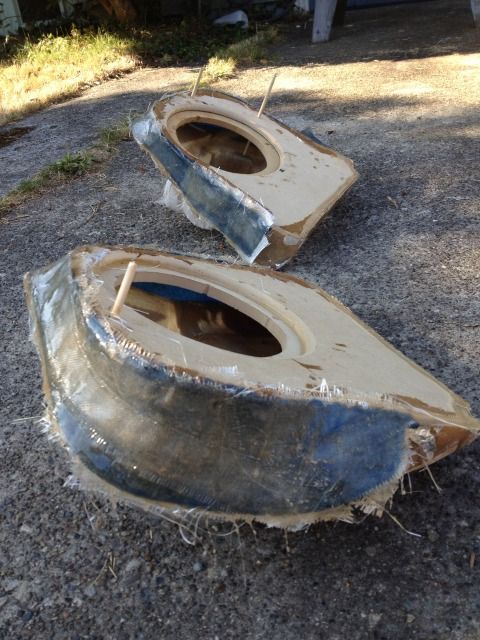
Well, if it turns out as good as it looks in my head, I will be happy. After the first two layers of mat fiberglass had hardened, I popped them out of the car. Here they are after a very rough trim around the edges:

I then put on two more layers of fiberglass, using cloth this time. I think 4 layers will be fine for the rear, I hear some people like to do 7 -10 layers but that seems like overkill in this situation. Here they are after the last two layers drying.
I had a little time left, so I cut out a couple speaker rings. Don't worry, I don't plan on making the typical "volcano" boxes.

#5
08-10-2012, 07:00 AM
Join Date: May 2012
Location: Burien, WA
Posts: 108
Likes: 0
Received 0 Likes
on
0 Posts
Here are a couple shots of me measuring for the front panels. You can see how much space I don't have to work with. Getting the hole on the passenger side in just the right place was tricky, I only had about 1/4" room to play with up and down or side to side between the woofer motor and the box.
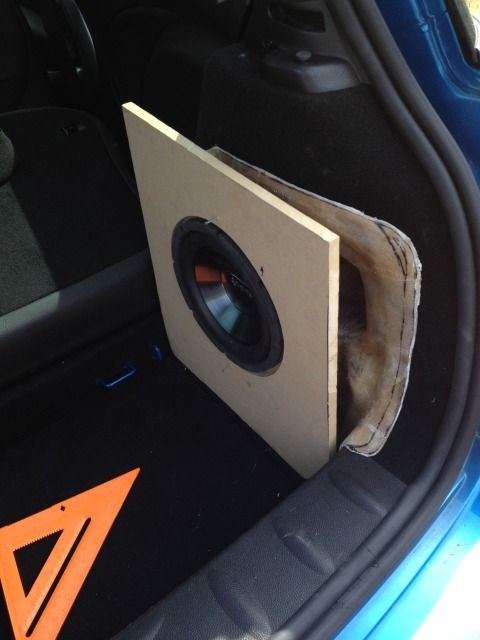
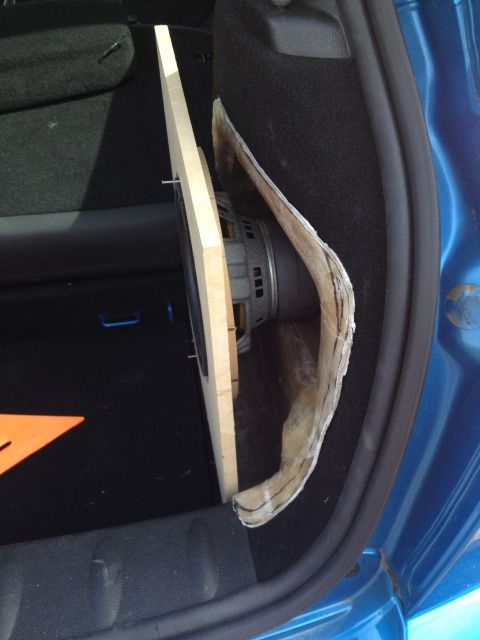
Here is one of the front panels after trimming, routing, sanding etc. The ring I showed a picture of before is being glued on from the back, which will let me flush mount the woofer.

Good thing these woofers are designed for small boxes! I still plan on stuffing them with polyfill.
Here is one of the front panels after trimming, routing, sanding etc. The ring I showed a picture of before is being glued on from the back, which will let me flush mount the woofer.
Good thing these woofers are designed for small boxes! I still plan on stuffing them with polyfill.
#7
08-12-2012, 07:49 PM
Join Date: May 2012
Location: Burien, WA
Posts: 108
Likes: 0
Received 0 Likes
on
0 Posts
Thanks! I'm taking it kind of slow, sorry. Here are the baffles being mounted. I drilled straight through them and put in some wooden dowels. That let me get the baffles exactly where I wanted them, so I could hot glue them on place. I didn't want to mess with cutting the dowels to length and messing that up. This way, I can just trim them flush with the face, drop some fiberglass resin in to seal them up, and you will never know they were there.


Trending Topics

#9
08-13-2012, 10:05 AM
Join Date: May 2012
Location: Burien, WA
Posts: 108
Likes: 0
Received 0 Likes
on
0 Posts
Thanks chupo!
The Mini has been taking time (and fundage) away from the Mustang, so I haven't messed with it much. I plan on taking it in for a professional diagnosis of the horrible sound it's making Wednesday or Thursday. Once the stereo in the Mini is done, I will go back to putting the new engine in the Mustang. Once the new engine is in, I will be saving up for springs and wheels for the mini... gah it never ends!
Stock that engine put out 210 hp at the flywheel. I bet mine is not far off, I only have a few performance mods and am running stock boost. When I do the engine swap I will also be upgrading the injectors, porting my header and most importantly getting a dyno tune for the 'squirt. With the hardware I have, I would really like a 300 rear wheel horsepower dyno sheet.
I might be able to finish up the fiberglassing of the mini boxes tonight, but its kind of hot outside.
#10
08-14-2012, 07:46 PM
Join Date: May 2012
Location: Burien, WA
Posts: 108
Likes: 0
Received 0 Likes
on
0 Posts
Slowly but surely. Here is some tee-shirt material stretched and glued over the gap:
Here they are after a few layers of fiberglass:

Now I need to trim around the edges, smooth everything out, slap a little bondo on there and figure out what I am going to cover them with. I have a funky idea that might be cool if I can find it.
Here they are after a few layers of fiberglass:
Now I need to trim around the edges, smooth everything out, slap a little bondo on there and figure out what I am going to cover them with. I have a funky idea that might be cool if I can find it.
#11
08-19-2012, 07:32 PM
Join Date: May 2012
Location: Burien, WA
Posts: 108
Likes: 0
Received 0 Likes
on
0 Posts
Ready for a ton of pics?
Here are the boxes after trimming, a coat of bondo, and some sanding to get them smooth.
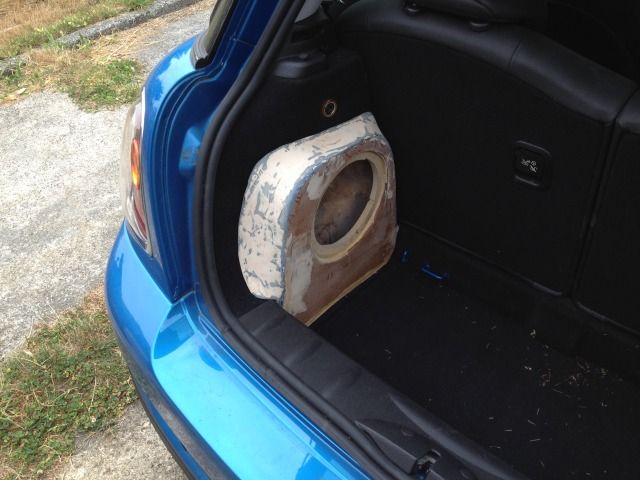
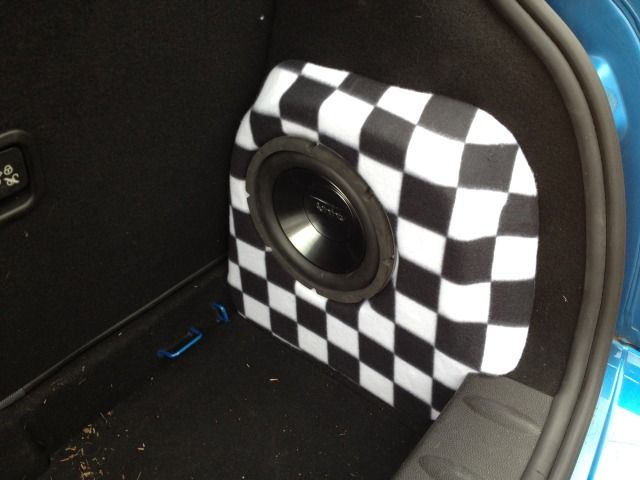
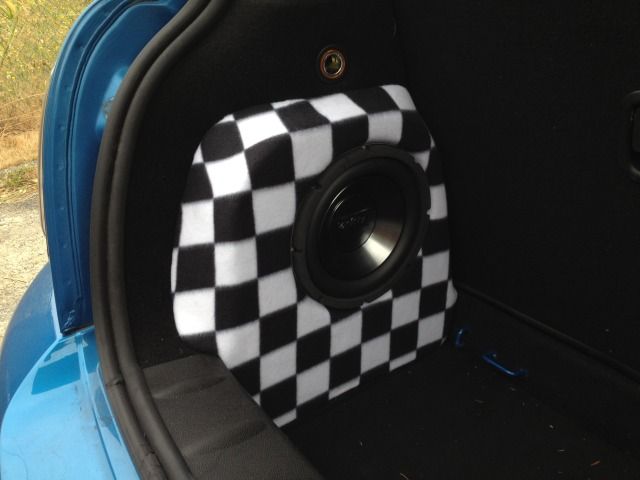
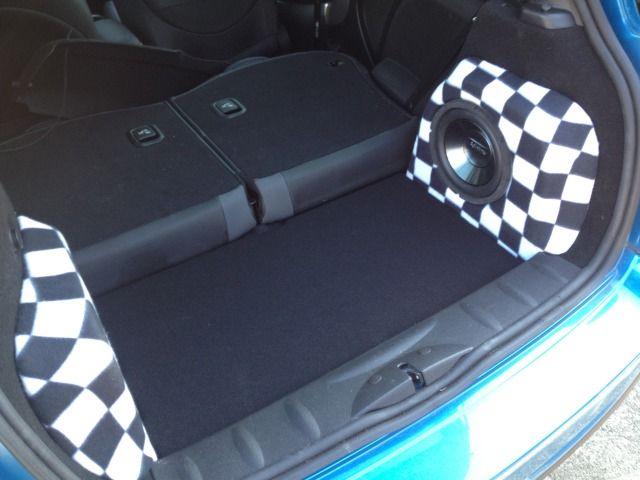
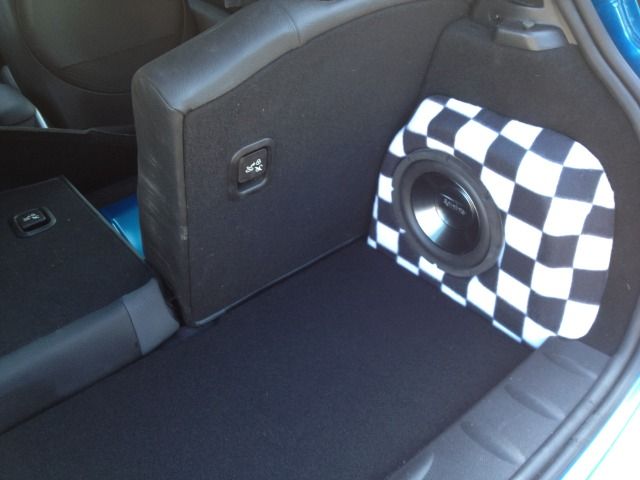
I have been searching for something to cover these in. I wanted to do them in union jack fabric, but I just couldn't find any. Today at the fabric store my wife pointed this checkerboard pattern out, which fits in with Mini culture just perfect.
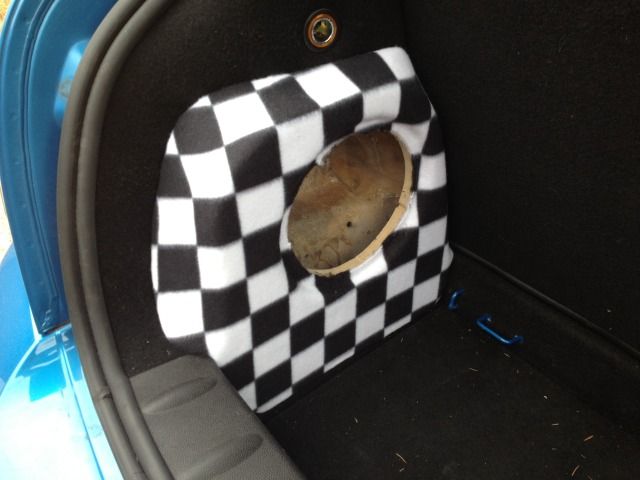
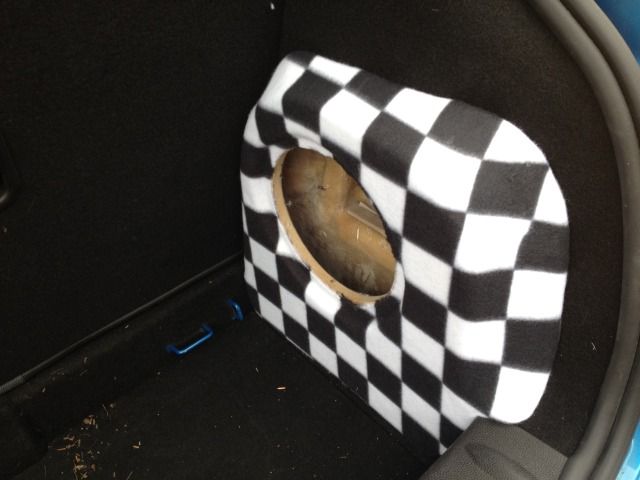
I just had to see what the subs would look like in their new homes:
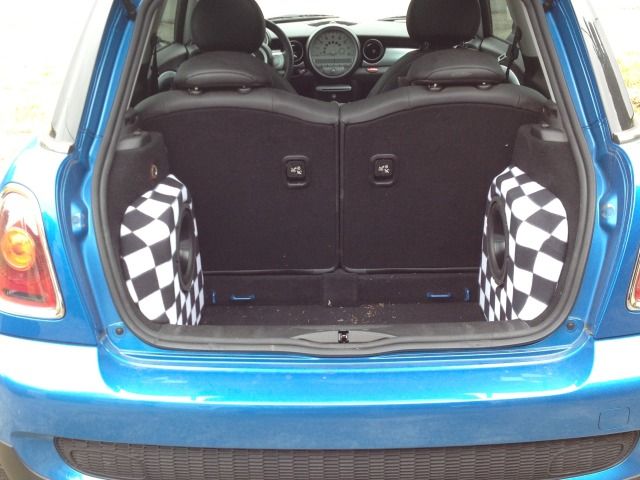
Here is a sneak peek at my amp, its a monster:
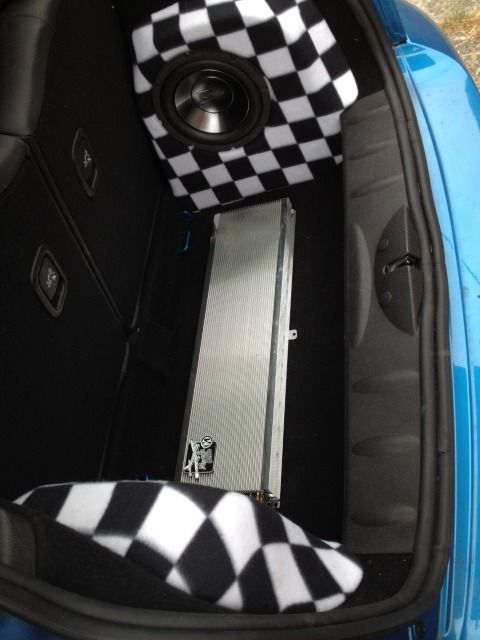
Thoughts so far?
Here are the boxes after trimming, a coat of bondo, and some sanding to get them smooth.
I have been searching for something to cover these in. I wanted to do them in union jack fabric, but I just couldn't find any. Today at the fabric store my wife pointed this checkerboard pattern out, which fits in with Mini culture just perfect.
I just had to see what the subs would look like in their new homes:
Here is a sneak peek at my amp, its a monster:
Thoughts so far?
#12
08-19-2012, 07:38 PM
3rd Gear
Join Date: Jan 2010
Location: Plattsmouth, NE
Posts: 276
Likes: 0
Received 0 Likes
on
0 Posts

#15
08-20-2012, 06:43 AM
Join Date: May 2012
Location: Burien, WA
Posts: 108
Likes: 0
Received 0 Likes
on
0 Posts
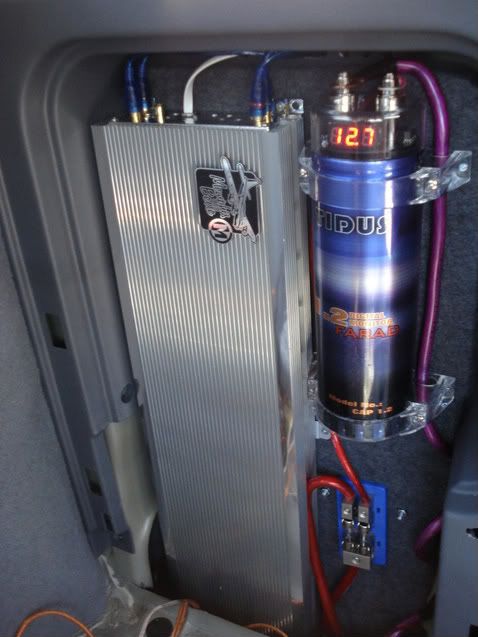
Yeah, one of the old school ones. 50 x 4 and 1000 x 1. It was my dream amp since I got into car audio, I've had this one around 6 years now. You can find them for sale for pretty cheap these days though.
This is when it lived in my Frontier:
And my Protege5:
I haven't decided if I will be running a cap in the Mini yet.
This is when it lived in my Frontier:
And my Protege5:
I haven't decided if I will be running a cap in the Mini yet.
#17
08-22-2012, 09:11 AM
Join Date: May 2012
Location: Burien, WA
Posts: 108
Likes: 0
Received 0 Likes
on
0 Posts
Thanks!
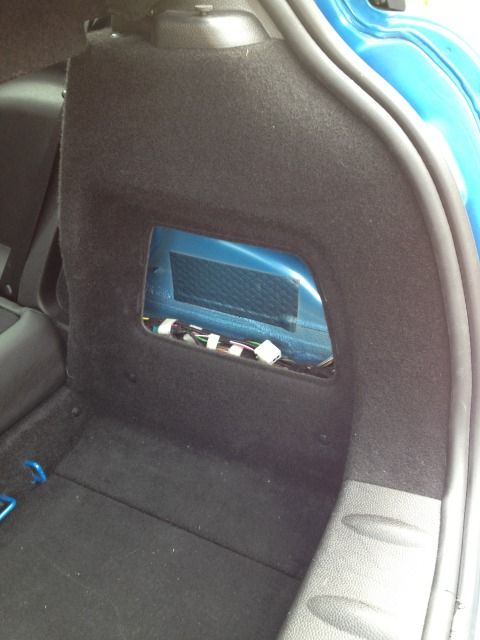
Super small update. Here are the power and ground wires for the amp. I used an exisiting hole over the wheel well. I just sanded the paint down and ran a bolt with a lock nut. Remember those cavitites in the speaker boxes I made with the paper? Now you get an idea of how the wires will run behind them.

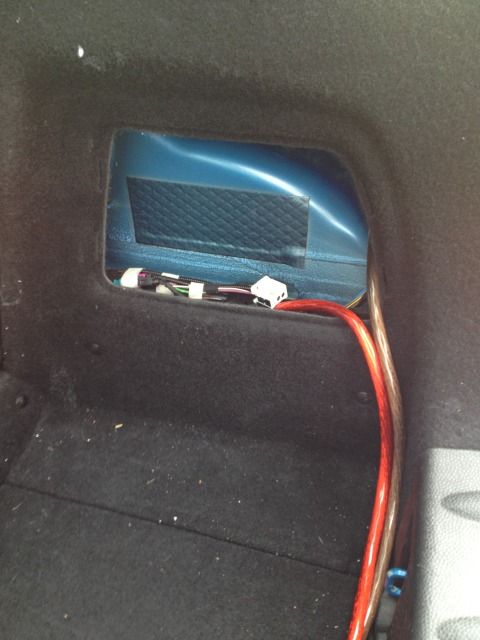
Super small update. Here are the power and ground wires for the amp. I used an exisiting hole over the wheel well. I just sanded the paint down and ran a bolt with a lock nut. Remember those cavitites in the speaker boxes I made with the paper? Now you get an idea of how the wires will run behind them.
#19
08-23-2012, 07:15 PM
Join Date: May 2012
Location: Burien, WA
Posts: 108
Likes: 0
Received 0 Likes
on
0 Posts
Yep, I love it. On to more pics!
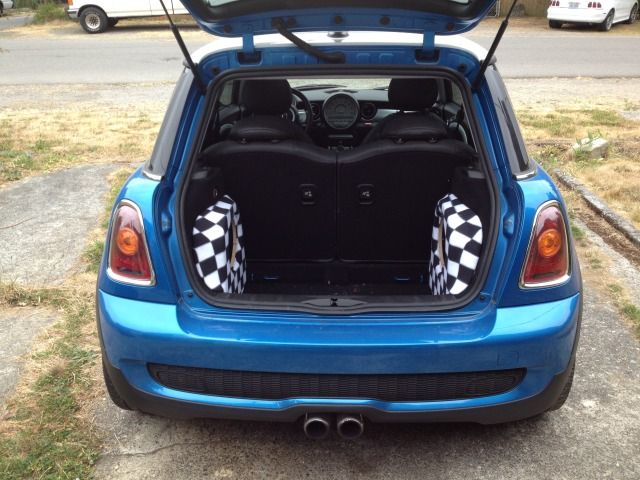
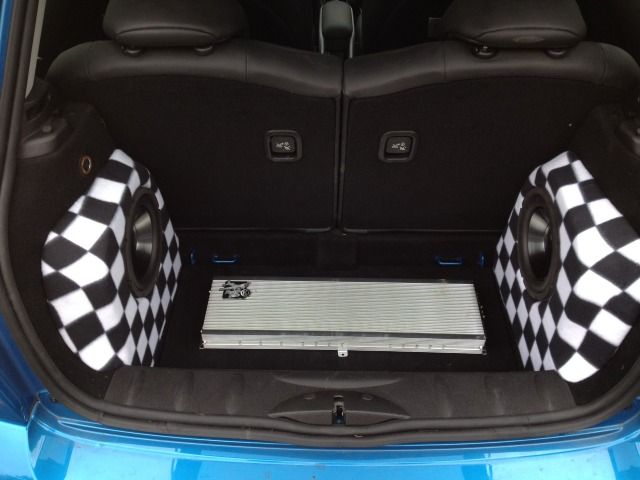
Here is the new trunk floor, also in checkerboard. The amp will be mounted to this.

I came up with these little stands for the false floor. They are just some 1" wooden dowel, wrapped in electrical tape with rubber chair feet on the end.
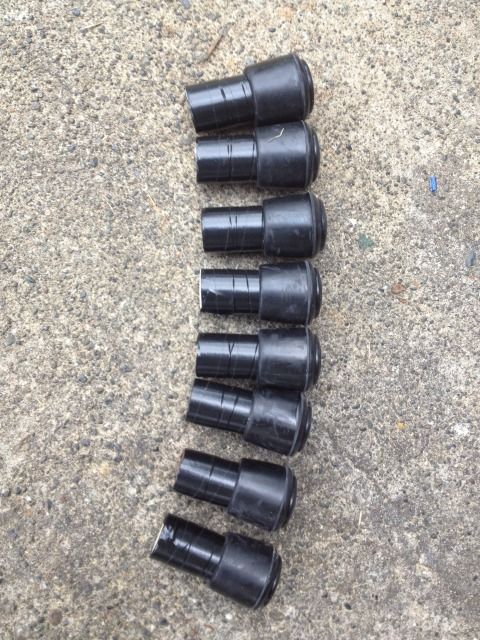
When screwed on from the bottom of the floor, they almost look like chess pieces.
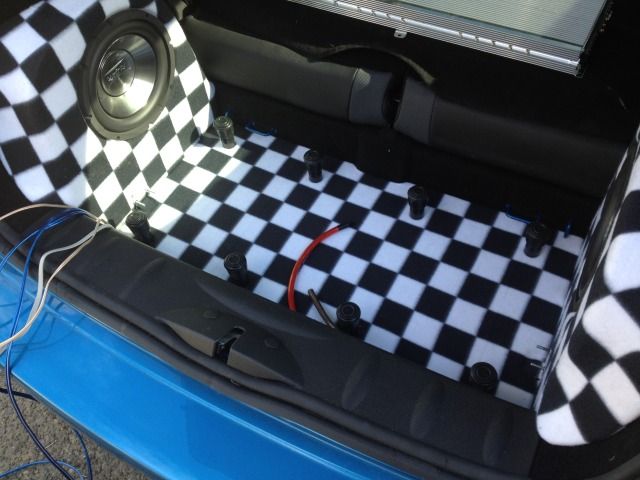
I then made the false floor out of 3/4" MDF covered in carpet. It fits really well, and helps push the speaker boxes into their cavities. When installed, everything is very solid, I can easily sit on the floor. I think I will need to get some grills for the speakers. The floor makes the boxes look smaller, and is about 1/2" above the amp. Before you ask if I'm worried about it overheating, no I'm not. I've had this amp for a long time, and I'm not pushing it nearly as hard in this system as I have in the past.


Here is the new trunk floor, also in checkerboard. The amp will be mounted to this.
I came up with these little stands for the false floor. They are just some 1" wooden dowel, wrapped in electrical tape with rubber chair feet on the end.
When screwed on from the bottom of the floor, they almost look like chess pieces.
I then made the false floor out of 3/4" MDF covered in carpet. It fits really well, and helps push the speaker boxes into their cavities. When installed, everything is very solid, I can easily sit on the floor. I think I will need to get some grills for the speakers. The floor makes the boxes look smaller, and is about 1/2" above the amp. Before you ask if I'm worried about it overheating, no I'm not. I've had this amp for a long time, and I'm not pushing it nearly as hard in this system as I have in the past.
#21
08-28-2012, 12:43 AM

#23
09-06-2012, 07:13 AM
Join Date: May 2012
Location: Burien, WA
Posts: 108
Likes: 0
Received 0 Likes
on
0 Posts
All right, lets do this! Most of what I am about to do is the same as this thread by TomFarin, which helped me tremendously.
https://www.northamericanmotoring.co...upgrade-2.html
I decided to make a pass through adapter for the x9331 plug also. I ordered the plug ends form across the pond, everything else came from Radio Shack or my spare wire box.
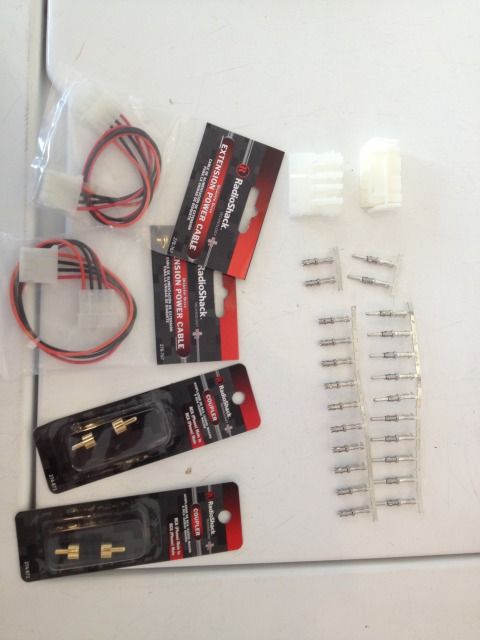
See the "disk drive power extension" cables? Those have a male and female 4 pin molex plug, and plenty of wiring, assembled, for 3 bucks. I will be using them for my speakers.
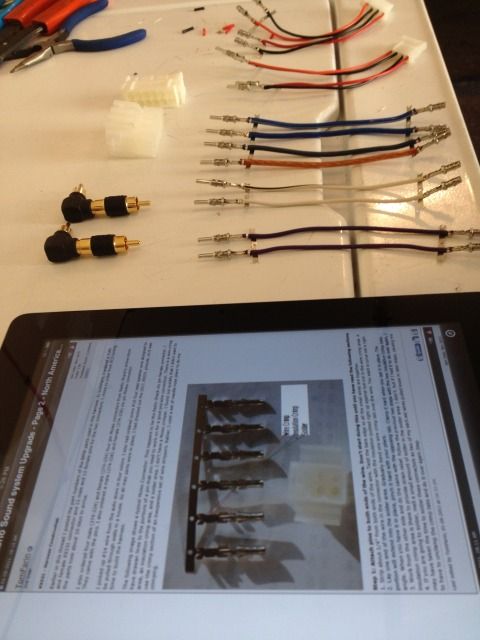
Here is me crimping and soldering all the wires for the connector, following Tom's post and diagrams.

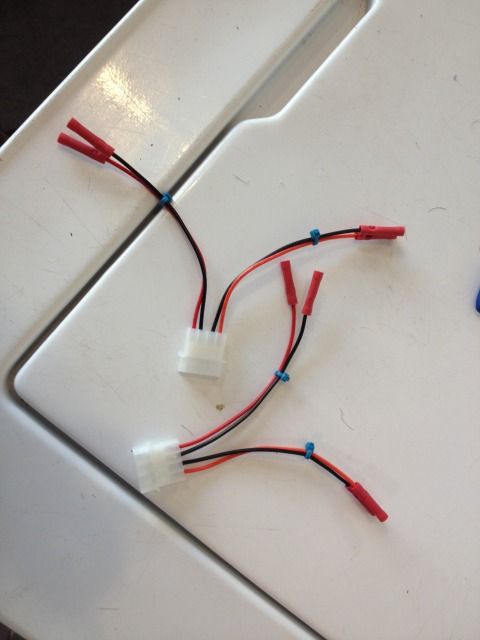
I ended up with this. I made sure to use big gauge wire where needed. The two pigtails are where I will tap into the front speaker level outs, then send my amplified levels back in.

These will be crimped on to the speaker wires going back to and comming from the amp:
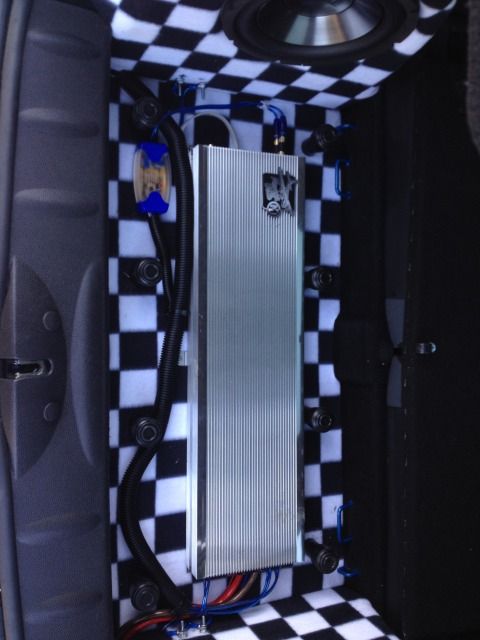
Here is a shot of the amp all wired up, and the line out converter I used from autosound2000 (Dave Navone).
Now for the fun part. Which atually did turn out to be fun, and relatively easy. The front stage.
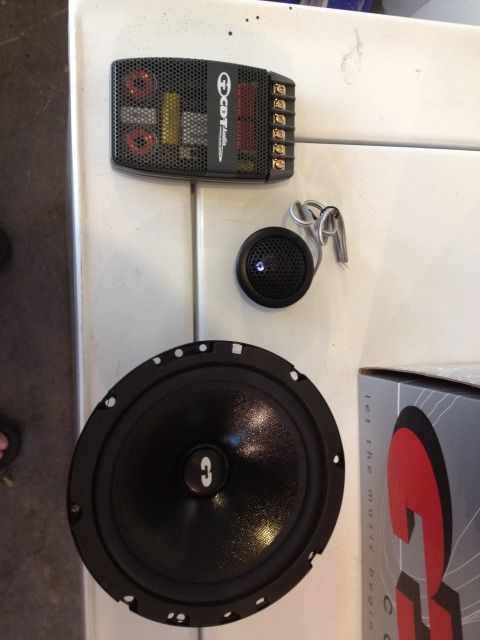
These are the components I chose, CDT CL-61A with upgraded 1" silk dome tweets. They get decent reviews online, and were only 130 bucks shipped.
First the tweeter comes out.
Then remove the cat.

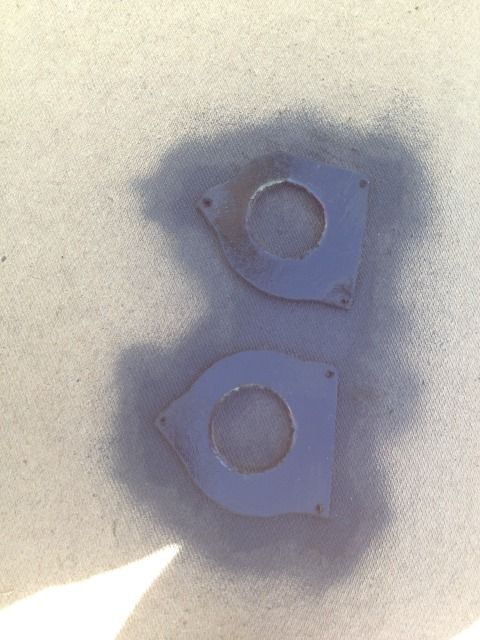
I cut out my tweeter mounting plates as soon as I pulled the first tweeter because I know they would take some time for the paint to dry.
https://www.northamericanmotoring.co...upgrade-2.html
I decided to make a pass through adapter for the x9331 plug also. I ordered the plug ends form across the pond, everything else came from Radio Shack or my spare wire box.
See the "disk drive power extension" cables? Those have a male and female 4 pin molex plug, and plenty of wiring, assembled, for 3 bucks. I will be using them for my speakers.
Here is me crimping and soldering all the wires for the connector, following Tom's post and diagrams.
I ended up with this. I made sure to use big gauge wire where needed. The two pigtails are where I will tap into the front speaker level outs, then send my amplified levels back in.
These will be crimped on to the speaker wires going back to and comming from the amp:
Here is a shot of the amp all wired up, and the line out converter I used from autosound2000 (Dave Navone).
Now for the fun part. Which atually did turn out to be fun, and relatively easy. The front stage.
These are the components I chose, CDT CL-61A with upgraded 1" silk dome tweets. They get decent reviews online, and were only 130 bucks shipped.
First the tweeter comes out.
Then remove the cat.
I cut out my tweeter mounting plates as soon as I pulled the first tweeter because I know they would take some time for the paint to dry.
#24
09-06-2012, 07:30 AM
Join Date: May 2012
Location: Burien, WA
Posts: 108
Likes: 0
Received 0 Likes
on
0 Posts
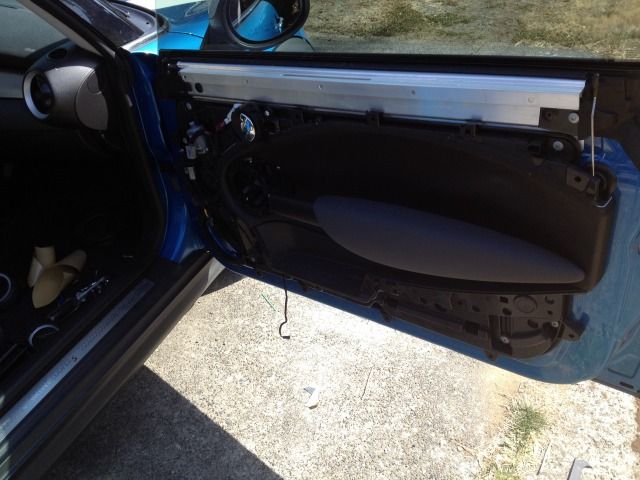
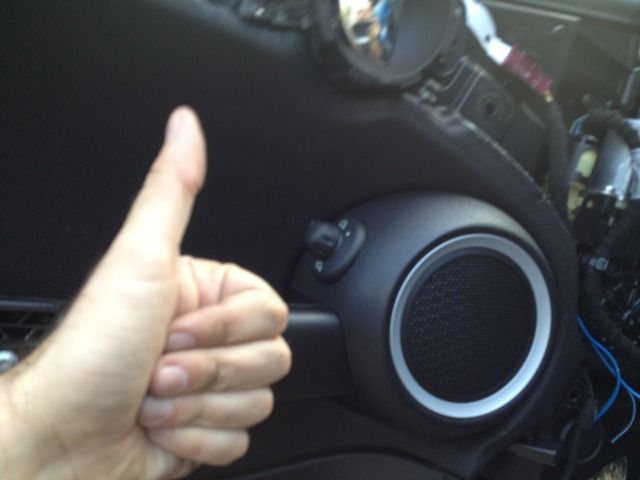
Here is the big door panel removed. I did the passenger side first after reading horror stories about the mirror controls on the drivers side.
I pulled the woofers out, and put in some dynamat.

I stripped some of the factory wiring covering away to give me some room to work. This is the one place where I would be cutting factory wires, the speaker plug. I wanted to give myself enough wire on each end of the cut, so that if I ever wanted to put the stock speakers back in I could.

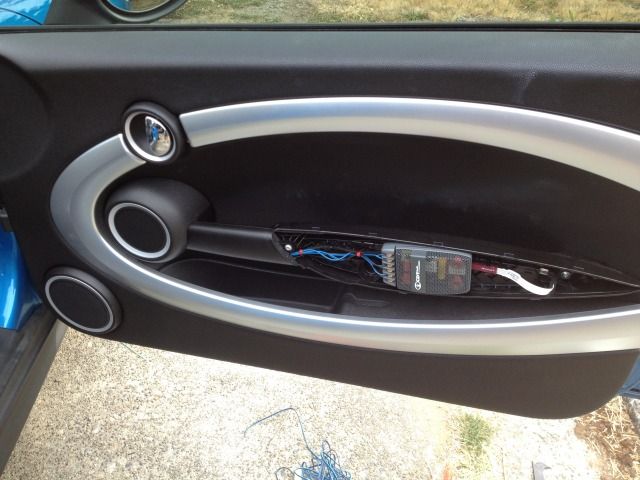
TomFarin chose to put his crossovers in teh door itself. However, I wanted to keep mine out of the elements, and also retain acces to them so I could play with the tweeter level switched during tuning. I elected for the arm rest. Here I'm running the wires.

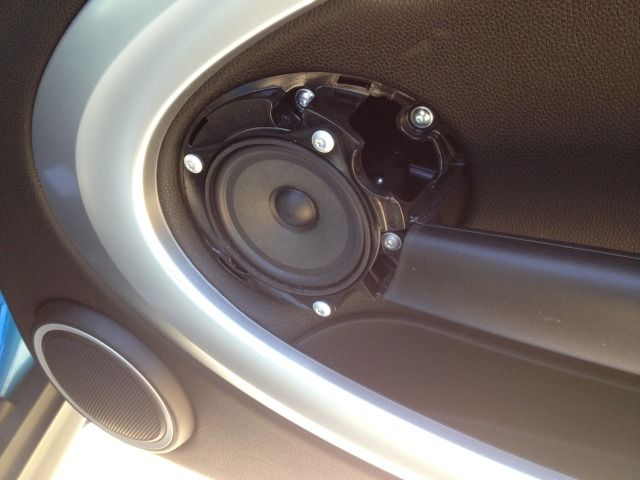
Here is the passenger door with the woofer, tweet, and crossover all installed. Not too shabby right?

Drivers door looks the same, except for that pesky switch. Turned out to be a cake walk. When you take the cover off, the switch will probably pop in half like Tom's did, and you run the risk of those little pins falling out. Once the cover is off, un plug the wires from the other half of the switch.

Snap the switch back together and set it aside. Now, when you put the cover back on, all you have to do is plug the switch back in and pop it in the hole. Took 30 seconds.

My last shot here is of my adapter in place.

I wired it all up, stuffed the wiring up under the dash, crossed my fingers and turned it on. Everything works!
The LOC has a built in amp turn on, and its fast enough that I still get all the door chimes and stuff.
I have not adjusted the gains or crossovers on the amp yet (they are the same as they were my old system), but it already sounds 200x better than stock. I'm hoping I can get the subs a little louder, but what can you expect from 2 8's sealed after having a monster 15" ported.
I can't believe I waited this long to upgrade the stereo, what a difference it makes in driving enjoyment.
I pulled the woofers out, and put in some dynamat.
I stripped some of the factory wiring covering away to give me some room to work. This is the one place where I would be cutting factory wires, the speaker plug. I wanted to give myself enough wire on each end of the cut, so that if I ever wanted to put the stock speakers back in I could.
TomFarin chose to put his crossovers in teh door itself. However, I wanted to keep mine out of the elements, and also retain acces to them so I could play with the tweeter level switched during tuning. I elected for the arm rest. Here I'm running the wires.
Here is the passenger door with the woofer, tweet, and crossover all installed. Not too shabby right?
Drivers door looks the same, except for that pesky switch. Turned out to be a cake walk. When you take the cover off, the switch will probably pop in half like Tom's did, and you run the risk of those little pins falling out. Once the cover is off, un plug the wires from the other half of the switch.
Snap the switch back together and set it aside. Now, when you put the cover back on, all you have to do is plug the switch back in and pop it in the hole. Took 30 seconds.
My last shot here is of my adapter in place.
I wired it all up, stuffed the wiring up under the dash, crossed my fingers and turned it on. Everything works!
The LOC has a built in amp turn on, and its fast enough that I still get all the door chimes and stuff.
I have not adjusted the gains or crossovers on the amp yet (they are the same as they were my old system), but it already sounds 200x better than stock. I'm hoping I can get the subs a little louder, but what can you expect from 2 8's sealed after having a monster 15" ported.
I can't believe I waited this long to upgrade the stereo, what a difference it makes in driving enjoyment.