Navigation & Audio Dream double-din carpc system
#26
 09-20-2008, 05:07 PM


#27
09-29-2008, 11:31 AM

#28
09-29-2008, 11:34 AM
Let us all know how it goes. I have not had a chance to get the parts ordered to play with yet. Just to busy with family matters (funeral) lately.
#29
09-29-2008, 11:44 AM
My sympathy to you and your family. When you do get more free time, hopefully modding your mini will be therapeutic.
#30
09-29-2008, 12:40 PM

i think the hardest part is going to make a wiring loom for moving the OEM stereo...there are not only regular copper wires in there but there are two fiber optic wires coming from somewhere in the dash to the large connector on the back of the stereo. oh, and on a side note...don't tap the power lines for the stereo either...i have my dice RDS taking power from that and i cant dim my dash lights or turn off my headlights without the ipod adapter loosing power. just fyi
one other thing, why is shipping so much? i oder things from Hong Kong all the time and express 2-3 day shipping is only 30-40 bucks on much bigger and heavier things. that is using EMS post and the USPS stateside.
one other thing, why is shipping so much? i oder things from Hong Kong all the time and express 2-3 day shipping is only 30-40 bucks on much bigger and heavier things. that is using EMS post and the USPS stateside.
#31
09-30-2008, 05:29 AM
Now according to the wiring diagrams there is not supposed to be a Fiber Optic cable to the head unit. But Mini has been wrong in the past.
As for the power wire you used. It must have been the display power wire rather than the full power all the time wire. That would explain the dimming problem.
#32
09-30-2008, 08:24 AM
When I removed the stereo to install NewMiniStuff's nav audio harness, I had to remove the aux input's fiber optic wiring as per instructions and reinsert in the new connector. I think that's what you noticed going to the large connector.
#33
10-20-2008, 11:20 AM

#35
10-21-2008, 05:17 AM
I had my center console plastics off two weeks ago and i am not sure if there was enough sire to the controls to move them that far down.
i also belive that if you are using a 2 din. Moving it down that far will also mean that you have to cut sheet metal in the dash to get it to fit. The 2 din opening in the dash sheet metal is up at the top of the stack where the cd player and the volume control are. And if i remember correctly there was other stuff like heater core, fan etc back behind where you are wanting to put your 2 din deck. If that is the case it wouldnot fit anyway as there is not enought depth for it. But if you are not useing a deck and only a screen then if the wires for the heater/AC controls are long enought then you may not have any problems.
If you have not already glued the pieces back together you may want to take apart you dash first (if you have not already done so) to make sure you have enough sire and room in the back area to do what you want.
I don't mean to rain on your pararde here but i would hate ot see you do all this work and find out there is no way for it to work.
#36
10-21-2008, 07:33 AM
I had my center console plastics off two weeks ago and i am not sure if there was enough sire to the controls to move them that far down.
i also belive that if you are using a 2 din. Moving it down that far will also mean that you have to cut sheet metal in the dash to get it to fit. The 2 din opening in the dash sheet metal is up at the top of the stack where the cd player and the volume control are. And if i remember correctly there was other stuff like heater core, fan etc back behind where you are wanting to put your 2 din deck. If that is the case it wouldnot fit anyway as there is not enought depth for it. But if you are not useing a deck and only a screen then if the wires for the heater/AC controls are long enought then you may not have any problems.
If you have not already glued the pieces back together you may want to take apart you dash first (if you have not already done so) to make sure you have enough sire and room in the back area to do what you want.
I don't mean to rain on your pararde here but i would hate ot see you do all this work and find out there is no way for it to work.
i also belive that if you are using a 2 din. Moving it down that far will also mean that you have to cut sheet metal in the dash to get it to fit. The 2 din opening in the dash sheet metal is up at the top of the stack where the cd player and the volume control are. And if i remember correctly there was other stuff like heater core, fan etc back behind where you are wanting to put your 2 din deck. If that is the case it wouldnot fit anyway as there is not enought depth for it. But if you are not useing a deck and only a screen then if the wires for the heater/AC controls are long enought then you may not have any problems.
If you have not already glued the pieces back together you may want to take apart you dash first (if you have not already done so) to make sure you have enough sire and room in the back area to do what you want.
I don't mean to rain on your pararde here but i would hate ot see you do all this work and find out there is no way for it to work.
As a side-note, it's been fun hacking away with all my mods successful or not. I've always been nervous about breaking something due to my hacks that require a trip to the dealer. My car just got out of the body shop and one of the brake lights wasn't working. They changed the bulb and it still didn't work. They blamed my back-up camera wiring as causing some "short" and told me to go to the dealer. All I did was tap the ground wire. Well, I ended up getting a new bulb at autozone and it worked. How quick the auto electrician blamed my wiring. Only in NYC do you get absolutely no benefit of the doubt.
#38
11-10-2008, 12:28 AM

4th Gear
Join Date: Aug 2008
Location: Houston, TEXAS
Posts: 538
Likes: 0
Received 0 Likes
on
0 Posts


#40
11-10-2008, 05:11 AM
Looks Great, But we need more pics.
Question, Can you actually get to the toggle switches? They look like they are behind the cup holders.
Also most small touch screen monitors have a lousy viewing angle from above how is it to view this monitor?
What equipment did you use to drive it and where is is all mounted.
We need details
Question, Can you actually get to the toggle switches? They look like they are behind the cup holders.
Also most small touch screen monitors have a lousy viewing angle from above how is it to view this monitor?
What equipment did you use to drive it and where is is all mounted.
We need details
#41
11-10-2008, 08:42 AM
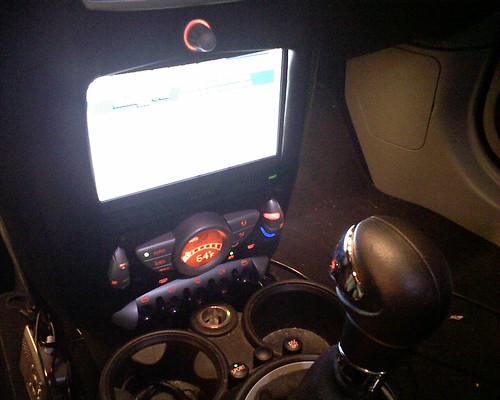
Thanks guys! I'll take better pictures today. I warn you things are still rough around the edges, literally. It's more a proof of concept, but it's good enough for me for now. All I can say is it is better to be lucky than good. Things just barely fit.
Since I installed the whole touchscreen case and all with the bottom buttons, the controls are way, way low, not really ergonomic, but okay with may lanky arms. BTW, the wires/connectors were plenty long. Can't pull up on the door lock switch since it is abutting the cig lighter, but you can stil lock/unlock just by pushing down. Luckily, there is more space for your finger on the edges where the window switches are to pull up. I almost thought about dremeling away the cig adapter and relocating it. Good thing I didn't have time, or I might not have been able to control myslef. The cup holders might have been gone as well.
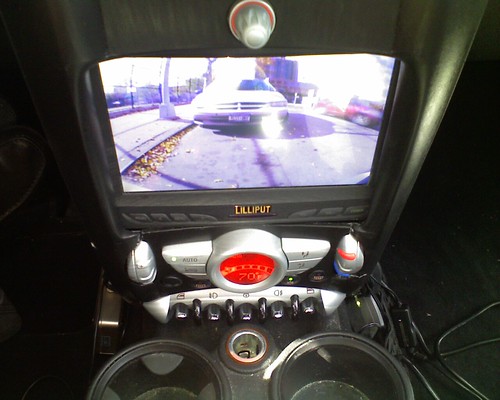
The viewing angle is no problem at all with my new 2008 Lilliput 629GL-70NP screen. If you get the 629 make sure it is a 2008 model with the 500:1 contrast ratio. I have video one to my back-up cam, video two and audio to my DVR/dashcam, and the VGA/usb to my EEE 1000h Laptop that I put under the passenger seat. Since the is no more room under the center cubby, I relocated the aux port to the side with a headphone wire extension. My next step is to set-up a dedicated carpc/gps/xm radio now that I have a working screen.
If I had to do things over again now that I skimmed a few superficial skills from the masters at mp3car.com, I might emulate the $500 Japan single-din kit and get a retractable touchscreen. Then the A/C controls/toggles would be in a better position. Not sure if I like the look of the single-din unit sticking out, but the screen would be more safely positioned, higher up, but will block the volume ****. I'm not keen on relocating the CD player/volume **** as done by the Japanese double-din kit especially without the necessady cables, but the screen would look beautiful there properly fabricated. Also, I wouldn't use Mighty Putty again. I was inpatient, and couldn't wait for Dynatron 660 flexible epoxy which was in the mail. Also, a user showed me a site where I can get a spare casing for my touchscreen so I can fabricate/bezel the front casing directly into the console piece.
If you are OCD or averse to masochism, I don't recommend any of this. Save-up for the Japanese kits. I'm not averse to masochism, and I'm only selectively OCD, so I enjoyed the planning, dremling, sculpting, sanding, painting, and taking apart the mini cooper's masochistic dash. Next car I'm getting will have a standard double-din.
Just got called to work. Sorry for the lengthy babble.
Since I installed the whole touchscreen case and all with the bottom buttons, the controls are way, way low, not really ergonomic, but okay with may lanky arms. BTW, the wires/connectors were plenty long. Can't pull up on the door lock switch since it is abutting the cig lighter, but you can stil lock/unlock just by pushing down. Luckily, there is more space for your finger on the edges where the window switches are to pull up. I almost thought about dremeling away the cig adapter and relocating it. Good thing I didn't have time, or I might not have been able to control myslef. The cup holders might have been gone as well.
The viewing angle is no problem at all with my new 2008 Lilliput 629GL-70NP screen. If you get the 629 make sure it is a 2008 model with the 500:1 contrast ratio. I have video one to my back-up cam, video two and audio to my DVR/dashcam, and the VGA/usb to my EEE 1000h Laptop that I put under the passenger seat. Since the is no more room under the center cubby, I relocated the aux port to the side with a headphone wire extension. My next step is to set-up a dedicated carpc/gps/xm radio now that I have a working screen.
If I had to do things over again now that I skimmed a few superficial skills from the masters at mp3car.com, I might emulate the $500 Japan single-din kit and get a retractable touchscreen. Then the A/C controls/toggles would be in a better position. Not sure if I like the look of the single-din unit sticking out, but the screen would be more safely positioned, higher up, but will block the volume ****. I'm not keen on relocating the CD player/volume **** as done by the Japanese double-din kit especially without the necessady cables, but the screen would look beautiful there properly fabricated. Also, I wouldn't use Mighty Putty again. I was inpatient, and couldn't wait for Dynatron 660 flexible epoxy which was in the mail. Also, a user showed me a site where I can get a spare casing for my touchscreen so I can fabricate/bezel the front casing directly into the console piece.
If you are OCD or averse to masochism, I don't recommend any of this. Save-up for the Japanese kits. I'm not averse to masochism, and I'm only selectively OCD, so I enjoyed the planning, dremling, sculpting, sanding, painting, and taking apart the mini cooper's masochistic dash.
Next car I'm getting will have a standard double-din. Just got called to work. Sorry for the lengthy babble.
#42
11-10-2008, 10:24 AM
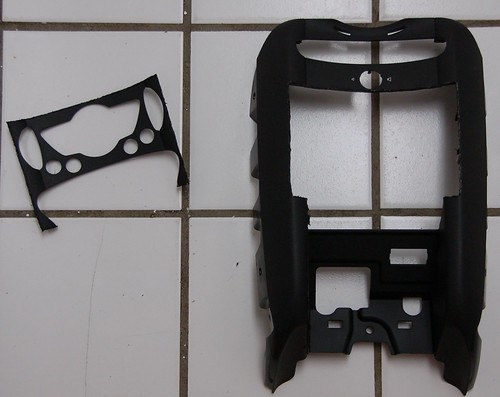
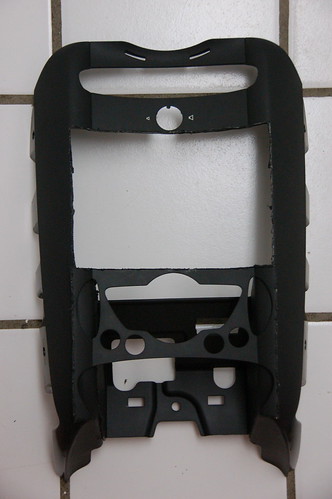
More pictures. As you can see, the bottom edge sticks out. The A/C console face plate top edge was supposed to be hidden under the bottom edge of the touchscreen, but the space was to tight back there so it popped out. I had to break my original epoxy putty "weld" to get it to fit. In retrospect, things would have fit more easily if I dremmeled or removed the old center cubby hole floor piece.


Last edited by lacning74; 11-11-2008 at 07:05 AM.
#43
11-10-2008, 10:50 AM
SO as you said it is not perfect but as long as you are happy that is what counts. And you had the Bal*s to try it.
I am planing on a carpc inthe near future but do not like the screen location in you car. I think even the move up as the Japanese have it would still be to low for me. I have some other ideas about it and am looking at mounting brakets to hang it from the roof. I have to make a mock up of the monitor out of card board so that i can play wiht it.
Unfortunately due to financial circumstances mine will take months to complete as i can only afford one peice every 2-4 weeks.
Well thanks for sharing and maybe you should go inot business making these if people are interested.
#44
11-10-2008, 11:55 AM

More pictures. As you can see, the bottom edge sticks out. The A/C console face plate top edge was supposed to be hidden under the bottom edge of the touchscreen, but the space was to tight back there so it popped out. I had to break my original epoxy putty "weld" to get it to fit. In retrospect, things would have fit more easily if I dremmeled or removed the old center cubby hole floor piece.

#45
11-12-2008, 12:37 PM

http://www.mp3car.com/index.php/116-...computers.html
But they do have a smart mirror out that will do navigation, bluetooth phone and back up camera.
http://www.azentekonline.com/cms/content/view/79/180/
#46
11-18-2008, 07:04 AM
If anyone is interested, here is my worklog thread at mp3car.com. I will post details here when I'm much further along.
Oh yeah, I also installed Newministuff.com's Bluetooth MFSW Parrot EVO module. I wired the microphone up to the overhead console and put it where the oem blueooth mic is usually hidden. The unit works great! It is so nice to finally have a function for those two buttons on the steering wheel. I didn't get the one with the display because you can't control the volume from the steering wheel and it is one less thing to clutter my dashboard. The exchange rate is much more favorable for the USA. At least there's one positive thing from this wall street crisis.
Oh yeah, I also installed Newministuff.com's Bluetooth MFSW Parrot EVO module. I wired the microphone up to the overhead console and put it where the oem blueooth mic is usually hidden. The unit works great! It is so nice to finally have a function for those two buttons on the steering wheel. I didn't get the one with the display because you can't control the volume from the steering wheel and it is one less thing to clutter my dashboard. The exchange rate is much more favorable for the USA. At least there's one positive thing from this wall street crisis.
#47
12-10-2008, 09:11 AM

Looks good, I cant wait to get my mini and get crackin on this install. I'm a professional installer and I had an idea plotted out in my head about how accomplish this, seeing your install gave me the final details i had to figure out. Good work!
I plan on using a little bit of fiberglass/polyfiber/bondo and molding on gauge pods for boost/afr and probably will eliminate the cig lighter and relocate it to another location because i dont like how low that all sat. I really dont even use a cig light so i may eliminate it all together. I also plan on wrapping the panels and headliner in the vehicle in black suede so the same will go for the custom console, that will cover any slight imperfections and make finish work simple.
Overall good job!
I just cant wait to get a mini now that i know my equipment will work for sure!
#48
12-10-2008, 09:45 AM
Looks good, I cant wait to get my mini and get crackin on this install. I'm a professional installer and I had an idea plotted out in my head about how accomplish this, seeing your install gave me the final details i had to figure out. Good work!
I plan on using a little bit of fiberglass/polyfiber/bondo and molding on gauge pods for boost/afr and probably will eliminate the cig lighter and relocate it to another location because i dont like how low that all sat. I really dont even use a cig light so i may eliminate it all together. I also plan on wrapping the panels and headliner in the vehicle in black suede so the same will go for the custom console, that will cover any slight imperfections and make finish work simple.
Overall good job!
I just cant wait to get a mini now that i know my equipment will work for sure!
I plan on using a little bit of fiberglass/polyfiber/bondo and molding on gauge pods for boost/afr and probably will eliminate the cig lighter and relocate it to another location because i dont like how low that all sat. I really dont even use a cig light so i may eliminate it all together. I also plan on wrapping the panels and headliner in the vehicle in black suede so the same will go for the custom console, that will cover any slight imperfections and make finish work simple.
Overall good job!
I just cant wait to get a mini now that i know my equipment will work for sure!
#49
12-10-2008, 01:54 PM
I hear that! Ya ive worked at custom shops when i first started installing professionally, now i work in a big box store doing regular installs. Nothing crazy, so when it comes to my own vehicles, I want crazy. Ive had a double din in my honda for the last 8 months or so. Ive got a very very good system set aside for the mini once i get it.
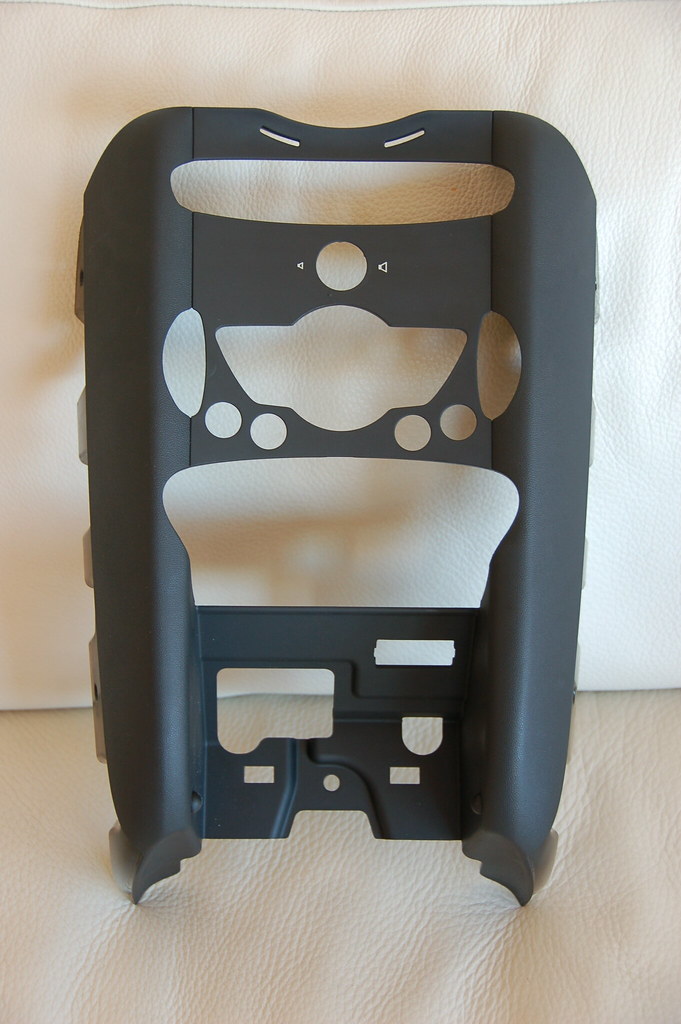
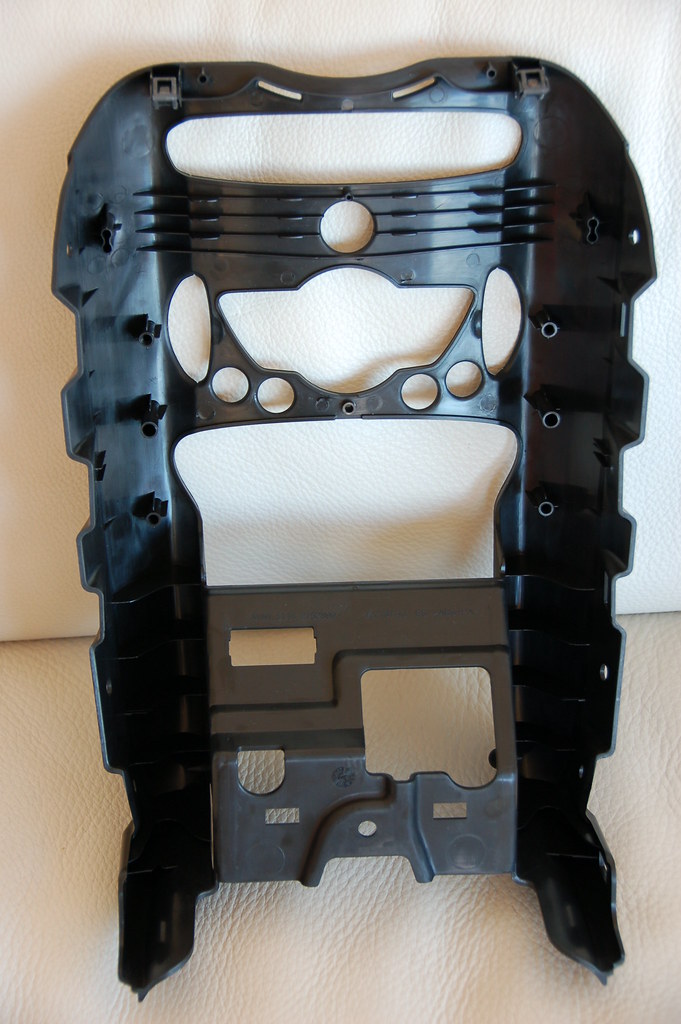
Do you, or anyone else have pictures of the space behind the radio bezel? Im curious as to how deep it is. I was planning on building up higher in the bezel and removing the cd drive to accomidate the screen that way the climate controls werent so low liek yours is.
Thanks in advance if anyone does have pics!
#50
12-10-2008, 02:12 PM
I hear that! Ya ive worked at custom shops when i first started installing professionally, now i work in a big box store doing regular installs. Nothing crazy, so when it comes to my own vehicles, I want crazy. Ive had a double din in my honda for the last 8 months or so. Ive got a very very good system set aside for the mini once i get it.
Do you, or anyone else have pictures of the space behind the radio bezel? Im curious as to how deep it is. I was planning on building up higher in the bezel and removing the cd drive to accomidate the screen that way the climate controls werent so low liek yours is.
Thanks in advance if anyone does have pics!

I wanted to do the same thing, in order to emulate the Japan double-din kit. Removing the CD player has been a dream of others in order to easily install single-din systems, but unfortunately, it is integrated into the headunit/speedo display/and controls. You'll need some custom cable extension to relocate the cd/volume **** unit somewhere else (like the glovebox as done with the Japanese mod kit pictured earlier in the thread) to preserve function.


Thread
Thread Starter
Forum
Replies
Last Post
Mini Mania
Interior/Exterior Products
0
09-04-2015 02:34 PM
M7Speed
R60 :: Countryman Talk (2010-2015)
0
09-04-2015 10:47 AM

