Navigation & Audio Follow up: XM CommanderMT Install: Antenna
#1
 08-01-2008, 09:20 AM


Join Date: Jun 2008
Location: Jupiter, Florida
Posts: 189
Likes: 0
Received 0 Likes
on
0 Posts
Follow up: XM CommanderMT Install: Antenna
First I have to say none of what I am posting about is an original idea concerning the usage of the OEM Sirius antenna for the XM antenna...this has been discussed in threads before...would like to thank piloart  in particular for steering me towards this option of using the OEM antenna and having the link to CD International Technology (SMB cable supplier).
In a separate thread I posted about having the XM CommanderMT installed and finding that if fit perfectly in the cubby (aka 'secret compartment')>>
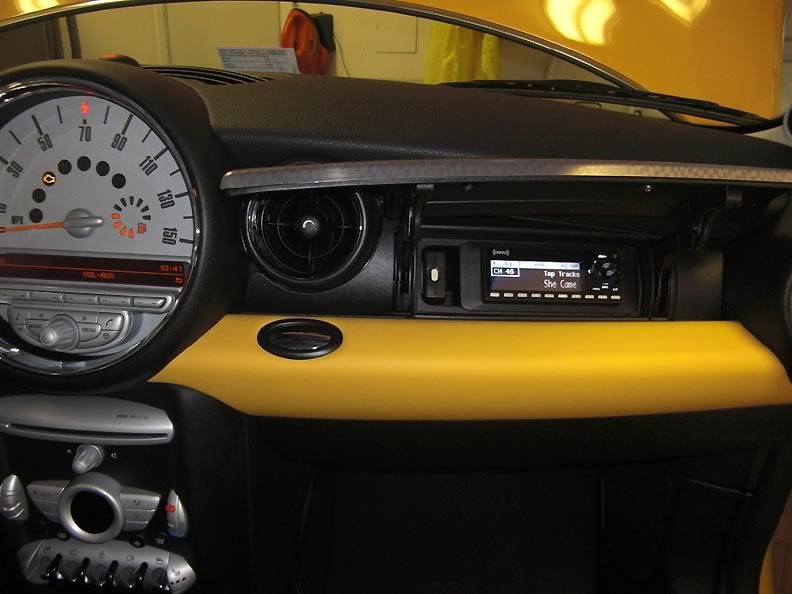
I also included a pic showing the XM antenna location and that is where piloart came in about using the OEM Sirius antenna thus eliminating the need for the mag mount XM antenna.
Well...here is the 'how to' with some pics that I hope will make it clear what can be done..
First, with patience is easy to do and would take about 1.5 hrs total.
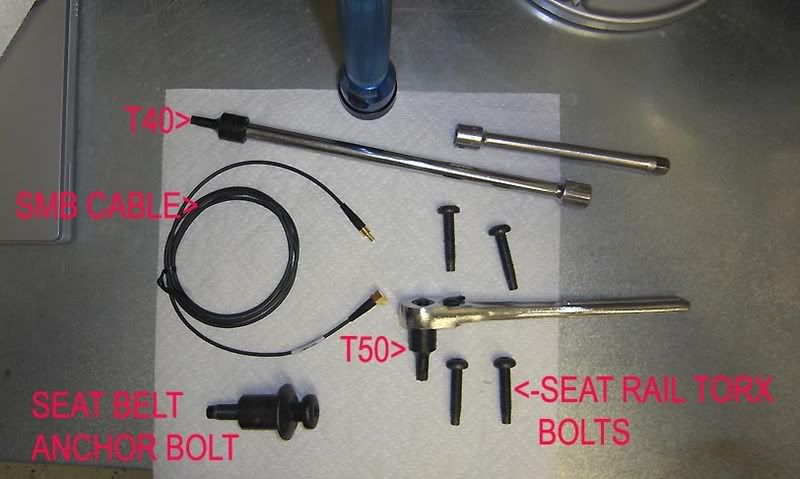
Tools needed is Torx T40 and T50 drivers, ratchet with extensions, slotted screwdriver, black/duct tape, lights and nothing really more...
Under the passenger seat is a plug that runs directly to the OEM antenna mount which contains the radio antenna and the Sirius satellite antenna.. the location is right about where you see the seat (air bag seat sensor, heated seats, air bag wiring etc) cable coming thru a slit in the carpet>>

Some have suggested you can do the antenna hook up without removing the passenger seat..more power to them...I simply can not see how that can done due to the connector you are trying to get to is rather buried (you will see in the pics to come).
Removing the seat is rather straight forward... will need a Torx T40 driver and a ratchet w/ extension>>

Slide seat all the way back and remove front Torx bolts (2) and then move seat all the way forward and remove back Torx bolts (2). Now carefully tilt seat back to get to the seat plug>>
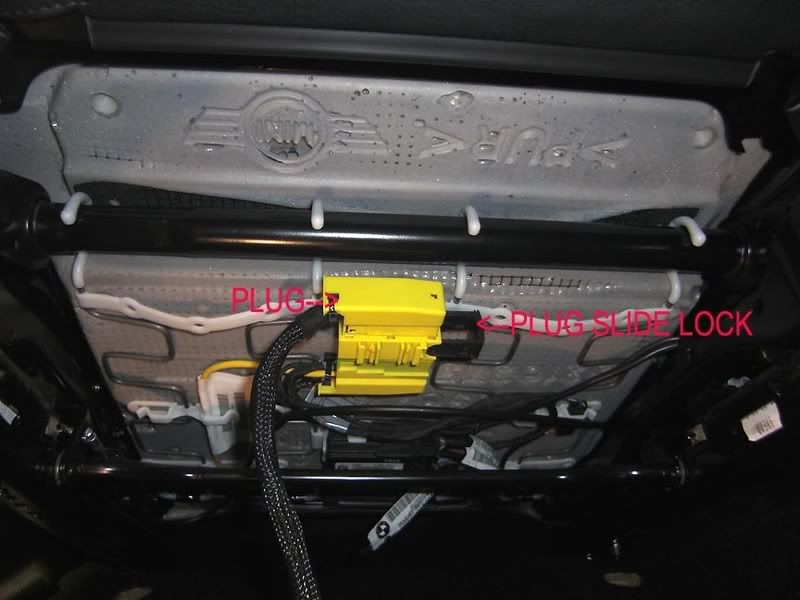
Plug is held in place with a slide clip...just use the slotted screwdriver and push slide to the right and out...will look like the pic above. Now wiggle plug out. PLEASE NOTE: DO NOT TURN ON IGNITION WHILE SEAT IS UNPLUGGED. WILL PLACE AIRBAG SYSTEM IN A FAULT MODE MEANING INDICATOR LIGHT SHOWING THIS NEEDS TO BE RESET BY DEALERSHIP.
Set seat back down flat and carefully remove from car making sure not to hit any interior trim with the seat rails.
Now remove the passenger seat belt anchor (requires a T50 drive) and peel off door gasket from bottom area of door opening...you then pop off the bottom trim running along the door sill and carpeting...when finished would look something like this>>

Suggestion..always place removed bolts in position as to where they came from...just in case there are any thread conditions that you would want to make the same bolt went back into the same site>>>
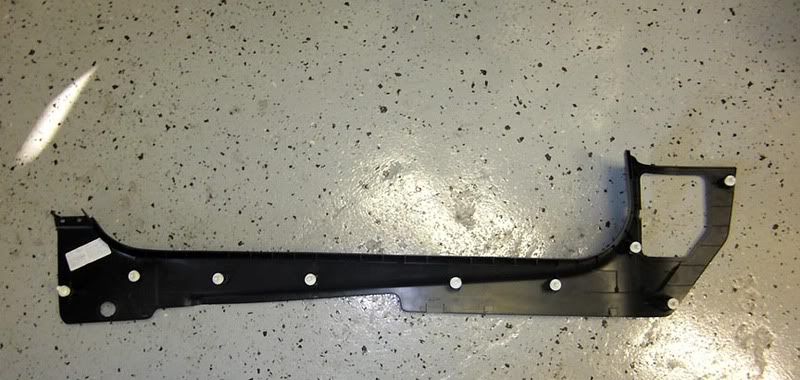
This is the back side of the trim piece removed... there are (9) of the push clips...when removing the trim piece if any of these remain on the car remove and install back on to trim piece...when re-installing the trim piece it is just a matter of aligning the push clips with the holes in the body and pushing in.
Lift up carpet (has a really thick..good!!...foam pad so makes pushing it up more tedious... this is what you see and what you are going after>>>
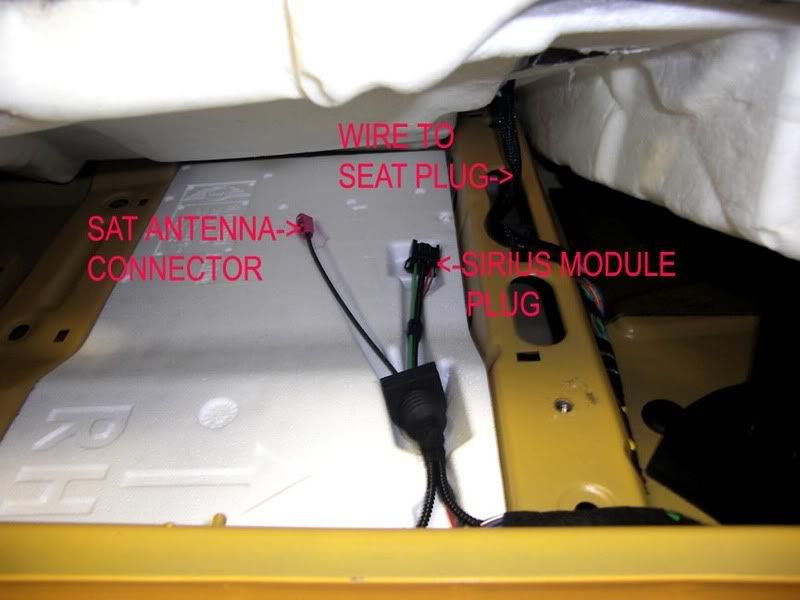
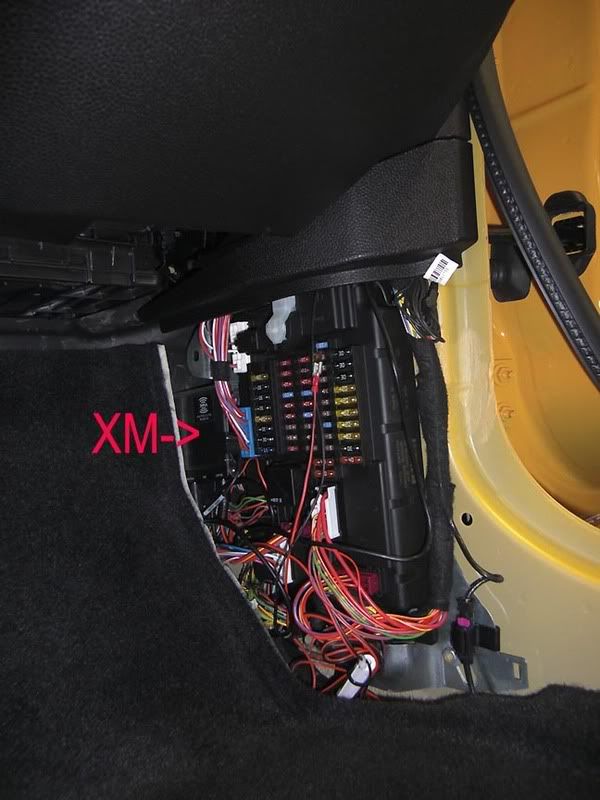
Using the CD International Technology supplied 5' SMB connector/cable (their part #SB9SBJ-174LN-5) hook up XM tuner to OEM antenna plug. The XM tuner module was installed in the passenger foot well area where fuse box is located thus 5' SMB was plenty long enough..if you install the module in a more remote area then will need to order a longer SMB cable>>>
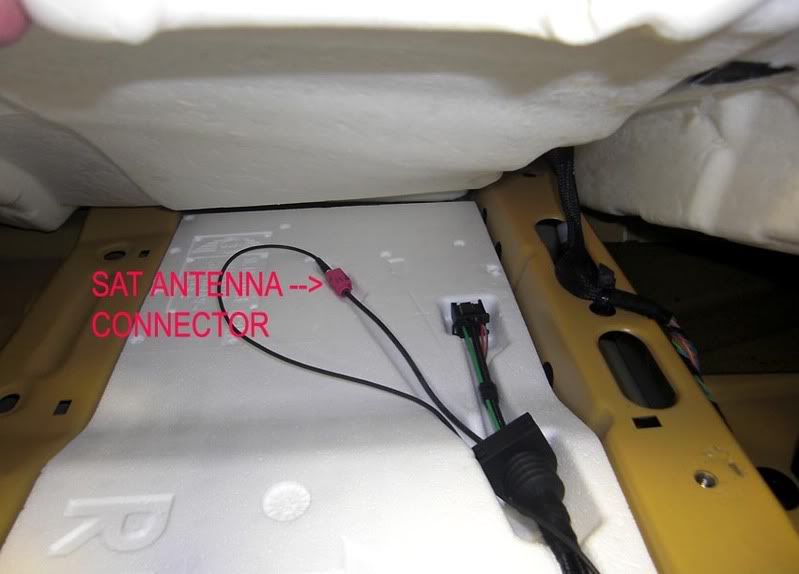
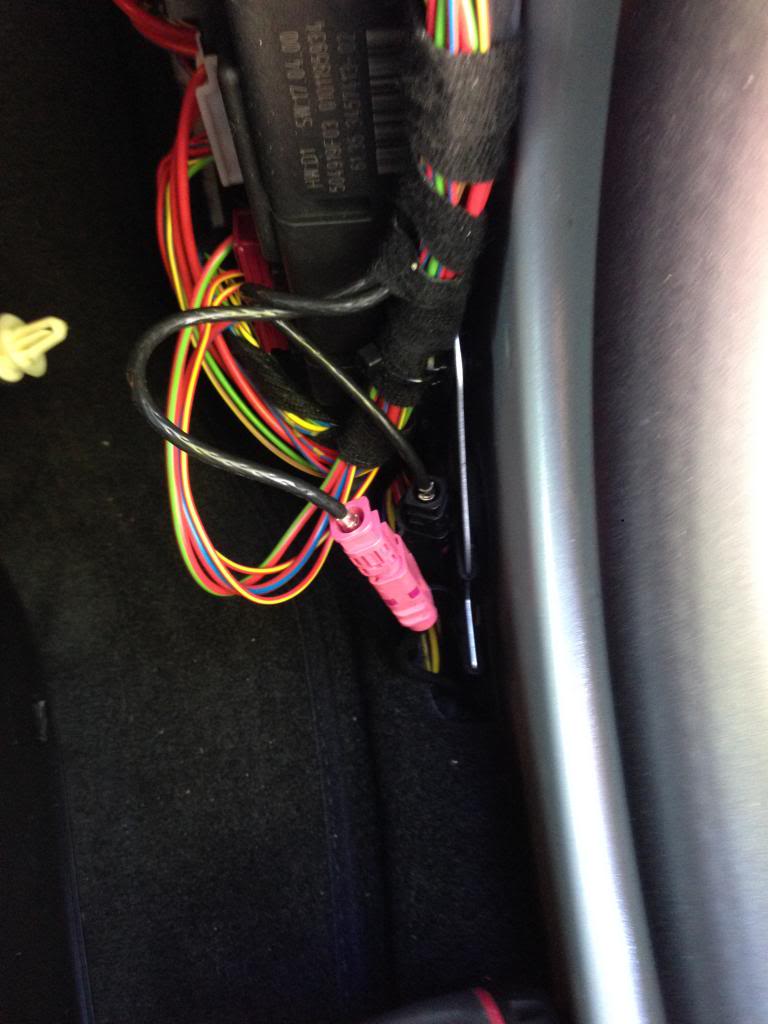
Connect SMB cable to XM module (or what unit you use), run along wiring bundle near door sill and then to satellite antenna connector...just using your finger push styrofoam down creating an indent for the SMB plug going into the Sat connector>>
Now cover the connector with some black/duct tape and place carpet back down in place.
Install removed trim piece along sill and re-install the door gasket...make sure you work the door gasket from the corners first. Re-install seat belt bolt and now install seat..first before bolting tilt seat back and install seat plug..wiggle in a bit then push the slide clip in and it will seat the plug the rest of the way... now bolt seat into place.
Wipe trim down and that is it... works like a charm and great not to have that mag antenna. Now the whole set up looks factory installed.
Michael
in particular for steering me towards this option of using the OEM antenna and having the link to CD International Technology (SMB cable supplier).In a separate thread I posted about having the XM CommanderMT installed and finding that if fit perfectly in the cubby (aka 'secret compartment')>>
I also included a pic showing the XM antenna location and that is where piloart came in about using the OEM Sirius antenna thus eliminating the need for the mag mount XM antenna.
Well...here is the 'how to' with some pics that I hope will make it clear what can be done..
First, with patience is easy to do and would take about 1.5 hrs total.
Tools needed is Torx T40 and T50 drivers, ratchet with extensions, slotted screwdriver, black/duct tape, lights and nothing really more...
Under the passenger seat is a plug that runs directly to the OEM antenna mount which contains the radio antenna and the Sirius satellite antenna.. the location is right about where you see the seat (air bag seat sensor, heated seats, air bag wiring etc) cable coming thru a slit in the carpet>>
Some have suggested you can do the antenna hook up without removing the passenger seat..more power to them...I simply can not see how that can done due to the connector you are trying to get to is rather buried (you will see in the pics to come).
Removing the seat is rather straight forward... will need a Torx T40 driver and a ratchet w/ extension>>
Slide seat all the way back and remove front Torx bolts (2) and then move seat all the way forward and remove back Torx bolts (2). Now carefully tilt seat back to get to the seat plug>>
Plug is held in place with a slide clip...just use the slotted screwdriver and push slide to the right and out...will look like the pic above. Now wiggle plug out. PLEASE NOTE: DO NOT TURN ON IGNITION WHILE SEAT IS UNPLUGGED. WILL PLACE AIRBAG SYSTEM IN A FAULT MODE MEANING INDICATOR LIGHT SHOWING THIS NEEDS TO BE RESET BY DEALERSHIP.
Set seat back down flat and carefully remove from car making sure not to hit any interior trim with the seat rails.
Now remove the passenger seat belt anchor (requires a T50 drive) and peel off door gasket from bottom area of door opening...you then pop off the bottom trim running along the door sill and carpeting...when finished would look something like this>>
Suggestion..always place removed bolts in position as to where they came from...just in case there are any thread conditions that you would want to make the same bolt went back into the same site>>>
This is the back side of the trim piece removed... there are (9) of the push clips...when removing the trim piece if any of these remain on the car remove and install back on to trim piece...when re-installing the trim piece it is just a matter of aligning the push clips with the holes in the body and pushing in.
Lift up carpet (has a really thick..good!!...foam pad so makes pushing it up more tedious... this is what you see and what you are going after>>>
Using the CD International Technology supplied 5' SMB connector/cable (their part #SB9SBJ-174LN-5) hook up XM tuner to OEM antenna plug. The XM tuner module was installed in the passenger foot well area where fuse box is located thus 5' SMB was plenty long enough..if you install the module in a more remote area then will need to order a longer SMB cable>>>
Connect SMB cable to XM module (or what unit you use), run along wiring bundle near door sill and then to satellite antenna connector...just using your finger push styrofoam down creating an indent for the SMB plug going into the Sat connector>>
Now cover the connector with some black/duct tape and place carpet back down in place.
Install removed trim piece along sill and re-install the door gasket...make sure you work the door gasket from the corners first. Re-install seat belt bolt and now install seat..first before bolting tilt seat back and install seat plug..wiggle in a bit then push the slide clip in and it will seat the plug the rest of the way... now bolt seat into place.
Wipe trim down and that is it... works like a charm
and great not to have that mag antenna. Now the whole set up looks factory installed.Michael
Last edited by MeloR56; 08-01-2008 at 10:15 AM.

#3
08-01-2008, 11:10 AM

6th Gear
Join Date: Mar 2007
Location: Bryan Texas
Posts: 1,369
Likes: 0
Received 0 Likes
on
0 Posts
Great pictures and wirte up. Chilton's should hire you and fire that guy that draws their doodles.
I am one of those guys that fished the connector out without removing the seat. I mounted a Sportscaster unit at the bottom of the stack. Used the Aux input.
No big signal loses tp speak of.
Again. Kudos on the write up.
I am one of those guys that fished the connector out without removing the seat. I mounted a Sportscaster unit at the bottom of the stack. Used the Aux input.
No big signal loses tp speak of.
Again. Kudos on the write up.
#4
08-01-2008, 01:45 PM

Is the 5ft cable long enough to snake up from the seat location, hiding it behind molding or in the dash, and still reach a more traditional mounting location (for those of us with self-contained tuner such as the SkyFi.) If not, is there a readily available extension cable? These things are expensive.
#5
08-01-2008, 04:21 PM

Michael has put up one beautifully illustrated and expertly written 'How-To' for the Antenna connection project.
I had my seats out for the Okole/Memory Foam project and was able to feel the Sirius Module through the carpet and went in through the seat rail carpet opening first and then worked it from there to the seat cable slit.
I used a long hemostat, but a coathanger hook would do as well for anyone not wanting to remove carpet.
Michael's excellent discription and photographs really give insight to what is under that carpet, now I know why I got a little styrofoam out with my job.
It has been reported on the N&A Board that for cars with DSC, there is a plastic cover under the seat providing easy access to these connectors.
#6
05-29-2009, 06:37 PM

Good news for antenna access
Once I removed my passenger seat in my 2009 MCS, I found a plate covering the area needed to access for the build in satellite antenna. This made the job much easier. After connecting my CD 5ft cable, I ran it up under the edge of the console to where my XMExpress currently rests. I have a ProClip bracket on order to give the Express its final resting place.....that is untill and/if they stay in business. Many thanks to all who posted on this subject. You have been a great help.
Wayne
Wayne
Last edited by MissGracyCooper; 05-30-2009 at 06:33 AM.
#7
06-28-2009, 09:23 PM

More pointers
Thanks for the awesome instructions! The photos really helped identify what to look for.
Just a few notes from my installation:
I have a 2007 MCS with DSC. I was able to get to the sat antenna connector under the seat without actually having to remove the seat. I just moved the seat to its furthest position back and unscrewed the two front screws holding down the plastic cover, and then moved the seat far forward and removed the rear two screws. (Used the seat tilt control to get a little bit more space.) I was able to lift the plastic panel up just enough to get to the connector and then snake the cable.
I found it easiest to start snaking the cable from the radio location (behind the cupholders) and then work my way back to the connector under the seat. It was a little easier snaking the end of the SMB cable with the straight connector versus the right angle connector. I ran the cable down the center tunnel tucked behind the trim. It drops down at the passenger seat, under the seat rail, and then under the plastic DSC cover to get to the red satellite connector.
I have the XM xPress RC mounted behind the cupholders, so the SMB cable exits behind the trim right at the bottom right corner not far from the AUX IN connector.
Next up is to hardwire the power connection. As has already been pointed out, the cigarette lighter adapter has a transformer in it that reduces the 12V to 5V, so you MUST keep that. Don't just snip off the cigarette lighter plug or you'll fry your satellite radio. The cigarette plug also has a small fuse inside it that you probably should keep.
I plan to dismantle the cigarette lighter adapter and solder new wires for the positive (the pin) and the negative (the pieces that touch the sides). I can then connect the positive to an add-a-circuit, or something similar at the fuse panel, and ground the negative to the car.
I'll follow up if anything changes.
Cheers,
Tom
Trending Topics

#9
10-19-2009, 02:40 PM
Are you referring to item #8 on drawing below?
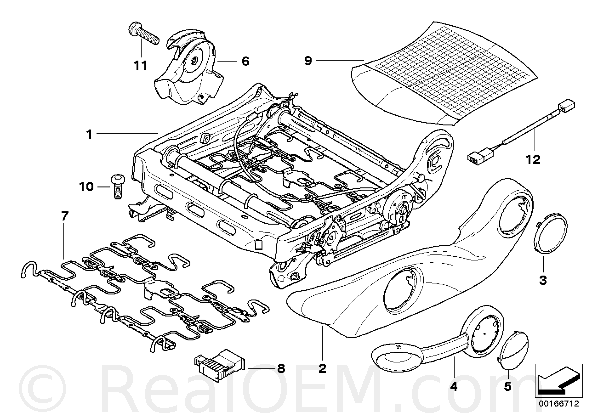
p/n's for above drawing can be found on THIS SITE http://www.realoem.com/bmw/showparts...21&hg=52&fg=10
They don't have 2010's listed yet, but parts should be the same.
p/n's for above drawing can be found on THIS SITE http://www.realoem.com/bmw/showparts...21&hg=52&fg=10
They don't have 2010's listed yet, but parts should be the same.
Last edited by pilotart; 10-19-2009 at 02:51 PM. Reason: change link to the 2009 R55 Clubman 'S'
#10
12-03-2009, 05:55 PM

Hi, this is my first post. I've been lurking, and this thread comes to closest to addressing my problem.
Which is: I don't think my MCS is wired for satellite. It was built in March 2007 and has NAV. They mentioned something about it being too early in that model year so it was not ready for satellite radio, even though we asked for it and were ready to pay for it. (It's my wife's car, so I am not too in tune with what the dealer tells her; she's mechanically savvy.)
So, how would I find out if it's actually the case that my car is not pre-wired for satellite radio? If it isn't, is there a way to do it to make it look OEM and controlled by the NAV?
Thanks!
#11
12-03-2009, 08:50 PM
You should be able to just 'fish' for the cables through the seat cable slit in your carpet,
mine included the Antenna taped to the electronic and Fibre-Optic connections for the OEM Sat Radio.
All I wanted was the Antenna, to 'look' OEM and be controlled by your Nav Head,
you would need an OEM SATELLITE- RADIO.
Click Here to open a parts catalog for a January 2007 build of a R56.
From that page:
No. Description - Qty < Up To > Part Number Price Notes
01 Satellite- radio 1 03/2007 65129119346 ENDED, See EBA 0427577
01 Satellite- radio 1 08/2007 65209142850 ENDED
01 Satellite- radio 1 09/2008 65209142852 $495.00
01 Satellite- radio 1 03/2009 65129192273 $495.00
01 Satellite- radio 1 "From" " 65129192274 $495.00
{EBA 0427577 = Einbauanleitung (options installation manual).}
You can see that there were changes in the radio units (Sirius became XM/Sirius and systems were improved)
and the early 2007 was changed to the second (of five) versions with "03/2007" build.
You would want to install the most recent version.
Also note that the Antenna page for early 2007 and my 2008 are identical.
This would be the only way to have your Sirius/XM to be controlled by your Nav Head.
The OP as well as probably most of us who have added Satellite Radio
have forgone 'control' by the MINI Radio and just used the MINI Antenna and Aux Stereo Feed
and tuned with our Sat-Radio's own Remote.
For me, this was primarily important for the 'portability' of using same Radio in many locations
and secondarily that I much preferred XM over Sirius' sound and programming.
mine included the Antenna taped to the electronic and Fibre-Optic connections for the OEM Sat Radio.
All I wanted was the Antenna, to 'look' OEM and be controlled by your Nav Head,
you would need an OEM SATELLITE- RADIO.
Click Here to open a parts catalog for a January 2007 build of a R56.
From that page:
No. Description - Qty < Up To > Part Number Price Notes
01 Satellite- radio 1 03/2007 65129119346 ENDED, See EBA 0427577
01 Satellite- radio 1 08/2007 65209142850 ENDED
01 Satellite- radio 1 09/2008 65209142852 $495.00
01 Satellite- radio 1 03/2009 65129192273 $495.00
01 Satellite- radio 1 "From" " 65129192274 $495.00
{EBA 0427577 = Einbauanleitung (options installation manual).}
and the early 2007 was changed to the second (of five) versions with "03/2007" build.
You would want to install the most recent version.
Also note that the Antenna page for early 2007 and my 2008 are identical.
This would be the only way to have your Sirius/XM to be controlled by your Nav Head.
The OP as well as probably most of us who have added Satellite Radio
have forgone 'control' by the MINI Radio and just used the MINI Antenna and Aux Stereo Feed
and tuned with our Sat-Radio's own Remote.
For me, this was primarily important for the 'portability' of using same Radio in many locations
and secondarily that I much preferred XM over Sirius' sound and programming.
#12
12-04-2009, 10:04 AM
Excellent information, thanks pilotart.
So it sounds like I'd have to buy the satellite radio unit that goes under the seat and the amplifier and antenna unit. (I wonder if the amp is already there?) I have that style antenna but would also wonder if I would need the trap circuits as well.
I will first try to find out what I actually have installed in my MCS, then call the dealer to find out what it would take to install those items--and how much it would cost, which I'm sure would approach prohibitive.
I'd go the AM route, but the wife wants total integration, claims she doesn't want to look like those CB radio geeks with 17 whip antennas on their roofs and contraptions, monitors, oscilloscopes and other gizmos Velcroed all over their dashboards. I completely understand where she's coming from.
UPDATE: I just called my dealer and he said a retrofit kit to allow my 03/2007 R56 to run satellite radio OEM-style through my NAV is backordered for six months, and won't be available until the first quarter of 2010.
That sucks. :(
Last edited by MiniMiAmor; 12-04-2009 at 12:27 PM. Reason: Update for dealer inquiry
#13
12-04-2009, 05:38 PM
Well, HERE is one kit that says:
I know nothing about this company or product, but just noticed that it was available. No idea why it would include its own antenna as your built-in Antenna would work better.
For my installation, no wires are seen and it uses MINI's built-in Antenna and aux Jack.
It just sits in the 'cubby' below the Aux Jack for ease of removal to use in my other locations.
The OP of this thread has completely concealed his installation with a portion inside his MINI's Fuse Box and a Tuner inside his 'Secret' Compartment.
I'm sure there are as many installation methods as there are different models of tuners and any of them will work best connected to MINI's Antenna.
Our XM Direct lets you use your factory radio display and controls to listen to XM with no need for a separate receiver mounted on your dash. The hide-away tuner box integrates seamlessly with your factory BMW audio system and can be hidden out of sight for a factory-like appearance. Kit includes XMDirect receiver, low-profile roof antenna and our BMW-specific interface that makes the kit plug and play. ...
2007-2008 R56 Mini Cooper Coupe
2008-2008 R55 Mini Cooper Clubman
2009-2008 R57 Mini Cooper Cabriolet
Notes:
Requires activation from BMW or MINI dealer after installation.
Questions on this specific item? Browse our knowledgebase.
2007-2008 R56 Mini Cooper Coupe
2008-2008 R55 Mini Cooper Clubman
2009-2008 R57 Mini Cooper Cabriolet
Notes:
Requires activation from BMW or MINI dealer after installation.
Questions on this specific item? Browse our knowledgebase.
For my installation, no wires are seen and it uses MINI's built-in Antenna and aux Jack.
It just sits in the 'cubby' below the Aux Jack for ease of removal to use in my other locations.
The OP of this thread has completely concealed his installation with a portion inside his MINI's Fuse Box and a Tuner inside his 'Secret' Compartment.
I'm sure there are as many installation methods as there are different models of tuners and any of them will work best connected to MINI's Antenna.
#14
12-06-2009, 11:22 AM
I'll give them a call this week. Thanks for the information.
I am inclined to believe that I'm going to get the "March 2007" denial; all I'm told now is that I need a May 2007 R56 and later to get all the goodies my car needs/wants.
I am inclined to believe that I'm going to get the "March 2007" denial; all I'm told now is that I need a May 2007 R56 and later to get all the goodies my car needs/wants.
Well, HERE is one kit that says:I know nothing about this company or product, but just noticed that it was available. No idea why it would include its own antenna as your built-in Antenna would work better.
For my installation, no wires are seen and it uses MINI's built-in Antenna and aux Jack.
It just sits in the 'cubby' below the Aux Jack for ease of removal to use in my other locations.
The OP of this thread has completely concealed his installation with a portion inside his MINI's Fuse Box and a Tuner inside his 'Secret' Compartment.
I'm sure there are as many installation methods as there are different models of tuners and any of them will work best connected to MINI's Antenna.
#15
11-03-2011, 07:03 PM

Neutral
Once I removed my passenger seat in my 2009 MCS, I found a plate covering the area needed to access for the build in satellite antenna. This made the job much easier. After connecting my CD 5ft cable, I ran it up under the edge of the console to where my XMExpress currently rests. I have a ProClip bracket on order to give the Express its final resting place.....that is untill and/if they stay in business. Many thanks to all who posted on this subject. You have been a great help.
Wayne
Wayne
#16
11-04-2011, 11:26 AM
9erminiturbo - In answer to your question about the size of the compartment under the passenger's seat: we are talking a while back, and my memory is not so good any more. However, I vaguely recall the compartment was maybe 6 or 7 inches by about the same. It was only about an inch or so deep filled with a solid piece of Styrofoam with groves for the wires/cables it contained. I am not sure, but it sounded like you wanted to place the XM tuner in this compartment. I am not sure what type of tuner you are talking about, but mine is mounted on the dash with a ProClip bracket. It works great for our needs. Not sure if this information is any use to you. What ever you decide to do, good luck. It sounds like you know what your are doing though.
#17
10-18-2014, 07:25 PM

My 2015 F6 with Navi looks just like this with the same slide on the seat connector and everything covered in carpet. I also have what looks like a sub under my seat.
Would it be a fair assumption that the sat radio antenna is in the same place? I would hope Mini didn't move it after being there for a while.
I might be daring tomorrow morning to get that cable run. I already have a 6' cable from CDInt.
Would it be a fair assumption that the sat radio antenna is in the same place? I would hope Mini didn't move it after being there for a while.
I might be daring tomorrow morning to get that cable run. I already have a 6' cable from CDInt.
#18
10-19-2014, 01:23 PM
I pulled out the seat today, removed the cover for the sub....and notta. There is no pink cable to be seen anywhere. I don't know if it is because I have an F56, navi, or both. Since I had the car apart I just ran the magnetic antenna that came with the Onyx package. I'll leave it there until I see something on here or the other forums about how to use the stock antenna.
#19
03-03-2015, 08:15 PM

#20
03-06-2015, 04:43 PM


Thread
Thread Starter
Forum
Replies
Last Post