Interior/Exterior Plasti-Dip Happy Feelings!
#51
 08-11-2014, 08:06 AM


So here's my first go at Plasti Dip! I think it turned out great. This stuff is indeed very easy to work with. Like anything, quality prep work is essential. Some before and after PD on the wheels as well as Back to Black on the trim:
I took off the center caps and taped off the center area of the center caps to spray separately, then installed them after spraying the wheels. Turned out cleeeeean.
...and yes, there's some trim damage to the underside. I didn't notice it until after I bought the car. Gotta look into replacing it...=/
As for the matte finish...I think it looks great as-is. Makes for a nice match to the plastic trim (after Back to Black, of course). So I'm not gonna use Glossifier.
#52
08-11-2014, 03:35 PM
1st Gear
Join Date: Aug 2014
Location: Denver, CO
Posts: 19
Likes: 0
Received 0 Likes
on
0 Posts
May I recommend doing your black wheel trim and side skirts? I did this last year. It was great! I was getting the striped look just like you are with those wheel arches. I sprayed the plastidip using a paint sprayer. (A lot faster) The finish was great and looks alot better, makes the car look younger!
#53
08-11-2014, 03:48 PM
I was contemplating doing the plastic trim, as the milky look and the striping was quite ugly. But after applying "Back to Black", the plastic looks brand new (minor scuffs not withstanding), so I don't think I'm gonna worry about PD'ing the plastic trim. The rest of the chrome and black trim (like around the roof) is another story...I think I do in fact want to PD those pieces...just a lot of taping off and prep work for those areas =/.
Also with your time, I highly recommend using a 'Tape & Drape' type of cover when you do your plasti-dip. It saves so much time, covers better, and saves a lot of tape usage as well. For a long time I just used news paper or that type of coverage and just taped it. Man what a waste of time. Sure it cost less to use the news paper, but to what extent? Using Tape and Drape I could cover the sections your talking about, in less than 10 min. Trust me I know how much time can be wasted. I had a white roof that I plasti-dipped black. I have a sunroof so there was a ton of masking that I had to do around the sunroof glass and under the roof. But the end result was great. especially the plastic trim.

#54
08-11-2014, 04:25 PM
1st Gear
Join Date: Aug 2014
Location: Denver, CO
Posts: 19
Likes: 0
Received 0 Likes
on
0 Posts
In the next pic you'll see Back To Black has been applied to all trim and everything has a nice black (almost wet even) finish to it again. All the milkiness and striping is gone, and it's got that brand new look once again.
The Back To Black did not do so well for the upper trim that runs around the roof and top of the windshield/rear glass. It helped, but not nearly as dramatically. It did however do wonders for the antenna base.
As for the Tape and Drape...I saw that on dipyourcar.com, and I am definitely going to be using that for bigger projects in the future.
#55
08-11-2014, 08:12 PM

#56
08-11-2014, 08:33 PM

Former Vendor

 Was your arm and finger about to fall off when done?!


#59
08-13-2014, 03:51 PM
1st Gear
Join Date: Aug 2014
Location: Denver, CO
Posts: 19
Likes: 0
Received 0 Likes
on
0 Posts
I truly wasn't all that interested in dipping my whole car, but seeing yours is seriously making me reconsider that....
So you just taped everything off real well and sprayed with a gun? How many gallons? dipyourcar.com says like 2 gallons for a car this size..... Did you have to open doors/bonnet/hatch to get a good wrap around the edges, or just shoot at an acute angle to make sure it wrapped?
Again...excellent job.

#60
08-13-2014, 04:33 PM
Thanks, I enjoy it but think I might paint it this actual color or change the dip color again soon.
The pearl required about 2 gallons of their clear to mix (body), we also laid a black base coat to help it pop a bit more. For the top that required a white base mixed then another gallon of clear to mix the pearl. I didn't open the doors or bonnet, instead just ran tape on the inside to feather the edge a bit. The one thing we found is that you don't want to use an actual paint gun because it atomizes the dip too much making the finish rough. The best is using the dipyourcar gun.
With you being located in Denver you might want to look for a authorized dealer because I did it with my friend who owns a body shop and he is an authorized dealer here in New Mexico. If you can't find anything in the Colorado area just make the drive down to Albuquerque and my buddy can hook you up.
#61
08-14-2014, 06:06 AM
+1 To the DYC Sprayer. I used a regular Graco sprayer last year on my roof. It did the job ok. But I got the new DYC Sprayer and just used this a couple weeks ago. The spray quality with the dip is much better, not to mention much faster. The dip seemed to dry alot faster as well, so I could do the job quicker.
#62
08-14-2014, 08:39 AM
1st Gear
Join Date: Aug 2014
Location: Denver, CO
Posts: 19
Likes: 0
Received 0 Likes
on
0 Posts
#63
09-19-2014, 08:32 AM

2nd Gear
Join Date: Jun 2013
Location: NE Indiana
Posts: 129
Likes: 0
Received 0 Likes
on
0 Posts
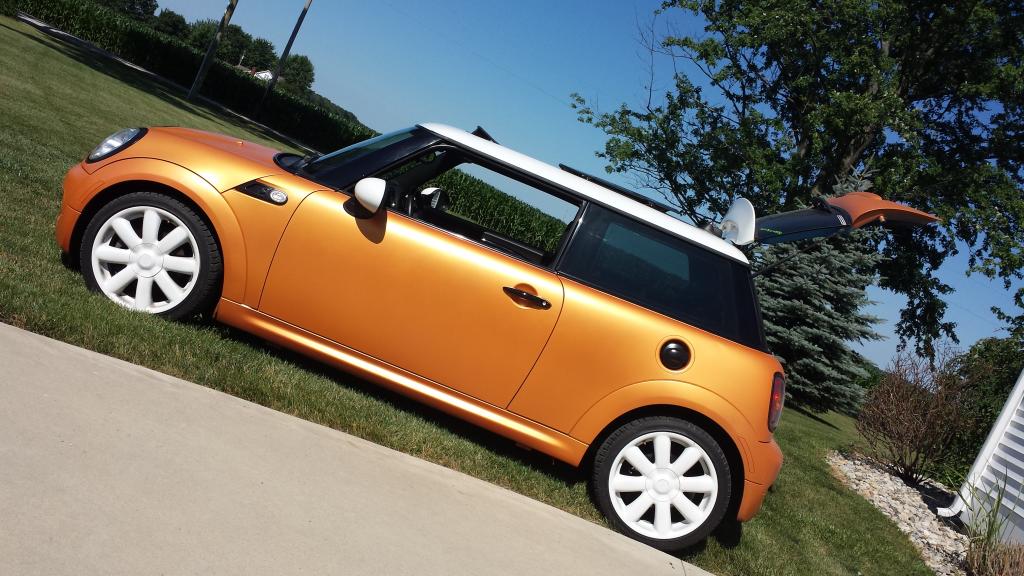
Well I'm glad this little forum exists for us Mini owners who enjoy some good dipping... This is my 07' R56S It's been fully dipped twice as I run it as a side business. This is a custom pearl mix I did a few months back and it will be getting changed this winter as well. The wheels, and everything you see in black is all dip.. roof and mirrors are stock white.


#65
10-01-2014, 10:41 AM


#68
10-22-2014, 01:07 PM
2nd Gear
Join Date: Jun 2013
Location: NE Indiana
Posts: 129
Likes: 0
Received 0 Likes
on
0 Posts
#69
10-22-2014, 01:12 PM
Zero smell! I removed the pieces to spray. Put 3 coats of matte black then another 3 coats of Electric lime green. Then I topped it off with a slow spray of glossifier to get a nice sheen to it and then used Groits quick spray wax to give it a nice smooth feel, helps keep the tacky feeling down (doesn't get rid of it completely). I let it air out in my garage for 1 day and then installed it. No smell at all.
Blurr, your Joey mod, did you use Dip or did you use Paint, I've been tinkering with the idea of doing this mod.
Also, where are the front fender flares?
Blurr, your Joey mod, did you use Dip or did you use Paint, I've been tinkering with the idea of doing this mod.
Also, where are the front fender flares?
#70
10-22-2014, 01:19 PM
2nd Gear
Join Date: Jun 2013
Location: NE Indiana
Posts: 129
Likes: 0
Received 0 Likes
on
0 Posts
Zero smell! I removed the pieces to spray. Put 3 coats of matte black then another 3 coats of Electric lime green. Then I topped it off with a slow spray of glossifier to get a nice sheen to it and then used Groits quick spray wax to give it a nice smooth feel, helps keep the tacky feeling down (doesn't get rid of it completely). I let it air out in my garage for 1 day and then installed it. No smell at all.
Blurr, your Joey mod, did you use Dip or did you use Paint, I've been tinkering with the idea of doing this mod.
Also, where are the front fender flares?
Blurr, your Joey mod, did you use Dip or did you use Paint, I've been tinkering with the idea of doing this mod.
Also, where are the front fender flares?
The Joey mod is all high temp paint, shrouds are flat black good for 2k and the projector ring is brake caliper paint good for 900... dip will be gone really quick from the heat of the ballast.
I'm waiting on new clips for my flares.. took them off to keep any bridging from the Halo Efx (I dont use plasti dip) between flares and the body. they will be back on tomorrow as well as the rear belt line trim.
#71
10-22-2014, 01:20 PM
#72
10-22-2014, 01:31 PM
#73
02-21-2015, 06:49 AM

4th Gear
I have had great luck with Plasti Dip. For improved durability it is important to really clean the part being dipped. Also, make sure the coating is put down in enough layers to really provide a good thickness of cover. Applying the dip in the correct temperature is important too. I also find the initial coats being put down thin and even really helps with finish. I have always found the finish to come out smooth for me. It does have a flat or dull finish that I like.
I have done my R53 mirrors and they have held up really great.
I did my R53 belt line and have not been happy with that. I find that road grime stains the top portion of the belt line with Plasti Dip. I removed it and have done a blackout vinyl instead.
I also would not do your door handles. Plasti Dip doesn't hold up to repeated handling very well.
Dip has its applications for sure.

#75
02-21-2015, 08:08 AM

1st Gear
Join Date: Jan 2015
Location: Punxsutawney. PA
Posts: 30
Likes: 0
Received 0 Likes
on
0 Posts
