Interior/Exterior Doing a perfect projector retrofit on '11 R56
#1
 05-11-2012, 10:53 PM


Doing a perfect projector retrofit on '11 R56
I retrofitted my last vehicle with FX-R projectors and 50w 6000K bulbs for the bixenon setup and a set of Morimoto Mini D2S for the fogs. It was insanely bright and I loved it. After I sold that car and bought my Mini with halogens, I started to miss my old retrofit the first night I drove. Now, 5 months later I've started my Mini retrofit!
Parts List:
-Pair of new OEM headlights ($125 each)
-FX-R 3.0 Bixenon Projectors ($140)
-Morimoto 5000K 50W Xenon Bulbs ($50)
-Morimoto 5Five 50W Xenon Ballasts (Kept from previous retrofit $0)
-MC-R Shrouds ($45)
-Custom CAN-BUS Wiring Harness ($35)
-Building Accessories (JBWeld, Screws, Etc...) ($25)
So for around $420 I will have an amazing set of one-of-a-kind xenon projector headlights. That's less than the factory option. Plus I can sell my old lights for at least $150 for the pair.
DAY 1
I started by opening the headlights with a hairdryer since I didn't have an oven available. It worked pretty well and took about 1.5 hours per headlight. I then took them completely apart and put spare parts in a bag for safe keeping.
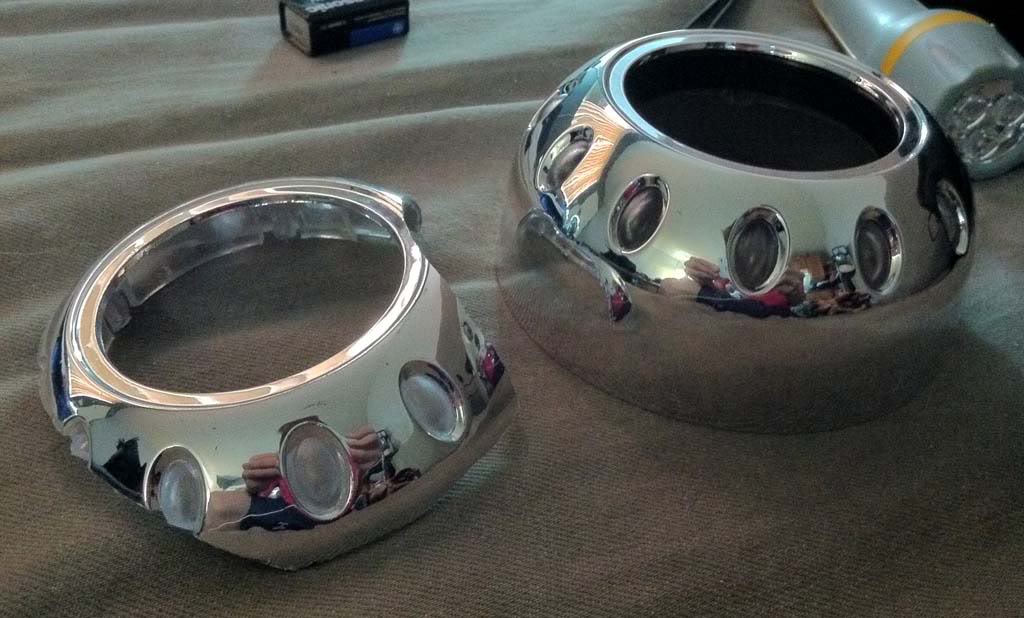
I spent the next two hours cutting the stock reflector and new MC-R shroud to fit together smoothly. It required a whole lot of eyeballing and dremeling.
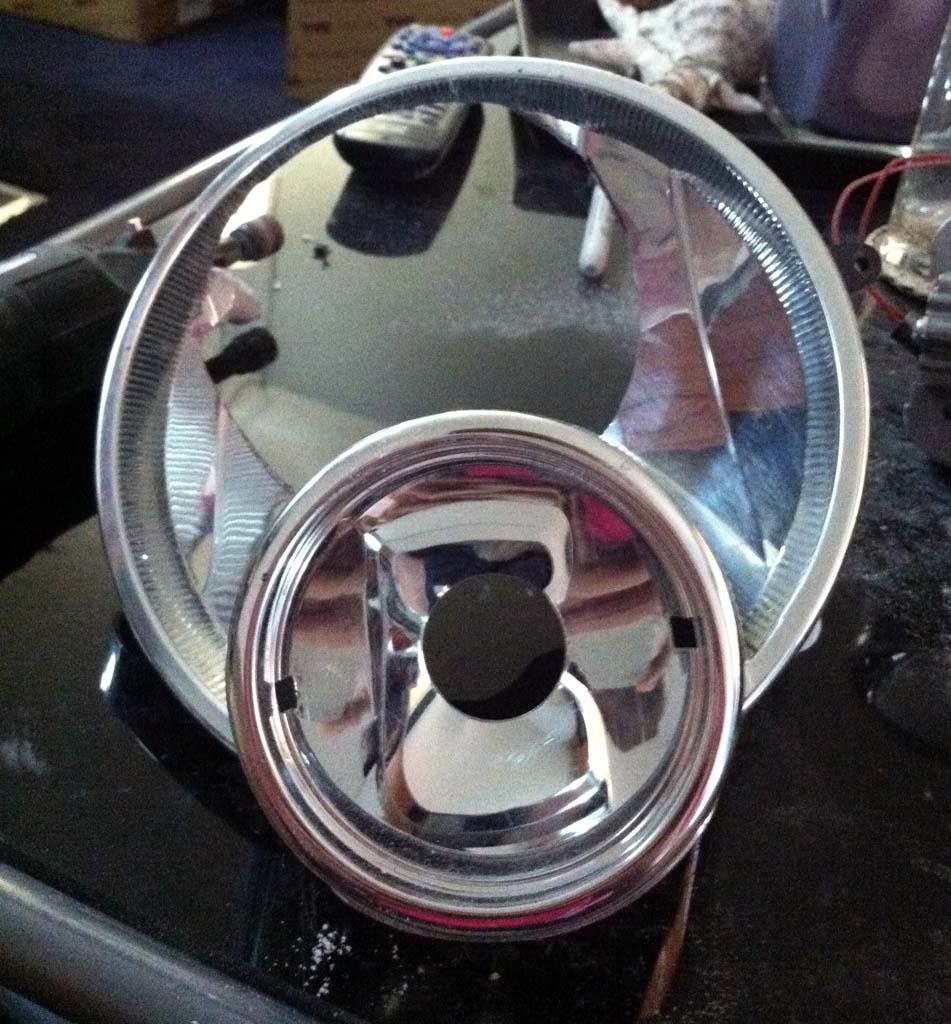
Here's a before and after of the shrouds. I had to cut a ton off of these things since they are absolutely ginormous from the beginning.
Test fit everything together. I think it's looking pretty awesome!
I attached everything together using lots and lots of JBWeld. I used a little JBQuick to hold things in place then once it hardened I smothered everything in JBWeld which takes about 5 hours harden as opposed 10 minutes but holds stronger than the JBQuick.

DAY 2
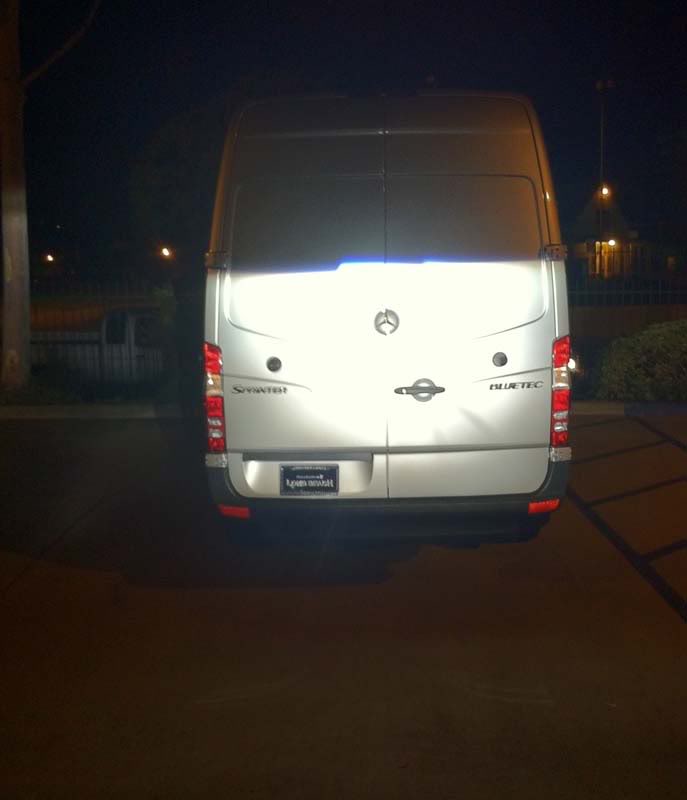
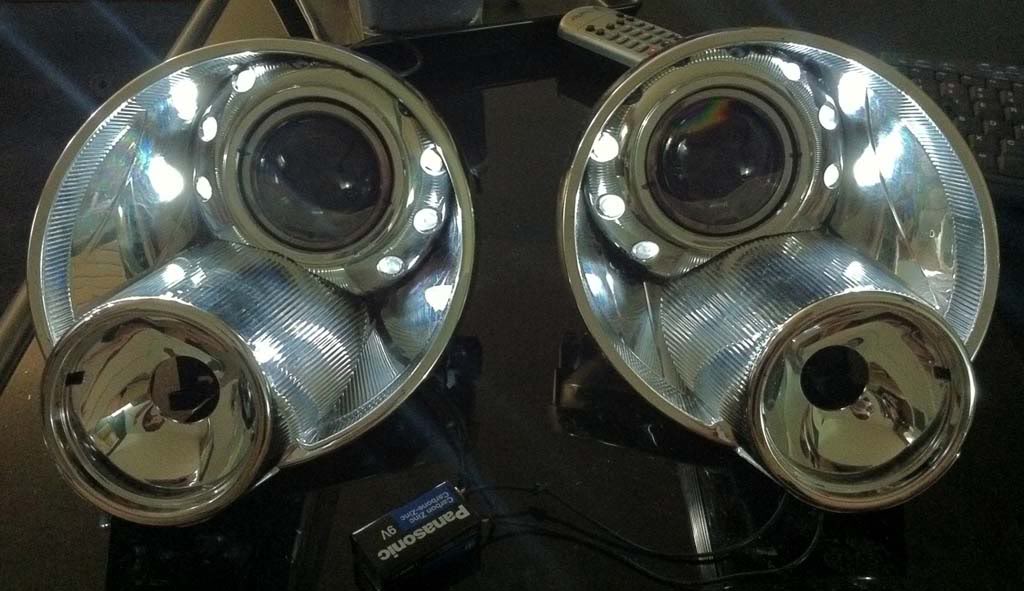
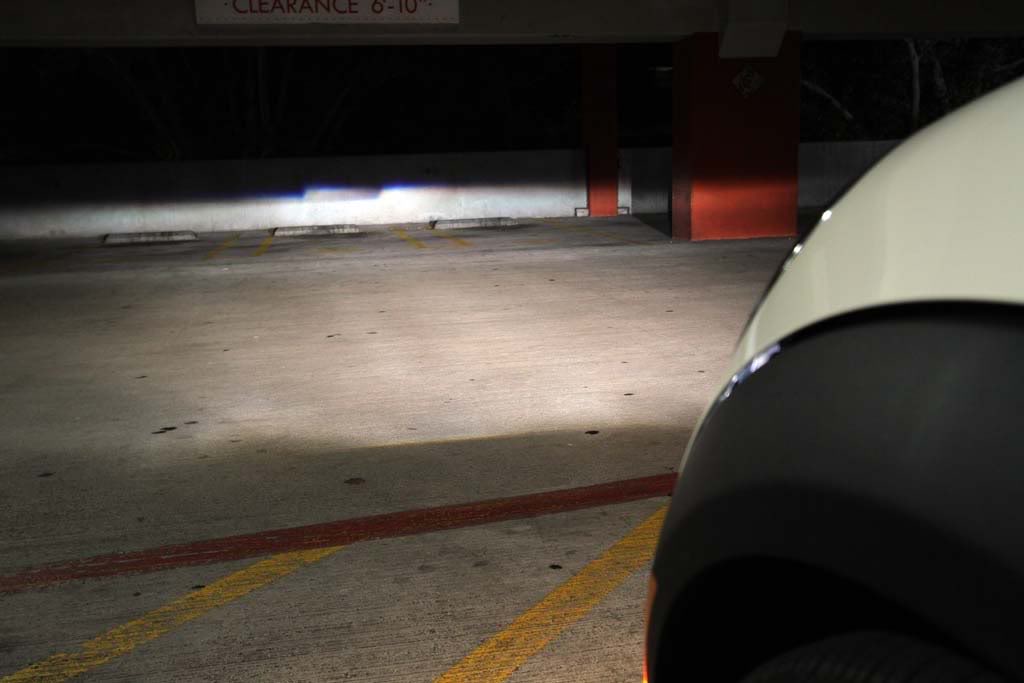
I spent most of day 2 working on my job so I didn't have time to build the retrofit. Once night fell I went out and tested the projectors for the first time. I'm loving their output! Beautiful blue flare and nice and sharp cutoff. The projector output is much wider and taller than my previous FX-R 1.0 I used last time. This picture was taken from about 10' away, the output only gets better with distance.
DAY 3
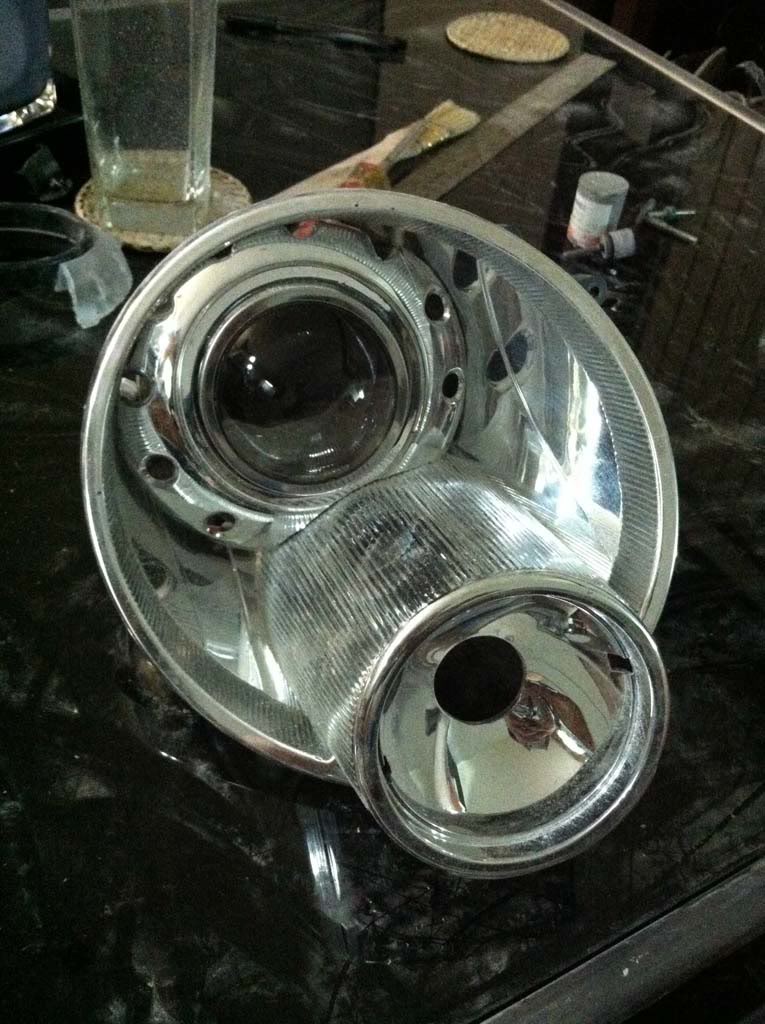
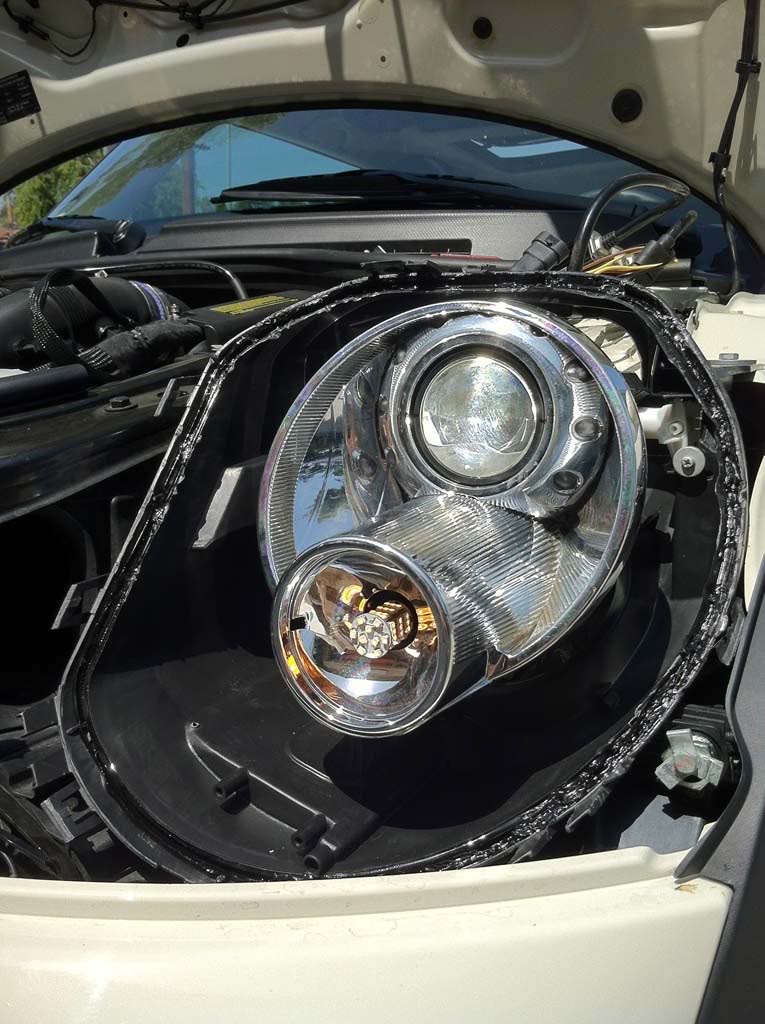
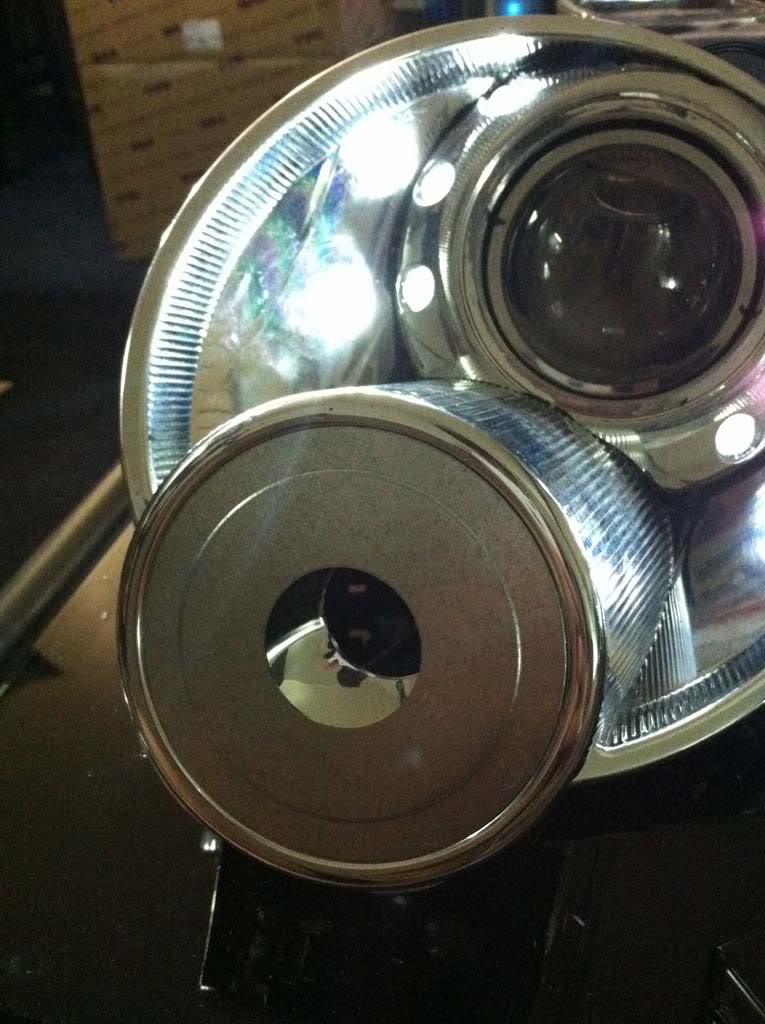
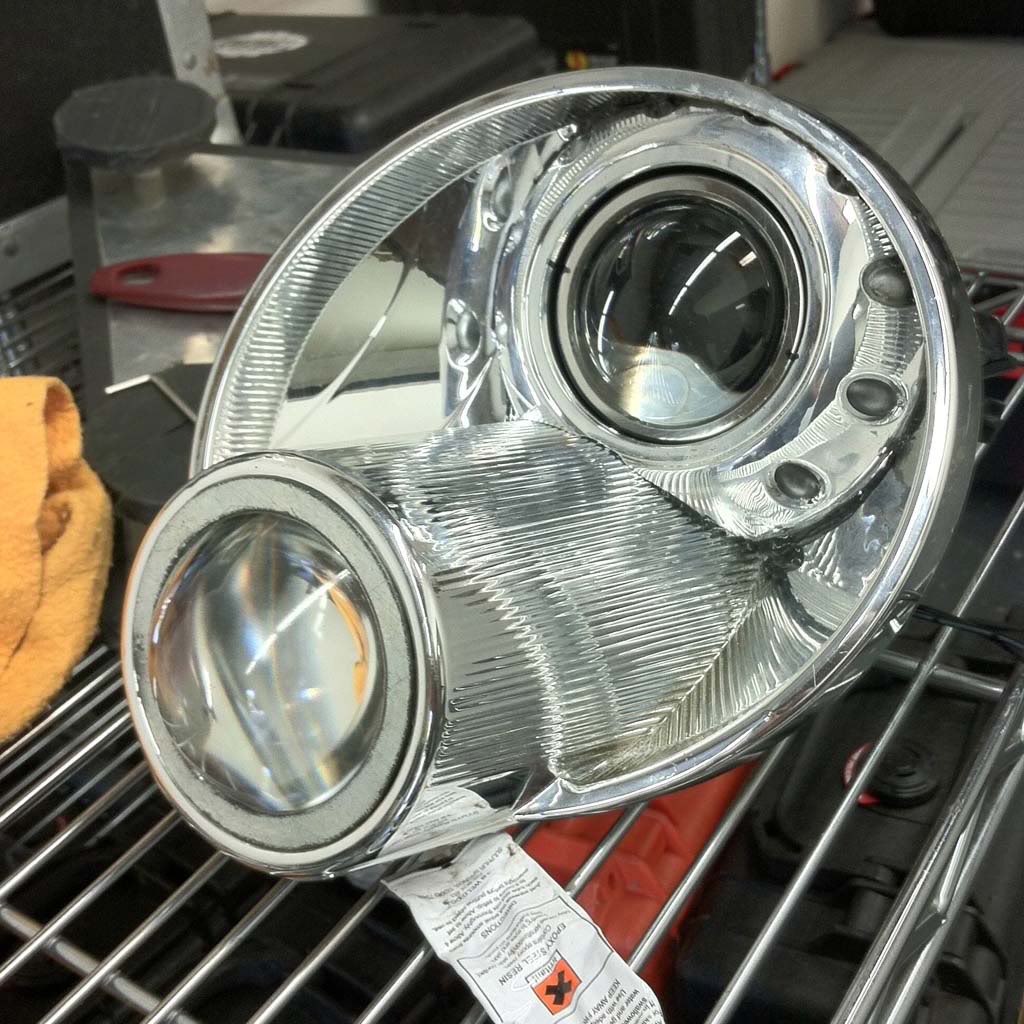
Very important day. Today I mount the projectors to the reflector bowl. I had to put my new headlights on my Mini and park on a level surface facing a wall. Long story short, I put the lights in, turned them on, rotated them until the output was straight on the wall, then used JBQuick to hold the projectors in place on the reflector. Once the JBQuick dried I smothered it in JBWeld.
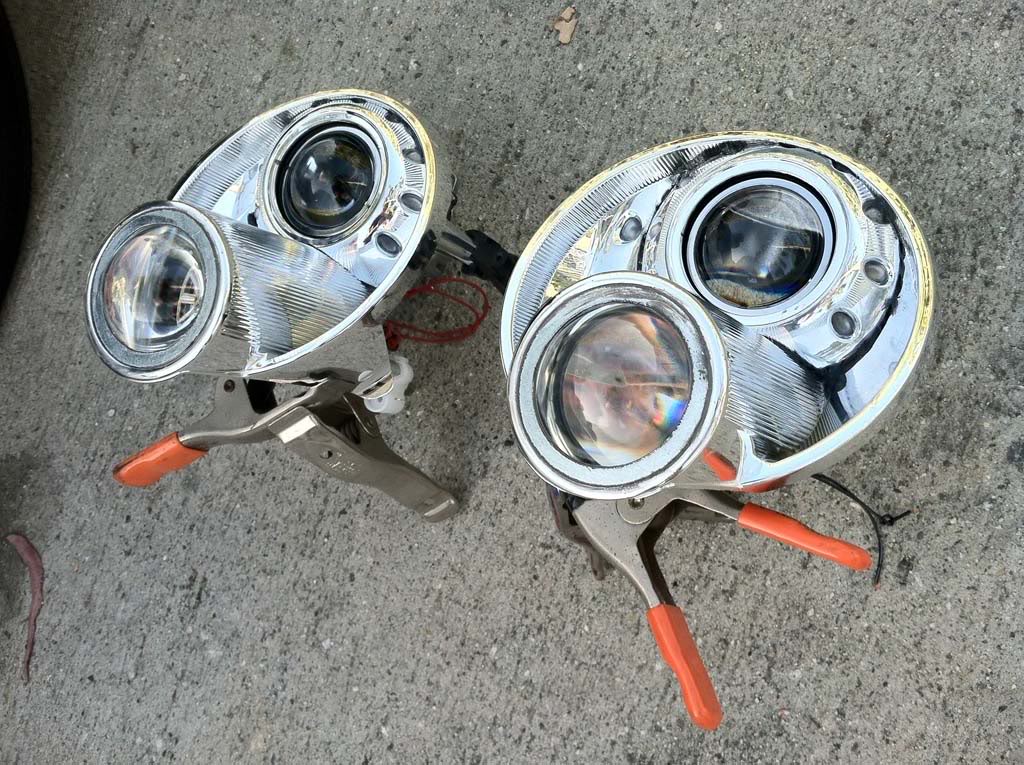
Here are some pictures of the lights being test fitted on my Mini. I think they look amazing! It's worth noting that none of these pictures have the front lens on.
OEM Halogen vs. Retrofit
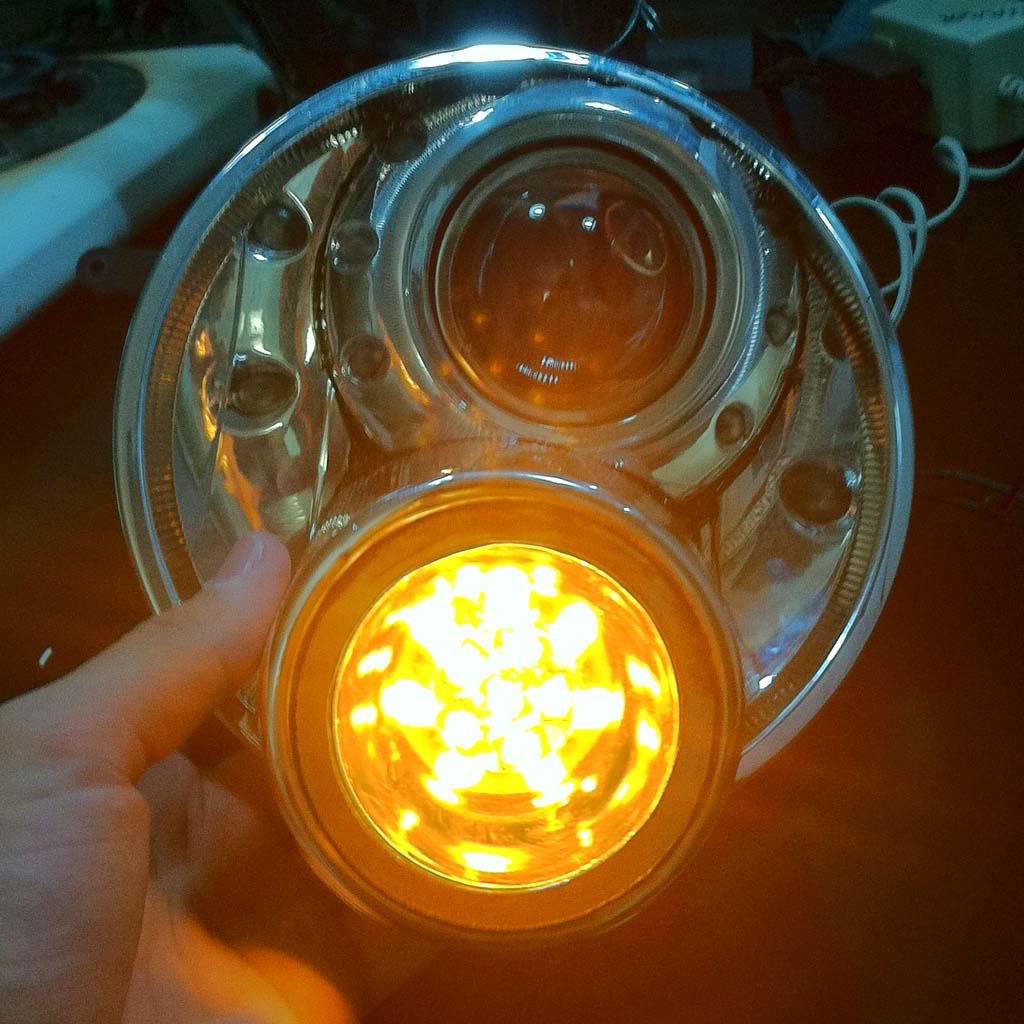
I let the lights cure for about 6 hours then once I got home I wired up a pair of six 5000K LEDs to shine through the little holes in the shrouds. These will only be on when the headlights are on. I don't like the pretend Audi-style lights or the like so these will just be mimicking the actual Mini xenon headlight.
DAY 4
Again, I worked a lot of today but I got a little done. I was going through my old leftovers from my previous retrofit and I found 2 extra 3" clear lenses. I knew I was removing the amber lenses over the turn signals but I didn't know what to put over them; now I know.
The lens is too small to fit in the turn signal spot so I had to find a washer of some sort to act as a spacer. I found these reducing washers at HomeDepot that fit perfectly in the turn signal spot.
I attempted to cut the inner ring out but it would have taken 2 hours of continuous dremeling to get it out so I took it to a local metal fabricator. They just cut me two new washer rings for free! First I JBWelded the lens to the ring then an hour later I JBWelded the ring/lens assembly to the turn signal.
Got them both done and let them cure out in the sun for about 6 hours.
Here's what they will kind of look like with the signal on. I like them and they're pretty unique.
Today I also had to take my boss's car to a repair shop after he backed into a pole. While there I asked about getting my headlights re-chromed. They could only do metal but the guy told me that he would paint them for FREE!
After a long and hard decision process I think I've decided to just paint the reflector/projector assembly gloss black and leave the inner silver trim of the housing as is. I didn't want to go all black since I don't really like that color combo on the pepper white. I definitely didn't want to go pepper white on the headlights because they'd probably disappear and look really weird.
Anyone have any suggestions as to what color I should go with on these? I think I'm going to get them painted tomorrow.
Parts List:
-Pair of new OEM headlights ($125 each)
-FX-R 3.0 Bixenon Projectors ($140)
-Morimoto 5000K 50W Xenon Bulbs ($50)
-Morimoto 5Five 50W Xenon Ballasts (Kept from previous retrofit $0)
-MC-R Shrouds ($45)
-Custom CAN-BUS Wiring Harness ($35)
-Building Accessories (JBWeld, Screws, Etc...) ($25)
So for around $420 I will have an amazing set of one-of-a-kind xenon projector headlights. That's less than the factory option. Plus I can sell my old lights for at least $150 for the pair.
DAY 1
I started by opening the headlights with a hairdryer since I didn't have an oven available. It worked pretty well and took about 1.5 hours per headlight. I then took them completely apart and put spare parts in a bag for safe keeping.
I spent the next two hours cutting the stock reflector and new MC-R shroud to fit together smoothly. It required a whole lot of eyeballing and dremeling.
Here's a before and after of the shrouds. I had to cut a ton off of these things since they are absolutely ginormous from the beginning.
Test fit everything together. I think it's looking pretty awesome!
I attached everything together using lots and lots of JBWeld. I used a little JBQuick to hold things in place then once it hardened I smothered everything in JBWeld which takes about 5 hours harden as opposed 10 minutes but holds stronger than the JBQuick.
DAY 2
I spent most of day 2 working on my job so I didn't have time to build the retrofit. Once night fell I went out and tested the projectors for the first time. I'm loving their output! Beautiful blue flare and nice and sharp cutoff. The projector output is much wider and taller than my previous FX-R 1.0 I used last time. This picture was taken from about 10' away, the output only gets better with distance.
DAY 3
Very important day. Today I mount the projectors to the reflector bowl. I had to put my new headlights on my Mini and park on a level surface facing a wall. Long story short, I put the lights in, turned them on, rotated them until the output was straight on the wall, then used JBQuick to hold the projectors in place on the reflector. Once the JBQuick dried I smothered it in JBWeld.
Here are some pictures of the lights being test fitted on my Mini. I think they look amazing! It's worth noting that none of these pictures have the front lens on.
OEM Halogen vs. Retrofit
I let the lights cure for about 6 hours then once I got home I wired up a pair of six 5000K LEDs to shine through the little holes in the shrouds. These will only be on when the headlights are on. I don't like the pretend Audi-style lights or the like so these will just be mimicking the actual Mini xenon headlight.
DAY 4
Again, I worked a lot of today but I got a little done. I was going through my old leftovers from my previous retrofit and I found 2 extra 3" clear lenses. I knew I was removing the amber lenses over the turn signals but I didn't know what to put over them; now I know.
The lens is too small to fit in the turn signal spot so I had to find a washer of some sort to act as a spacer. I found these reducing washers at HomeDepot that fit perfectly in the turn signal spot.
I attempted to cut the inner ring out but it would have taken 2 hours of continuous dremeling to get it out so I took it to a local metal fabricator. They just cut me two new washer rings for free! First I JBWelded the lens to the ring then an hour later I JBWelded the ring/lens assembly to the turn signal.
Got them both done and let them cure out in the sun for about 6 hours.
Here's what they will kind of look like with the signal on. I like them and they're pretty unique.
Today I also had to take my boss's car to a repair shop after he backed into a pole. While there I asked about getting my headlights re-chromed. They could only do metal but the guy told me that he would paint them for FREE!
After a long and hard decision process I think I've decided to just paint the reflector/projector assembly gloss black and leave the inner silver trim of the housing as is. I didn't want to go all black since I don't really like that color combo on the pepper white. I definitely didn't want to go pepper white on the headlights because they'd probably disappear and look really weird.
Anyone have any suggestions as to what color I should go with on these? I think I'm going to get them painted tomorrow.
Last edited by calforhelp; 05-19-2012 at 02:03 AM.


#4
05-13-2012, 11:36 PM
#6
05-14-2012, 06:55 AM

#7
05-15-2012, 05:56 PM

That's an awesome job you did on the retrofit! I would also say Satin Black due to glare. I did a retrofit on my other car ('04 Echo RS Hatch) with FX-R projectors, 50w Morimoto Ballasts and 5000k bulbs - turned out great, but I left everything chrome, in case the paint didn't set up well.
Do you know of any upgrades to the factory projectors? I haven't really sized them up too much, not sure if anyone has tried a washer mod or clear lens swap or anything. It's hard to find anyone who has done a retrofit on a Mini - I've always been curious.
Do you know of any upgrades to the factory projectors? I haven't really sized them up too much, not sure if anyone has tried a washer mod or clear lens swap or anything. It's hard to find anyone who has done a retrofit on a Mini - I've always been curious.
Trending Topics
#8
05-15-2012, 07:28 PM
I dropped the lights off yesterday and they said I should be able to pick them up sometime tomorrow! I went with a satin black. Before I took them in, I put some bondo over the three holes at the top of the shroud and cleaned up any seams. The shop said they would clean them up even more before painting for me. These guys are awesome!
I'm having that body shop paint them for me. They'll be using automotive paint so it should hold up to the heat a little better than some spray paint would.
While I was looking around at other people's MINI retrofits I accidentally found somebody who had put the projectors out of a MINI into their car, I was thinking it was a Civic or something. He did a clear lens swap and the output was actually pretty decent; much better than stock. I tried to find it again but I can't.
While I was looking around at other people's MINI retrofits I accidentally found somebody who had put the projectors out of a MINI into their car, I was thinking it was a Civic or something. He did a clear lens swap and the output was actually pretty decent; much better than stock. I tried to find it again but I can't.
#10
05-16-2012, 08:11 AM
I used the FX projectors in my last retrofit and mane the are huge for a MINI, I got the easy to retrofit Morimoto D2S projectors that basically slide in the old bulb hole and lock down with a tightening nut, although the hole had to be enlarged, the shroud work is where the skill of a dremel will shine or look just so-so. Decent choices, I myself stick to the 35w to not be too obvious that it isn't stock. Even when properly aimed, do you ever get flashed with the 50w setup? Watch the shrouds with that heat, I melted a set with the current 35w I have.
#11
05-16-2012, 09:43 AM
The FX projectors ARE very huge for this car but it all fits inside the headlight with about 1/4" to spare behind the D2S ballast socket. I could have gone with the Morimoto Mini but I wasn't a huge fan of the cutoff last time I used them. I guess the H1 version is supposed to be better than the D2S. I figured that if I made the FX fit last time, I could make them fit this time.
Previously I maybe had gotten flashed two or three times in the two years I had them. Usually when I was going uphill. But then I would flash my high beams back which included 170W of concentrated HID power. You know, just to show what my brights really look like.
The shrouds should be ok, the guys at TRS would tell me if they saw any problems arising out of my selection of parts. Last time I used some E46 shrouds in a much, much smaller housing and those were fine.
I'm hopefully picking up my lights today and putting them all back together tonight or tomorrow! I installed my custom-made wiring harness from TRS yesterday which works flawlessly so once I get the lights put back together, it's just plug and drive!

#14
05-16-2012, 06:28 PM
Join Date: Jan 2012
Location: Pensacola, FL
Posts: 686
Likes: 0
Received 0 Likes
on
0 Posts


#16
05-17-2012, 10:13 AM
Still not done. Went to pickup my lights from the painters yesterday but they said they wouldn't be done until Friday now :(
The turn signal LEDs should be ok. They're from v-leds so they're pretty high quality, not some $12 Autozone bulbs. If they do fail, the company has always been awesome about replacing at no cost even if out of warranty.
I was getting a bulb out and the HIDs were flickering without being able to turn them on. This was with using a regular CAN-BUS harness from TheRetrofitSource. Matt over there had a harness custom made for me that takes power from the battery instead of the stock wiring. The harness included a capacitor to level out the flickering, and a load resistor to prevent a bulb warning on the low beams. The harness was $50 and works perfectly, I still use the OEM headlight switch to turn them on so it essentially works as stock.
I just bought my OBDII USB cable so I can do some programing with windows and such, I might try to disable the bulb check for the headlights so I can remove the resistors.
Last edited by calforhelp; 05-19-2012 at 02:03 AM.
#17
05-19-2012, 02:01 AM
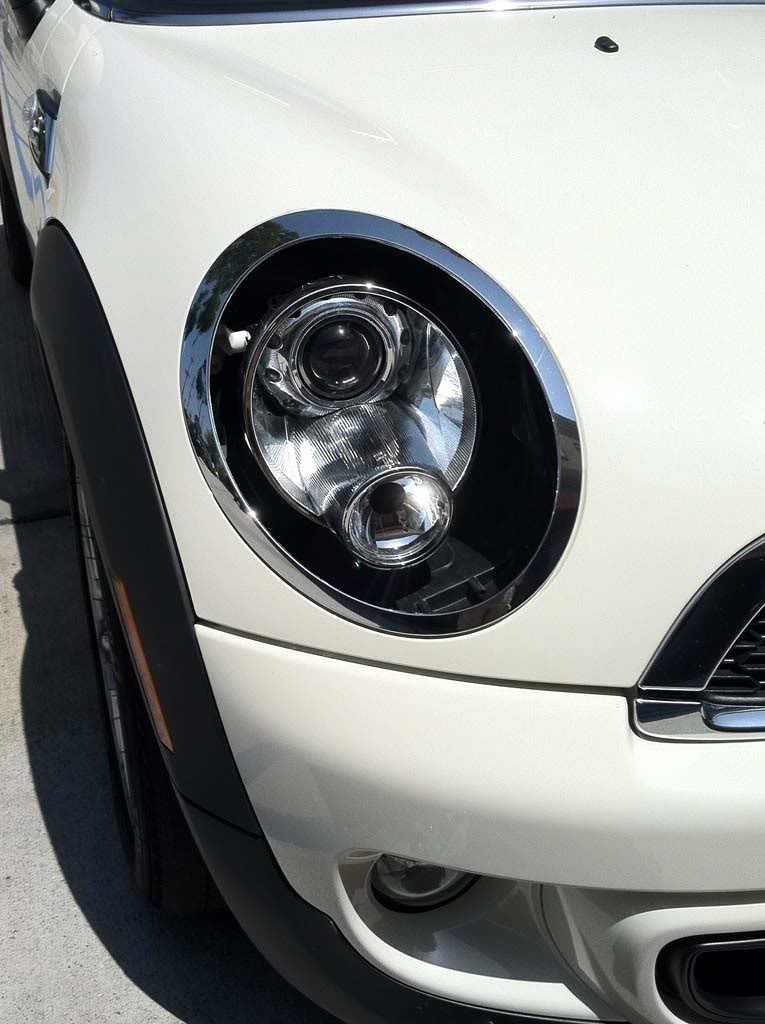
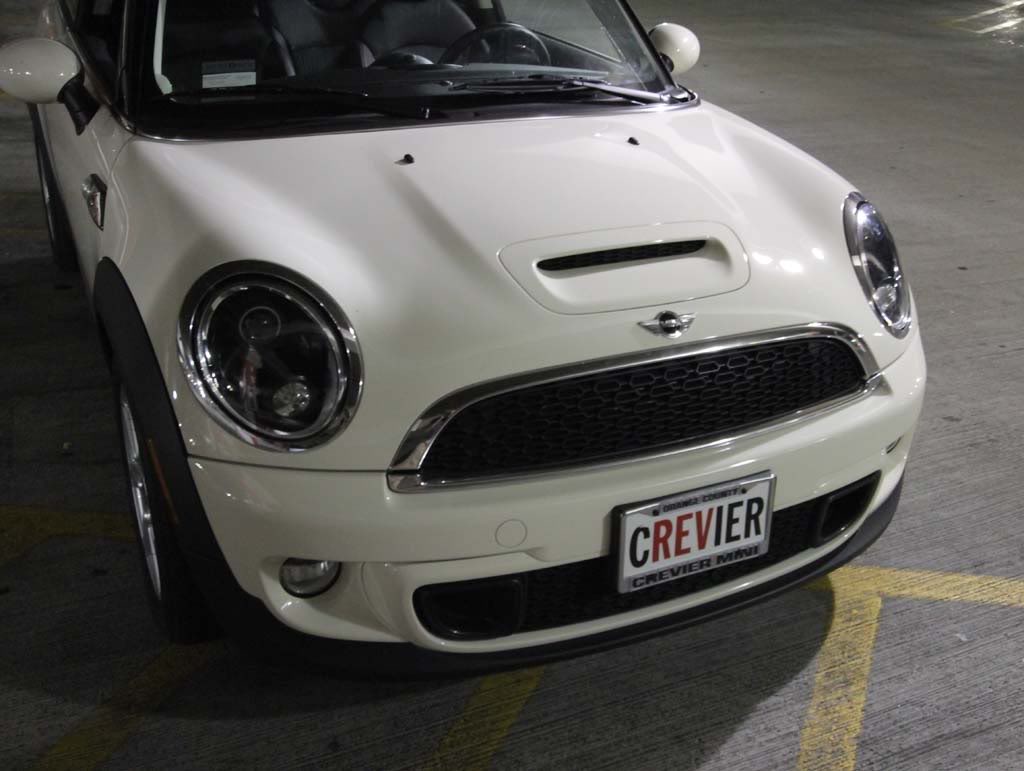
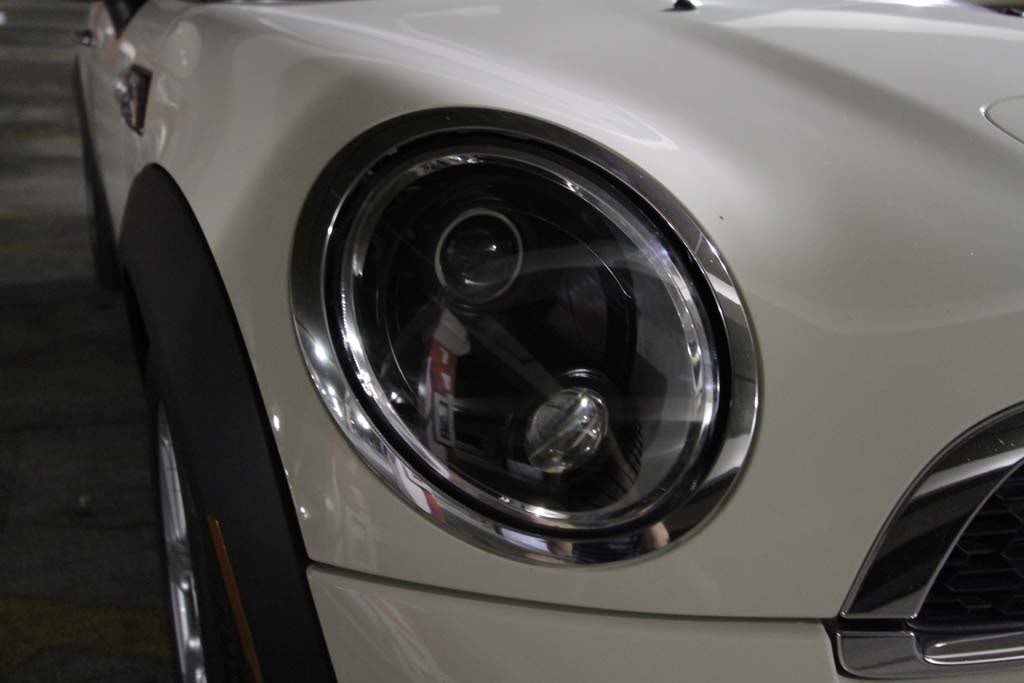
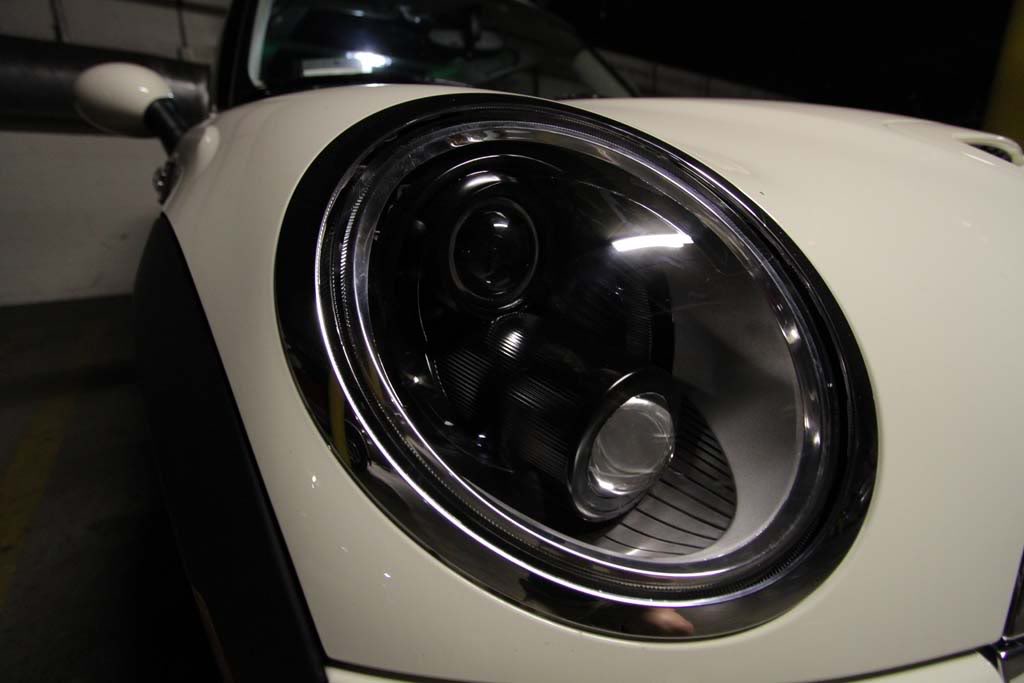
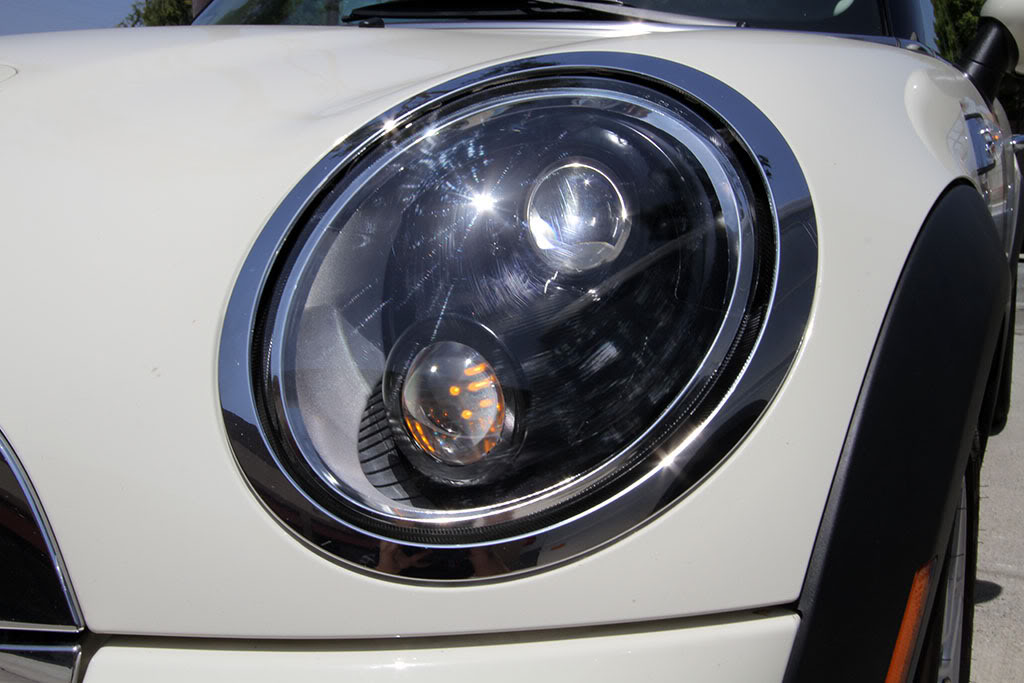
I picked up my lights earlier today from the painters. They looked fantastic but they painted over my angel eyes :( I used a razor and it took about 2 hours to scratch the paint all off of the plastic lights.
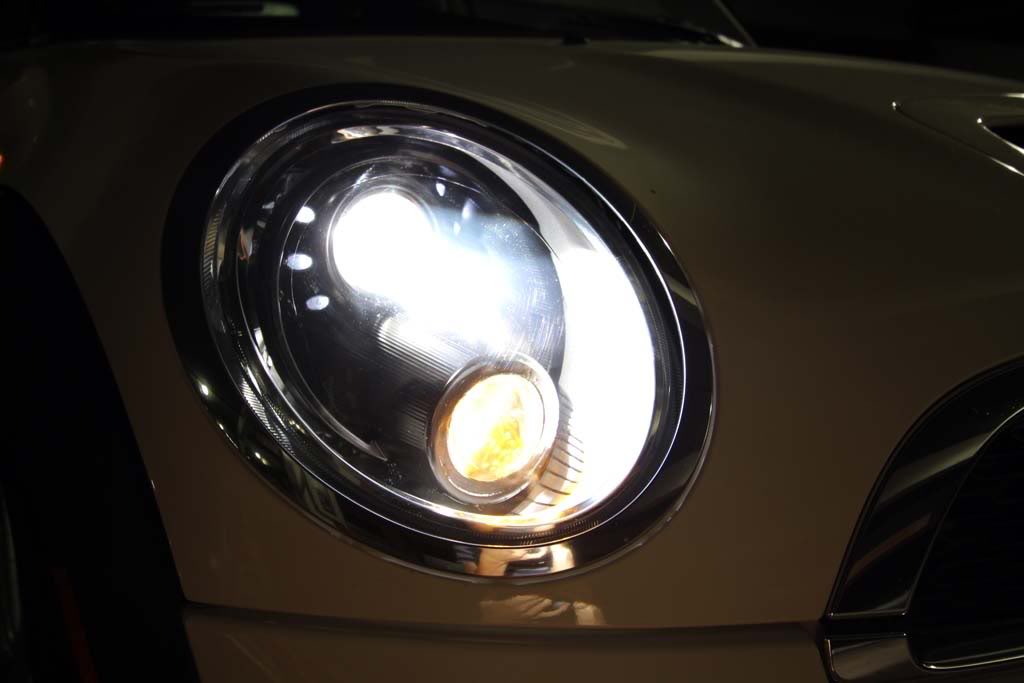
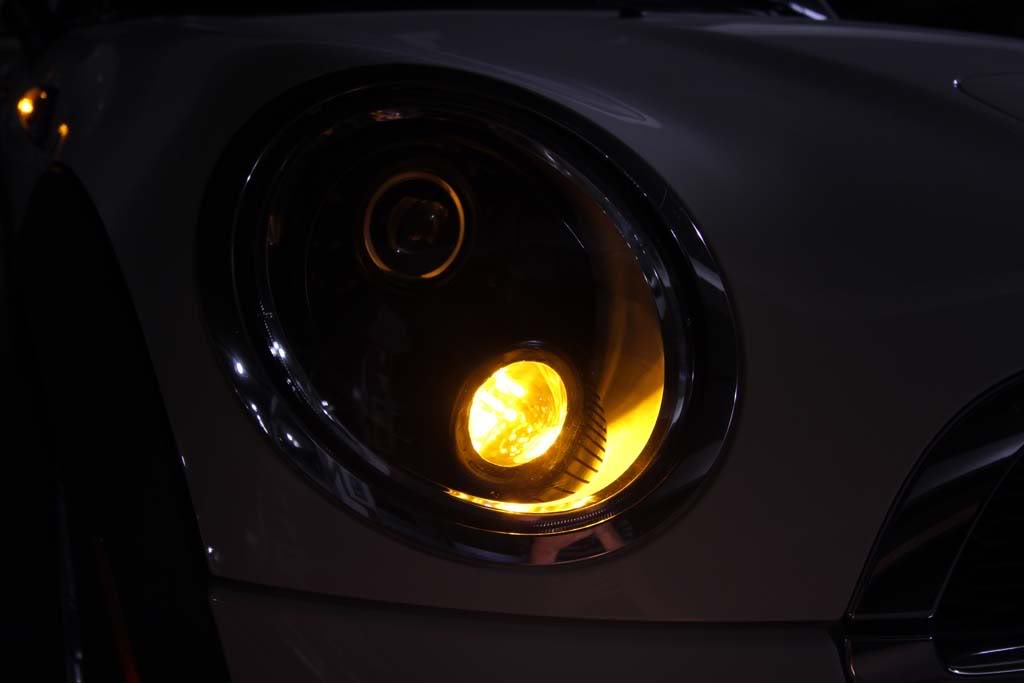
I also painted the insides of my projectors black so that from certain angles the lens looks black. Pretty cool effect.
I put everything together and glued it back together. I let the glue set for 3 hours and then installed!
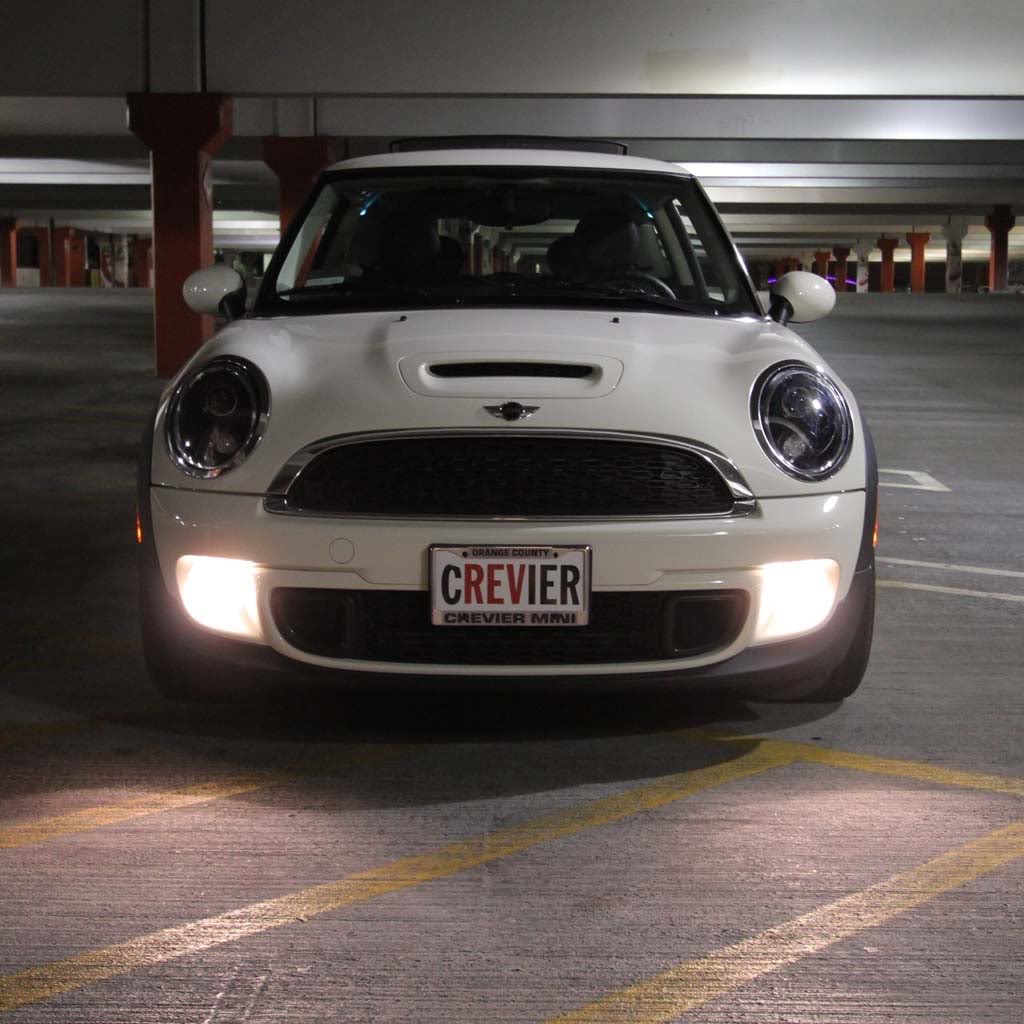
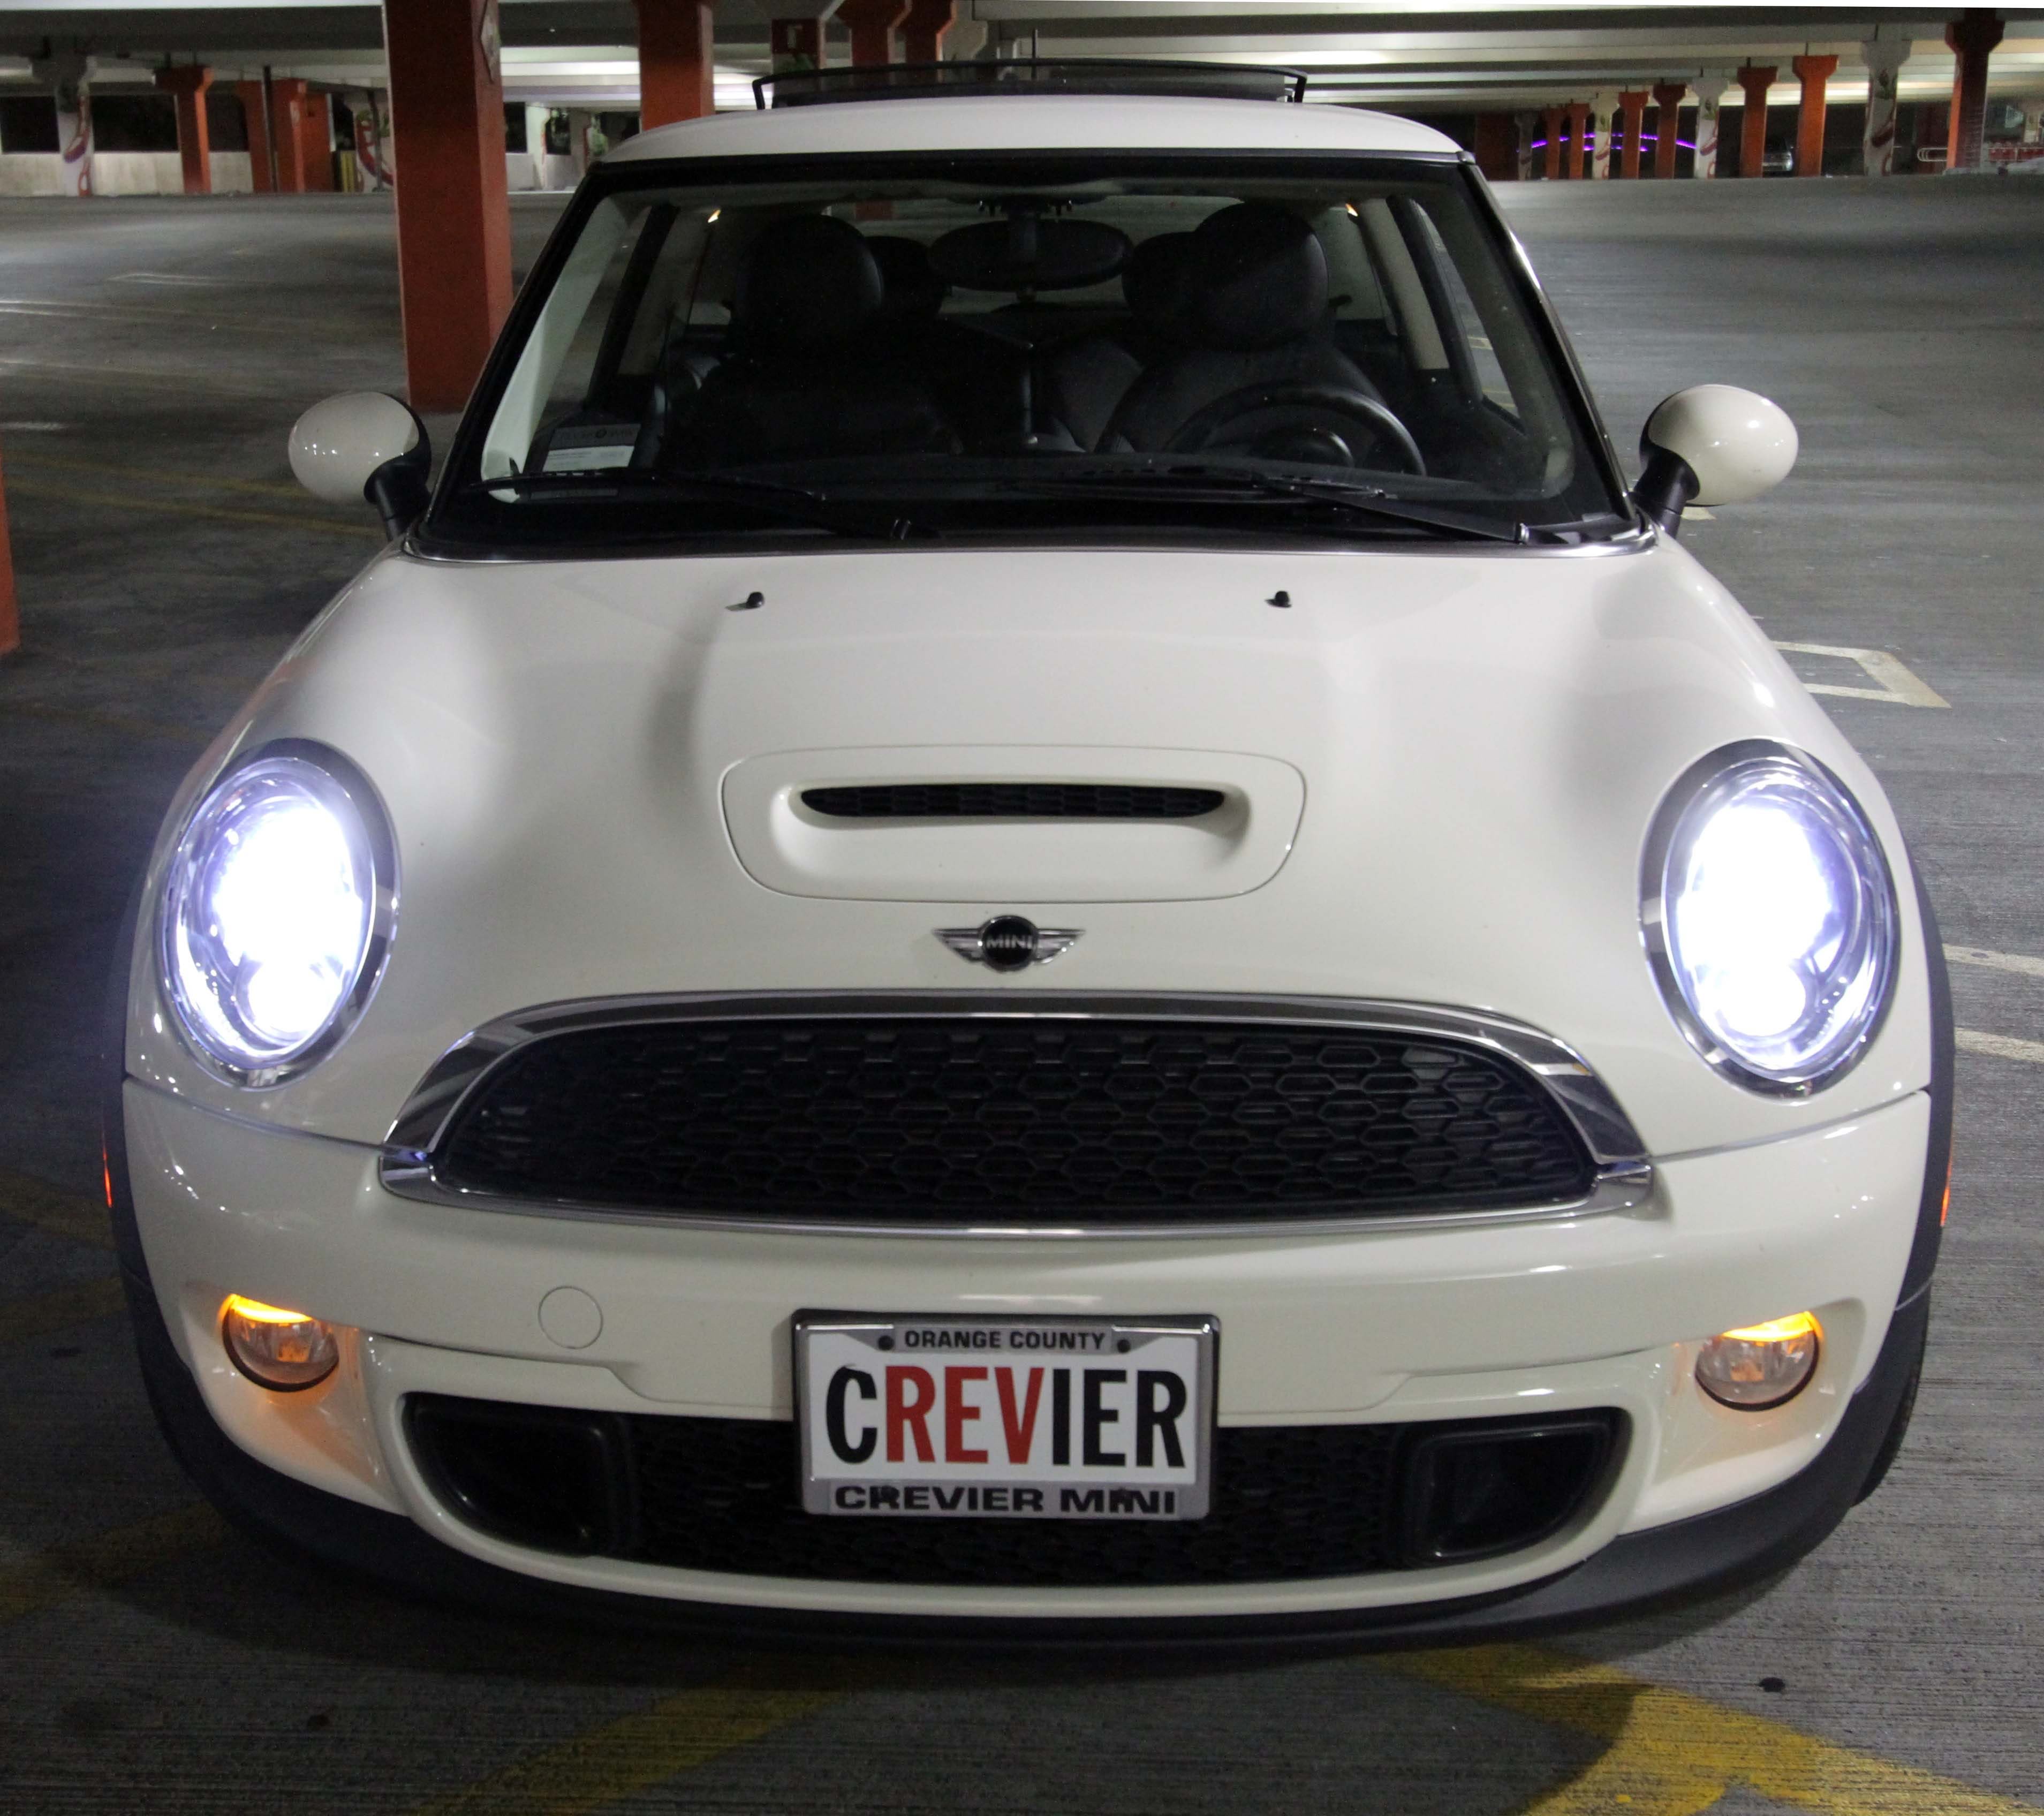
I couldn't be more satisfied with how they turned out. I was worried that the black lights might have stuck out from the pepper white paint but they blend in nicely with the grille and it all looks pretty uniform. I love them! I noticed that my passenger projector is a little askew but it's not too bad and most people would probably never notice.
My bulbs are 5000K. They look a little blue right now but the color should shift after I use them for a month or so and get a little warmer.


I'll post some daytime pictures tomorrow when I can get some better photos.
I also painted the insides of my projectors black so that from certain angles the lens looks black. Pretty cool effect.
I put everything together and glued it back together. I let the glue set for 3 hours and then installed!
I couldn't be more satisfied with how they turned out. I was worried that the black lights might have stuck out from the pepper white paint but they blend in nicely with the grille and it all looks pretty uniform. I love them! I noticed that my passenger projector is a little askew but it's not too bad and most people would probably never notice.
My bulbs are 5000K. They look a little blue right now but the color should shift after I use them for a month or so and get a little warmer.
I'll post some daytime pictures tomorrow when I can get some better photos.
Last edited by calforhelp; 05-19-2012 at 02:11 AM.
#18
05-19-2012, 04:26 PM
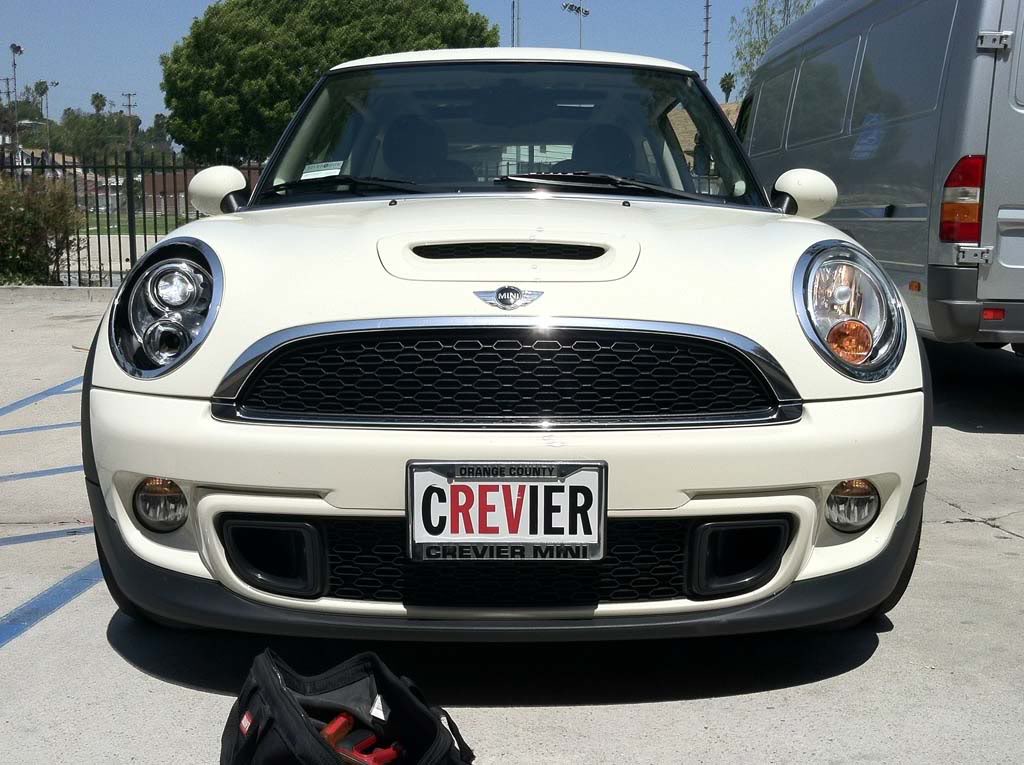
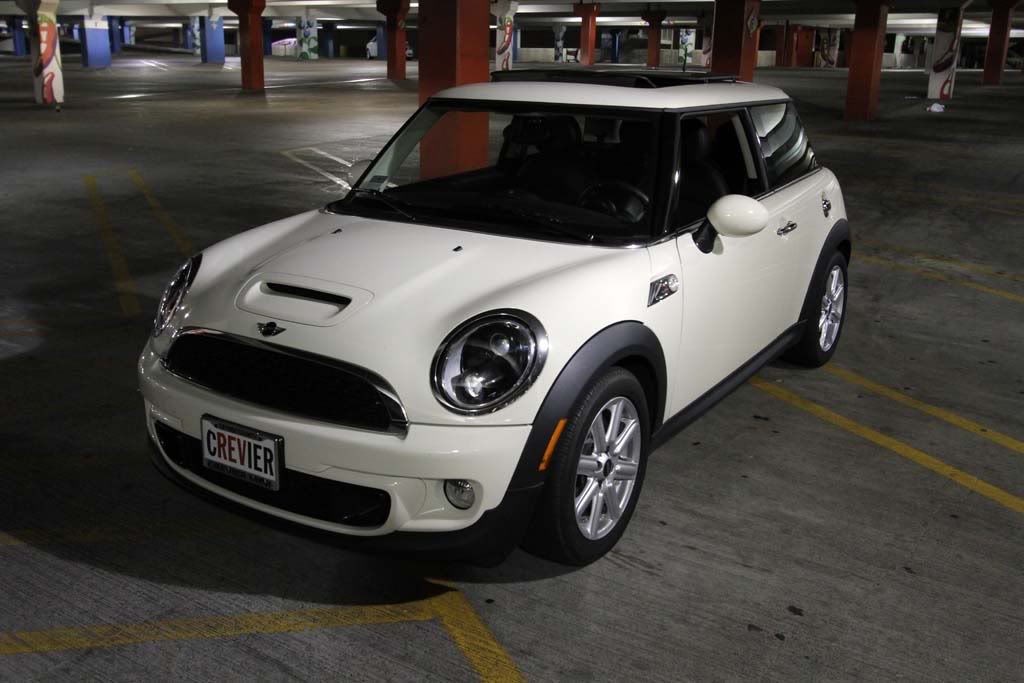
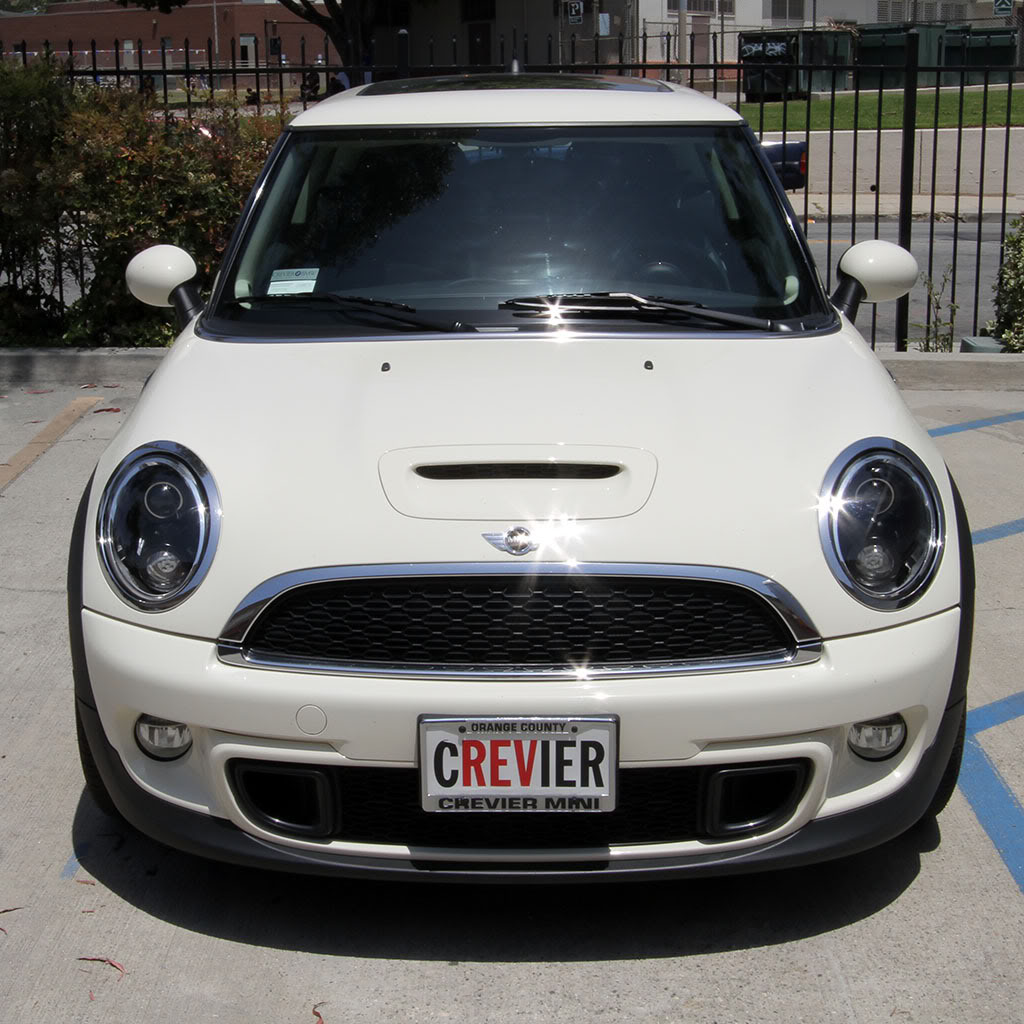
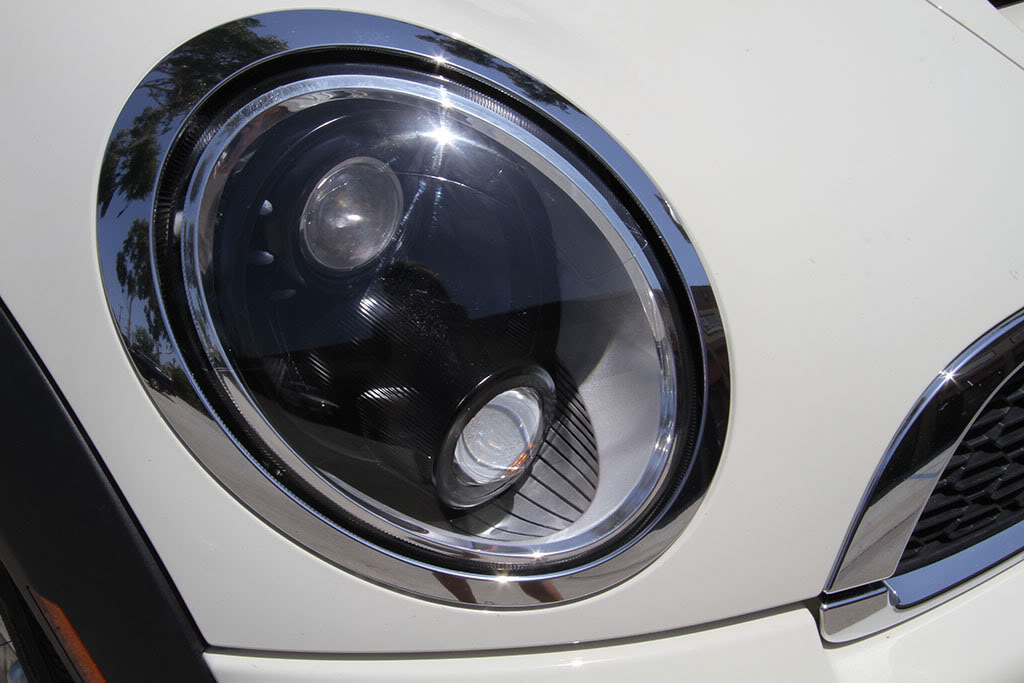
Here are some daytime pics. You can see here that I left the headlight's original silver shroud silver. I think it makes a nice transition from the black to the chrome. The LED bulbs in the turn signals is a little hard to see in the daytime. I also had them in the original halogen headlights but the lens in front of them diffused the light enough for it to be noticeable. Now you can only really see it if you are directly in front, good thing I have the side scuttle as well.
I also got a pair of 5000K LED fog bulbs which are pretty dang bright. They do give me a bulb warning tho so I'll have to wait for my OBDII cable to come so I can hopefully fix that.
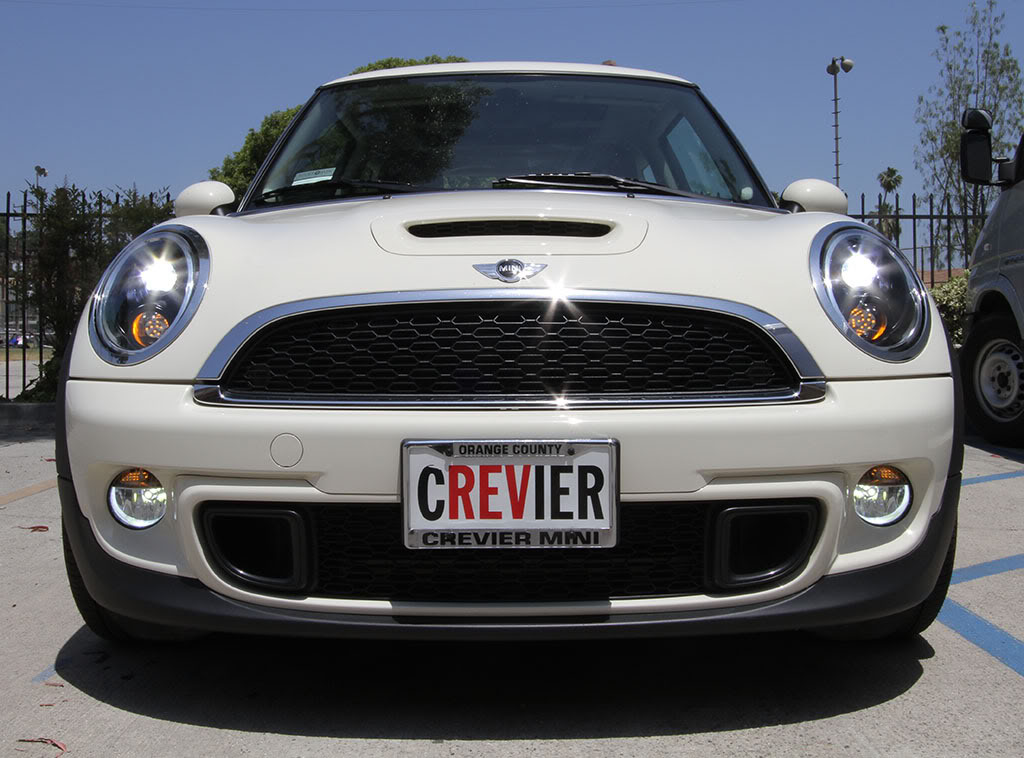
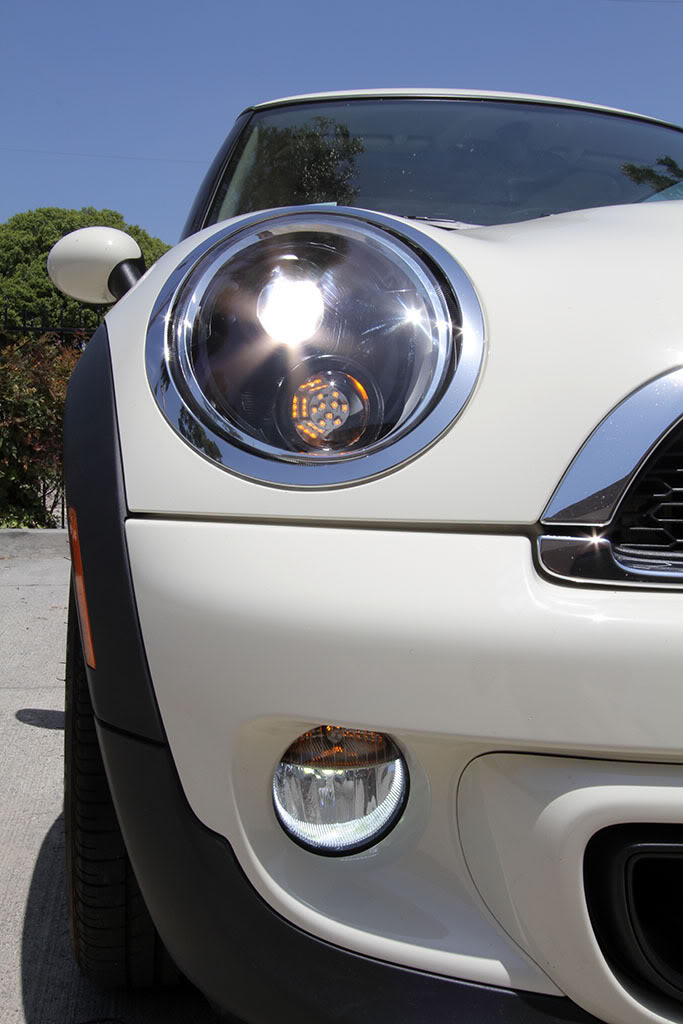
I also got a pair of 5000K LED fog bulbs which are pretty dang bright. They do give me a bulb warning tho so I'll have to wait for my OBDII cable to come so I can hopefully fix that.
#19
05-26-2012, 11:22 PM


#21
05-27-2012, 05:14 PM
#22
11-05-2012, 08:54 PM

Neutral
Join Date: Sep 2011
Location: Fort Worth, TX
Posts: 4
Likes: 0
Received 0 Likes
on
0 Posts
i did a retrofit with motorimoto 3five kit, the standard H13 can-bus adapter they gave me now is causing horrible flickering headlight problems when I'm driving. What kind of customer harness did they make for you? I've been emailing retrofitsource and they just sent me another H13 can-bus adapter. I'm about ready to just give up and get another set of OEM halogens.
#23
11-05-2012, 09:01 PM
Don't give up yet!! It'll all be worth it 
Call TRS and ask for Matt. Tell him that you need the same custom harness that he made for a 2011 MINI Cooper S back in May. It was for order number 18817. It was a custom H13 harness made with a capacitor to level out the flickering.
If they still don't know what you're talking about let me know and I can call him and hopefully get him to remember.
Lemme know if you get it worked out!
#24
11-05-2012, 09:14 PM
Neutral
Join Date: Sep 2011
Location: Fort Worth, TX
Posts: 4
Likes: 0
Received 0 Likes
on
0 Posts
Thanks for the prompt reply, I'm glad i found this thread, I thought i was going crazy, i've only seen a few retrofits for R56 headlights with Morimoto headlights. Before, I bought those Spec-D Halo projectors, they had horrible light output and scattered light all over the place and were hard to adjust. These look way way better, even better than the stock xenon's.
How did you mount the projectors onto the halogen reflectors? I just cut a hole in the reflector and used silicon RTV to glue the Morimoto mini H1's directly to the reflectors, no way to rotate adjust it but I can use the x and y adjusters.
Ill call retrofit source tomorrow and get that harness
How did you mount the projectors onto the halogen reflectors? I just cut a hole in the reflector and used silicon RTV to glue the Morimoto mini H1's directly to the reflectors, no way to rotate adjust it but I can use the x and y adjusters.
Ill call retrofit source tomorrow and get that harness
#25
11-06-2012, 04:31 AM
Thanks for the prompt reply, I'm glad i found this thread, I thought i was going crazy, i've only seen a few retrofits for R56 headlights with Morimoto headlights. Before, I bought those Spec-D Halo projectors, they had horrible light output and scattered light all over the place and were hard to adjust. These look way way better, even better than the stock xenon's.
How did you mount the projectors onto the halogen reflectors? I just cut a hole in the reflector and used silicon RTV to glue the Morimoto mini H1's directly to the reflectors, no way to rotate adjust it but I can use the x and y adjusters.
Ill call retrofit source tomorrow and get that harness
How did you mount the projectors onto the halogen reflectors? I just cut a hole in the reflector and used silicon RTV to glue the Morimoto mini H1's directly to the reflectors, no way to rotate adjust it but I can use the x and y adjusters.
Ill call retrofit source tomorrow and get that harness
I bought the D2S projectors and I would get the H1 next time as it is a hair smaller. The rotational aiming is easy, just twist the projector/shaft and tighten down captive nut to hole the projector in place. I would think RTV or JB weld would hold it just fine but I didn't use either, just the supplied gasket material and nut on the threaded shaft of the projector.
As far as harness goes, I didn't use anything for my '09 that these were originally in and it worked fine. Now the same setup in my '10 will give my a headlight error after about 30 minutes of driving with the headlights on. Still something to look into.