Interior/Exterior Carbon Fiber'd the interior first photos!
#26
 07-26-2011, 02:56 PM


Thanks again.
Geoffrey I know you mentioned you wanted to wrap your door handles. Well, its a PIA. It's hard to make all those curves and get it 100%. So heres todays project.. As much of a PIA it was I think they came out nice. Now for the other side of the car.. My hands are killing me so its waiting till tomorrow..
And no, I didn't cut the hole for the key out. I'll use that for emergency only for now..
One thing I noticed already. Is that they get hot.. Real hot to the touch. I wonder how thats gonna play out with this stuff. Its supposed to stand up to 220 degrees..
#27
07-26-2011, 05:55 PM
#28
07-26-2011, 07:16 PM

Former Vendor
#29
07-26-2011, 07:35 PM
#30
07-27-2011, 08:02 AM

4th Gear
love it, have you thought about doing your strpes on the hood and trunk? if you matched up the direction on the vinyl for the stripes, with the ones on the headlight rings that would look sweeeet. i have the 3m di-noc on my laptop and have noticed the rolled corners creasing like your shifter ring. i used the headgun and a stiff plastic wedge to press them out, this material seems thicher and more durable than standard vinyl. i cannot wait to see your center speedo/vents done. can you please put all your pictures in you gallery so we can get the big picture. i love watching your progress. and the more you do, the better you get and the overall look coordinates more and more. i have seen pictures of a tuner company do the black fender arches and front /side/back lower trim of the countryman and you cannot tell until the light hits them right.
#31
07-29-2011, 06:10 PM
#32
07-29-2011, 08:35 PM
Former Vendor
#33
07-30-2011, 05:42 AM

#34
07-30-2011, 08:32 AM

2nd Gear
Join Date: Nov 2010
Location: Georgetown, TX
Posts: 89
Likes: 0
Received 0 Likes
on
0 Posts
#35
07-30-2011, 02:34 PM
Geoffrey, Yup. Did them on the car. Pretty simple really.
I like the look but I get too **** about it peeling up around the edges(and it is in several places) and that will make me either redo a few of the handles or take it off completely and get the black Union Jack handles. Its not all the vinyls fault either. The handles are a tuff shape. The 4th turned out way better than the first, so maybe I do have some hope, but I hate half assed stuff..
One thing I have learned from 3M is that I should be doing this in a temp closer to the 70-80's than 100's.. Plus they told me it should stay in a stable temperature for about 48 hours following install. So maybe fall would be the time to do it for the parts I cant take off and leave off.. My headlight bezels are perfect. Did those indoors and let them sit for a few day, no problems..
Ryan, Anytime is cool. Just PM me when your ready to do something

#36
11-06-2011, 12:29 PM

5th Gear
random though, but you are aware that real CF is cheaper, correct? (its a little messier, but if your just doing mono-layer aesthetic covering, the real stuff is cheaper. Just get some resin and mix black paint into it and paint it onto your part like a base and wrap with real CF. Gives you that dry carbon look... but better than the di-noc for obvious reasons... because it is cf.
#37
11-06-2011, 01:08 PM
4th Gear
random though, but you are aware that real CF is cheaper, correct? (its a little messier, but if your just doing mono-layer aesthetic covering, the real stuff is cheaper. Just get some resin and mix black paint into it and paint it onto your part like a base and wrap with real CF. Gives you that dry carbon look... but better than the di-noc for obvious reasons... because it is cf.

#38
11-06-2011, 01:30 PM

2nd Gear
Join Date: Aug 2011
Location: Doylestown Pa
Posts: 70
Likes: 0
Received 0 Likes
on
0 Posts
Door handles are a major PIA, but my R53 Gas cap was by far the most difficult thing to wrap. A lot of heat and patience!!! I have to redo my door handles as the vinyl shrunk a little at the edges. I used Oracle wrap material in matte black, also did stripes with it. The wrap materials are amazing, they stretch to almost 200% then go almost back to flat again.
#39
06-22-2012, 10:50 PM

4th Gear
Join Date: Aug 2009
Location: Maryland
Posts: 308
Likes: 0
Received 0 Likes
on
0 Posts
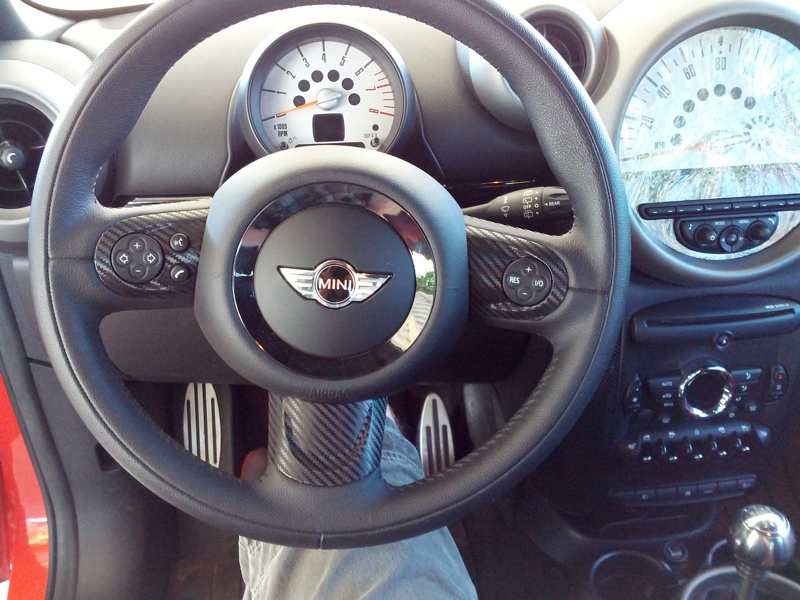
I have been eyeing up the 3M DI-NOC 3D Carbon Fiber Vinyl for a week or two and after ordering some samples I went for it and ordered 12 feet! I have wrapped my door panels, steering wheel controls and my center console (twice). I am planning on tackling the vents and Speedo console (Mickey Mouses Head).
This stuff is the most realistic carbon with a very visible herring bone pattern. Once installed it seems like the real thing. I had to convince people today that it wasn't real CF...
Here is a link to where I bought it. They have a great video of a Mini getting its mirrors, headlight rings, and roof wrapped. Which I think looks awesome in the end.
http://www.tiptopsigns.com/3M-DI-NOC...er-p-2472.html
Its supposed to have a 6 year warranty outdoor and unlimited indoor. So it should hold up well.
Here are some photos.. I will add more as I get more.
. Plus the person on the phone sounded like they were over seas , the voicemail message. Regardless tiptopsigns for 12" x 96" with shipping would have cost me $145.00. MetroRestying same spec with shipping, $45. Huge difference. Anyhow, I order on Thursday of this week and should get it Monday. Will post back when I have install and wrapped all the plastic silver rings for the interior.
#41
06-27-2012, 10:40 AM
2nd Gear
Join Date: Jun 2012
Location: D.C. Metro
Posts: 138
Likes: 0
Received 0 Likes
on
0 Posts
#42
06-27-2012, 11:09 AM
4th Gear
Join Date: Aug 2009
Location: Maryland
Posts: 308
Likes: 0
Received 0 Likes
on
0 Posts
I will not be taking the rings off, why are you guys calling them bits, that's weird or different. I tried taking them off at one point and time with needle noise pliers, but I was nicking the plastic. I will be laying the CF wrap over and then heating to conformity, and then using a sharp OLFA knife and carefully cutting to get them where I like it.
#43
06-29-2012, 07:06 AM
4th Gear
Join Date: Aug 2009
Location: Maryland
Posts: 308
Likes: 0
Received 0 Likes
on
0 Posts
I have been eyeing up the 3M DI-NOC 3D Carbon Fiber Vinyl for a week or two and after ordering some samples I went for it and ordered 12 feet! I have wrapped my door panels, steering wheel controls and my center console (twice). I am planning on tackling the vents and Speedo console (Mickey Mouses Head).
This stuff is the most realistic carbon with a very visible herring bone pattern. Once installed it seems like the real thing. I had to convince people today that it wasn't real CF...
Here is a link to where I bought it. They have a great video of a Mini getting its mirrors, headlight rings, and roof wrapped. Which I think looks awesome in the end.
http://www.tiptopsigns.com/3M-DI-NOC...er-p-2472.html
Its supposed to have a 6 year warranty outdoor and unlimited indoor. So it should hold up well.
Here are some photos.. I will add more as I get more.
This stuff is the most realistic carbon with a very visible herring bone pattern. Once installed it seems like the real thing. I had to convince people today that it wasn't real CF...
Here is a link to where I bought it. They have a great video of a Mini getting its mirrors, headlight rings, and roof wrapped. Which I think looks awesome in the end.
http://www.tiptopsigns.com/3M-DI-NOC...er-p-2472.html
Its supposed to have a 6 year warranty outdoor and unlimited indoor. So it should hold up well.
Here are some photos.. I will add more as I get more.
If you took them off, how did you go about doing it?
#44
06-29-2012, 02:10 PM

#45
07-26-2012, 07:01 PM
It takes a lot of heat and patience to wrap most of the parts. Plus you will need the 3M adhesive promoter..It makes the vinyl stick to the hard bends and corners. You will need to remove all the pieces if you want them to look their best. You need to wrap them completely. You will need to get them very hot to help the glue set and once you have the piece wrapped you need to keep them in a controlled temp for 48 hours. I do recommend this. I did my car last year in the heat of the beach on vacation. Some of the pieces(easy ones) stuck and didnt peel at all, some of the difficult corners did peel. Pieces I did later in my house (headlight bezels) I took a great amount of time to wrap them 100% all sides so they really stuck well. I let them sit a few days and they have been on the car for a year and they still look great!
It took me a entire week to do my car. With a lot of error before I got it right. My fingers hurt like crazy, but it was so worth it...
It has been one full year and every piece is still perfect.
Good luck.
It took me a entire week to do my car. With a lot of error before I got it right. My fingers hurt like crazy, but it was so worth it...
It has been one full year and every piece is still perfect.
Good luck.
#46
07-26-2012, 07:04 PM
#47
09-16-2012, 09:28 PM

I ordered a bunch of the 3M 1080 (supposed to be easier to work with than the Di-NOC), primarily for covering all the piano black surfaces but other bits as well. I did the steering wheel trim pieces since they're pretty easy and can be removed from the car. I may redo the bottom spoke again since I'm not totally happy with it, but overall I like how it looks.
#48
09-17-2012, 06:32 PM
4th Gear
Join Date: Aug 2009
Location: Maryland
Posts: 308
Likes: 0
Received 0 Likes
on
0 Posts
#49
09-17-2012, 07:14 PM

#50
09-17-2012, 08:44 PM
1. Disconnect battery
2. There is a small hole behind the bottom spoke going into the wheel. Insert a flat head screwdriver with the blade perpendicular to the wheel. Push further into the wheel and you'll feel the mechanism release that holds the airbag on. Push the screwdriver in as you pull the airbag off. It takes very very little effort if you have it released properly, so if it doesn't come off, you probably don't have the release activated properly.
3. There should be enough cable to leave the airbag on top of the steering wheel, but you can also disconnect the wires and set aside if you can figure out how to get the wires to release (I couldn't).
4. The bottom spoke is just held on with friction fittings. You can wiggle it out with your fingers or gently coax it out with a screwdriver.
5. The side spokes each have a T20 screw holding them on (may only be there on the MFSW). After that screw is out, you can wiggle them out with your fingers. If you have the MFSW, be careful not to pull too hard since there are wires coming off the back. You can either disconnect the wires or pop just the top cover off.
The only tricky bit was the airbag. I fiddled with the airbag for a while until I reread the instructions and realized I needed to spin the screwdriver 90 degrees. After I figured that out, it was a piece of cake.