Interior/Exterior Notice: Amazing Lightbar!
#76
 03-09-2008, 12:36 AM


#77
03-09-2008, 12:39 AM
It is a very nice bar but imo the lights need to be closer to the bumper. Jusr look at the pics in my link and you will see what I am talking about. That can be fixed very easy tho. I was going to cut about 2" off the mounts and reweld them to bing it in close but I just made my own palo knockoff for $30 and 4 hours of my time. Here is how it turned out, would anyone be interested in buying the bar I made?

#78
03-09-2008, 08:27 PM


 <-this is not photoshop looks it but I swear its real
#79
03-10-2008, 09:13 AM

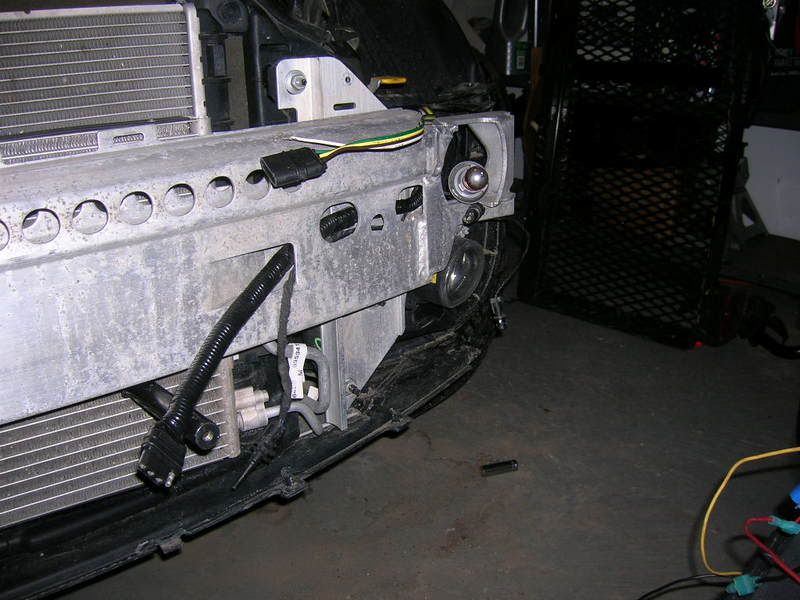
Install pics - so far
So far.... (pardon the wintry mix on the outside of the car - yuck! And the flash makes it look even worse.)
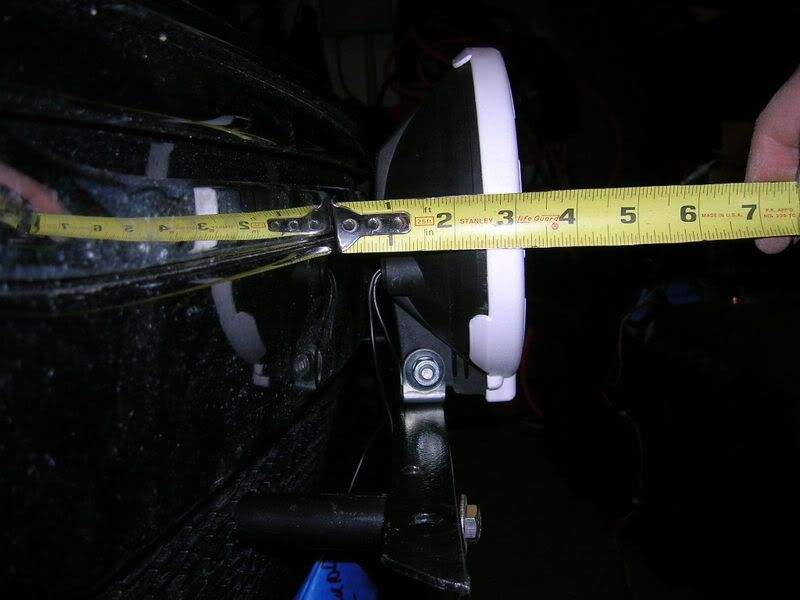
I've rotated the crossbar 90 degrees and flipped it so the lights are closer to the car and higher up. That 1/2" shorter tube would be great, mine are the older longer ones. Only issues I've had so far are
1) The Mini bumper is concave inside, so the tubes are not pointing straight forward. So far that was OK since I was redrilling the crossbar in order to mount the lights on top
2) The Mini aluminum bumper is pretty hard, stripped a few screw heads off until I got the right hole size for my stainless screws.
3) It's winter, so it's cold and the car's messy.
What I'd do differently:
1) Angle the tubes to match the bumper angle (if only I had a large vise...)
2) Shorten the tubes 1/2" (reddrockets is doing this on the newer ones, apparently)

Now I'm working on the wiring of the lightbar itself to the plug, then (once my wife returns from flogging the Mini) get at the car!
I've rotated the crossbar 90 degrees and flipped it so the lights are closer to the car and higher up. That 1/2" shorter tube would be great, mine are the older longer ones. Only issues I've had so far are
1) The Mini bumper is concave inside, so the tubes are not pointing straight forward. So far that was OK since I was redrilling the crossbar in order to mount the lights on top
2) The Mini aluminum bumper is pretty hard, stripped a few screw heads off until I got the right hole size for my stainless screws.
3) It's winter, so it's cold and the car's messy.
What I'd do differently:
1) Angle the tubes to match the bumper angle (if only I had a large vise...)
2) Shorten the tubes 1/2" (reddrockets is doing this on the newer ones, apparently)
Now I'm working on the wiring of the lightbar itself to the plug, then (once my wife returns from flogging the Mini) get at the car!
Last edited by DixonL2; 03-10-2008 at 09:19 AM.
#80
03-10-2008, 01:44 PM

So far.... (pardon the wintry mix on the outside of the car - yuck! And the flash makes it look even worse.)
I've rotated the crossbar 90 degrees and flipped it so the lights are closer to the car and higher up. That 1/2" shorter tube would be great, mine are the older longer ones. Only issues I've had so far are
1) The Mini bumper is concave inside, so the tubes are not pointing straight forward. So far that was OK since I was redrilling the crossbar in order to mount the lights on top
2) The Mini aluminum bumper is pretty hard, stripped a few screw heads off until I got the right hole size for my stainless screws.
3) It's winter, so it's cold and the car's messy.
What I'd do differently:
1) Angle the tubes to match the bumper angle (if only I had a large vise...)
2) Shorten the tubes 1/2" (reddrockets is doing this on the newer ones, apparently)
Now I'm working on the wiring of the lightbar itself to the plug, then (once my wife returns from flogging the Mini) get at the car!
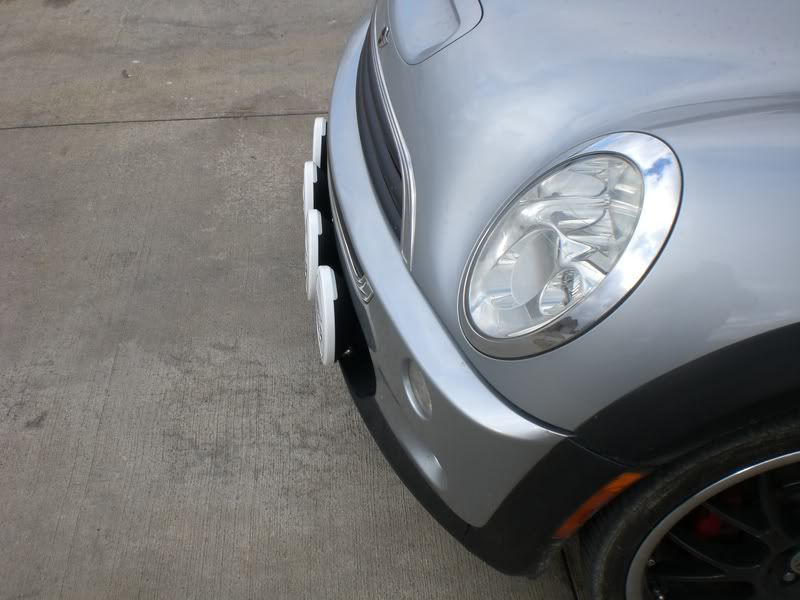
That looks pretty good if the finished result is nice I might have to do that with mine. The things with the bumper being concave on the back messed me up when I did my install, wasnt fun.
#81
03-10-2008, 02:07 PM

Few questions. I have tried to follow this thread for a while.
Are there any pictures or instructions on how the light bar mounts to the bumper? It looks to me that you have to take the bumper off to mount them (and bumper cover).
Does this bar let you mount the lights between the bottom and top grill? I want the lights inbetween this area.
Are there any pictures or instructions on how the light bar mounts to the bumper? It looks to me that you have to take the bumper off to mount them (and bumper cover).
Does this bar let you mount the lights between the bottom and top grill? I want the lights inbetween this area.
#82
03-10-2008, 04:47 PM
this does require removal of the bumper cover and bumper support not a big deal just about 6 or so nuts for the carrier and the 9 fasteners for the cover. if you mean directly in front of the middle grille yes that is entirely possible with this setup you just need the longer tubes and shallow lights.
#83
03-10-2008, 06:26 PM
Yes, you have to remove bumper cover and support. No, it's not difficult, just time consuming (about 30 minutes with practice and jacking the car to get at the philips head screws on the bottom).
The concavity of the back of the bumper is a beast to deal with, I was redrilling the crossbar anyway but still could've done it better. Overall I like it though, and they're plenty stable.
Lights are right where I want 'em, and even my WIFE likes them! Now all I've got to do is finish the in-car wiring... right now I'm such a poseur, I've got these 4 gigantic lights that (ahem) don't work! (yet)
And just like I said - 2 stainless steel bolts and a plug, and the lights come off.
How the lightbar mounts to the bumper: I used SS sheet metal screws, plenty sturdy.


...and the almost-finished product (finished on the outside anyway...)


The concavity of the back of the bumper is a beast to deal with, I was redrilling the crossbar anyway but still could've done it better. Overall I like it though, and they're plenty stable.
Lights are right where I want 'em, and even my WIFE likes them! Now all I've got to do is finish the in-car wiring... right now I'm such a poseur, I've got these 4 gigantic lights that (ahem) don't work! (yet)
And just like I said - 2 stainless steel bolts and a plug, and the lights come off.
How the lightbar mounts to the bumper: I used SS sheet metal screws, plenty sturdy.
...and the almost-finished product (finished on the outside anyway...)
Last edited by DixonL2; 03-10-2008 at 07:02 PM.
#84
03-10-2008, 06:30 PM


#85
03-10-2008, 07:03 PM

#86
03-10-2008, 08:04 PM

#87
03-10-2008, 08:13 PM


#88
03-11-2008, 03:21 AM
 Also for me, I haven't a clue when it comes to lighting and taking my car apart.. Ask Dixon.. He can attest to that.. and lol i am being kind with this picture! So when I ordered my light brackets, I wanted the least invasive to my car.. these weren't as bad as they could have been.. they use the holes already in the bumper... they were 99 dollars a piece and I put on two.
#89
03-11-2008, 05:32 AM
^^ Hey, that's my back when we were installing your hitch!! ^^
I remember having your trunk apart, glad that hitch and all worked out!
I like your staggered lights. Did you have that silver hood stripe when I was there last? Lookin' good.
FULLY agreed on being non-invasive where possible, nice thing about these bars is that the holes are on the back of the bumper, fully covered and won't rust or oxidize or harm the car long term. The only "permanent" modifications were the 1" holes in the mesh lower grille, and a replacement grille can't be too hard to find if I need one.
#90
03-11-2008, 06:35 PM
#91
03-12-2008, 12:03 AM
#92
03-12-2008, 06:52 AM
Thanks! That's the eBay bar but I bought it used with the Hella 500 fogs. I bought the driving lights from (ahem) WalMart for about $60. Check my previous post, WalMart seems to get their Hellas from both Asia and Germany, and the German ones looked to have clearer flutes in the glass (looks like the Asian ones were made on older tooling). I think WalMart only carries the driving light version, but the Hella 500 fogs are available on the web for similar pricing. I still don't have my car wiring done yet, so can't report on performance but will do so...
Oh, and www.rallylights.com has the clear acrylic stone shields at $11.84 each...
http://www.rallylights.com/hella/500.asp
ALSO - installation tip for this and the ALTA bar: That concave bumper has to be taken into account either by bending the brackets (so the light mounting bar comes out parallel with direction-of-travel of the car) OR by premounting the front bar on the tubes and then moving the uprights toward the centerline of the car such that the bracket mounts flat with the interior surface of the bumper - meaning the front mounting tubes would be somewhat splayed once mounted.
Last edited by DixonL2; 03-12-2008 at 01:04 PM.
#93
03-16-2008, 06:32 PM
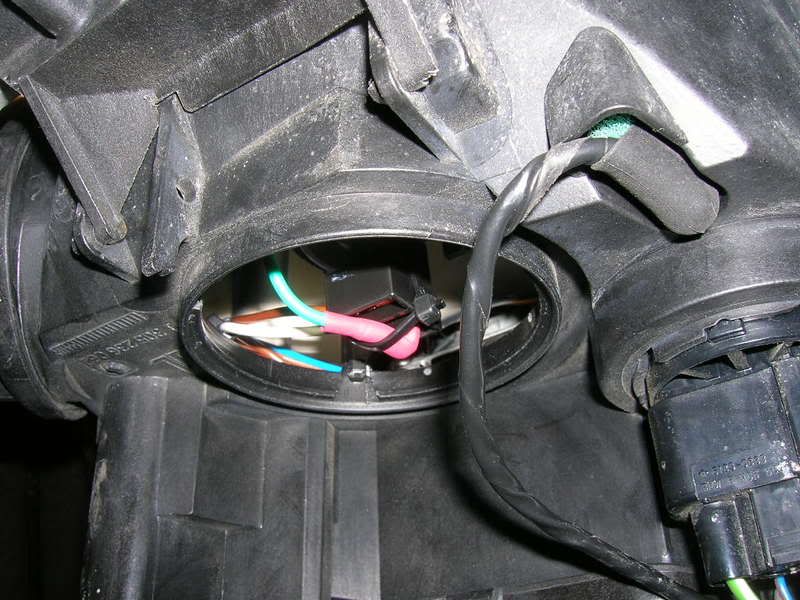
OK, guys, where I tapped into the high beams and parking lights.
I tapped the high beam white wire right at the driver's side headlight assembly (pic) for the driving lights (on only when high beams are on). To tap into the high beam, I used a spade connector, gently inserted it into the headlamp socket from the back, then bent and ziptied it to prevent it coming out. I ran it in through the headlight vent, being sure to reinstall the little foamy thing that keeps too much moisture out.
I tapped into the marker light on the driver's side bumper, the non-brown wire, for the fogs (can be on without headlights, but go off when marker lights go off). I put my switches in the downtube - looks cool, but I won't do it again (pain in the BUTT to install!). Sorry sideways pic, Photobucket's weird today with my mac, if you've got a laptop tip it on end:

Had one of "those days" running wires, though, I'd get both ends on then remember that I had to thread the wiring through a small opening, I'd solder a connection and forget the shrink tubing and have to re-do, I'd leave critical parts in my basement workshop when I'm working in the garage, every time I dropped a socket it went to dead center under the car (or hit my shoe and went skittering across the garage floor - and under a shelving unit), that type of thing. I got a lot of exercise though... and the install is nice and cleeean.
The Hella 500 driving beams are pencil beams - great reach and they're what I was looking for, but not a lot of beam spread. The fogs are nice, at 55W they're good fogs, I'm heading for 100W as cornering lamps. Phew! Now I'm done. Until the next mod... parcel shelf anyone?
I tapped the high beam white wire right at the driver's side headlight assembly (pic) for the driving lights (on only when high beams are on). To tap into the high beam, I used a spade connector, gently inserted it into the headlamp socket from the back, then bent and ziptied it to prevent it coming out. I ran it in through the headlight vent, being sure to reinstall the little foamy thing that keeps too much moisture out.
I tapped into the marker light on the driver's side bumper, the non-brown wire, for the fogs (can be on without headlights, but go off when marker lights go off). I put my switches in the downtube - looks cool, but I won't do it again (pain in the BUTT to install!). Sorry sideways pic, Photobucket's weird today with my mac, if you've got a laptop tip it on end:
Had one of "those days" running wires, though, I'd get both ends on then remember that I had to thread the wiring through a small opening, I'd solder a connection and forget the shrink tubing and have to re-do, I'd leave critical parts in my basement workshop when I'm working in the garage, every time I dropped a socket it went to dead center under the car (or hit my shoe and went skittering across the garage floor - and under a shelving unit), that type of thing. I got a lot of exercise though... and the install is nice and cleeean.
The Hella 500 driving beams are pencil beams - great reach and they're what I was looking for, but not a lot of beam spread. The fogs are nice, at 55W they're good fogs, I'm heading for 100W as cornering lamps. Phew! Now I'm done. Until the next mod... parcel shelf anyone?
#95
03-16-2008, 09:14 PM
I like RedRockets but like you I think they stick out too far...haven't seen pictures of his redesign yet.
#97
03-17-2008, 06:23 PM
 mine used to pop off the visor in any kind of spirited turn. Almost lost it out the window once
#98
03-17-2008, 06:53 PM

Join Date: Sep 2007
Posts: 269
Likes: 0
Received 0 Likes
on
0 Posts


