How To HOW TO - Jack up the MINI
#1
 09-24-2013, 07:10 PM


HOW TO - Jack up the MINI
I've been looking for a way to jack up the MINI and place on jack stands using the approved jacking locations. Which is kind of tricky since your trying to put a jack stand in the same location as the jack itself.
I've tried the 2x4 "stud" method and while it works I worry about eventually damaging the rocker panels.
I've used locations under the car that are somewhat reinforced but again they are not approved and I worry about eventually damaging the under-carriage.
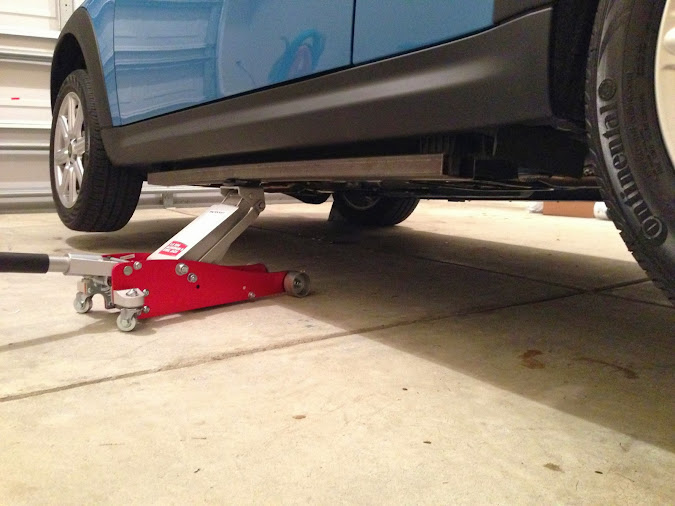
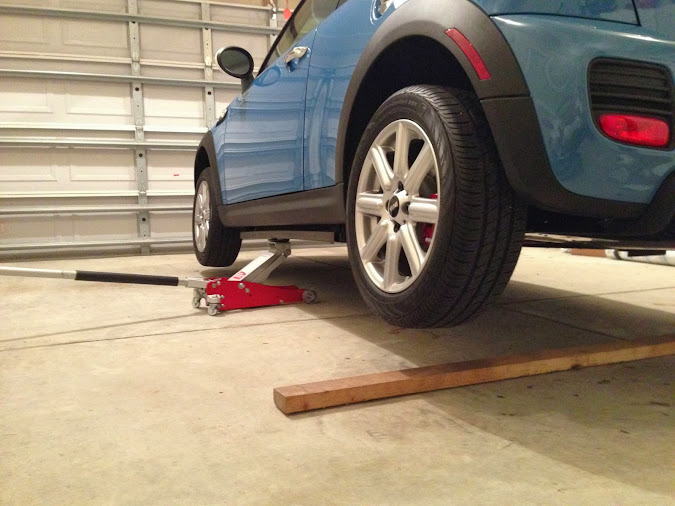
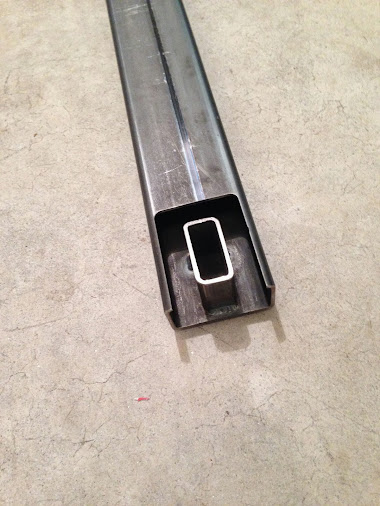
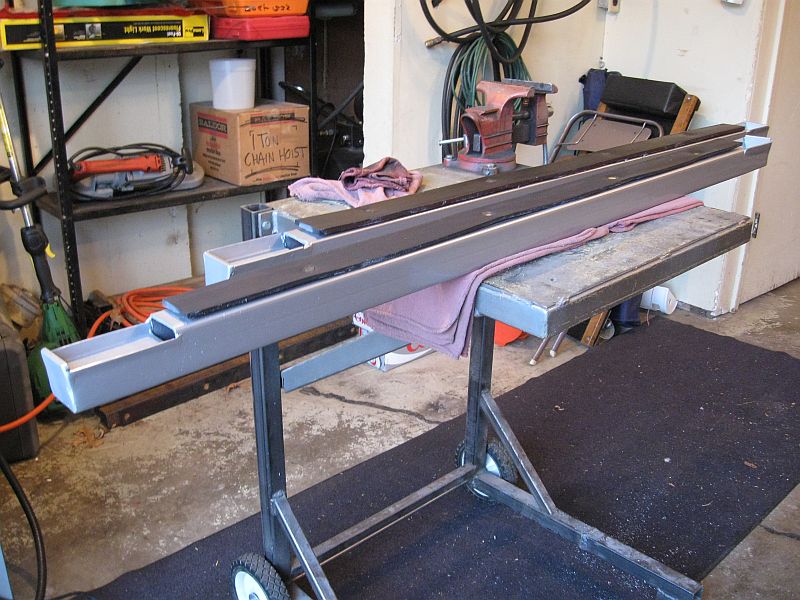
So today I fabricated a jacking bar made from 1.5"x3"x1/8" steel rectangular tubing with smaller tubing pieces that nest into the jacking cups. The bar spans the two jacking locations on the side, you can place the jack in the middle, jack up the side and slide the jack stands underneath all in less than 1 minute. The jacking bar only slightly deflects but never comes in contact with the rocker panel.
The total cost was about $30 for a pair and can be made with normal household tools - a welder helps but is not needed.
The bar work with both the aero and standard rocker panels. (The other side of the car has the aero kit installed - waiting on a backordered part to finish the driver side)
Now I just need to pick a paint color.
NOTE: A low profile jack is useful for lowered cars. My jack has a minimum height of 3 3/8" and works without having to drive up on a 2x4. (Car is lowered by 1.2")

I've tried the 2x4 "stud" method and while it works I worry about eventually damaging the rocker panels.
I've used locations under the car that are somewhat reinforced but again they are not approved and I worry about eventually damaging the under-carriage.
So today I fabricated a jacking bar made from 1.5"x3"x1/8" steel rectangular tubing with smaller tubing pieces that nest into the jacking cups. The bar spans the two jacking locations on the side, you can place the jack in the middle, jack up the side and slide the jack stands underneath all in less than 1 minute. The jacking bar only slightly deflects but never comes in contact with the rocker panel.
The total cost was about $30 for a pair and can be made with normal household tools - a welder helps but is not needed.
The bar work with both the aero and standard rocker panels. (The other side of the car has the aero kit installed - waiting on a backordered part to finish the driver side)
Now I just need to pick a paint color.
NOTE: A low profile jack is useful for lowered cars. My jack has a minimum height of 3 3/8" and works without having to drive up on a 2x4. (Car is lowered by 1.2")
#2
10-02-2013, 07:05 PM

Join Date: Apr 2012
Location: Clarsville TN
Posts: 128
Likes: 0
Received 0 Likes
on
0 Posts
#4
10-02-2013, 07:30 PM
Join Date: Apr 2012
Location: Clarsville TN
Posts: 128
Likes: 0
Received 0 Likes
on
0 Posts

#6
10-02-2013, 08:55 PM
6th Gear
#7
10-02-2013, 11:33 PM
Looks cool!
A few questions: (Sorry if I'm just missing the obvious, it's late after a long day! )
)
You said you can make this metal beam with inserts without welding tools, how?
The bar seats into the jack pads. Awesome for stability! But where do you put the jack stands? Onto the bar?
Stands to bar to pads to car seems like too long a chain to really be safe.
A few questions: (Sorry if I'm just missing the obvious, it's late after a long day!
)You said you can make this metal beam with inserts without welding tools, how?
The bar seats into the jack pads. Awesome for stability! But where do you put the jack stands? Onto the bar?
Stands to bar to pads to car seems like too long a chain to really be safe.
Trending Topics
#9
10-03-2013, 02:52 AM
Looks cool!
A few questions: (Sorry if I'm just missing the obvious, it's late after a long day! )
You said you can make this metal beam with inserts without welding tools, how?
The bar seats into the jack pads. Awesome for stability! But where do you put the jack stands? Onto the bar?
Stands to bar to pads to car seems like too long a chain to really be safe.
A few questions: (Sorry if I'm just missing the obvious, it's late after a long day!
)You said you can make this metal beam with inserts without welding tools, how?
The bar seats into the jack pads. Awesome for stability! But where do you put the jack stands? Onto the bar?
Stands to bar to pads to car seems like too long a chain to really be safe.
I place the jack stands under the jack pads, so yes it metal bar is in between the jack pad and jack stand. I had the same concern about stability but after I tried it was really stable.
#10
10-03-2013, 03:37 AM

Excellent idea. By the way, several years ago Sears sold a jacking system that addressed your point that it is tricky to insert a jack stand in the same place being used by the lift jack. The system was called 'Lift and Secure.' For some reason the product quickly disappeared from the store shelves and the catalog.
#11
12-02-2013, 03:01 PM

Take a look at this link and tell me what you all think. It shows where to lift the Mini on the reinforced portion of the frame so you can put the jack stands at the jack stand points.
http://www.pelicanparts.com/techarti..._Your_MINI.htm
http://www.pelicanparts.com/techarti..._Your_MINI.htm
#12
12-02-2013, 03:41 PM
Take a look at this link and tell me what you all think. It shows where to lift the Mini on the reinforced portion of the frame so you can put the jack stands at the jack stand points. http://www.pelicanparts.com/techarti..._Your_MINI.htm

#14
12-02-2013, 06:16 PM

I built some about 2 years ago, but I did mine a little differently - I used 3/16" wall thickness 2" square tubing, I cut a section off the end then turned it over and welded it back to the tubing to create a cup for the stock plastic blocks to fit into, and put a piece of rubber on top to protect the rocker panels.
#16
12-02-2013, 06:20 PM
#17
02-05-2014, 12:41 PM

5th Gear
Join Date: Jan 2014
Location: Ashburn, VA
Posts: 893
Likes: 0
Received 0 Likes
on
0 Posts
I don't know how the OP got all the metal for $30.. I've been quoted $131 from my local metal supply.
Local Supply Company - Minimum order is 24 feet for each type of tubing... that's
- 1 piece, 24 feet, 3" x 1.5" 11 gauge (1/8" or .12 wall) -- 83.42 lbs for $64.56
- 1 piece, 24 feet, 2" x 1" 11 gauge (1/8" or .12 wall) -- 54.05 lbs for $40.46
- Plus $20 to cut the pieces down to size to fit inside my MINI..
Then I would have to cut and fabricate a lot of the metal..
Total cost - $131.43
www.discountsteel.com - Can give me the exact sizes and lengths I need... 52 inches gives you enough metal to reach both jack points..
- 2 pieces, 52 inches each, 3" x 1.5" 11 gauge (1/8" or .12 wall) -- $47.66
- 4 pieces, 2 inches each (OP suggest 1.75 inches), 2" x 1" 11 gauge (1/8" or .12 wall) -- $21.88
- Shipping is about $34.44
Total cost is $103.98
Ebay - Has steel pieces close to the size that is needed
- 2 pieces, 60 inches each, 3" x 1.5" 11 gauge (1/8" or .12 wall) -- $22.62+$13.74(shipping) each, $72.72 total -- would need to be cut shorter
- 1 piece, 36 inches, 2" x 1" 11 gauge (1/8" or .12 wall) -- $8.78+$13.09(shipping), $21.78 total -- would need to be cut into 4 1.75" long pieces
Total cost is $94.50
Other options is to buy modified jack stands with the blocks built in.. these are almost $110 a pair... total cost, $220
Last edited by igzekyativ; 02-05-2014 at 01:40 PM.
#18
02-05-2014, 12:53 PM
5th Gear
Join Date: Jan 2014
Location: Ashburn, VA
Posts: 893
Likes: 0
Received 0 Likes
on
0 Posts
Also, I sent a PM but, what is the total length of your 3" x 1.5" tube? What is the total length/height of your 2" x 1" tube?
EDIT: Here is his PM reply..
3"x1.5"x50.5" it can be longer, just not shorter.
2"x1"x1.75" it can be taller but then you may run into clearance issues with the jack. My car is lowered by 1.2", has the JCW side skirts and I use a low profile jack and barely make it. It can't be shorter because then the long metal "beam" would press against the side skirt which it didn't want.
He also suggested that it would only cost $35 per side plus shipping form www.onlinemetals.com, but I priced it out and it was $70 per side plus shipping...
Last edited by igzekyativ; 02-05-2014 at 01:36 PM.

#20
02-18-2014, 06:32 AM
5th Gear
Join Date: Jan 2014
Location: Ashburn, VA
Posts: 893
Likes: 0
Received 0 Likes
on
0 Posts
Why did you cut out a space for the 1.75 inch piece? Why not just weld/glue it on top? Any recommendation for the type of glue to use (I don't have access to a welder)?
Edit: I think I know the answer... it would be to low for a jack to get underneath if it wasn't cut.
Edit: I think I know the answer... it would be to low for a jack to get underneath if it wasn't cut.
Last edited by igzekyativ; 02-18-2014 at 07:00 AM.
#22
04-13-2015, 11:07 AM

These are brilliant.
I'll make some in the next week or two but I'll use 1/4" wall tubing or even C channel (which will be a little lower profile and already open faced) to reduce any deflection.
Steel is cheap if you hunt around a little, do you have a welding or metal fabricating shop near you?
They can probably supply raw material much more cheaply, or even a finished product for the same or maybe less than you'd pay for materials since they buy in bulk.
Any metal recyclers nearby? They typically sell usable scrap for much less than "new" value.
Or even try Metal Supermarkets if you have one near you, the locations near me sell cut off or cull material for $2/Lb.
I'll make some in the next week or two but I'll use 1/4" wall tubing or even C channel (which will be a little lower profile and already open faced) to reduce any deflection.
I don't know how the OP got all the metal for $30.. I've been quoted $131 from my local metal supply.
Local Supply Company - Minimum order is 24 feet for each type of tubing... that's
- 1 piece, 24 feet, 3" x 1.5" 11 gauge (1/8" or .12 wall) -- 83.42 lbs for $64.56
- 1 piece, 24 feet, 2" x 1" 11 gauge (1/8" or .12 wall) -- 54.05 lbs for $40.46
- Plus $20 to cut the pieces down to size to fit inside my MINI..
Then I would have to cut and fabricate a lot of the metal..
Total cost - $131.43
www.discountsteel.com - Can give me the exact sizes and lengths I need... 52 inches gives you enough metal to reach both jack points..
- 2 pieces, 52 inches each, 3" x 1.5" 11 gauge (1/8" or .12 wall) -- $47.66
- 4 pieces, 2 inches each (OP suggest 1.75 inches), 2" x 1" 11 gauge (1/8" or .12 wall) -- $21.88
- Shipping is about $34.44
Total cost is $103.98
Ebay - Has steel pieces close to the size that is needed
- 2 pieces, 60 inches each, 3" x 1.5" 11 gauge (1/8" or .12 wall) -- $22.62+$13.74(shipping) each, $72.72 total -- would need to be cut shorter
- 1 piece, 36 inches, 2" x 1" 11 gauge (1/8" or .12 wall) -- $8.78+$13.09(shipping), $21.78 total -- would need to be cut into 4 1.75" long pieces
Total cost is $94.50
Other options is to buy modified jack stands with the blocks built in.. these are almost $110 a pair... total cost, $220
Local Supply Company - Minimum order is 24 feet for each type of tubing... that's
- 1 piece, 24 feet, 3" x 1.5" 11 gauge (1/8" or .12 wall) -- 83.42 lbs for $64.56
- 1 piece, 24 feet, 2" x 1" 11 gauge (1/8" or .12 wall) -- 54.05 lbs for $40.46
- Plus $20 to cut the pieces down to size to fit inside my MINI..
Then I would have to cut and fabricate a lot of the metal..
Total cost - $131.43
www.discountsteel.com - Can give me the exact sizes and lengths I need... 52 inches gives you enough metal to reach both jack points..
- 2 pieces, 52 inches each, 3" x 1.5" 11 gauge (1/8" or .12 wall) -- $47.66
- 4 pieces, 2 inches each (OP suggest 1.75 inches), 2" x 1" 11 gauge (1/8" or .12 wall) -- $21.88
- Shipping is about $34.44
Total cost is $103.98
Ebay - Has steel pieces close to the size that is needed
- 2 pieces, 60 inches each, 3" x 1.5" 11 gauge (1/8" or .12 wall) -- $22.62+$13.74(shipping) each, $72.72 total -- would need to be cut shorter
- 1 piece, 36 inches, 2" x 1" 11 gauge (1/8" or .12 wall) -- $8.78+$13.09(shipping), $21.78 total -- would need to be cut into 4 1.75" long pieces
Total cost is $94.50
Other options is to buy modified jack stands with the blocks built in.. these are almost $110 a pair... total cost, $220
They can probably supply raw material much more cheaply, or even a finished product for the same or maybe less than you'd pay for materials since they buy in bulk.
Any metal recyclers nearby? They typically sell usable scrap for much less than "new" value.
Or even try Metal Supermarkets if you have one near you, the locations near me sell cut off or cull material for $2/Lb.
#23
04-13-2015, 02:16 PM
These are brilliant.
I'll make up a set in the next week or two but I'll use some 1/4" wall tube or C-channel, depends what we have laying around at work. It should help with deflection and I don't see there being any drawbacks except higher weight.
igzekyativ, have you tried contacting any local welding or machine shops? They may be willing to sell you material at a much lower cost, or they may even cut and weld something for about the cost of what you are getting quoted for material.
You could also try local metal recyclers, they typically sell usable recycled metal for much less than "new" costs, I see Potomac Metals is near your listed location and I've seen them mentioned as a supplier on other forums, might be worth a call.
And as a last resort there's a Metal Supermarket in Baltimore if you ever get up that way, they typically sell off-cuts and cull material for about $2/Lb.

#25
04-18-2015, 01:27 PM
6th Gear

