How To 1st Gen (2005 and later) Passenger Engine Mount Replacement
#1
 05-13-2013, 08:33 AM


1st Gen (2005 and later) Passenger Engine Mount Replacement
This is a summary of what I learned from other posts. I had an R52 with a passenger side leaking motor mount. I bought an aftermarket mount mini p/n 22 11 6 778 610 by Lemfoerder (Lemfoder). This mount is identical to stock with the exception that the word Mini is ground off and painted over. The mount was $63 (free shipping).
Special tools needed: e12 torx socket, 18 mm (or 11/16) socket.

1. Loosen right front wheel lugs.
2. Raise passenger side with jack and place jack stand or wooden blocks under mini subframe.
3. Remove passenger wheel (it really is easier this way).
4. Remove enough inner fender liner screws so you can pull the liner out of the way to easily reach the torx bolt.
5. Remove torx bolt from bottom of the engine mount.
6. Place jack with wood block under oil pan and very slightly lift engine.
7. Remove bracket grounding bolt with 13 mm socket. The bolt will fall if you are not ready to catch it.
8. Remove top nut of mount with 17 mm socket.
9. Remove (4) engine bracket bolts with 17 mm socket.
10. Remove engine mount bracket.
11. Remove engine mount bolt (to strut housing) with 18 mm socket.
12. Remove engine mount.
13. Clean area with isopropyl alcohol.
14. Assemble in reverse order.
Torque Specs (as best as I can find):
13 mm nuts- 10 ft lbs
17 mm nuts/bolts- 50 ft lbs
18 mm- 50 ft lbs
E12 torx- 50 ft lbs
Special tools needed: e12 torx socket, 18 mm (or 11/16) socket.
1. Loosen right front wheel lugs.
2. Raise passenger side with jack and place jack stand or wooden blocks under mini subframe.
3. Remove passenger wheel (it really is easier this way).
4. Remove enough inner fender liner screws so you can pull the liner out of the way to easily reach the torx bolt.
5. Remove torx bolt from bottom of the engine mount.
6. Place jack with wood block under oil pan and very slightly lift engine.
7. Remove bracket grounding bolt with 13 mm socket. The bolt will fall if you are not ready to catch it.
8. Remove top nut of mount with 17 mm socket.
9. Remove (4) engine bracket bolts with 17 mm socket.
10. Remove engine mount bracket.
11. Remove engine mount bolt (to strut housing) with 18 mm socket.
12. Remove engine mount.
13. Clean area with isopropyl alcohol.
14. Assemble in reverse order.
Torque Specs (as best as I can find):
13 mm nuts- 10 ft lbs
17 mm nuts/bolts- 50 ft lbs
18 mm- 50 ft lbs
E12 torx- 50 ft lbs
#3
05-13-2013, 12:09 PM

Platinum Sponsor
Nice write up.
__________________

MINI Guru/ MINI Owner Since 2004 | NEW Lifetime Part Replacement | Local Pickup
Milltek | Genuine MINI | Forge Motorsport | NM Engineering | ECS Performance | M7 Speed
Customer Service Hours: 8am-8pm EST|Sales Team Hours: 8am-11pm | SAT 10am-7pm 800.924.5172
MINI Guru/ MINI Owner Since 2004 | NEW Lifetime Part Replacement | Local Pickup
Milltek | Genuine MINI | Forge Motorsport | NM Engineering | ECS Performance | M7 Speed
Customer Service Hours: 8am-8pm EST|Sales Team Hours: 8am-11pm | SAT 10am-7pm 800.924.5172

#5
08-03-2014, 02:43 PM

Nice writeup. Used it with the help of some other resources for the engine mount replacement. A few things to note:
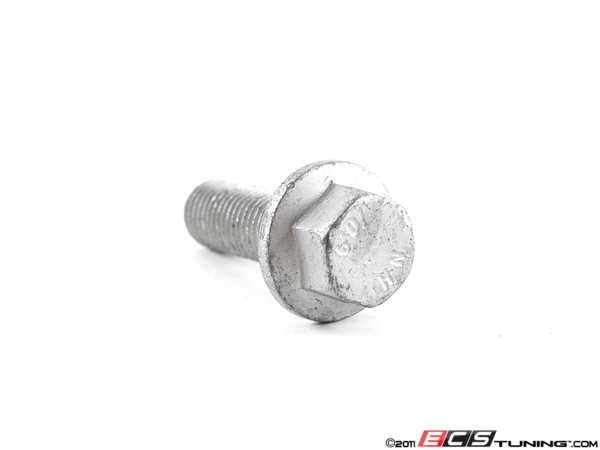
-That E12 torx bolt is a one-time use torque-to-yield bolt. Throw it away and buy another or risk it snapping when reinstalling. That bolt will also need to be torqued to spec plus 90 degrees of angle torque to initiate its stretch. For this you must use an angle gauge. The correct torque for that bolt is 41 ft/lb (plus the 90 degrees).
- The 16mm bolt to strut housing is 50 ft/lbs as is the nut for engine mount stud.
#6
08-04-2014, 07:40 AM
Platinum Sponsor
The upper engine mount is right here.
Upper Engine Mount from 12/2003+ Gen 1 Upper Engine Mount 22116778610
http://www.ecstuning.com/Search/SiteSearch/22_11_6_778_610/
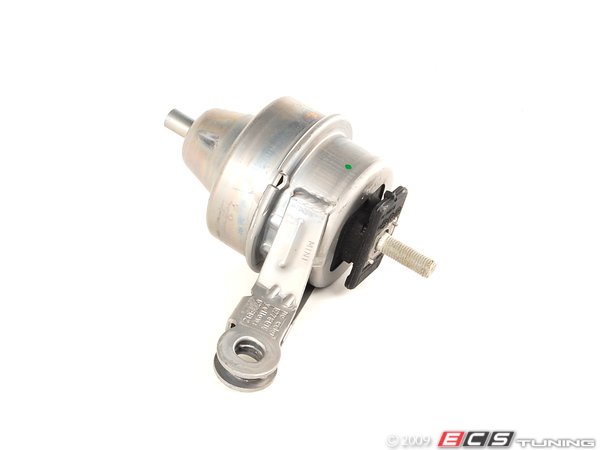
Superpro , linked above, also as a donuts shape dampener that mounts on top. Sandwiches between the top of the mount and the bracket.
Upper Engine Mount from 12/2003+ Gen 1 Upper Engine Mount 22116778610
http://www.ecstuning.com/Search/SiteSearch/22_11_6_778_610/
Superpro , linked above, also as a donuts shape dampener that mounts on top. Sandwiches between the top of the mount and the bracket.
__________________
MINI Guru/ MINI Owner Since 2004 | NEW Lifetime Part Replacement | Local Pickup
Milltek | Genuine MINI | Forge Motorsport | NM Engineering | ECS Performance | M7 Speed
Customer Service Hours: 8am-8pm EST|Sales Team Hours: 8am-11pm | SAT 10am-7pm 800.924.5172
MINI Guru/ MINI Owner Since 2004 | NEW Lifetime Part Replacement | Local Pickup
Milltek | Genuine MINI | Forge Motorsport | NM Engineering | ECS Performance | M7 Speed
Customer Service Hours: 8am-8pm EST|Sales Team Hours: 8am-11pm | SAT 10am-7pm 800.924.5172
#7
10-03-2014, 07:01 PM

4th Gear
Trending Topics

#9
10-06-2014, 07:51 AM
Platinum Sponsor
+1 on the fluid. It sometimes leaks down the back. But you will see a oily stain which is very hard to get off the engine bay rocker panel.
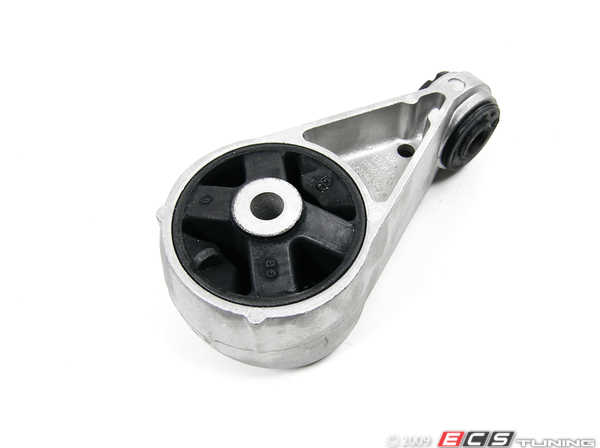
"What do the 2004s use for a lower mount?" Same lower Mount on all Gen 1 MINIs.
https://www.northamericanmotoring.co...any-ideas.html
Thanks
"What do the 2004s use for a lower mount?" Same lower Mount on all Gen 1 MINIs.
https://www.northamericanmotoring.co...any-ideas.html
Thanks
__________________
MINI Guru/ MINI Owner Since 2004 | NEW Lifetime Part Replacement | Local Pickup
Milltek | Genuine MINI | Forge Motorsport | NM Engineering | ECS Performance | M7 Speed
Customer Service Hours: 8am-8pm EST|Sales Team Hours: 8am-11pm | SAT 10am-7pm 800.924.5172
MINI Guru/ MINI Owner Since 2004 | NEW Lifetime Part Replacement | Local Pickup
Milltek | Genuine MINI | Forge Motorsport | NM Engineering | ECS Performance | M7 Speed
Customer Service Hours: 8am-8pm EST|Sales Team Hours: 8am-11pm | SAT 10am-7pm 800.924.5172
#10
10-07-2014, 07:32 AM

1st Gear
Join Date: Jul 2014
Location: Somerset, KY
Posts: 18
Likes: 0
Received 0 Likes
on
0 Posts
#11
10-07-2014, 07:55 AM
Platinum Sponsor
The bolt for the newest part is : 07119906199 M12X1.5X35-10.9
#4 for the 12/2003+ upper mount to side strut tower.

http://www.ecstuning.com/Search/SiteSearch/07119906199/
Thanks
#4 for the 12/2003+ upper mount to side strut tower.
http://www.ecstuning.com/Search/SiteSearch/07119906199/
Thanks
__________________
MINI Guru/ MINI Owner Since 2004 | NEW Lifetime Part Replacement | Local Pickup
Milltek | Genuine MINI | Forge Motorsport | NM Engineering | ECS Performance | M7 Speed
Customer Service Hours: 8am-8pm EST|Sales Team Hours: 8am-11pm | SAT 10am-7pm 800.924.5172
MINI Guru/ MINI Owner Since 2004 | NEW Lifetime Part Replacement | Local Pickup
Milltek | Genuine MINI | Forge Motorsport | NM Engineering | ECS Performance | M7 Speed
Customer Service Hours: 8am-8pm EST|Sales Team Hours: 8am-11pm | SAT 10am-7pm 800.924.5172
#12
10-07-2014, 08:01 AM
1st Gear
Join Date: Jul 2014
Location: Somerset, KY
Posts: 18
Likes: 0
Received 0 Likes
on
0 Posts
#13
10-07-2014, 08:20 AM
Platinum Sponsor

__________________
MINI Guru/ MINI Owner Since 2004 | NEW Lifetime Part Replacement | Local Pickup
Milltek | Genuine MINI | Forge Motorsport | NM Engineering | ECS Performance | M7 Speed
Customer Service Hours: 8am-8pm EST|Sales Team Hours: 8am-11pm | SAT 10am-7pm 800.924.5172
MINI Guru/ MINI Owner Since 2004 | NEW Lifetime Part Replacement | Local Pickup
Milltek | Genuine MINI | Forge Motorsport | NM Engineering | ECS Performance | M7 Speed
Customer Service Hours: 8am-8pm EST|Sales Team Hours: 8am-11pm | SAT 10am-7pm 800.924.5172
#14
10-07-2014, 08:53 AM

6th Gear
#15
10-07-2014, 09:04 AM
Platinum Sponsor
Here is the new bolt #5: M10X125 torx head its a TTY bolt and is recommended to be replaced even though people sometimes reuse it.
http://www.ecstuning.com/Search/SiteSearch/22116766753/

Thanks
http://www.ecstuning.com/Search/SiteSearch/22116766753/
Thanks
__________________
MINI Guru/ MINI Owner Since 2004 | NEW Lifetime Part Replacement | Local Pickup
Milltek | Genuine MINI | Forge Motorsport | NM Engineering | ECS Performance | M7 Speed
Customer Service Hours: 8am-8pm EST|Sales Team Hours: 8am-11pm | SAT 10am-7pm 800.924.5172
MINI Guru/ MINI Owner Since 2004 | NEW Lifetime Part Replacement | Local Pickup
Milltek | Genuine MINI | Forge Motorsport | NM Engineering | ECS Performance | M7 Speed
Customer Service Hours: 8am-8pm EST|Sales Team Hours: 8am-11pm | SAT 10am-7pm 800.924.5172
#16
10-25-2014, 04:56 AM
4th Gear
I have replaced my mounts. Passenger side, lower and also transmission mount. After inspection they all looked rather worn. After they were removed it was really clear how bad they were.
One note: I did purchase a new torx bolt for the passenger side mount. When trying to remove the passenger side mount the torx bolt would not free up. Numerous methods were tried with no luck. Seeing as I had a new bolt, I used a dremel tool to cut the head of the torx bolt. Once the head was cut off the mount slid up and out.
One note: I did purchase a new torx bolt for the passenger side mount. When trying to remove the passenger side mount the torx bolt would not free up. Numerous methods were tried with no luck. Seeing as I had a new bolt, I used a dremel tool to cut the head of the torx bolt. Once the head was cut off the mount slid up and out.
#17
10-27-2014, 08:08 AM
Platinum Sponsor
Fastzombie - glad you were able to get it done. having the extra parts does help. Soaking with freeall for a while helps.
__________________
MINI Guru/ MINI Owner Since 2004 | NEW Lifetime Part Replacement | Local Pickup
Milltek | Genuine MINI | Forge Motorsport | NM Engineering | ECS Performance | M7 Speed
Customer Service Hours: 8am-8pm EST|Sales Team Hours: 8am-11pm | SAT 10am-7pm 800.924.5172
MINI Guru/ MINI Owner Since 2004 | NEW Lifetime Part Replacement | Local Pickup
Milltek | Genuine MINI | Forge Motorsport | NM Engineering | ECS Performance | M7 Speed
Customer Service Hours: 8am-8pm EST|Sales Team Hours: 8am-11pm | SAT 10am-7pm 800.924.5172

Thread
Thread Starter
Forum
Replies
Last Post
igzekyativ
MINIs & Minis for Sale
34
07-16-2020 12:54 PM
silence2-38554
R50/R53 :: Hatch Talk (2002-2006)
98
09-21-2016 02:52 PM
silence2-38554
R50/R53 :: Hatch Talk (2002-2006)
3
11-12-2015 09:39 AM