How To Electrical: DIY Battery Replacement | w/ pictures
#1
 12-04-2012, 10:04 PM


Electrical: DIY Battery Replacement | w/ pictures
Below are step-by-step instructions of how to change a dead battery in your R56. Dealers charge anywhere from $175 to $350 for this service when it can be done by yourself in about 15 minutes, for only the cost of the battery.
Items Needed
STEP 1
Open your hood and locate your battery. It is underneath a plastic cover on the rear passenger side of the engine bay.
STEP 2
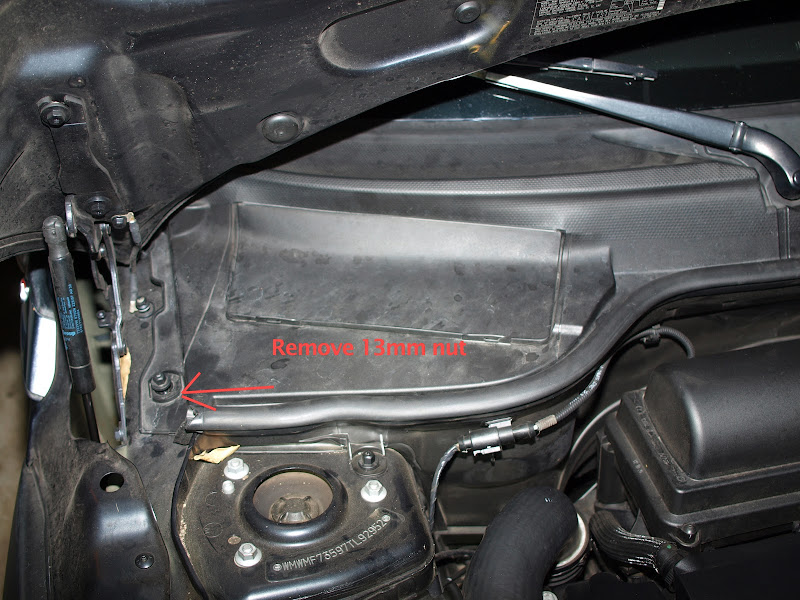
Using your 13 mm wrench, remove the plastic bolt holding down the plastic battery cowel indicated in the picture below
STEP 3
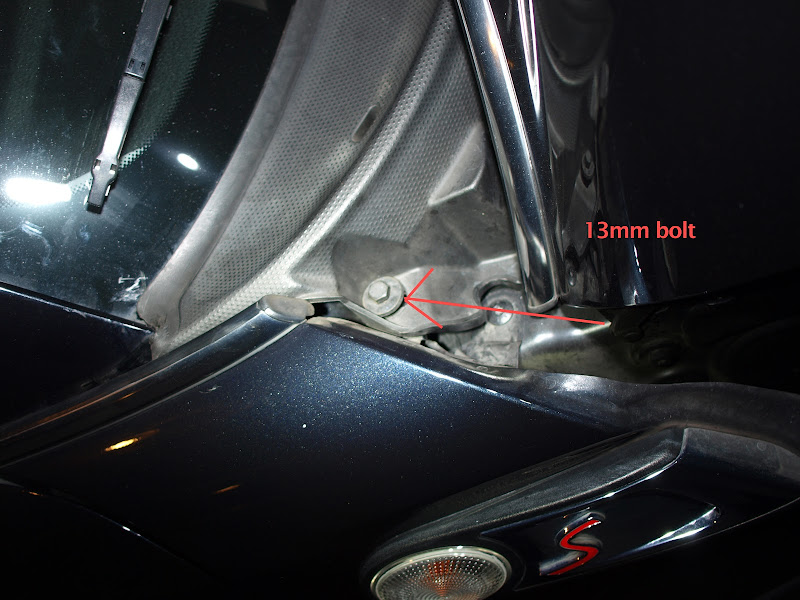
Locate the 2nd 13mm bolt holding down the plastic cowel. It will be behind your hood with the hood up.
STEP 4
Remove the weather stripping along the front of the battery cover. It will easily pull right up. After that, remove the battery cover. It is now held in place by 3 plastic snaps running along the front of the cover. Some slight tugging might be necessary but I found they snapped off easily and did not break. Sometimes it helps to open the battery access flap and reach underneath to feel around while tugging upward. Once the snaps give way, you can remove the entire plastic cover without removing the windshield wiper. It just takes a little maneuvering- but all you Mini drivers should be good at that.

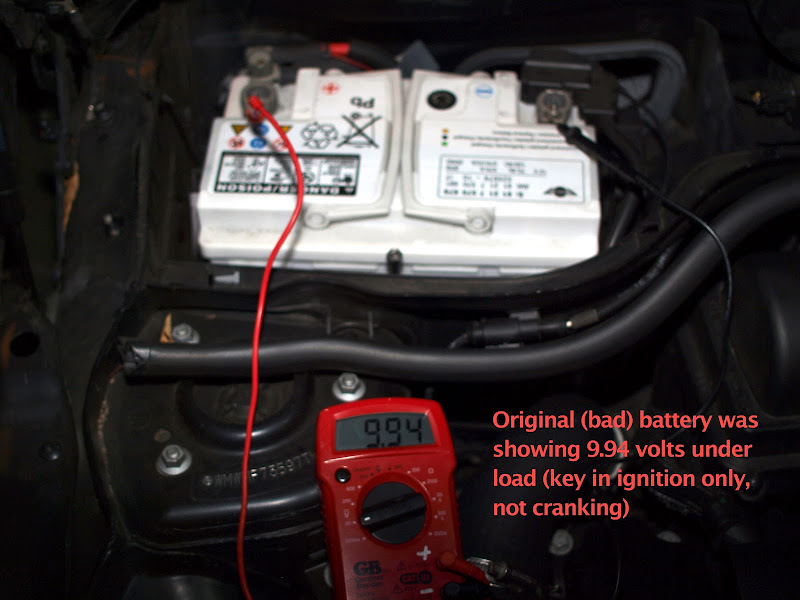
Once the plastic is removed you'll have full access to the battery and the cabin air filter. I hooked my battery up to a Multimeter and showed it was putting out far less than 12 volts under load with the key in ignition. Keep in mind this is not during cranking. Yep, this battery is gone.
STEP 5
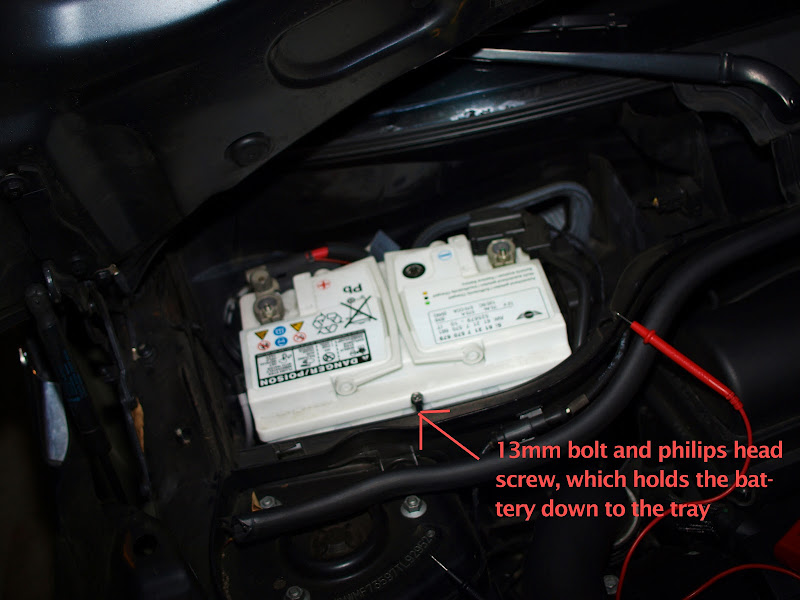
The battery is held down by a bracket that clamps the bottom of the battery to the battery tray. Fortunately, Mini was kind enough to extend a long 13mm bolt / philips head screw all the way to the top so you do not need a socket extension to access this. (VW/AUDI needs to learn from this).
Remove the bolt and clamp. Once this is done the battery will be in a ready to remove state, however, do not remove the battery yet!
STEP 6
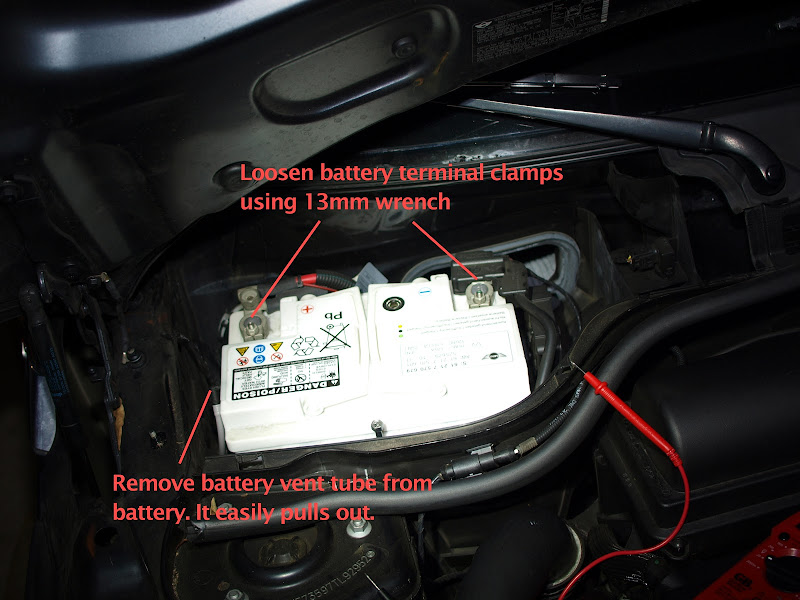
Remove the battery cables and the battery gas vent. Start by removing the negative (black) battery cable first, then remove the red. You are now ready to lift the battery out of the car. It's heavy so be careful.
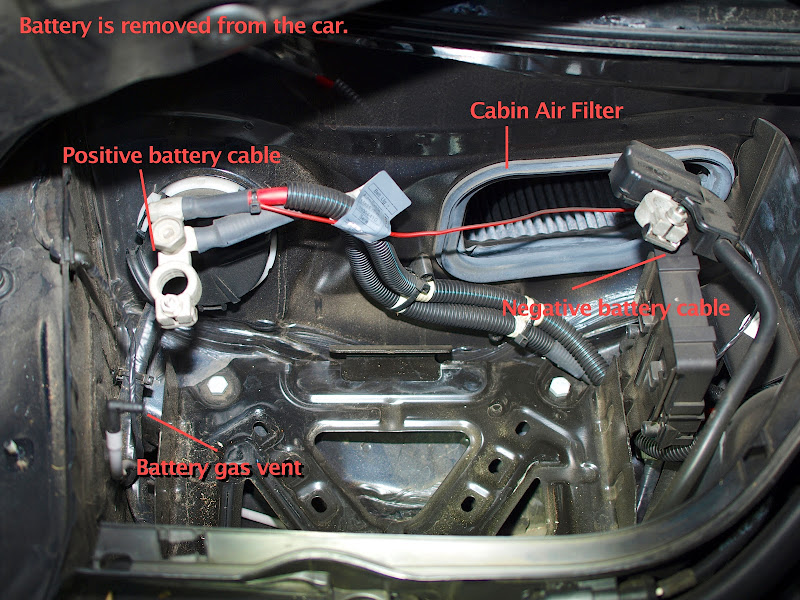
Here is what the battery bay looks like with everything removed
Here a side by side comparison of the old factory battery, and the new Group 47 Battery I got from Bosch (PepBoys) for $110.

STEP 7
Install your new battery and re-assemble everything by following steps 1-6 in reverse order. Do not forget to re-attach your battery gas vent to the new battery!!! Also, make sure your new battery slides underneath the ledge that holds it down in the rear (see picture)

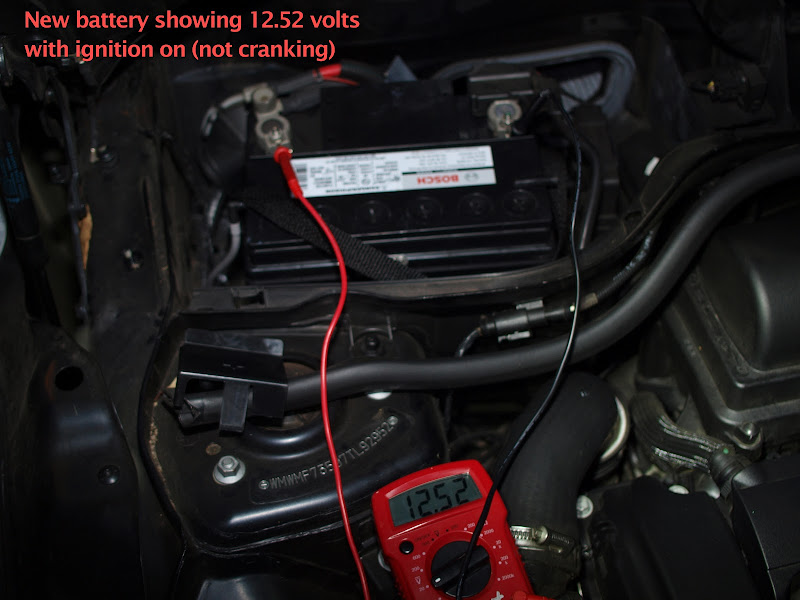
And done. Our new battery is in and showing the correct voltage with the ignition on. Get everything assembled and start up your car, then go buy a nice dinner with all the money you saved yourself over going to the stealership.
IMPORTANT NOTES
to remove the battery, always disconnect the ground/negative wire first
to install the battery, always connect the ground/negative last
the reason is if you are removing the positive first and the tool touches the car it will spark, but if you are removing the negative first and the tool touches the car there will be no spark. -thanks to user "bmwr606" for the explanation.
This is an educational DIY only. You perform this and all work on your car at your own risk and expense and will not hold me or any 3rd parties liable for any damage to your car or body that come as a result of this procedure. If you have questions or reservations about doing this on your own, maybe the internet isn't for you and you should take your car to a professional mechanic. Enjoy!
Items Needed
- Group 47 size battery rated to a minimum of 570 CCA w/ side vent | $100-$150
- 13mm socket or wrench
- *OPTIONAL Philips head screwdriver
- 15 minutes if your time and a get it done attitude
STEP 1
Open your hood and locate your battery. It is underneath a plastic cover on the rear passenger side of the engine bay.
STEP 2
Using your 13 mm wrench, remove the plastic bolt holding down the plastic battery cowel indicated in the picture below
STEP 3
Locate the 2nd 13mm bolt holding down the plastic cowel. It will be behind your hood with the hood up.
STEP 4
Remove the weather stripping along the front of the battery cover. It will easily pull right up. After that, remove the battery cover. It is now held in place by 3 plastic snaps running along the front of the cover. Some slight tugging might be necessary but I found they snapped off easily and did not break. Sometimes it helps to open the battery access flap and reach underneath to feel around while tugging upward. Once the snaps give way, you can remove the entire plastic cover without removing the windshield wiper. It just takes a little maneuvering- but all you Mini drivers should be good at that.
Once the plastic is removed you'll have full access to the battery and the cabin air filter. I hooked my battery up to a Multimeter and showed it was putting out far less than 12 volts under load with the key in ignition. Keep in mind this is not during cranking. Yep, this battery is gone.
STEP 5
The battery is held down by a bracket that clamps the bottom of the battery to the battery tray. Fortunately, Mini was kind enough to extend a long 13mm bolt / philips head screw all the way to the top so you do not need a socket extension to access this. (VW/AUDI needs to learn from this).
Remove the bolt and clamp. Once this is done the battery will be in a ready to remove state, however, do not remove the battery yet!
STEP 6
Remove the battery cables and the battery gas vent. Start by removing the negative (black) battery cable first, then remove the red. You are now ready to lift the battery out of the car. It's heavy so be careful.
Here is what the battery bay looks like with everything removed
Here a side by side comparison of the old factory battery, and the new Group 47 Battery I got from Bosch (PepBoys) for $110.
STEP 7
Install your new battery and re-assemble everything by following steps 1-6 in reverse order. Do not forget to re-attach your battery gas vent to the new battery!!! Also, make sure your new battery slides underneath the ledge that holds it down in the rear (see picture)
And done. Our new battery is in and showing the correct voltage with the ignition on. Get everything assembled and start up your car, then go buy a nice dinner with all the money you saved yourself over going to the stealership.
IMPORTANT NOTES
to remove the battery, always disconnect the ground/negative wire first
to install the battery, always connect the ground/negative last
the reason is if you are removing the positive first and the tool touches the car it will spark, but if you are removing the negative first and the tool touches the car there will be no spark. -thanks to user "bmwr606" for the explanation.
This is an educational DIY only. You perform this and all work on your car at your own risk and expense and will not hold me or any 3rd parties liable for any damage to your car or body that come as a result of this procedure. If you have questions or reservations about doing this on your own, maybe the internet isn't for you and you should take your car to a professional mechanic. Enjoy!
Last edited by mmcverry; 12-05-2012 at 09:17 AM. Reason: Added a safety tip from another member about removing battery cables.
The following 3 users liked this post by mmcverry:
#2
12-05-2012, 08:01 AM
When I was purchasing my new battery I found the following for my '07 R56: (All fit in my MINI)
Group 47 - The computer sizing programs said this was the replacement. It was narrower by almost 2" than my OE.
Group 40 - The same footprint as my OE, but slightly shorter in height.
Group 48 - The exact size fit to my OE battery.
I could have bought any of these sizes. Find one with the best value for you. Warranty, CCA (Cold Cranking Amps), Price.
#3
12-05-2012, 09:00 AM
mmcverry
nice writeup and great pictures
the only thing i would add is:
to remove the battery, always disconnect the ground/negative wire first
to install the battery, always connect the ground/negative last
the reason is if you are removing the positive first and the tool touches the car it will spark, but if you are removing the negative first and the tool touches the car there will be no spark
once the negative is removed, if the tool touches the car while removing the positive, there is no complete circuit and no spark
scott
#4
12-05-2012, 09:20 AM
Bmwr606, I have edited the post to include your suggestion and given you the credit. I always new to remove black first however I never could explain why...thank you for the insightful information.
Although this may seem like an overly simple task for such a write up, if this gets more owners under the hood of their cars, they will learn many things are not hard to DIY and they will hopefully learn, and share their knowledge on here too, expanding the resources available to mini owners here.
Although this may seem like an overly simple task for such a write up, if this gets more owners under the hood of their cars, they will learn many things are not hard to DIY and they will hopefully learn, and share their knowledge on here too, expanding the resources available to mini owners here.

#6
02-22-2013, 10:58 AM
#7
03-18-2013, 04:42 AM

Seriously ?
Thanks.
Trending Topics
#9
01-26-2014, 07:55 AM

#10
01-08-2015, 07:45 AM

This write-up worked perfectly and it couldn't of come at a better time. I read through it last night knowing I would have to change my battery soon (5+ yrs old) and this morning it was completely dead.....
Went to NAPA, got NAPA Legend 75 Month - Part # BAT 9848
it's got the vent hole too. Group 48.
Thanks mmcverry!
Went to NAPA, got NAPA Legend 75 Month - Part # BAT 9848
it's got the vent hole too. Group 48.
Thanks mmcverry!
#11
01-08-2015, 08:24 AM
This write-up worked perfectly and it couldn't of come at a better time. I read through it last night knowing I would have to change my battery soon (5+ yrs old) and this morning it was completely dead.....
Went to NAPA, got NAPA Legend 75 Month - Part # BAT 9848
it's got the vent hole too. Group 48.
Thanks mmcverry!
Went to NAPA, got NAPA Legend 75 Month - Part # BAT 9848
it's got the vent hole too. Group 48.
Thanks mmcverry!
#12
01-08-2015, 08:38 AM
#13
01-08-2015, 08:43 AM
I have a 2011 and think it has the IBS. I'm needing a battery soon like tomorrow. Just don't want to change batt and fry something.
#14
01-08-2015, 08:50 AM
another member posted this. hopefully it helps you.
"I bought a battery at NAPA and did not reset the IBS. I don't remember the group number, but it was an 'exact fit' with the vent tube, about $120. I talked with my dealer about it, and they said if the car has no symptoms of a low battery, there is little risk in not resetting the IBS. It was explained that the computer may not charge a new battery properly if there were existing electrical problems when the battery was replaced."
"I bought a battery at NAPA and did not reset the IBS. I don't remember the group number, but it was an 'exact fit' with the vent tube, about $120. I talked with my dealer about it, and they said if the car has no symptoms of a low battery, there is little risk in not resetting the IBS. It was explained that the computer may not charge a new battery properly if there were existing electrical problems when the battery was replaced."
#16
07-30-2015, 05:43 PM

#17
12-05-2015, 10:12 AM

Neutral
Join Date: Aug 2008
Location: Niles, OH
Posts: 4
Likes: 0
Received 0 Likes
on
0 Posts
Just used this to replace my battery. After looking at a couple posts, I found good battery choices but the Autozone H5-DLG was an EXACT fit for my R57 Cooper. I upgraded CCA from 480 to 650 with a 5-year guarantee. I took off the battery cover housing from the two bolts and three clips. The store installed my new battery in 5 minutes, kept the old one. All electronic settings maintained. I do not have any battery monitoring options. Less than $200. Start to finish 45 minutes including driving to the store and back home. Thanks for the info. 
#18
12-05-2015, 04:22 PM

This was a great post and very helpful when I replaced the battery in my 2012 R58 today. I bought the replacement at AutoZone; about $170. Note: my car had 10mm bolts, not 13mm. And, it had no IBS so the only thing I needed to do after the swap was to reset my clock. An easy swap; less than 15 minutes.
Also, the battery I replaced was the factory original, and I should shout out to BMW for engineering a battery space sufficiently sealed that the battery looked damn near new. One other note: It had a small window on top of the battery that changes color if the battery is fully charged (green) or not. Although the battery showed green, when I had it tested at AutoZone it was holding less than one amp of cranking power.
Also, the battery I replaced was the factory original, and I should shout out to BMW for engineering a battery space sufficiently sealed that the battery looked damn near new. One other note: It had a small window on top of the battery that changes color if the battery is fully charged (green) or not. Although the battery showed green, when I had it tested at AutoZone it was holding less than one amp of cranking power.
#19
12-21-2015, 07:16 PM

I replaced my 2008 R56S battery (the OEM battery finally died after 7 years and 73k miles, all in Wisconsin) with the Autozone Duralast H5-DLG. It was a perfect fit, didn't take too long to install. The only problem I found is that the weather stripping at the top of the right apron is now not sitting flush with the glass. I'm hoping this won't cause any problems when it rains or snows, but it's too early to tell.
The battery cost $189 with a $10 core, kinda steep but worth it for the 5yr warranty. I'll probably never have to replace it again for the lifetime of the car.
The battery cost $189 with a $10 core, kinda steep but worth it for the 5yr warranty. I'll probably never have to replace it again for the lifetime of the car.

#21
12-18-2016, 10:41 PM
for those not sure if they need to reprogram after a new battery install ...
if the negative battery cable looks like the attached photos, you have the IBS and will need reprogramming
the carly app for iphone and android can reprogram the new battery AND many other things as easily as selecting from a menu
mycarly.com
if the negative battery cable looks like the attached photos, you have the IBS and will need reprogramming
the carly app for iphone and android can reprogram the new battery AND many other things as easily as selecting from a menu
mycarly.com
The following 4 users liked this post by bmwr606:
#22
03-08-2017, 05:25 AM

Important info re Cowl Installation: Note that there's a lip under the cowl that must be "slid up" under the black windshield seal. That allows the lip of the cowl to press tightly against the windshield. So, when you're reinstalling the cowl, push it firmly down and slide it under the windshield seal
Also, the little plastic hold-down clips on the cowl are easily breakable. I had to replace my cowl because it deteriorated over time (common problem). Part of one clip was already broken when the part arrived (and it was packed well). The other pieces broken when i was installing the new cowl - they are super fragile.
The good news is that it doesn't seem to matter. If the cowl is installed properly, the clips aren't essential. The lip seal along the windshield and the two screws are enough to keep the cowl in place.
The following users liked this post:
jk857 (08-06-2017)
#23
08-06-2017, 10:33 AM

[QUOTE=mmcverry & john-demartino.;3636525]
Thanks! Very thorough, much better pictures than published in the Haynes manual & yes that cowl installation can be a bit tricky to get it to mate properly.
Just not sure about the Battery Registration requirement. I don't have the IBS module on the negative cable but the replacement Bosch battery is spec'ed at a greater CCA rating. I did use an Actron OBDII scanner to perform a "Battery Reset" but the Actron manual goes on to state that the different capacity battery would need the reprogramming routine run which it doesn't do. Anybody have any experience with this procedure & whether I can DIY or am I forced to have a dealer visit?
#25
03-27-2018, 06:08 PM
