How To Electrical: How To Install Hella Supertones
#1
 08-02-2011, 09:13 PM


Join Date: Feb 2008
Location: seattle, wa
Posts: 432
Likes: 0
Received 0 Likes
on
0 Posts
Electrical: How To Install Hella Supertones
here is my how to on replacing your OEM horn with a pair of Hella Supertones with the relay.......
preface: i have a 2007 MC (non s) and i am lowered about 4" from stock so i had to jack my car up to get under the bumper. for all you stock height people, you should be able to get under the bumper just fine. also, you are working with electricity so please dont be stupid.
these are the parts you will need, all of which can be found at a good radioshack (minus the hellas ):
):
- 1x set of Hellas (comes with relay)
- at least 20ft of: 14 gauge primary automotive wire i used 12 gauge because that is what my local radioshack had
- 8x female spade connectors make sure it matches wire gauge
- 4x 1/4" Ring Terminals again, make sure it matches wire gauge
- 2x Butt Connectors make sure it matches wire gauge
- 1x Waterproof MINI fuse holder it must be rated for at least 20 amps and get one that has the same gauge wire as the rest of the project
- 1x Mini fuse rated for 20 amps
- 1x Quick splice once again make sure it matches wire gauge
- Shrink wrap
- lighter
- wire stripper/crimper
first thing, disconnect the positive terminal from the battery and tuck it away for now, you wont be needing it for a while.
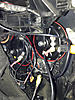
from the info i gathered on NAM and the rest of the interwebs, i thought that the 2 horns were on both sides of the car, WRONG! mine were located behind the passenger sided fog light. you can reach the horns through the access port in the wheel well but the removal of the front bumper does help getting in those tiny spaces.
this is the space where they were in, i had already removed one of the horns but it was on the left where the silver nut is. both hellas were able to fit in the stock location but some fidgeting was needed to make sure they didnt touch.

here is a pdf on how to remove the front bumper.
How to remove front bumper
once that is done, disconnect the connections on the the 2 horns, fog light, and side reflector light.


remove the horns, put in the hellas (use factory location and hardware) and get ready to wire. i started by putting the relay on one of the studs that the battery box was held down with.

the relay has 5 connections: 30, 85, 86, 87, 87a
- 30 goes to the battery
- 85 goes to ground
- 86 goes to existing horn wire
- 87 goes to horns
- 87a not used
for power, crimp on a ring connector to the mini fuse holder, this end get attached to the positive terminal of the battery (save that step for last though dont want to kill yourself now). on the other end attach a butt connector and extend the wire til it reaches the relay. i found a space between the end of the plastic battery bay and the sheet metal. i dont have a pic now but will later. next attach one of the spade connectors to the end of the wire and connect to port 30. to send power to the horns, attach one end to 87 and send the wire down towards the horns, when you are about 6 inches away, use the quick splice to send power to both horns.

here is where i grounded everything, turns out this already existed as a ground for something else and its conveniently located next to the battery.

talking about grounds, send a wire from 85 on the relay to the ground location. you can also send ground from the hellas to the ground location. the ground is the silver marked prong and power is copper.
the last step is to complete the circuit between pushing horn in car to making the noise. you will need to cut off one of the old connections to the old horns, revealing 2 wires one brown (the ground) and the other blue/red (positive signal). cap the ground and use the butt connector to attach the blue/red wire to 86 on the relay.
finally reconnect the positive terminal of your battery and give the horn a honk. hopefully if everything worked out you have a nice loud horn.
here is what they look like installed.

preface: i have a 2007 MC (non s) and i am lowered about 4" from stock so i had to jack my car up to get under the bumper. for all you stock height people, you should be able to get under the bumper just fine. also, you are working with electricity so please dont be stupid.
these are the parts you will need, all of which can be found at a good radioshack (minus the hellas
):- 1x set of Hellas (comes with relay)
- at least 20ft of: 14 gauge primary automotive wire i used 12 gauge because that is what my local radioshack had
- 8x female spade connectors make sure it matches wire gauge
- 4x 1/4" Ring Terminals again, make sure it matches wire gauge
- 2x Butt Connectors make sure it matches wire gauge
- 1x Waterproof MINI fuse holder it must be rated for at least 20 amps and get one that has the same gauge wire as the rest of the project
- 1x Mini fuse rated for 20 amps
- 1x Quick splice once again make sure it matches wire gauge
- Shrink wrap
- lighter
- wire stripper/crimper
first thing, disconnect the positive terminal from the battery and tuck it away for now, you wont be needing it for a while.
from the info i gathered on NAM and the rest of the interwebs, i thought that the 2 horns were on both sides of the car, WRONG! mine were located behind the passenger sided fog light. you can reach the horns through the access port in the wheel well but the removal of the front bumper does help getting in those tiny spaces.
this is the space where they were in, i had already removed one of the horns but it was on the left where the silver nut is. both hellas were able to fit in the stock location but some fidgeting was needed to make sure they didnt touch.
here is a pdf on how to remove the front bumper.
How to remove front bumper
once that is done, disconnect the connections on the the 2 horns, fog light, and side reflector light.
remove the horns, put in the hellas (use factory location and hardware) and get ready to wire. i started by putting the relay on one of the studs that the battery box was held down with.
the relay has 5 connections: 30, 85, 86, 87, 87a
- 30 goes to the battery
- 85 goes to ground
- 86 goes to existing horn wire
- 87 goes to horns
- 87a not used
for power, crimp on a ring connector to the mini fuse holder, this end get attached to the positive terminal of the battery (save that step for last though dont want to kill yourself now). on the other end attach a butt connector and extend the wire til it reaches the relay. i found a space between the end of the plastic battery bay and the sheet metal. i dont have a pic now but will later. next attach one of the spade connectors to the end of the wire and connect to port 30. to send power to the horns, attach one end to 87 and send the wire down towards the horns, when you are about 6 inches away, use the quick splice to send power to both horns.
here is where i grounded everything, turns out this already existed as a ground for something else and its conveniently located next to the battery.
talking about grounds, send a wire from 85 on the relay to the ground location. you can also send ground from the hellas to the ground location. the ground is the silver marked prong and power is copper.
the last step is to complete the circuit between pushing horn in car to making the noise. you will need to cut off one of the old connections to the old horns, revealing 2 wires one brown (the ground) and the other blue/red (positive signal). cap the ground and use the butt connector to attach the blue/red wire to 86 on the relay.
finally reconnect the positive terminal of your battery and give the horn a honk. hopefully if everything worked out you have a nice loud horn.
here is what they look like installed.
#2
08-03-2011, 04:22 PM
Join Date: Feb 2008
Location: seattle, wa
Posts: 432
Likes: 0
Received 0 Likes
on
0 Posts
heres a video of the horn. i tried to make a comparison video but my camera equalized the levels so the oem and hellas had the same loudness to them...
HELLLLLLA SOUND TEST
HELLLLLLA SOUND TEST

#4
10-30-2011, 09:50 PM
Join Date: Feb 2008
Location: seattle, wa
Posts: 432
Likes: 0
Received 0 Likes
on
0 Posts
#5
12-07-2011, 11:35 AM

Is there a large difference between running the seperate relay to power the horns off the battery vs using the existing +/- connection from the OEM horn? I can imagine the OEM wire outputting less, thus a less loud hella horn, but is it a large difference? Anyone tested it with a voltmeter?
#6
01-16-2013, 05:30 PM
Great write-up Corin!
I installed a pair last night based on the write-up. It was VERY useful. I deviated a little - I was not up for removing the bumper, and after some surveying - I determined I could complete the job by removing the front part of the felt wheel well liner. This gave me enough access, although tight, to complete the install. I made a small bracket so I could extend the lower horn into the empty cavity below the light fixtures.

Like Corin - I used the ground location he described:

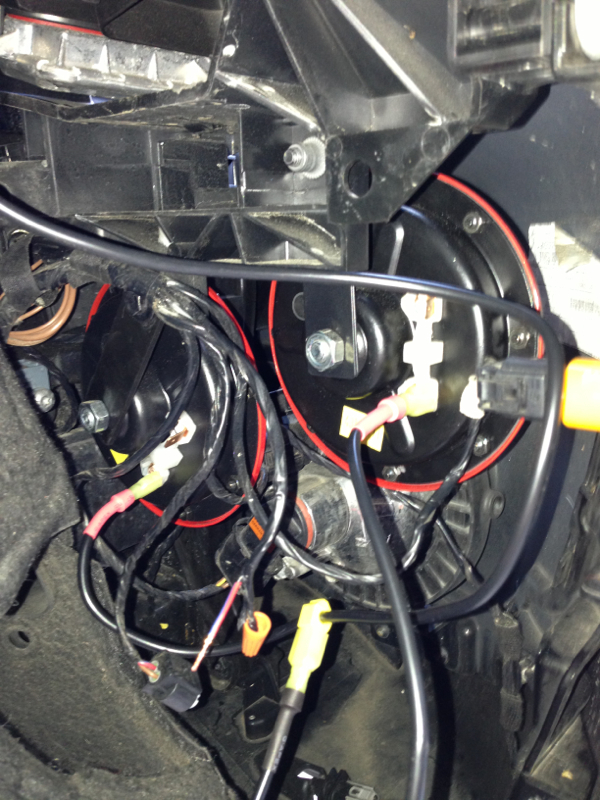
I found a studded screw hole on the batter cover just to the left of the existing relay - this is where I mounted the new relay (on the left). I drilled a small hole, and placed a rubber grommet it in, then brought the power out through this hole (the red wire on the right)

Here's a view looking down between the bumper and headlight:

The sound is impressive - sooo much louder than the original horns and very european. I like it! Thanks again Corin!
Like Corin - I used the ground location he described:
I found a studded screw hole on the batter cover just to the left of the existing relay - this is where I mounted the new relay (on the left). I drilled a small hole, and placed a rubber grommet it in, then brought the power out through this hole (the red wire on the right)
Here's a view looking down between the bumper and headlight:
The sound is impressive - sooo much louder than the original horns and very european. I like it! Thanks again Corin!
Last edited by euells; 01-17-2013 at 09:41 PM. Reason: Enlarge pics
#7
01-16-2013, 05:58 PM
Join Date: Feb 2008
Location: seattle, wa
Posts: 432
Likes: 0
Received 0 Likes
on
0 Posts
Trending Topics
#8
01-16-2013, 06:04 PM
#9
09-02-2013, 07:38 PM

Bumping this awesome thread. I installed a set of Supertones tonight and these instructions were extremely helpful.
The only thing I would clarify is that you must ground both the relay and the horns. For some reason, I thought grounding the relay was sufficient. Needless to say, my horns did not work until I added a ground to the horns as well.
I also did not remove the bumper and opted to take off the passenger side wheel for more access. It is still a tight area to work, but I can't imagine having enough room to do the install with the wheel and bumper on.
Here is a pic of my horns. The one closest to the outside of the car is easy to swap into the stock position.
I had a hard time fitting the horn closer to the engine side. I didn't have a spare bracket so I just hung it from the stock position. The problem is, the fog light access hatch no longer fully closes because it hits the back of the horn. I will need to go to the hardware store to get some brackets and bolts for a better fit.
For now, I'm enjoying the super loud horns. These are seriously piercing. I had a set on my old WRX and would often scare the crap out of pedestrians and other drivers with these. Use with care, lol!
#10
10-18-2013, 05:23 AM

#11
10-18-2013, 06:50 AM
Its been a while - but I don't think the tabs are different - but the screw that holds the tab down is either copper or silver. See attached pic. Hope this helps!
#12
10-18-2013, 10:56 AM
From your pic, one side is silver and the other is copper in color but mine are definitely silver on all four at the base of the 90 degree spade connectors. I will use the connection closer to the bracket as shown on your pic as negative. Sent an e-mail to Hella requesting some assistance but haven't gotten an answer. Thanks
#13
11-30-2013, 01:19 PM

4th Gear
#14
12-01-2013, 01:44 PM

2nd Gear
I wish I had read this before installing my horns today. But all is ok. I just removed the passage side headlight and dropped the one stock horn down some and mounted the one Hella horn on top of it, and mounted the other horn flat under the headlight. Will try the wiring tomorrow as described here.
#15
12-22-2013, 10:02 AM

5th Gear
Join Date: Jul 2012
Location: Richardson, TX
Posts: 777
Likes: 0
Received 0 Likes
on
0 Posts
Sorry, I'm a little confused. I have a set of Hella horns coming because my son's car has a dead one. I understand that removing the bumper cover is easiest access. But I thought the replacement was more or less a drop in, changing wire ends to convert and good to go? Is it necessary to do the whole relay wiring routine to make them work? The horns I ordered were the basic horn type, not air or pancake type. Two single electrical blades on the horn like all the rest. Sorry. Electrical challenged.
#16
12-22-2013, 10:05 AM
Join Date: Feb 2008
Location: seattle, wa
Posts: 432
Likes: 0
Received 0 Likes
on
0 Posts
#17
12-22-2013, 10:13 AM
5th Gear
Join Date: Jul 2012
Location: Richardson, TX
Posts: 777
Likes: 0
Received 0 Likes
on
0 Posts
They are Hella replacements.

#18
12-22-2013, 07:22 PM
#19
12-22-2013, 07:29 PM
#20
12-23-2013, 07:28 AM
5th Gear
Join Date: Jul 2012
Location: Richardson, TX
Posts: 777
Likes: 0
Received 0 Likes
on
0 Posts
#21
12-23-2013, 08:25 PM

#22
12-24-2013, 06:28 AM
5th Gear
Join Date: Jul 2012
Location: Richardson, TX
Posts: 777
Likes: 0
Received 0 Likes
on
0 Posts
That was my thought! I'm planning to give it a shot tomorrow afternoon and I'll let you know. I found a YouTube where a guy modified the plug to the horn and soldered the modification to the horn and let 'er rip! We'll see! I'm going to pull the bumper cover.
#23
12-24-2013, 09:42 AM

#24
01-28-2014, 04:29 PM
4th Gear
I've finished my install. I'm waiting on DP and FMIC so I'm not going to be able to test the horns until the car is back together. I did things a little differently.
I spliced the horn ground and relay ground together because I didn't have enough hardware on hand to run 2 or even 3 separate wires with connectors.
I installed the horns a little differently then you all did and I've put a head on picture with the bumper off. I don't want to have any problem with changing my driving light/fog light bulbs so I used a long bolt and 3 nuts to suspend the horn closest to the engine a little out of the way. When I get the bumper on I may need to fiddle with it to get everything to fit.
Last edited by Ian Landesman; 01-28-2014 at 04:37 PM. Reason: Addition
#25
02-02-2014, 01:04 PM
4th Gear
My fit was spot on. Total access to the driving and fog lights. BUT... these horns do not blow me away. They are a LITTLE better than stock, but for the expense (about $100 including parts, gas, etc) and the time (an evening and afternoon) I call "meh" at best. =/ Won't be doing this to my next car...