How To R56 :: Drivetrain :: DIY Water Pump Replacement
#1
 05-23-2011, 09:42 AM

R56 :: Drivetrain :: DIY Water Pump Replacement
So I finally noticed I was losing a few drops of coolant here or there and got serious about doing my water pump. I am just out of warranty so I was unable to get it covered, but according to mini my FMIC voided my warranty. The pumps are plastic, so are the impellers causing premature failures to them.
The parts needed are:
Water Pump - $114.38 - http://www.ddmtuning.com/Products/11...TER-PUMP115019
Belt - $19.23 - http://www.ddmtuning.com/Products/bm...rt-11287566789
Also 1 gallon of MINI coolant - mixes to make 2 gallons.
These are the OEM parts from BMW, just a lot less. The water pump you get at BMW is also RMFD.
I was able to save about ~$60-$70 in a parts going this route.
BMW wanted $580-$600 to do the job and another local shop wanted $584. I am not made of money and figure I have pretty good mechanic skills, why not knock this out myself. After much searching for a DIY i couldnt find one and this is why i am here.
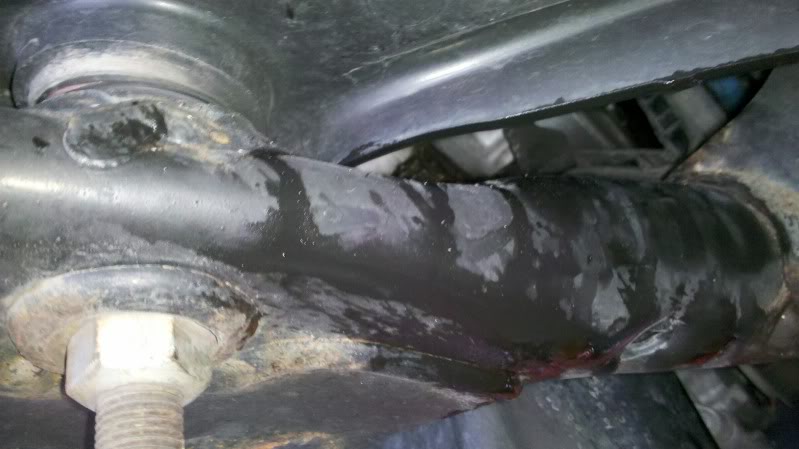
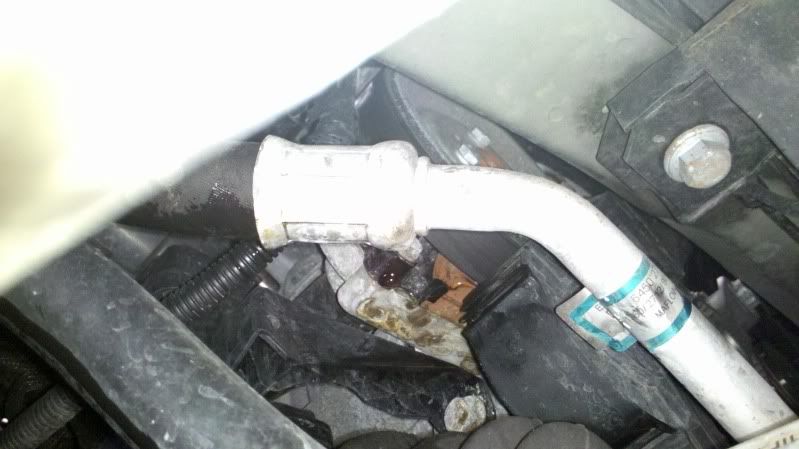
Here are pics of a the leaking water pump:
Water pump:

So first we drained the cooling system the best we could by disconnecting the two hoses near the bottom of the radiator. Next we took out the headlight on the passenger side. Then we removed the brace that runs from the passenger side strut mount the wraps around the front to the drive side strut mount. This bar is black and held on by two 13 MM bolts on each side. Then there are the 10MM bolts for the headlight, post FMIC charge pipe. Then there are a couple torx screws that hold the hood latches. remove all of these bolts and remove that bar, (we just folded it over out the way since there are the hood release cables in it.
Next we removed the charge piping on the passanger side:
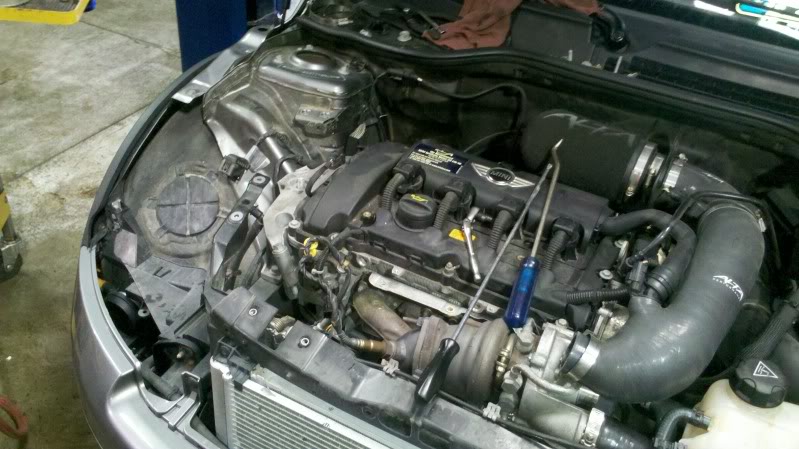
Headlight, brace, charge piping removed.
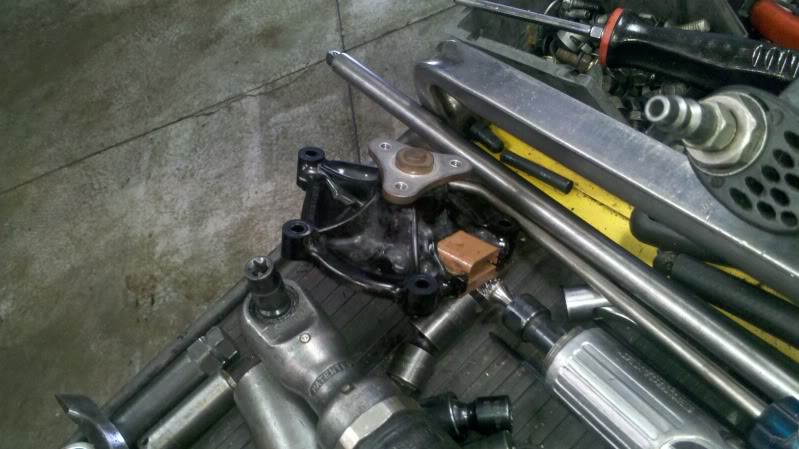
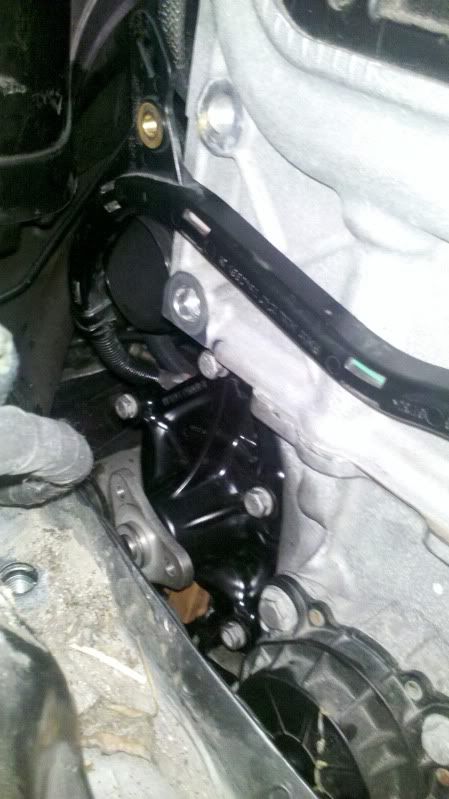
Then we went ahead and put a jack under the oil pan with a 2x4 so it wouldnt damage it. Now we removed the motor mount on the passenger side, it is held on with a few 13mm and a 15mm. Then there is another support for the motor mount held on by 4 inverted torx bolts, much like bmw transmission bolts look like. Once this was removed we were able to jack up the motor to a point where the water pump was quite accessible.
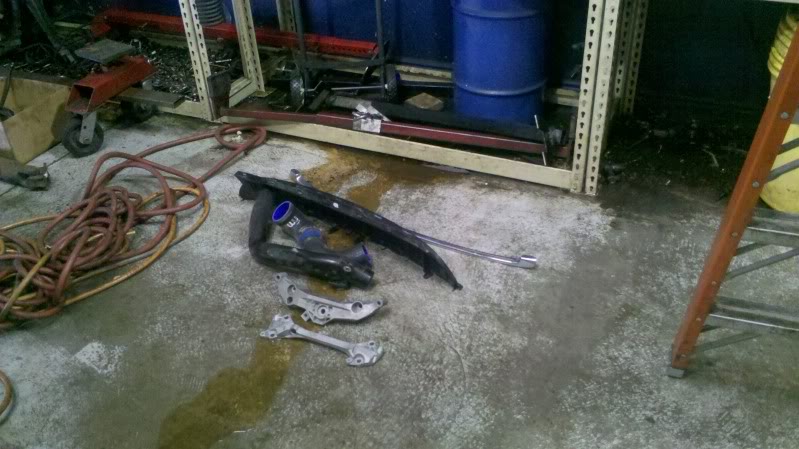
Removed parts:
Water pump:

We took the pulley off the water pump by removing the 3 10mm bolts that attach it to the water pump. We just put a pry bar in there to stop it from turning while we removed the pulley. We then removed the few 10mm bolts attaching the water pump to the block.
We then refilled the cooling system and made sure there was no air by cracking the bleeder valve on the thermostat located on the driver side of the block, near the intake.
We re-installed the same way as we took everything off. I changed my belt due to coolant leaking onto it and causing cracking. Overall not to bad of an install, took us about 2 hours with air tools and my friend who is a mechanic helping me. Really was not as bad as I was thinking it would be.
Overall cost me under $200 to change out my pump myself.
leaky pump:
If anyone has any questions feel free to pm me about them.
The parts needed are:
Water Pump - $114.38 - http://www.ddmtuning.com/Products/11...TER-PUMP115019
Belt - $19.23 - http://www.ddmtuning.com/Products/bm...rt-11287566789
Also 1 gallon of MINI coolant - mixes to make 2 gallons.
These are the OEM parts from BMW, just a lot less. The water pump you get at BMW is also RMFD.
I was able to save about ~$60-$70 in a parts going this route.
BMW wanted $580-$600 to do the job and another local shop wanted $584. I am not made of money and figure I have pretty good mechanic skills, why not knock this out myself. After much searching for a DIY i couldnt find one and this is why i am here.
Here are pics of a the leaking water pump:
Water pump:
So first we drained the cooling system the best we could by disconnecting the two hoses near the bottom of the radiator. Next we took out the headlight on the passenger side. Then we removed the brace that runs from the passenger side strut mount the wraps around the front to the drive side strut mount. This bar is black and held on by two 13 MM bolts on each side. Then there are the 10MM bolts for the headlight, post FMIC charge pipe. Then there are a couple torx screws that hold the hood latches. remove all of these bolts and remove that bar, (we just folded it over out the way since there are the hood release cables in it.
Next we removed the charge piping on the passanger side:
Headlight, brace, charge piping removed.
Then we went ahead and put a jack under the oil pan with a 2x4 so it wouldnt damage it. Now we removed the motor mount on the passenger side, it is held on with a few 13mm and a 15mm. Then there is another support for the motor mount held on by 4 inverted torx bolts, much like bmw transmission bolts look like. Once this was removed we were able to jack up the motor to a point where the water pump was quite accessible.
Removed parts:
Water pump:
We took the pulley off the water pump by removing the 3 10mm bolts that attach it to the water pump. We just put a pry bar in there to stop it from turning while we removed the pulley. We then removed the few 10mm bolts attaching the water pump to the block.
We then refilled the cooling system and made sure there was no air by cracking the bleeder valve on the thermostat located on the driver side of the block, near the intake.
We re-installed the same way as we took everything off. I changed my belt due to coolant leaking onto it and causing cracking. Overall not to bad of an install, took us about 2 hours with air tools and my friend who is a mechanic helping me. Really was not as bad as I was thinking it would be.
Overall cost me under $200 to change out my pump myself.
leaky pump:
If anyone has any questions feel free to pm me about them.
The following users liked this post:
2tallcurtis (10-29-2017)
#3
05-23-2011, 12:08 PM
Your big fmic was blocking the radiator from cooling properly. (we all know that isnt true).
They said my warranty was void as soon as they saw the fmic, i could only see what they would say about being catless..

#5
05-23-2011, 01:56 PM
I also have my front grille cut out some to show the fmic.. i figure why hide something so good looking.
#7
05-23-2011, 02:08 PM
Trending Topics
#8
05-23-2011, 03:56 PM
Check out this article by Corksport for some insight.
#9
06-16-2011, 09:43 AM

So I finally noticed I was losing a few drops of coolant here or there and got serious about doing my water pump. I am just out of warranty so I was unable to get it covered, but according to mini my FMIC voided my warranty. The pumps are plastic, so are the impellers causing premature failures to them.
The parts needed are:
Water Pump - $114.38 - http://www.ddmtuning.com/Products/11...TER-PUMP115019
Belt - $19.23 - http://www.ddmtuning.com/Products/bm...rt-11287566789
Also 1 gallon of MINI coolant - mixes to make 2 gallons.
These are the OEM parts from BMW, just a lot less. The water pump you get at BMW is also RMFD.
I was able to save about ~$60-$70 in a parts going this route.
BMW wanted $580-$600 to do the job and another local shop wanted $584. I am not made of money and figure I have pretty good mechanic skills, why not knock this out myself. After much searching for a DIY i couldnt find one and this is why i am here.
Here are pics of a the leaking water pump:

Water pump:
So first we drained the cooling system the best we could by disconnecting the two hoses near the bottom of the radiator. Next we took out the headlight on the passenger side. Then we removed the brace that runs from the passenger side strut mount the wraps around the front to the drive side strut mount. This bar is black and held on by two 13 MM bolts on each side. Then there are the 10MM bolts for the headlight, post FMIC charge pipe. Then there are a couple torx screws that hold the hood latches. remove all of these bolts and remove that bar, (we just folded it over out the way since there are the hood release cables in it.
Next we removed the charge piping on the passanger side:

Headlight, brace, charge piping removed.
Then we went ahead and put a jack under the oil pan with a 2x4 so it wouldnt damage it. Now we removed the motor mount on the passenger side, it is held on with a few 13mm and a 15mm. Then there is another support for the motor mount held on by 4 inverted torx bolts, much like bmw transmission bolts look like. Once this was removed we were able to jack up the motor to a point where the water pump was quite accessible.
Removed parts:

Water pump:
We took the pulley off the water pump by removing the 3 10mm bolts that attach it to the water pump. We just put a pry bar in there to stop it from turning while we removed the pulley. We then removed the few 10mm bolts attaching the water pump to the block.
We then refilled the cooling system and made sure there was no air by cracking the bleeder valve on the thermostat located on the driver side of the block, near the intake.
We re-installed the same way as we took everything off. I changed my belt due to coolant leaking onto it and causing cracking. Overall not to bad of an install, took us about 2 hours with air tools and my friend who is a mechanic helping me. Really was not as bad as I was thinking it would be.
Overall cost me under $200 to change out my pump myself.
leaky pump:

If anyone has any questions feel free to pm me about them.
The parts needed are:
Water Pump - $114.38 - http://www.ddmtuning.com/Products/11...TER-PUMP115019
Belt - $19.23 - http://www.ddmtuning.com/Products/bm...rt-11287566789
Also 1 gallon of MINI coolant - mixes to make 2 gallons.
These are the OEM parts from BMW, just a lot less. The water pump you get at BMW is also RMFD.
I was able to save about ~$60-$70 in a parts going this route.
BMW wanted $580-$600 to do the job and another local shop wanted $584. I am not made of money and figure I have pretty good mechanic skills, why not knock this out myself. After much searching for a DIY i couldnt find one and this is why i am here.
Here are pics of a the leaking water pump:
Water pump:
So first we drained the cooling system the best we could by disconnecting the two hoses near the bottom of the radiator. Next we took out the headlight on the passenger side. Then we removed the brace that runs from the passenger side strut mount the wraps around the front to the drive side strut mount. This bar is black and held on by two 13 MM bolts on each side. Then there are the 10MM bolts for the headlight, post FMIC charge pipe. Then there are a couple torx screws that hold the hood latches. remove all of these bolts and remove that bar, (we just folded it over out the way since there are the hood release cables in it.
Next we removed the charge piping on the passanger side:
Headlight, brace, charge piping removed.
Then we went ahead and put a jack under the oil pan with a 2x4 so it wouldnt damage it. Now we removed the motor mount on the passenger side, it is held on with a few 13mm and a 15mm. Then there is another support for the motor mount held on by 4 inverted torx bolts, much like bmw transmission bolts look like. Once this was removed we were able to jack up the motor to a point where the water pump was quite accessible.
Removed parts:
Water pump:
We took the pulley off the water pump by removing the 3 10mm bolts that attach it to the water pump. We just put a pry bar in there to stop it from turning while we removed the pulley. We then removed the few 10mm bolts attaching the water pump to the block.
We then refilled the cooling system and made sure there was no air by cracking the bleeder valve on the thermostat located on the driver side of the block, near the intake.
We re-installed the same way as we took everything off. I changed my belt due to coolant leaking onto it and causing cracking. Overall not to bad of an install, took us about 2 hours with air tools and my friend who is a mechanic helping me. Really was not as bad as I was thinking it would be.
Overall cost me under $200 to change out my pump myself.
leaky pump:
If anyone has any questions feel free to pm me about them.
Great write-up....I just had the dealer do mine.....parts, labor, and tax $713.00 ouch!

#10
07-02-2011, 11:17 AM

4th Gear
Join Date: Nov 2009
Location: Connecticut
Posts: 488
Likes: 0
Received 0 Likes
on
0 Posts
They need to read the Magnuson-Moss Warranty Act before they go claiming an intake adversely affects a water pump and voids a warranty. The same goes for not having a cat.
Check out this article by Corksport for some insight.
Check out this article by Corksport for some insight.

#11
08-15-2011, 02:18 PM

I have to say this DIY instruction is a very detailed approach in replacing my water pump. I did the work done last weekend (8/13/2011) and without this it could have taken me forever (though it did take me more than 2 hours to so so). KUDOS to you boosted_mini!!
So, what I can add are the following:
- My car looked a little bit different being an R56 Mini Cooper S 2007
- Some preparations:
o The bottom cover needed to be removed.
o The jack needed a small piece of 2X4 wood as defined in the instructions.
- The pump that was installed on my car had a rev. 01. The new water pump is at rev. 04.
- On my car I needed to remove the turbo tubes as they were on the way.
- I had to remove an extra part which is not in this car and this is part of the picture above which was the motor mounting piece which had dampers on it-this was directly mounted on the chasis of the engine-When removing this, I would suggest to mark it so you know where to put it back.
- DO NOT be afraid to raise the engine (I got intimidated in doing this task as it was my first time so I called on a buddy who had experience). He was blown off how much space was available on the car.
- When placing back the pulley for the water pump the black piece part (I dont know what its called) which is right by the pump had a **** with an "S" embossed on it which you had to pull to release tension on the pulley. Pull it carefully as over pulling it may cause it to break and that would be a big problem. The pulley went in easily after doing this.
- When REPLACING THE BELT (I did it based on this recommendation and true to experience the belt had
some cracks on it), you need to loosen up the belt tensioner (aluminum piece assembly).
o The belt tensioner can be loosened by simply yanking it with a small metal rod. I used my tire wrench to do this.
o The black piece again needed to be pulled.
- Then the belt can be placed easily.
o The black piece part needs to be pulled again as its needed to place it back to the original state.
o To tighten up the belt tensioner. Yank it downwards and it will lock itself into position.
ONE LAST THING: As I was already too tired to bleed the system. What I did was to force bleed it. This was done by simply removing the cap of the coolant reservoir then massaging the bottom hose. It took some time but that was easier than to gain access to the thermostat cover.
DONE!
Dont be afraid to do this it may sound a lot but its nothing really. Many thanks again to booster mini for exerting the effort in making such a detail instruction. If you have questions in this task just PM me. I will be most willing to help.
Last edited by nikkicooper; 08-15-2011 at 03:04 PM.

#13
09-29-2011, 10:32 AM


#17
10-03-2011, 10:04 AM
#18
10-24-2011, 11:44 AM

Temp sensor...
The Graf pump works fine. The OEM has a tan plastic cover w/2 holes [see pic]. I mistakenly thought it was a temp sensor [as was told me by 2 Mini parts mgrs], It is a weep hole & leaks when the bearing is about to go. OEM has the weaphole and plastic housing & impellar. The Graf @1/3 price has a metal housing and composite impellar. Took me 2 teck idiots who didnt know sh.. but assured me the pump had a sensor on it....
Last edited by aberathy; 11-28-2011 at 11:00 AM. Reason: Follow up info
#19
10-29-2011, 11:26 AM
No graf pump;
Sorry for the confusion, I assumed what 2 Mini dealer parts mgrs. [Crevier Mini & Ontario Mini] told me was truth. They assured me the engine light would stay on if I didnt plug the sensor in from the water pump-idiots
The e-sockets used is an 11.
The e-sockets used is an 11.
Last edited by aberathy; 11-14-2011 at 08:17 PM. Reason: Wrong Info-
#20
11-01-2011, 07:49 PM

The following users liked this post:
2tallcurtis (10-29-2017)

#23
11-02-2011, 09:03 AM
#24
11-02-2011, 09:53 AM
#25
11-14-2011, 05:49 AM