How To R53 Drivetrain :: Replaced Supercharger Tonight!!! DIY
#1
 05-19-2011, 05:58 AM


R53 Drivetrain :: Replaced Supercharger Tonight!!! DIY
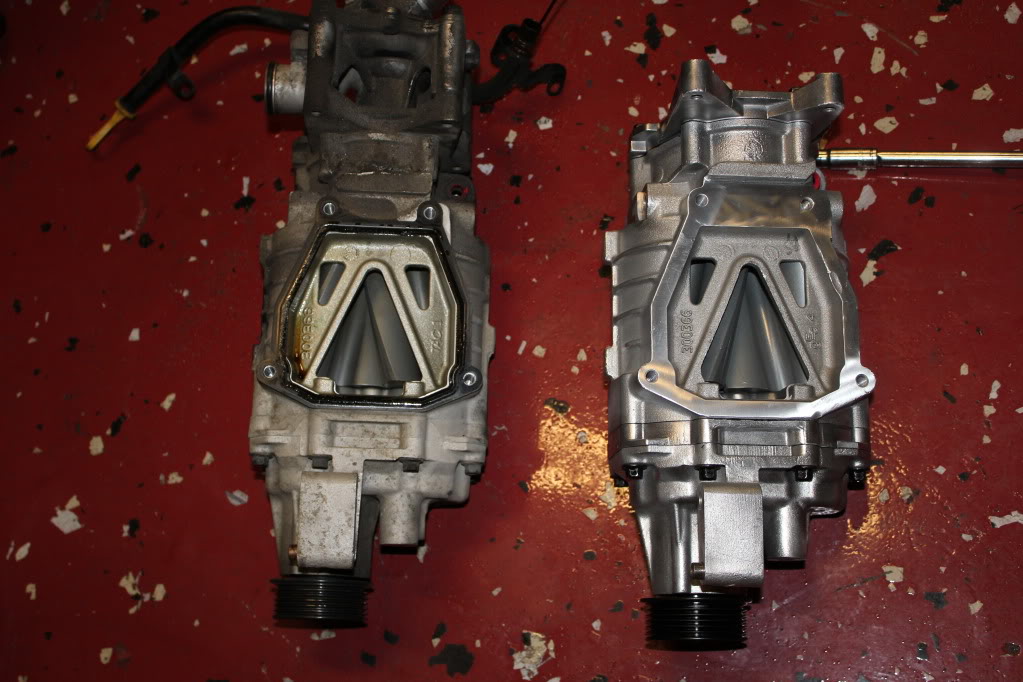
I just got my rebuilt supercharger today and decided to jump into the project. I decided to take pics and explain my process. Its a 2003 MCS with 6 speed and 65,000 miles. I had the rattle and got the fix for under $600 and under 5 hours of my time.
1. Jack the car up in the front and remove the tires (this did not help me in any way besides getting some screws out of the fender liner).
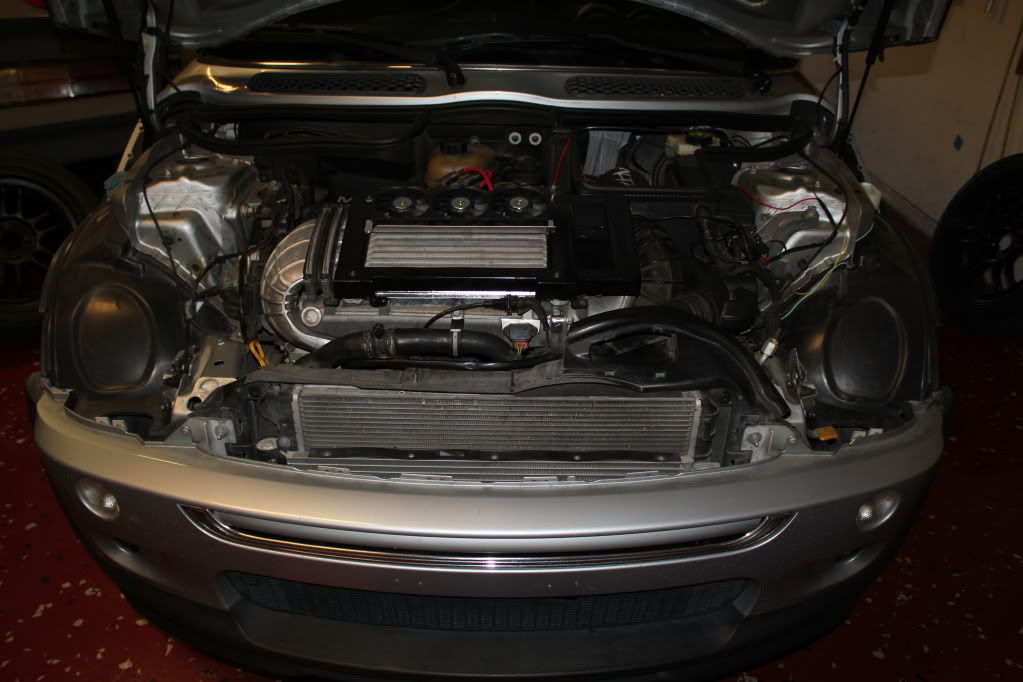
2. Remove front bumper and then crash bar. There are 10 bolts for the crash bar and 6 bolts/ 2 screws for the bumper cover.
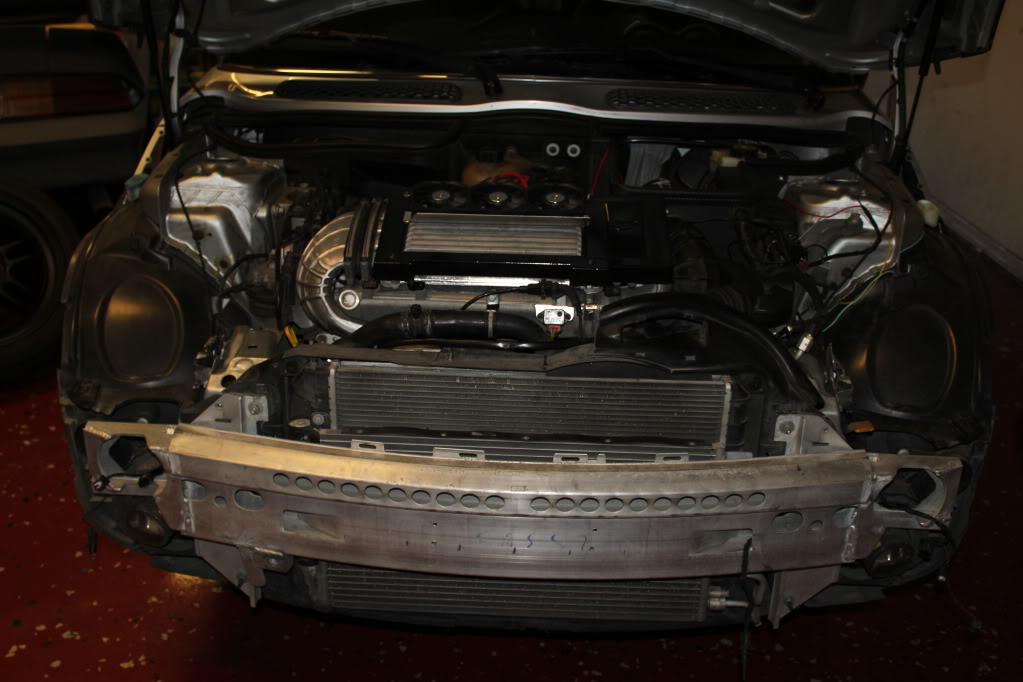
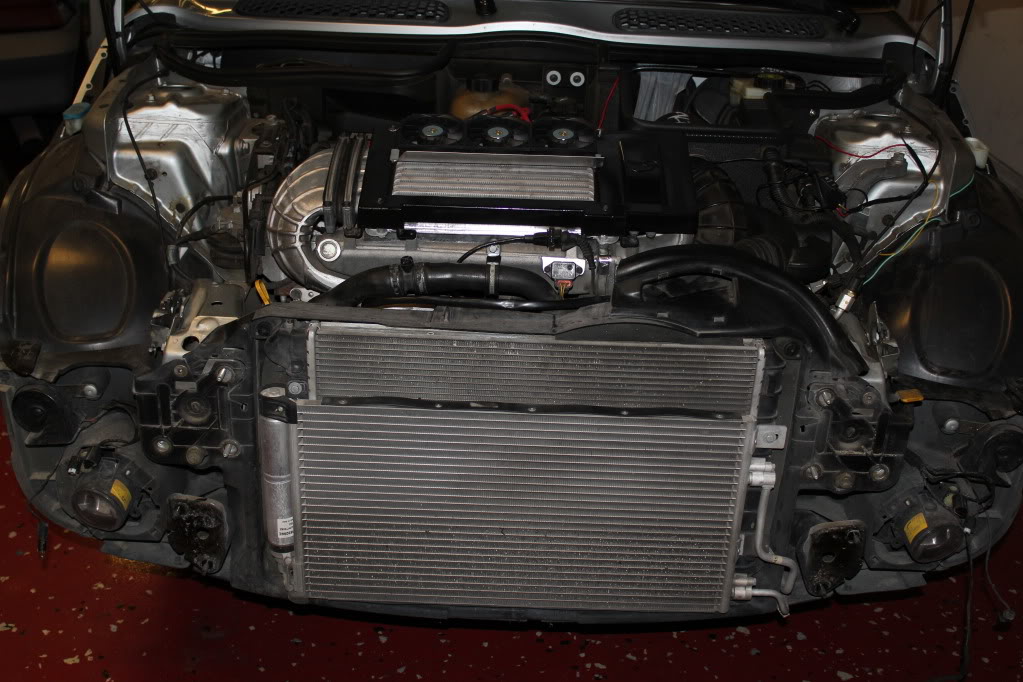
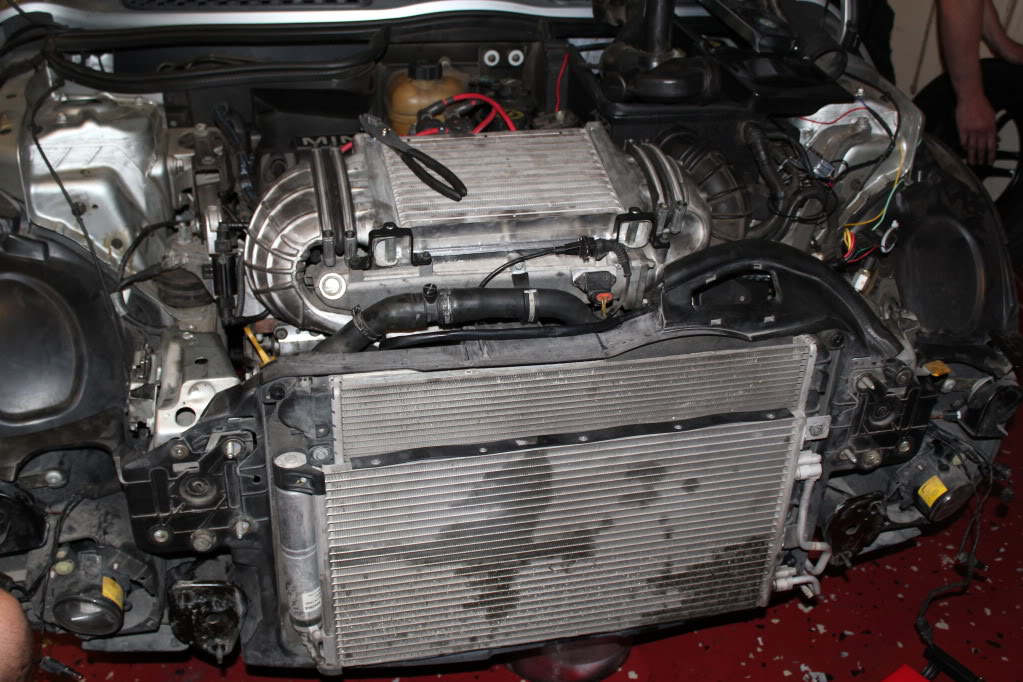
3. Remove the two bolts holding the AC condenser and slide it away from the radiator. Then comes the draining of the coolant. undo the top radiator hose and then the bottom one with some pliers. Use a bucket to catch the fluid as it pours out of the bottom right hand side.
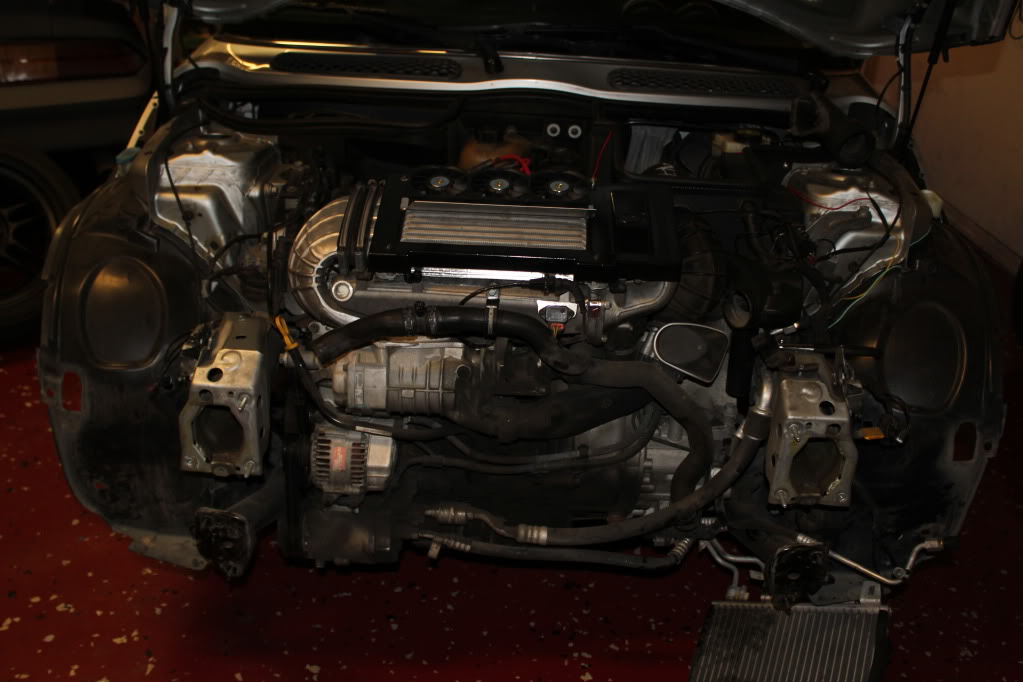
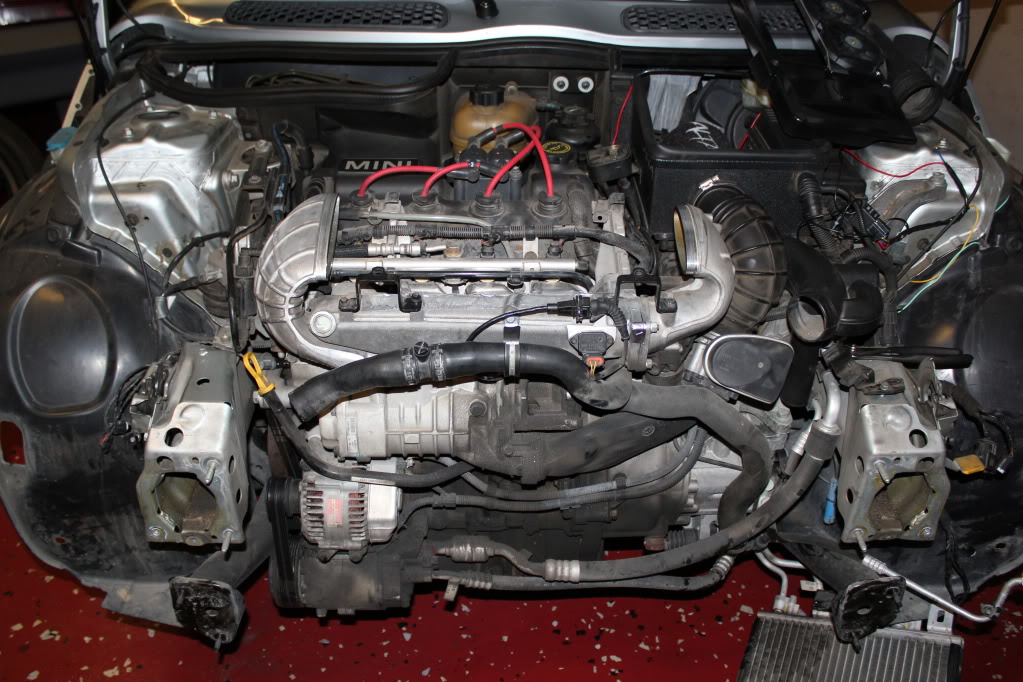
4. This is now the tricky part. The entire front end (including fog lights) comes off in one piece. There are 4 plastic screws in EACH fender liner that need to be removed and then 2 bolts on the bottom front, under the fog lights. You can remove the crash tubes (I did not do this) to help remove the front end. There are also two bolts above an inward of the fog lights that have a big washer type thing around them, go ahead and remove those too. Now after disconnecting all the lights and wires and feeding them out of their spaces, pull the front end off (I had a buddy help hold one side) It took some wiggling with the crash tubes in but tilted it forward and tada! (same pic as above. i forgot to take an in between pic)
5. I now removed the intercooler and diverter.
6. Next is the Bypass Valve with intercooler horn attached on the driver side. 3 bolts to remove the horn plus 2 hose clamps to get the tube off the intake tube. The factory clamps never tighten the right way after pulling off so I got some regular band clamps at AutoZone to replace them.
7. SERPENTINE BELT NEXT. Everyone talks about this "special" tool needed to remove this thing. Very wrong, it is more simple than you think. I used a bolt that i had laying around and was just big enough around to fit in one of the 3 holes that are located on the tensioner. It should stick out maybe 1/2" to use as a pivot. Thin using just a flat piece of metal about 2 feet long and 1" wide and 1/4" thick. I placed one end on the crack pulley and pulled upward using the bolt as the pivot and it released all the pressure very VERY easily so that my buddy could put an alen wrench in the second hole that gets exposed from the tab in the spring (on top of the tensioner). I made a video of us releasing the tension the same way as I did before after it was all done. Again, this took maybe 40 seconds.
http://www.youtube.com/watch?v=fuXCLGj2E2o
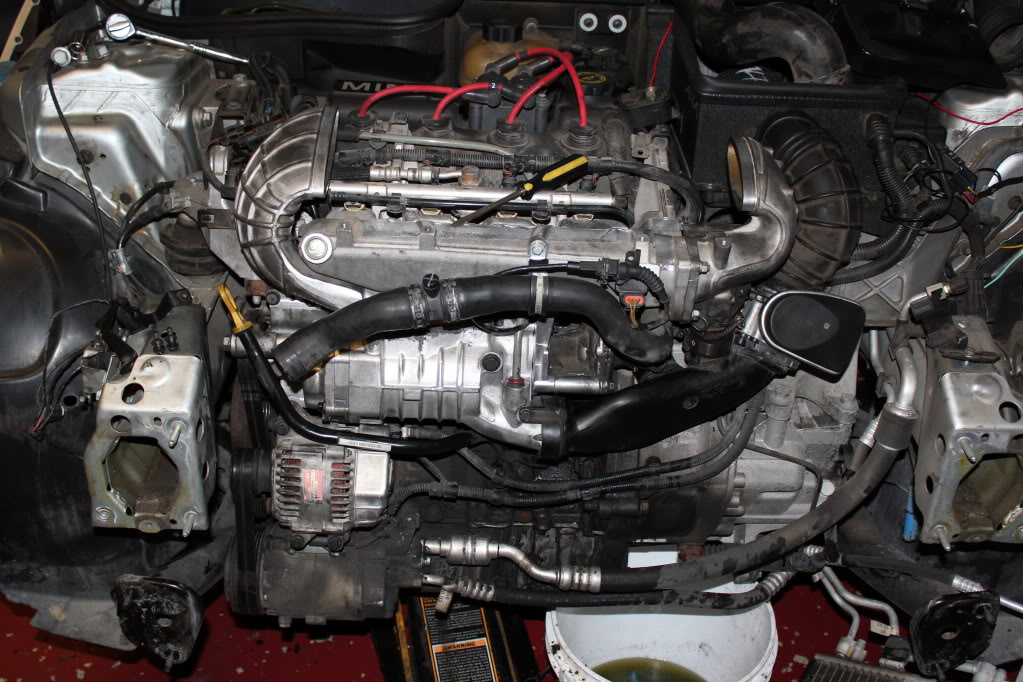
8. Alternator needs to come off now with the 3 bolts holding it on to the block and the 2 connectors on the back side. NEXT is the dip stick being help on by 2 bolts, one on the lower end and one on the top end, simple wiggle and it comes out.
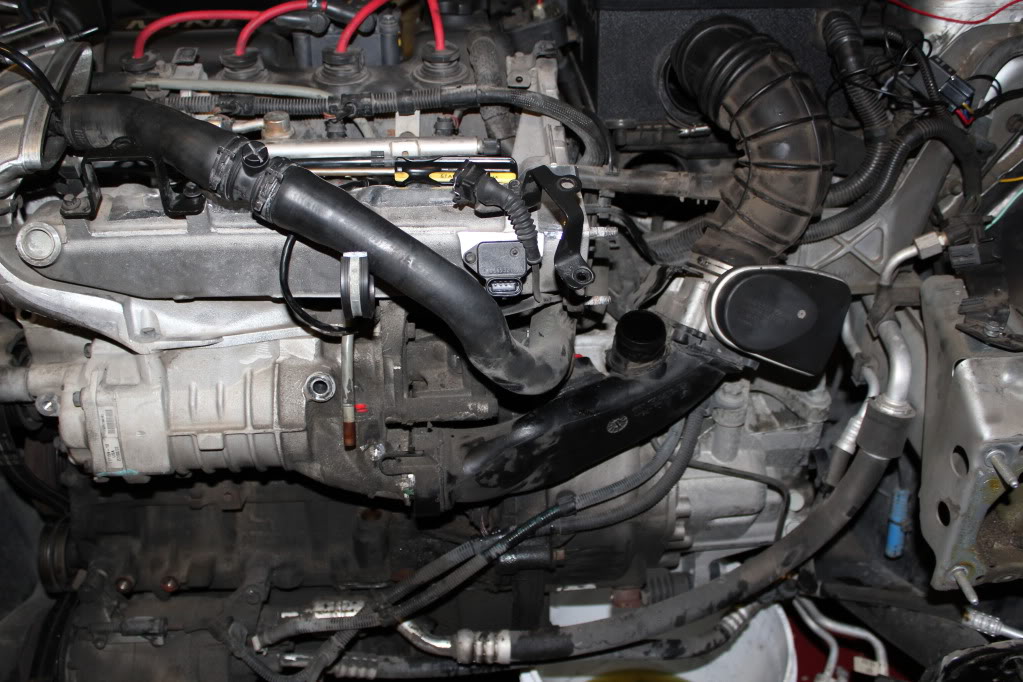
9. Get the various hoses from the water pump off (one in the back is a little difficult but with some pliers and the right angle it can be done easily.)
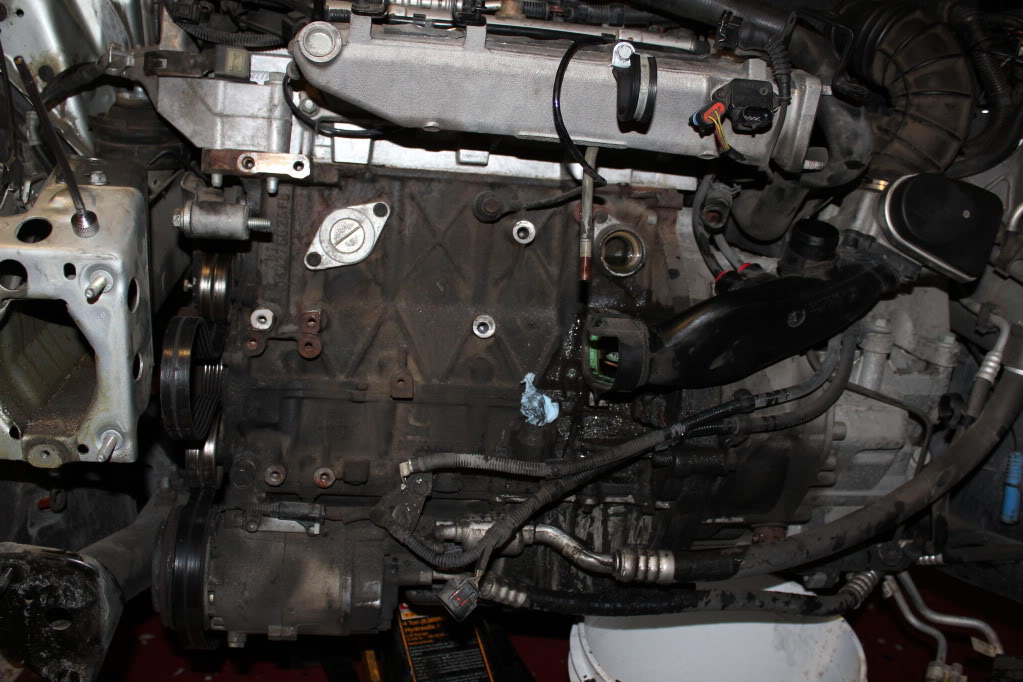
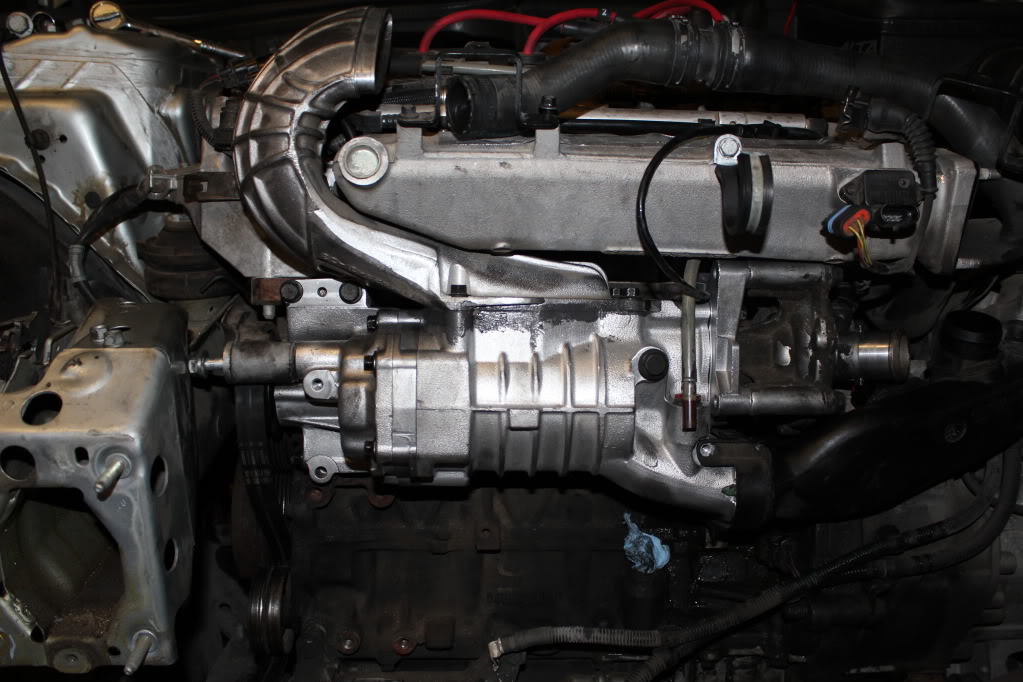
10. SUPERCHARGER. Now get the 4 bolts holding this thing on out. Slide the intake tube from the throttle body to the driver side after removing 1 bolt at the supercharger. Then wiggle it straight out with the passenger side intercooler horn and water pump attached.
11. I decided to look inside my old intercooler back case after taking the water pump off. I was truly amazed I was still driving the way I do (including some autox). Picture speaks a thousand words.
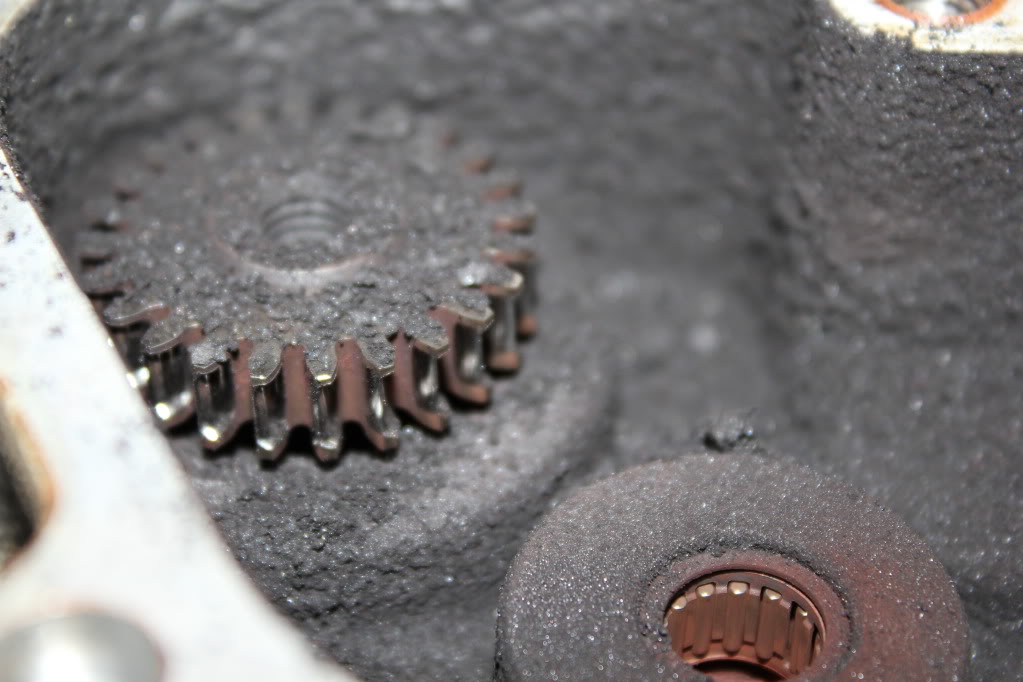
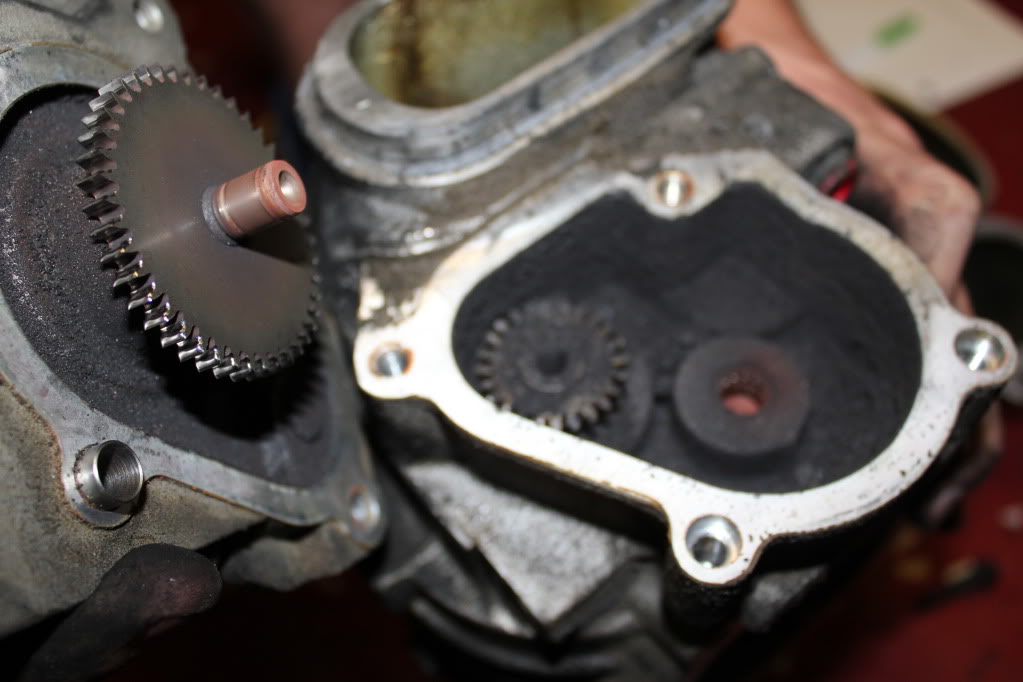
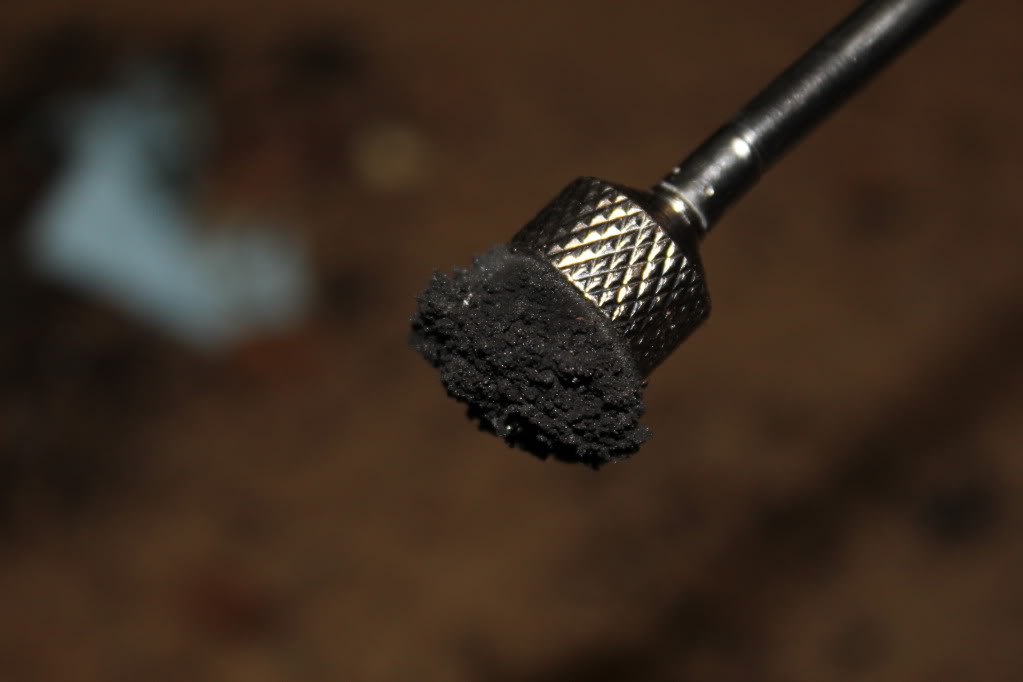
Bits of metal that i pulled out with a magnet. This case was bone dry
12. Bolt the horn and water pump onto the new charger and reverse the process. 4 bolts for the supercharger.Putting the intake tube back on with its 1 bolt too. Putting hoses back where they need to go on the water pump. Alternator with its 3 bolts and 2 connections in the back. Belt, same way you took it off and make sure all the grooves and in line with all the pulleys. Release the pin (alen wrench) and check it again. Dipstick back in with 2 bolts. then the driver side intercooler horn. Front end fiberglass piece with the 8 fender bolts and 4 bolts in the front (2 under fogs and 2 above and inward of the fogs with the big washer thing). Intercooler can go back on next. Then then connect the radiator hoses to the radiator. (I filled it back up from the passenger side tube). AC condenser with its 2 bolts. and the rest is self explanatory. Took me and a buddy 5 hours with a dinner break and a run to AutoZone. ENJOY!!
1. Jack the car up in the front and remove the tires (this did not help me in any way besides getting some screws out of the fender liner).
2. Remove front bumper and then crash bar. There are 10 bolts for the crash bar and 6 bolts/ 2 screws for the bumper cover.
3. Remove the two bolts holding the AC condenser and slide it away from the radiator. Then comes the draining of the coolant. undo the top radiator hose and then the bottom one with some pliers. Use a bucket to catch the fluid as it pours out of the bottom right hand side.
4. This is now the tricky part. The entire front end (including fog lights) comes off in one piece. There are 4 plastic screws in EACH fender liner that need to be removed and then 2 bolts on the bottom front, under the fog lights. You can remove the crash tubes (I did not do this) to help remove the front end. There are also two bolts above an inward of the fog lights that have a big washer type thing around them, go ahead and remove those too. Now after disconnecting all the lights and wires and feeding them out of their spaces, pull the front end off (I had a buddy help hold one side) It took some wiggling with the crash tubes in but tilted it forward and tada! (same pic as above. i forgot to take an in between pic)
5. I now removed the intercooler and diverter.
6. Next is the Bypass Valve with intercooler horn attached on the driver side. 3 bolts to remove the horn plus 2 hose clamps to get the tube off the intake tube. The factory clamps never tighten the right way after pulling off so I got some regular band clamps at AutoZone to replace them.
7. SERPENTINE BELT NEXT. Everyone talks about this "special" tool needed to remove this thing. Very wrong, it is more simple than you think. I used a bolt that i had laying around and was just big enough around to fit in one of the 3 holes that are located on the tensioner. It should stick out maybe 1/2" to use as a pivot. Thin using just a flat piece of metal about 2 feet long and 1" wide and 1/4" thick. I placed one end on the crack pulley and pulled upward using the bolt as the pivot and it released all the pressure very VERY easily so that my buddy could put an alen wrench in the second hole that gets exposed from the tab in the spring (on top of the tensioner). I made a video of us releasing the tension the same way as I did before after it was all done. Again, this took maybe 40 seconds.
http://www.youtube.com/watch?v=fuXCLGj2E2o
8. Alternator needs to come off now with the 3 bolts holding it on to the block and the 2 connectors on the back side. NEXT is the dip stick being help on by 2 bolts, one on the lower end and one on the top end, simple wiggle and it comes out.
9. Get the various hoses from the water pump off (one in the back is a little difficult but with some pliers and the right angle it can be done easily.)
10. SUPERCHARGER. Now get the 4 bolts holding this thing on out. Slide the intake tube from the throttle body to the driver side after removing 1 bolt at the supercharger. Then wiggle it straight out with the passenger side intercooler horn and water pump attached.
11. I decided to look inside my old intercooler back case after taking the water pump off. I was truly amazed I was still driving the way I do (including some autox). Picture speaks a thousand words.
Bits of metal that i pulled out with a magnet. This case was bone dry
12. Bolt the horn and water pump onto the new charger and reverse the process. 4 bolts for the supercharger.Putting the intake tube back on with its 1 bolt too. Putting hoses back where they need to go on the water pump. Alternator with its 3 bolts and 2 connections in the back. Belt, same way you took it off and make sure all the grooves and in line with all the pulleys. Release the pin (alen wrench) and check it again. Dipstick back in with 2 bolts. then the driver side intercooler horn. Front end fiberglass piece with the 8 fender bolts and 4 bolts in the front (2 under fogs and 2 above and inward of the fogs with the big washer thing). Intercooler can go back on next. Then then connect the radiator hoses to the radiator. (I filled it back up from the passenger side tube). AC condenser with its 2 bolts. and the rest is self explanatory. Took me and a buddy 5 hours with a dinner break and a run to AutoZone. ENJOY!!


#6
05-22-2011, 02:19 AM


#7
05-22-2011, 05:14 AM

Supercharger Technologies in Old Town, FL is where you can get a sub-$600 supercharger, or send them yours to be re-sealed/repaired. I've used them twice and have no affiliation other than as a satisfied customer. You do not have to disconnect the A/C condensor but removing the radiator makes the job much easier.
Great job of documenting the process. I can now do this in about four hours, thanks to having done it to my daughter's and my MINI.
Great job of documenting the process. I can now do this in about four hours, thanks to having done it to my daughter's and my MINI.
Trending Topics
#8
05-23-2011, 08:54 AM

#12
05-24-2011, 11:11 AM
I had to pull the daughter's supercharger off last night due to it leaking oil. Timed myself from start to finish, which meant no prep ahead of starting the clock. So, getting the tools out, compressor, jack stands and getting the supercharger off took one hour and ten minutes. So easy even a caveman can do it. This is the fourth time I've done this so I'm getting pretty proficient but this should give you an estimate of how easy this task is.
#13
05-24-2011, 11:15 AM
#14
05-24-2011, 11:27 AM
I had to pull the daughter's supercharger off last night due to it leaking oil. Timed myself from start to finish, which meant no prep ahead of starting the clock. So, getting the tools out, compressor, jack stands and getting the supercharger off took one hour and ten minutes. So easy even a caveman can do it. This is the fourth time I've done this so I'm getting pretty proficient but this should give you an estimate of how easy this task is.
This is why BMW/Mini says the S/C is "maintenance free"... but Eaton specifies an oil change interval of 40k.
#15
05-24-2011, 12:06 PM
One of the times was my own fault. When I reinstalled the supercharger on my 06 I pinched the coolant pump O-Ring that goes into the engine block (noticed coolant leaking as I was refilling the system), so I got to pull it all apart again. My daughter's 05 has 106,000 miles on it and the supercharger came off for the second time last night due to an oil leak, which is why mine was removed and I had new seals installed.
Better to remove these as soon as you see any evidence of an oil leak in order to prevent the gears from being trashed like the OPs.
MrCooperS, if you removed the alternator you were most of the way to removing the supercharger, which sits right above the alternator.
Better to remove these as soon as you see any evidence of an oil leak in order to prevent the gears from being trashed like the OPs.
MrCooperS, if you removed the alternator you were most of the way to removing the supercharger, which sits right above the alternator.
#16
05-24-2011, 12:43 PM
BTW, when removing the S/C, did you remove the radiator and AC condenser?
#17
05-24-2011, 01:37 PM
#18
05-25-2011, 10:23 PM

Exactly how I did mine, swing condenser out of the way.
I don't know why anyone would bother with putting the front support in "serivce mode" when a couple more hoses and draining the coolant completely opens up the engine / trans for service.
I am blown away how bad those gears look with the miles you have.
I had 189k miles on mine when I took it all apart to check things out.
Mine still had some oil left in it and gears looked perfect.
Maybe I was just lucky? Or maybe it's because this car has all highway miles?

#20
05-26-2011, 03:07 AM
Ain't that a thing of beautiful only BMW can whip up...

I collected data of failed S/C while browsing NAM. The list is incomplete... I'm sure of it.
Surprised that more superchargers failed under 100k than above!!! Maybe they should call it a "SuperGrinder"!!!
MY : k-miles (N/G: none given)
2002 : 120
2002 : 100
2002 : N/G
2003 : 119
2003 : 78
2003 : 64
2003 : 54
2003 : 48
2003 : 53
2003 : 65
2003 : N/G
2003 : N/G
2004 : 15
2004 : 41
2004 : 140
2004 : 15
2005 : 105
2006 : 53
2006 : N/G
???? : 121
**Screen names are withheld to protect the guilty!
I collected data of failed S/C while browsing NAM. The list is incomplete... I'm sure of it.
Surprised that more superchargers failed under 100k than above!!!
Maybe they should call it a "SuperGrinder"!!!MY : k-miles (N/G: none given)
2002 : 120
2002 : 100
2002 : N/G
2003 : 119
2003 : 78
2003 : 64
2003 : 54
2003 : 48
2003 : 53
2003 : 65
2003 : N/G
2003 : N/G
2004 : 15
2004 : 41
2004 : 140
2004 : 15
2005 : 105
2006 : 53
2006 : N/G
???? : 121
**Screen names are withheld to protect the guilty!
#22
05-26-2011, 08:14 AM

1st Gear
Join Date: May 2011
Location: Charleston, SC
Posts: 42
Likes: 0
Received 0 Likes
on
0 Posts
Awesome post
This post gives me the confidence to do this myself. I'm fairly mechanically inclined but didn't know what I was getting myself into. My radiator is leaking and it's been 100,000 miles since the sc was serviced. $800+ to get that done the first time and they want $600 to get the radiator changed. But not this time, just picked up a rad at a local place for $110. Going with new hoses too. Thanks for the post. Awesome!
#23
05-26-2011, 12:35 PM
#24
06-19-2012, 04:12 AM

This guide was very helpful when I replaced my SC a couple months ago and I wanted to thank the author. I get to do my second SC this weekend due to a buddy's daughter car is grinding like a popcorn machine. Thanks again "mini_wolf".
The Bentley manual has you removing the fuel intake among other things.
The Bentley manual has you removing the fuel intake among other things.
#25
06-19-2012, 07:38 AM


