How To Maintenance :: Thermostat Change
#51
 11-08-2011, 08:15 PM


1st Gear
Join Date: Jan 2008
Location: Colorado
Posts: 41
Likes: 0
Received 0 Likes
on
0 Posts

11 53 7 596 787 thermostat with gasket $49
82 14 0 031 133 antifreeze, one gallon $24
Thanks for the DIY instructions. I did remove the ECU as you said as I didn't want to twist the harness wires. If there is nothing wrong with the thermostat housing you can leave the larger coolant hose (front of housing) connected. There is enough flex in the hose to move the thermostat housing away from the engine mating surface to change the thermostat and clean & inspect the surfaces.
.
Last edited by Cooper_Climax; 11-11-2011 at 11:14 AM.
#52
11-21-2011, 05:48 PM

2nd Gear
Join Date: Sep 2006
Location: San Francisco, CA
Posts: 97
Likes: 0
Received 0 Likes
on
0 Posts
I'm curious to know how much time or expected labor this would normally take.
Including parts, I'm being quoted almost $400 for getting this kind of job done in the Bay Area. That seems a tad ridiculous to me. My guess from looking at the steps involved is about 1 to maybe 2 hours maximum. With parts estimated at about a maximum of $50 ... it's going to cost almost $350 in labor?
Wondering what folks think. Thanks for the thread and steps. Wish I had the time to do this myself.
#53
11-21-2011, 06:33 PM
1st Gear
Join Date: Jan 2008
Location: Colorado
Posts: 41
Likes: 0
Received 0 Likes
on
0 Posts
The author did a nice job with these Do It Yourself instructions . Most Mini Cooper owners have not done this task themselves so the first time is the slowest. It takes many hours because you must remove several items that are blocking access to the thermostat housing and even then the access is tight for the hose clamps. In addition you are handling the liquid coolant change or replenishment tasks.
Most Mini dealers charge $100 plus an hour labor so it adds up quickly.
Most Mini dealers charge $100 plus an hour labor so it adds up quickly.
#54
11-21-2011, 07:58 PM
2nd Gear
Join Date: Sep 2006
Location: San Francisco, CA
Posts: 97
Likes: 0
Received 0 Likes
on
0 Posts
#55
11-22-2011, 01:21 AM

I'm curious to know how much time or expected labor this would normally take.
Including parts, I'm being quoted almost $400 for getting this kind of job done in the Bay Area. That seems a tad ridiculous to me. My guess from looking at the steps involved is about 1 to maybe 2 hours maximum. With parts estimated at about a maximum of $50 ... it's going to cost almost $350 in labor?
Wondering what folks think. Thanks for the thread and steps. Wish I had the time to do this myself.
Including parts, I'm being quoted almost $400 for getting this kind of job done in the Bay Area. That seems a tad ridiculous to me. My guess from looking at the steps involved is about 1 to maybe 2 hours maximum. With parts estimated at about a maximum of $50 ... it's going to cost almost $350 in labor?
Wondering what folks think. Thanks for the thread and steps. Wish I had the time to do this myself.
 The round trip would take longer than the wrenching.
#56
12-01-2011, 08:16 AM

1st Gear
Join Date: Dec 2008
Location: Pearland, TX
Posts: 15
Likes: 0
Received 0 Likes
on
0 Posts
Thanks for the write up! I just changed the thermostat and gasket on my 2007 MINI Cooper S Convertible. It took about and hour and a half and I did not disconnect either hose from the housing. I was able to pull out the old, clean it up some and slide in the new thermostat. My leak is fixed! I added a little dye and brought out the Black light to track down the source.


#57
12-01-2011, 10:23 AM
1st Gear
Join Date: Jan 2008
Location: Colorado
Posts: 41
Likes: 0
Received 0 Likes
on
0 Posts
#58
12-01-2011, 10:41 AM
1st Gear
Join Date: Dec 2008
Location: Pearland, TX
Posts: 15
Likes: 0
Received 0 Likes
on
0 Posts
My 2007 MINI Cooper S is a Convertible. So it's the same engine as the earlier ones. Convertibles didn't get updated at the same time.
#59
12-24-2011, 08:10 AM

3rd Gear

#60
12-24-2011, 08:18 AM
3rd Gear
I drained NO coolant. Do NOT touch the overflow tank. Make sure the cap is tight on. I took the thermostat off and the only coolant that dripped was whatever was in the housing. IF you mess with the overflow cap and open it, coolant will flush out because you will break vacuum.
Thanks
#61
12-26-2011, 08:10 AM
#62
12-26-2011, 11:33 AM
3rd Gear
#63
12-27-2011, 12:07 PM
3rd Gear
#64
12-30-2011, 05:32 AM
3rd Gear
#65
12-31-2011, 01:51 PM
3rd Gear
Dear BigF, fishbone, cristo, and Way motor works
Thank you for your help!! I did the replacement earlier today and have been driving about all afternoon. I pretty much followed the procedure leaving the ECU installed. I did not drain coolant, and did not even take the housing hoses off there was plenty of room to take out the old unit (white gasket) and replace it with the new unit from WMW. The tip on those clips was awesome. I went from hating them to loving them once I figured out how to operate.
took me about 2 hours all in all.
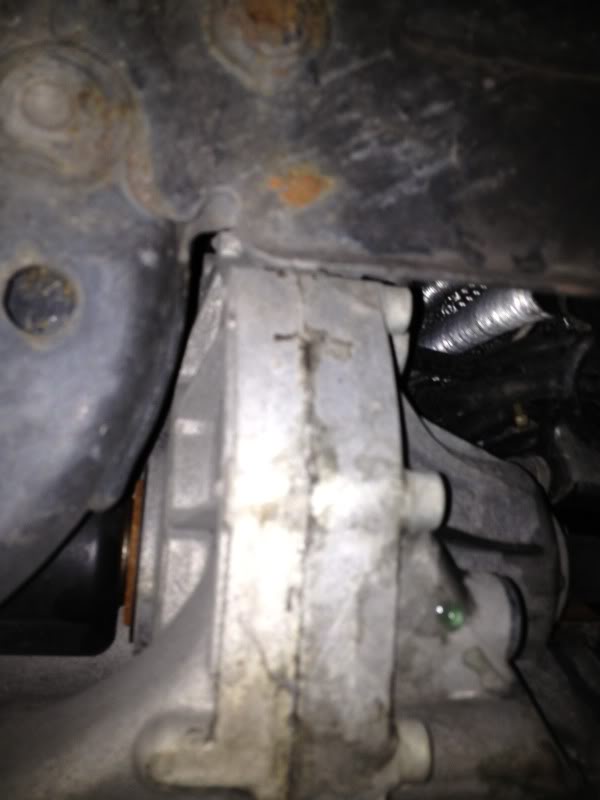
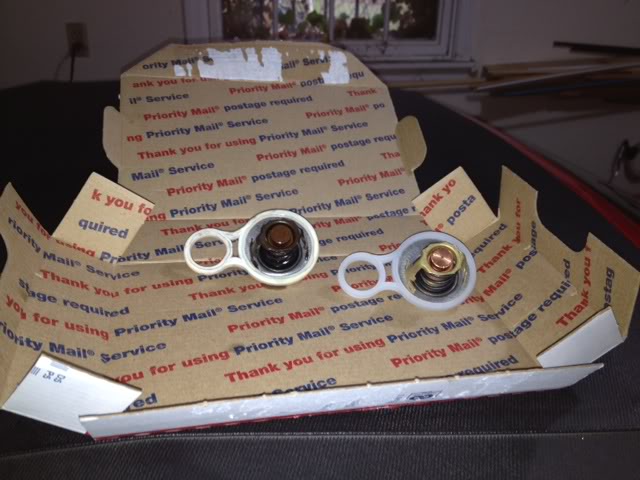
Here are my T-stats at the 1/2 way point
Thank you for your help!! I did the replacement earlier today and have been driving about all afternoon. I pretty much followed the procedure leaving the ECU installed. I did not drain coolant, and did not even take the housing hoses off there was plenty of room to take out the old unit (white gasket) and replace it with the new unit from WMW. The tip on those clips was awesome. I went from hating them to loving them once I figured out how to operate.
took me about 2 hours all in all.
Here are my T-stats at the 1/2 way point
Last edited by Sidewalksam; 12-31-2011 at 01:58 PM.
#66
01-01-2012, 09:12 PM

Join Date: May 2010
Location: Wappingers Falls NY
Posts: 102
Likes: 0
Received 0 Likes
on
0 Posts
#67
01-04-2012, 09:52 PM

The OP is very comprehensive so it's hard to add much, but it was a great help to me so I'd like to make a small contribution. I see several comments about the difficulties of reattaching the clips on the air intake tubes. I tried the cutting pliers route and various other types of pliers but wasn't having much luck until I noticed my Belden wire stripping/crimping tool (the type with the straight bladed wire cutter at the tip). With that it was a piece of cake. The other thing I learned applies to a lot of other jobs too. If, after disconnecting the battery, you close the boot lid, you won't be able to open it again. You will have to pop out the rear seat cushion and pull the manual release. Hope these points help someone.
#68
02-06-2012, 07:55 PM

#69
02-25-2012, 04:39 PM

1st Gear
Join Date: Jan 2012
Location: Philadelphia, PA
Posts: 20
Likes: 0
Received 0 Likes
on
0 Posts
It was blustery as anything outside, but the 06 MCSa had been throwing a temp light (which of course now has me looking into installing a temp gauge) and it's my wife's daily driver, so after a stop at Otto's Mini in Exton for a reasonably priced thermostat ($40), and at the local auto shop for the appropriate Valvoline Zerex coolant ($13), I set about doing my first surgery on the Mini.
The most frustrating bits were getting those friggin' clamps off the hoses. Not fun. I did the "don't break the vacuum" style swap, where the only coolant I lost was from opening the thermostat housing. I didn't bother removing the ECU from the airbox - I detached the harnesses, then took the ECU & box out together.
While I had everything out in the open, I took the opportunity to clean the throttle body out. With 100,000 miles on it, it needed it.
Definitely took me a few hours. I don't know if it's because of the mileage, but pulling engine bits apart on this car is really, really exhausting. The short stature of the car wasn't helping my posture any either.
I'm thinking I may have had the original thermostat in there - the gasket came apart as I was pulling it out. Adventures in used car ownership! Next episode: getting two big mushrooms out from under my hood :p
#70
02-29-2012, 02:14 AM
Thank you " thebigf " for doing the best write up I have seen on NAM !
The photos included in the repair job made it so much easier to follow instead of just reading what to do.
The other additions by other members to your write up we're also helpful and this is how we all learn to help each other repair our Mini's.
If you do any additional repairs please follow the same format with photos included with your post.
Again, Thank You for taking the time to give us all so much detail on this repair ! ! !
We all owe you !
#71
05-06-2012, 11:57 PM
That was an excellent write up. I don't think I could have done it without your guidance! My contribution is I found the perfect tool to snap back those really pesky clamps!
It was already part of a pliers set I bought from Costco a number of years ago. Never really used it until now. Thank god I had it b/c it made snapping back those intake hoses a breeze.

Thanks again OP!
It was already part of a pliers set I bought from Costco a number of years ago. Never really used it until now. Thank god I had it b/c it made snapping back those intake hoses a breeze.
Thanks again OP!
#72
06-21-2012, 08:11 AM

Neutral
Join Date: Jun 2012
Location: Kalamazoo, MI
Posts: 32
Likes: 0
Received 0 Likes
on
0 Posts
Standard Cooper (R50) T-stat change
I've read thru the complete thread and I'm sure i now can replace the T-stat on a S and or JCW but as requested 3 times what about the standard Cooper which doesn't have a battery in the boot, and doesn't have a turbo/super charger, etc. Both engine bays look very different.
Therefore has anybody done a standard cooper (R50) T-stat change and if so what procedure should I follow. thebigf did a great write up but I'm inclined not to do a complete drainage and parts removal except the thermostat&housing.
So what should I follow.
Therefore has anybody done a standard cooper (R50) T-stat change and if so what procedure should I follow. thebigf did a great write up but I'm inclined not to do a complete drainage and parts removal except the thermostat&housing.
So what should I follow.
#74
08-19-2012, 05:45 AM
2nd Gear
Join Date: Jan 2006
Location: Minneapolis, MN
Posts: 53
Likes: 0
Received 0 Likes
on
0 Posts
#75
08-20-2012, 01:21 PM
Neutral
Join Date: Jun 2012
Location: Kalamazoo, MI
Posts: 32
Likes: 0
Received 0 Likes
on
0 Posts
Regular MC Thermostat replacement
I did do my 06 MC R50 and don't know what the fuzz is al about. Only disconnected the coolant hoses to the T-stat, do not drain anything. Caught the little leakage from the head in a drain pan. Kept the open hose ends above the engine or as high as possible. Moved some of the air hoses to the side and all in all a very easy fix (she doesn't leak anymore). Used waterpump plyers for the easy clamps and a needle-nose 'vise-grip' for the harder to reach ones. The battery box removal/installation was probably the most time consuming.
Total time 1 hour 30 minutes. Ordered from way motor works. Excellent price, fit, and service.
Total time 1 hour 30 minutes. Ordered from way motor works. Excellent price, fit, and service.