How To Drivetrain :: Replacing harmonic vibration damper/crank pulley WITHOUT the OEM tools
#1
 12-11-2009, 09:45 AM


Drivetrain :: Replacing harmonic vibration damper/crank pulley WITHOUT the OEM tools
I recently needed to replace the vibration damper crank pulley on our ’06 MCS and rather than shell out for the ridiculously overpriced OEM tools that I would use (hopefully) only once, I was able to perform the swap with a generic harmonic vibration damper puller and some basic hardware from the local True Value Hardware. In searching the forums I found a few other posts with people asking if/how this could be done, so here’s my how-to.
I got the pulley puller from Sears for about 20 bucks. You can find similar tools at Harbor Freight or probably local auto parts stores.
First you need to loosen up the serpentine belt. Unfortunately, I think the OEM belt tensioner tool is your best bet here. I was able to borrow one. (Thanks Dustin.) I didn’t actually remove the belt; just pulled back the tensioner and locked it in place with a small screwdriver so the belt had slack.
Crack the lugbolts on the front passenger wheel, jack up the car, remove the wheel and remove the wheel well liner.
Next the center bolt on the pulley needs to come out. However, if you turn the bolt, the crank itself turns and thus the transmission and wheels do also. This is where OEM tool #1 is supposed to be used to hold the pulley in place. I was able to back the bolt out fairly easily with a pneumatic impact wrench. If you don’t have an impact wrench, you can have a helper press firmly on the brake with the transmission in a high gear, which should hold everything in place. (I suppose if you have an automatic it is a moot issue.)
The pulley now needs to be pulled off the crankshaft. Here is where my ghetto pulley tool solution came into play. The OEM tools include a “thread protector” that screws into the end of the crank, then the pulley remover bolts onto the crank pulley and pushes against the thread protector while the long center rod on the tool is turned. Thus the pulley is pulled off the crankshaft.
The problem with my Sears tool is that the “pushing” end of the center bolt is too fat to fit through the center of the pulley. Also, none of the various bolt sizes that came with the tool fit the pulley bolt holes.

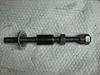
So I bought a long piece of metric M12 threaded rod at the True Value store (couldn’t believe they carried this but they do) and dremeled off about a 4-inch length (slightly longer than the crank bolt). I threaded this deep into the crankshaft but left some length sticking out for the pulley remover to push against. Like so:

I also bought some longer M6 bolts and washers to connect the pulley remover to the pulley, while leaving enough clearance for the pusher to do its job. Here’s the set-up:

(Those bolts are not threaded in crooked, they were bending as I put pressure on the tool.)

Now as I wrenched down on the center bolt on the tool, it effectively pulled the pulley off the crankshaft. It only needed to move about an inch and a half before the pulley fell off the end.


Ok, now to press on the new pulley. Again, the pricey OEM tool is designed for this job, but I simply cut off another length of my M12 threaded rod (about a foot), slid on a flat washer, then spun on two nuts and jammed them together to push against the pulley. Then I jammed on two more nuts at the end of the rod to be able to turn it with a wrench. I threaded the whole thing on to the pulley and into the crankshaft.

As I turned the nuts at the end of the rod, it slowly threaded deeper into the crank and pressed the pulley into place. After I got it most of the way pressed on, I removed the rod and threaded the bolt in to finish pressing it into place.
The bolt needs to be torque to 85 ft-lbs, but again the pulley wants to turn instead. I don’t trust my impact wrench to apply proper tightening torque, so I had to have the brake pressed to hold the pulley still while I tightened the bolt to torque. (I was working on my own, and the belt tensioner tool is actually the perfect length to jam between the depressed brake pedal and the steering wheel, essentially holding your brake down without a helper.)
Once the bolt is tight, replace the serpentine belt, release the tensioner, replace the wheel well liner, the front wheel, lower the car, torque the lugs, and you’re done.
I got the pulley puller from Sears for about 20 bucks. You can find similar tools at Harbor Freight or probably local auto parts stores.
First you need to loosen up the serpentine belt. Unfortunately, I think the OEM belt tensioner tool is your best bet here. I was able to borrow one. (Thanks Dustin.) I didn’t actually remove the belt; just pulled back the tensioner and locked it in place with a small screwdriver so the belt had slack.
Crack the lugbolts on the front passenger wheel, jack up the car, remove the wheel and remove the wheel well liner.
Next the center bolt on the pulley needs to come out. However, if you turn the bolt, the crank itself turns and thus the transmission and wheels do also. This is where OEM tool #1 is supposed to be used to hold the pulley in place. I was able to back the bolt out fairly easily with a pneumatic impact wrench. If you don’t have an impact wrench, you can have a helper press firmly on the brake with the transmission in a high gear, which should hold everything in place. (I suppose if you have an automatic it is a moot issue.)
The pulley now needs to be pulled off the crankshaft. Here is where my ghetto pulley tool solution came into play. The OEM tools include a “thread protector” that screws into the end of the crank, then the pulley remover bolts onto the crank pulley and pushes against the thread protector while the long center rod on the tool is turned. Thus the pulley is pulled off the crankshaft.
The problem with my Sears tool is that the “pushing” end of the center bolt is too fat to fit through the center of the pulley. Also, none of the various bolt sizes that came with the tool fit the pulley bolt holes.
So I bought a long piece of metric M12 threaded rod at the True Value store (couldn’t believe they carried this but they do) and dremeled off about a 4-inch length (slightly longer than the crank bolt). I threaded this deep into the crankshaft but left some length sticking out for the pulley remover to push against. Like so:
I also bought some longer M6 bolts and washers to connect the pulley remover to the pulley, while leaving enough clearance for the pusher to do its job. Here’s the set-up:
(Those bolts are not threaded in crooked, they were bending as I put pressure on the tool.)
Now as I wrenched down on the center bolt on the tool, it effectively pulled the pulley off the crankshaft. It only needed to move about an inch and a half before the pulley fell off the end.
Ok, now to press on the new pulley. Again, the pricey OEM tool is designed for this job, but I simply cut off another length of my M12 threaded rod (about a foot), slid on a flat washer, then spun on two nuts and jammed them together to push against the pulley. Then I jammed on two more nuts at the end of the rod to be able to turn it with a wrench. I threaded the whole thing on to the pulley and into the crankshaft.
As I turned the nuts at the end of the rod, it slowly threaded deeper into the crank and pressed the pulley into place. After I got it most of the way pressed on, I removed the rod and threaded the bolt in to finish pressing it into place.
The bolt needs to be torque to 85 ft-lbs, but again the pulley wants to turn instead. I don’t trust my impact wrench to apply proper tightening torque, so I had to have the brake pressed to hold the pulley still while I tightened the bolt to torque. (I was working on my own, and the belt tensioner tool is actually the perfect length to jam between the depressed brake pedal and the steering wheel, essentially holding your brake down without a helper.)
Once the bolt is tight, replace the serpentine belt, release the tensioner, replace the wheel well liner, the front wheel, lower the car, torque the lugs, and you’re done.
Last edited by Marquette MINI; 12-13-2009 at 08:17 PM.


#4
12-11-2009, 12:03 PM

1st Gear
Join Date: Jun 2007
Location: San Ramon, CA
Posts: 45
Likes: 0
Received 0 Likes
on
0 Posts
#5
12-11-2009, 12:28 PM
Interesting questions. That is another story altogether. Here's the short version: My hydraulic engine mount went bad (as they all do, apparently). I replaced it with the TSW mount, which added a considerable amount of NVH. So we thought the vibration damper may be bad, since they sometimes do fail, and now that the mount had been replaced the failure became evident. (The car has 75K miles on it.) Well guess what, the vibration is still there! D'oh! So I suspect that the damper was fine and didn't need to be replaced, but it was the most likely cause. And now that it is on, I'm not going to bother switching back and will just keep the original as a spare. Next up is to try to swap out the lower motor mount, which can apparently fail if the car is run on a bad upper mount for a while (which mine was).
#6
12-13-2009, 08:31 AM

5th Gear
mine went just a few hundred miles ago. Started making noise like a bad clutch (cause that is actually going bad too), then it changed, then the pulley fell off one day. ow i have the ATI super Damper Crank pulley. but pricey, but it works well, its lighter than stock, and its not a reduction pulley (plus, as the name suggests, it actually dampens)
#7
12-14-2009, 06:36 PM
Good write up, I've had to do the similar thing when I forgot the Factory tool. I'm glad it worked for you, but FYI for anyone trying this you need to be really careful and screw the 6mm screws in all the way cause they are pretty easy to break.
And whne you go to replace it use the new ATI Damper. We just put the ATI Damper on Soccerbummer's car. These have been working great. So if you end up needing a new one this is the way to go.
And whne you go to replace it use the new ATI Damper. We just put the ATI Damper on Soccerbummer's car. These have been working great. So if you end up needing a new one this is the way to go.

Trending Topics
#9
03-09-2010, 06:42 PM
ATI Super Damper installed and operational. Big thanks to Way for overnighting one to me!
Only tidbit of info - if you have an automatic transmission, you'll need to devise a way to brace the old and new pulleys so they don't turn when removing and torquing the crankshaft bolt, because the crankshaft will turn. I used a deep impact socket and 3" extension, standing on the bumper crush tube, bracing against an M6 bolt in the puller hole of the OEM pulley, and against one of the protruding star bolts on the ATI pulley. Worked great.
Only tidbit of info - if you have an automatic transmission, you'll need to devise a way to brace the old and new pulleys so they don't turn when removing and torquing the crankshaft bolt, because the crankshaft will turn. I used a deep impact socket and 3" extension, standing on the bumper crush tube, bracing against an M6 bolt in the puller hole of the OEM pulley, and against one of the protruding star bolts on the ATI pulley. Worked great.

#11
05-26-2011, 04:32 PM

Neutral
Join Date: May 2008
Location: Houston, Texas
Posts: 4
Likes: 0
Received 0 Likes
on
0 Posts
This is invaluable. Thank you so much for the thread. My little Zoe's HB had a catastrophic failure yesterday on my drive home from work. Fortunately, I was stopped at a light. Unfortunately, it took out my inner CV joints and shredded the belt. I need to finish the teardown and see if anything else was damaged, then the parts order begins!
Hmm, maybe I got lucky and it damaged my s/c pulley, then I can pop on a 15% while I'm in there!
~rem
2005 MCS R53 - Alta CAI, WWBBK, TDPR 1.2
Hmm, maybe I got lucky and it damaged my s/c pulley, then I can pop on a 15% while I'm in there!
~rem
2005 MCS R53 - Alta CAI, WWBBK, TDPR 1.2
#12
08-16-2011, 05:12 PM

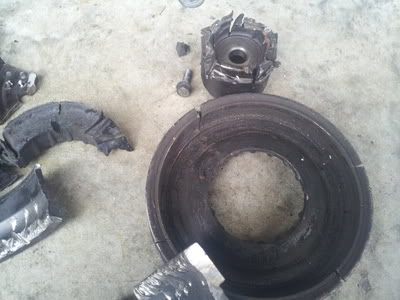
What I didn't realize is that the rubber that dampens is actually inside the assembly. Here's a nice little picture of mine. Once again, you couldn't see this while it was on the car.
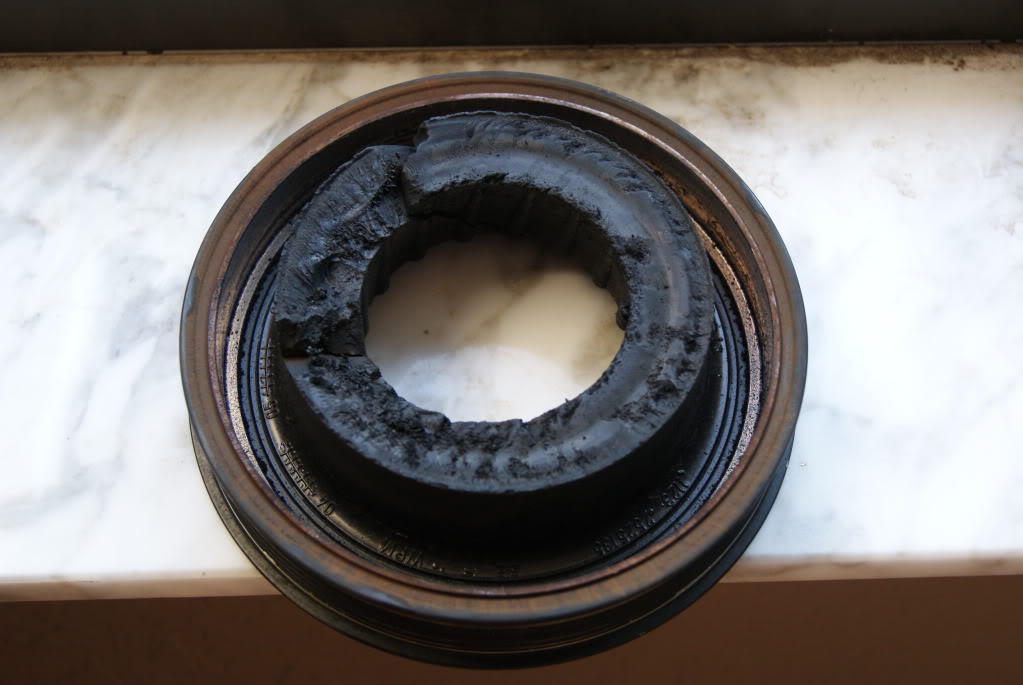
It's something of a ticking timebomb around 70,000 miles it seems.

#14
09-06-2011, 06:34 PM

I did mine also to prevent any issues down the road. My advance auto parts had a removal tool. I just bought the 10mm threaded rods with 2 washers each (lots of force on these). Thread the bolts way in to the old pulley.
For installation, I fabricated this tool which I think is probably better. Parts came from www.mdmetrics.com
The outer locked nuts are used to thread into drive shaft, then inner nut is used to push on short pipe section which pushes on the pulley (via the washer). I used a socket on the outer bolts and wedged up against the steering knuckle to prevent rotation, while using a box end wrench on the inner pushing nut) By the way, I would be happy to sell this wonderful item if one is interested...
For installation, I fabricated this tool which I think is probably better. Parts came from www.mdmetrics.com
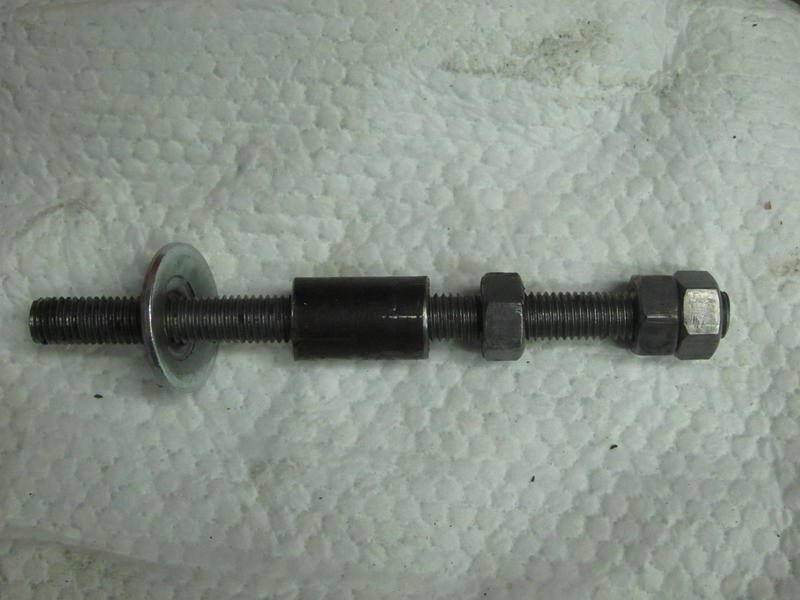
The outer locked nuts are used to thread into drive shaft, then inner nut is used to push on short pipe section which pushes on the pulley (via the washer). I used a socket on the outer bolts and wedged up against the steering knuckle to prevent rotation, while using a box end wrench on the inner pushing nut) By the way, I would be happy to sell this wonderful item if one is interested...
#15
09-06-2011, 07:11 PM

Join Date: Dec 2010
Location: Central CT
Posts: 982
Likes: 0
Received 0 Likes
on
0 Posts
#16
09-07-2011, 06:03 PM
#17
04-12-2012, 06:35 AM

I wish I saw this thread earlier. I tried to pull my damper and I also used the generic puller shoen in the pictures, but I didnt use the 12mm rod, so I ended up breaking those little M6 bolts and stripping the threads. Has anyone had anything similar happened ? Any ideas how can i pull the damper now without having access to the threads in the middle of the damper?
#18
04-12-2012, 06:49 AM
I wish I saw this thread earlier. I tried to pull my damper and I also used the generic puller shoen in the pictures, but I didnt use the 12mm rod, so I ended up breaking those little M6 bolts and stripping the threads. Has anyone had anything similar happened ? Any ideas how can i pull the damper now without having access to the threads in the middle of the damper?
#19
04-15-2012, 05:35 AM
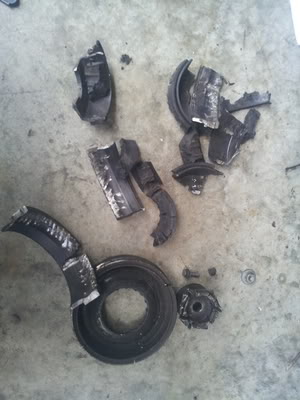
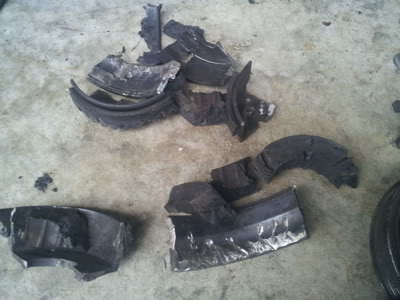
At this point I'm just takin it out in pieces. I tried heating it up and it still won't slide out, there isn't enought clearance for a claw puller, so I took my grinder and cut away piece by piece. I cut the whole outside out, but the middle, the hub that's on the shaft still won't come out. Is driving me crazy...
#20
04-23-2012, 05:24 PM

#21
04-25-2012, 07:30 AM
It may work like that, IDK. But you wanna make sure the screw is sitting tight so it wont skip threads and mess them up cause you will be putting a lot of pressure on them. With the rod, i guess it goes all the way to the rear and it seats nice and tight, is really got nowhere else to go. All I can say is, be carefull. I went thru hell with this. If i had to do it again i will buy the original puller tool. The method above works, but i would make sure i buy at least stainless steel bolts, not zinc, cause those M6 bolts are VERY thin. Be very carefull, if they start to give in, abort ! thats how i messed mine up, Here is a few pics of how mine came out...this is what you wanna avoid.

#25
05-22-2012, 06:07 AM
When I was at the Dragon I had Way replace mine with the ATI. I did so simply out of concern for the possibility of failure without warning, as has happened to several of my colleagues on cars with less miles than mine (116K). Having done so, I see no evidence on the old damper that failure was at all imminent. (You obviously can't inspect the backside of the damper until it is removed from the crankshaft.)