How To Drivetrain :: DIY fuel filter change MCS


#177
 11-10-2014, 06:15 AM

You will want to drill down in the messages and find where it details how to prime the fuel system after you have completed all of the steps for the new fuel filter install. ... However ...
... if my memory serves, you will want to turn the key from the 0 (zero) position (totally off) to the position just before you start the vehicle (this is probably the second position from the zero position). Don't try to start the vehicle yet... You will want to do this process three (3) times... Each position zero to position two turn will send fuel into the lines, which was upset when you disengaged everything (it allowed air to enter the system likely and depressurized the fuel line, etc.).
You have to go from the 0 (zero) position to the position just before start (position 2) three (3) times. Then the fuel line, etc. will have fully pressurized. You should be able to start the car after that (i.e., after doing the steps above three times, do it a fourth time, except go all the way to position 3 and start the vehicle)... Good luck!
Last edited by mjlwriter; 11-10-2014 at 06:22 AM.
#178
01-04-2015, 12:40 PM

1st Gear
Having just done this to my second gen I will add my .02$
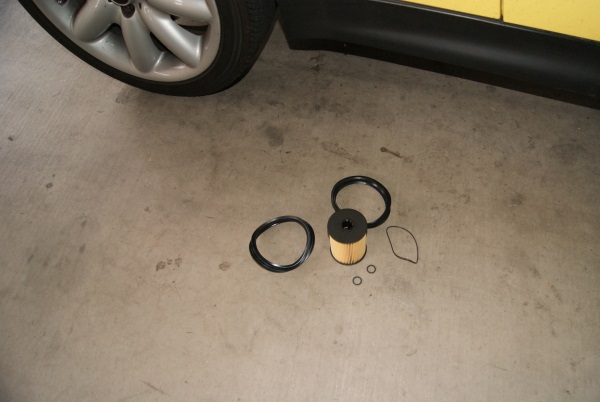
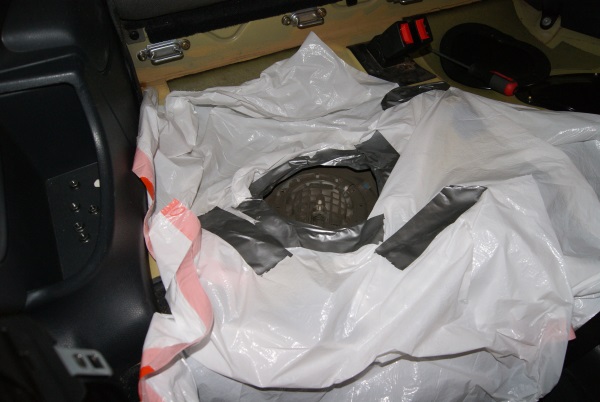
The top of my filter housing simply would not unscrew without the fear of messing up the fuel sending unit. I used the factory method pulling both sides and extracted the entire housing.
The following picture explains a lot for the short cut.

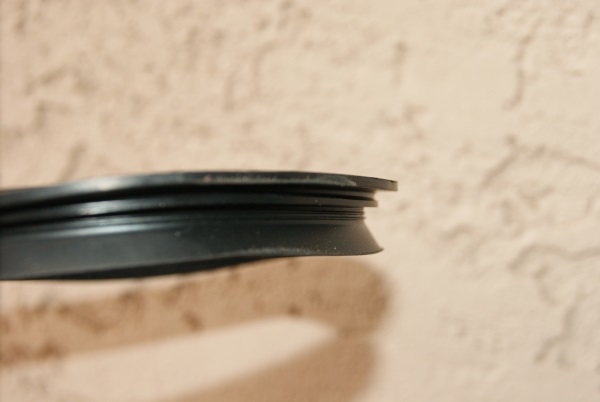
If you try the short cut do not pull the housing up any higher than this or you will start banging the sending unit lever on the tank and mess it up as stated earlier in the thread. Also as posted earlier be sure of the gasket placement, the smaller lip on the gasket goes down inside the tank(this side down on gasket) then the filter housing sits on the large upper gasket lip which is flush with the tank. You can stretch the new gasket over the housing and then work the smaller lip down into the tank and the large lip over the top of the tank so it is flush. If you don't get the upper lip flush you will have hell to pay getting the metal locking ring on.(Bently manual does not explain this at all)
After pulling the housing out of the tank I used several methods to try and get the lid off, it was really stuck. I ended up using oil filter vice grips and a large flat bladed screw driver in the housing just below the fuel hose.(See upper left side of picture, screwdriver goes below fuel hose inlet)
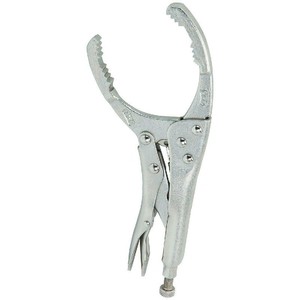
The oil filter vice grips worked perfectly to grasp the housing and the large flat blade screw driver fit in the large cavity just below the fuel hose inlet(do not use the hose inlet hole to pry!) to allow the 1/4 turn and off came the top. If I would of known this before hand the job would of been an hour or so job. Pop the metal ring, lift up hosing just enough to grab with the vice grips(not much grip pressure needed) then twist off the top. Replace the filter and o-rings, put the top back on, work the new seal over the housing and down into the tank so the upper lip is flush and put the retaining ring back on.
I would highly recommend having the vice grips handy, no telling if your housing lid is going to be easy or hard. Mine was really stuck and this did the trick and would of worked easily in the car. Once locked down the vice grips would also hold the housing out of the tank while you work on it. As for the filter my car had 100k on the clock and was a black mess. I swear my car seems to run just a bit smoother after the filter change and my high pressure fuel pump(2nd gen MCS) was replaced just before I bought the car a few months back so I wonder if the clogged filter had a detrimental effect on on the pump.
The top of my filter housing simply would not unscrew without the fear of messing up the fuel sending unit. I used the factory method pulling both sides and extracted the entire housing.
The following picture explains a lot for the short cut.
If you try the short cut do not pull the housing up any higher than this or you will start banging the sending unit lever on the tank and mess it up as stated earlier in the thread. Also as posted earlier be sure of the gasket placement, the smaller lip on the gasket goes down inside the tank(this side down on gasket) then the filter housing sits on the large upper gasket lip which is flush with the tank. You can stretch the new gasket over the housing and then work the smaller lip down into the tank and the large lip over the top of the tank so it is flush. If you don't get the upper lip flush you will have hell to pay getting the metal locking ring on.(Bently manual does not explain this at all)
After pulling the housing out of the tank I used several methods to try and get the lid off, it was really stuck. I ended up using oil filter vice grips and a large flat bladed screw driver in the housing just below the fuel hose.(See upper left side of picture, screwdriver goes below fuel hose inlet)
The oil filter vice grips worked perfectly to grasp the housing and the large flat blade screw driver fit in the large cavity just below the fuel hose inlet(do not use the hose inlet hole to pry!) to allow the 1/4 turn and off came the top. If I would of known this before hand the job would of been an hour or so job. Pop the metal ring, lift up hosing just enough to grab with the vice grips(not much grip pressure needed) then twist off the top. Replace the filter and o-rings, put the top back on, work the new seal over the housing and down into the tank so the upper lip is flush and put the retaining ring back on.
I would highly recommend having the vice grips handy, no telling if your housing lid is going to be easy or hard. Mine was really stuck and this did the trick and would of worked easily in the car. Once locked down the vice grips would also hold the housing out of the tank while you work on it. As for the filter my car had 100k on the clock and was a black mess. I swear my car seems to run just a bit smoother after the filter change and my high pressure fuel pump(2nd gen MCS) was replaced just before I bought the car a few months back so I wonder if the clogged filter had a detrimental effect on on the pump.
Last edited by blackcreek; 01-04-2015 at 12:50 PM.
#179
02-28-2015, 08:59 PM

Finally got around to doing this on my R53.
Fairly straighforward job and easy. Can get frustrating at times like separating the canister into the top and bottom pieces. But... The next issue I had was securing and locking the metal ring. Once I figured out how to seat the top seal, it was all down hill from there...
Primed the fuel system about ten times before turning him over... probably overkill as I am sure 5-6 would be sufficient. I believe he starts up more quickly now and the drive is a bit smoother.
Fairly straighforward job and easy. Can get frustrating at times like separating the canister into the top and bottom pieces. But... The next issue I had was securing and locking the metal ring. Once I figured out how to seat the top seal, it was all down hill from there...


Primed the fuel system about ten times before turning him over... probably overkill as I am sure 5-6 would be sufficient. I believe he starts up more quickly now and the drive is a bit smoother.
#180
03-29-2015, 03:43 PM
Great DIY - Just got done changing out the fuel filter on my '06 R53JCWs and it went swimmingly. The car has 94,000 miles on it. On a side-note. I was surprised to find that the filter change isn't in my Bentley manual.
The car sat overnight so the line pressure was gone. Only a few drops when unplugging the fuel line.
Prior to start, I cycled the ignition 10-12 times - position "0" to "2". With the seat pulled, you could hear the filter ***'y refilling. Once that was done, I started the car and let it idle for about 5 minutes before touching the throttle. I had no lights, no misfires or stumbling or rough idle. In fact, it idled very smoothly better than before. I did a few cycles of the throttle gradually adding more RPMs - still no lights and smooth as could be.
I'd like to give a big shout out to everyone that documents and photos their DIYs and shares them. I'm a very visual person and seeing it done beforehand just makes it that much easier. I'm was an aircraft mechanic and C-130 flight engineer in my former life and I never thought twice about tearing apart a turbine engine or a complex propeller system and rebuilding them. My car - I'm not so fast to jump in. Thank You!
And for what it is worth, I got the filter kits from Outmotoring. The fuel tank gaskets are labeled "DIESEL ONLY" and it was identical in shape as the one I removed. The material felt the same too. I can't imagine for a second that it would matter whether it is gasoline or diesel - it is still petroleum-based. Where I might be concern is if it were used in a hot section and incompatible with being heat-soaked. That ain't the case though.
#181
03-29-2015, 04:53 PM
Great DIY - Just got done changing out the fuel filter on my '06 R53JCWs and it went swimmingly. The car has 94,000 miles on it. On a side-note. I was surprised to find that the filter change isn't in my Bentley manual.
The car sat overnight so the line pressure was gone. Only a few drops when unplugging the fuel line.
Prior to start, I cycled the ignition 10-12 times - position "0" to "2". With the seat pulled, you could hear the filter ***'y refilling. Once that was done, I started the car and let it idle for about 5 minutes before touching the throttle. I had no lights, no misfires or stumbling or rough idle. In fact, it idled very smoothly better than before. I did a few cycles of the throttle gradually adding more RPMs - still no lights and smooth as could be.
I'd like to give a big shout out to everyone that documents and photos their DIYs and shares them. I'm a very visual person and seeing it done beforehand just makes it that much easier. I'm was an aircraft mechanic and C-130 flight engineer in my former life and I never thought twice about tearing apart a turbine engine or a complex propeller system and rebuilding them. My car - I'm not so fast to jump in. Thank You!
And for what it is worth, I got the filter kits from Outmotoring. The fuel tank gaskets are labeled "DIESEL ONLY" and it was identical in shape as the one I removed. The material felt the same too. I can't imagine for a second that it would matter whether it is gasoline or diesel - it is still petroleum-based. Where I might be concern is if it were used in a hot section and incompatible with being heat-soaked. That ain't the case though.
The car sat overnight so the line pressure was gone. Only a few drops when unplugging the fuel line.
Prior to start, I cycled the ignition 10-12 times - position "0" to "2". With the seat pulled, you could hear the filter ***'y refilling. Once that was done, I started the car and let it idle for about 5 minutes before touching the throttle. I had no lights, no misfires or stumbling or rough idle. In fact, it idled very smoothly better than before. I did a few cycles of the throttle gradually adding more RPMs - still no lights and smooth as could be.
I'd like to give a big shout out to everyone that documents and photos their DIYs and shares them. I'm a very visual person and seeing it done beforehand just makes it that much easier. I'm was an aircraft mechanic and C-130 flight engineer in my former life and I never thought twice about tearing apart a turbine engine or a complex propeller system and rebuilding them. My car - I'm not so fast to jump in. Thank You!
And for what it is worth, I got the filter kits from Outmotoring. The fuel tank gaskets are labeled "DIESEL ONLY" and it was identical in shape as the one I removed. The material felt the same too. I can't imagine for a second that it would matter whether it is gasoline or diesel - it is still petroleum-based. Where I might be concern is if it were used in a hot section and incompatible with being heat-soaked. That ain't the case though.
Well done!I agree, the DIY threads (on any car forum) are priceless!
#183
05-19-2015, 10:45 AM

Platinum Sponsor
+1 makes its easier with less gas.
" The fuel tank gaskets are labeled "DIESEL ONLY" and it was identical in shape as the one I removed "
Yes they show "diesel only" on the gasket, its a shared gasket set on the Gas cars.
http://www.ecstuning.com/Search/SiteSearch/16146757196/
" The fuel tank gaskets are labeled "DIESEL ONLY" and it was identical in shape as the one I removed "
Yes they show "diesel only" on the gasket, its a shared gasket set on the Gas cars.
http://www.ecstuning.com/Search/SiteSearch/16146757196/
__________________

MINI Guru/ MINI Owner Since 2004 | NEW Lifetime Part Replacement | Local Pickup
Milltek | Genuine MINI | Forge Motorsport | NM Engineering | ECS Performance | M7 Speed
Customer Service Hours: 8am-8pm EST|Sales Team Hours: 8am-11pm | SAT 10am-7pm 800.924.5172
MINI Guru/ MINI Owner Since 2004 | NEW Lifetime Part Replacement | Local Pickup
Milltek | Genuine MINI | Forge Motorsport | NM Engineering | ECS Performance | M7 Speed
Customer Service Hours: 8am-8pm EST|Sales Team Hours: 8am-11pm | SAT 10am-7pm 800.924.5172
Last edited by ECSTuning; 07-16-2018 at 06:01 AM.
#184
10-25-2015, 11:57 AM

Eurothrasher, and all the other contributors: MANY THANKS.
Got it done in 70 min with no incidents, thanks to all the advice here.
$48 for the filter kit, $8 for a cheap HarborFreight filter-plier to get a good grip on the canister, and $1 for a one-time-use turkey-baster to vacuum the crap out.
DO have an assistant, and DO tape off the area thoroughly, and DO bring a small bucket and a bunch of rags!
PS: didn't have silicone lube, so I came back out of the house with a bottle of KY-liquid to apply to the O-rings.
My Lovely Assistant grabs the bottle from me and says, "here, I KNOW how to apply THAT!"
Last edited by basil49; 10-26-2015 at 07:21 AM.
The following users liked this post:
Eurothrasher (07-19-2018)
#185
07-15-2018, 08:02 AM
I realize this is an old thread but I'm hoping someone is still paying attention. I just replaced the fuel filter on my 2004 MC40 (S) and now I can't seem to pressurize the system. I've disassembled the filter/housing three different times thinking I made a mistake but everything appears correct. I pulled the fuel pump itself and that all looks correct also. When moving the key to position 2 I can hear the pump priming. I've primed and attempted starting numerous times to no avail. I pulled the intercooler to test the Schrader valve on the fuel rail and there's no pressure escaping. Car was running fine prior to the fuel filter replacement. HELP!!!
#188
07-19-2018, 08:47 AM

I realize this is an old thread but I'm hoping someone is still paying attention. I just replaced the fuel filter on my 2004 MC40 (S) and now I can't seem to pressurize the system. I've disassembled the filter/housing three different times thinking I made a mistake but everything appears correct. I pulled the fuel pump itself and that all looks correct also. When moving the key to position 2 I can hear the pump priming. I've primed and attempted starting numerous times to no avail. I pulled the intercooler to test the Schrader valve on the fuel rail and there's no pressure escaping. Car was running fine prior to the fuel filter replacement. HELP!!!

#189
07-19-2018, 09:04 AM
Platinum Sponsor
^^ all of those above. I would start one by one and check off the hit list.
__________________
MINI Guru/ MINI Owner Since 2004 | NEW Lifetime Part Replacement | Local Pickup
Milltek | Genuine MINI | Forge Motorsport | NM Engineering | ECS Performance | M7 Speed
Customer Service Hours: 8am-8pm EST|Sales Team Hours: 8am-11pm | SAT 10am-7pm 800.924.5172
MINI Guru/ MINI Owner Since 2004 | NEW Lifetime Part Replacement | Local Pickup
Milltek | Genuine MINI | Forge Motorsport | NM Engineering | ECS Performance | M7 Speed
Customer Service Hours: 8am-8pm EST|Sales Team Hours: 8am-11pm | SAT 10am-7pm 800.924.5172
#190
08-11-2018, 11:01 AM

Having done this, and it being one of the worst car experiences ever, I have one piece of advice:
Buy the MINI part. Don't buy aftermarket. I purchased Bosch thinking they're a reputable manufacturer (which they are); however, the gasket was not the same size as OEM. Thus, the car wouldn't start. I had to re-do everything and use the old gasket.
Hope this helps someone wanting to go through with this!

Thread
Thread Starter
Forum
Replies
Last Post
silence2-38554
R50/R53 :: Hatch Talk (2002-2006)
98
09-21-2016 02:52 PM
ECSTuning
Vendor Classifieds
0
08-19-2015 08:27 AM
bc219
R50/R53 :: Hatch Talk (2002-2006)
13
08-10-2015 11:22 AM