F55/F56 Replacing the MCS F56 mirror caps
#1
 07-09-2014, 07:15 PM


Replacing the MCS F56 mirror caps
Hi, has anyone done this?
I want to buy the mirror caps with the Union Jack online but I don't know if I will be able to replace them myself. I know the previous gen MINI was easy to do this, but anybody has got any experience doing this with the F56?
Also where would you recommend to shop for this online, so that they are the least expensive?
Thanks!
#2
07-09-2014, 08:15 PM
Hi, has anyone done this?
I want to buy the mirror caps with the Union Jack online but I don't know if I will be able to replace them myself. I know the previous gen MINI was easy to do this, but anybody has got any experience doing this with the F56?
Also where would you recommend to shop for this online, so that they are the least expensive?
Thanks!
#3
07-10-2014, 06:27 AM

4th Gear
Hi, has anyone done this?
I want to buy the mirror caps with the Union Jack online but I don't know if I will be able to replace them myself. I know the previous gen MINI was easy to do this, but anybody has got any experience doing this with the F56?
Also where would you recommend to shop for this online, so that they are the least expensive?
Thanks!
I want to buy the mirror caps with the Union Jack online but I don't know if I will be able to replace them myself. I know the previous gen MINI was easy to do this, but anybody has got any experience doing this with the F56?
Also where would you recommend to shop for this online, so that they are the least expensive?
Thanks!

#5
07-10-2014, 08:17 AM
4th Gear
Not sure I understand the question.
Yes the 2014 mirror caps are interchangeable, but (I believe) only with caps made for the 2014 F56 models, not with the ones made for the Gen 2 cars. At least they're advertised and sold as caps for the F56 cars although I have no experience trying them on a Gen 2 if that's the question you're asking.
Yes the 2014 mirror caps are interchangeable, but (I believe) only with caps made for the 2014 F56 models, not with the ones made for the Gen 2 cars. At least they're advertised and sold as caps for the F56 cars although I have no experience trying them on a Gen 2 if that's the question you're asking.
#7
07-12-2014, 08:39 AM

2nd Gear
Join Date: Jun 2014
Location: San Jose, CA, USA
Posts: 80
Likes: 0
Received 0 Likes
on
0 Posts
Trending Topics
#8
07-12-2014, 07:42 PM
4th Gear
don't know what model/year but is it really that easy?
mini wing mirror cover removal - youtube
mini wing mirror cover removal - youtube
#9
07-13-2014, 10:38 AM
2nd Gear
Join Date: Jun 2014
Location: San Jose, CA, USA
Posts: 80
Likes: 0
Received 0 Likes
on
0 Posts
#10
07-13-2014, 12:54 PM

Suffering from withdrawal (I sold my R56 six weeks ago, about another four weeks until the F56 is here), I went to Mini of Peabody today and gave a good look to the F56 and R56 cars. The mirror cap size on the F56 is definitely not the same size. It is much longer with more of a point at the end closest to the front.
#11
07-13-2014, 01:13 PM

No tools needed
I have a 2009 R57 convertible and replaced the driver's side mirror cap. Towne MINI actually showed me how to take off the old and pop on the new without a pry tool.
Place the heels of each hand on the top and bottom at middle of the mirror cap and apply pressure to the cap, top and bottom. This releases the clips and as you press down, pull the cap away from the mirror. It should pop right off.
To put the new cap back on, align the clips with pressure on the top and bottom and push the cap back towards the mirror. Everything should pop back in place.
If I can do it, as I am a mechanical idiot, any one can!
The following users liked this post:
speedyalice (02-11-2020)


#15
07-14-2014, 04:54 PM
the names Marco, so feel free to call me that. as far as tips, it's quite similar to the video, only i didn't have a plastic tool strong enough. i actually used a plastic flathead that came with glass-replacement kit for my cell phone. when i tried to push the corner up, the tool actually snapped. i had another one...i pulled that enough that i got my finger hooked onto the edge. from there i literally pulled up and away until it popped off. i thought the OEM cover would have cracked but it's pretty strong. this is a pretty easy install.
#16
07-15-2014, 06:14 PM

1st Gear
Join Date: Jul 2014
Location: Western NY
Posts: 48
Likes: 0
Received 0 Likes
on
0 Posts
The technique in the video has not worked for me. Date of the video shown on Youtube is June 14, 2012, and I don't believe the first F56 models were available (at least in the U.S.) until April 2014. I had ordered the JCW Pro caps recently, but wound up returning them because the red color (top half) did NOT match my Blazing Red (but WAS a perfect match to my wife's Chili Red Clubman. Too bad she didn't want new caps!).
I have invested a couple of hours on this already....I tried reverse-engineering by scrutinizing the JCS Pro caps and holding them up to my existing caps. So far, no luck cracking the code. I'm in communication with several different dealers (been told, by the way, that Mini has not released official directions yet for the F56 mirror caps, and the dealer where I bought mine hasn't installed any as of yet!), and will share any helpful info if I get any. Also just received a new set of trim removal tools, and will give it another go over the next few days. Until I figure this out, I'm going to hold off on buying a different set of replacement caps.
I have invested a couple of hours on this already....I tried reverse-engineering by scrutinizing the JCS Pro caps and holding them up to my existing caps. So far, no luck cracking the code. I'm in communication with several different dealers (been told, by the way, that Mini has not released official directions yet for the F56 mirror caps, and the dealer where I bought mine hasn't installed any as of yet!), and will share any helpful info if I get any. Also just received a new set of trim removal tools, and will give it another go over the next few days. Until I figure this out, I'm going to hold off on buying a different set of replacement caps.
#17
07-15-2014, 09:09 PM
the names Marco, so feel free to call me that. as far as tips, it's quite similar to the video, only i didn't have a plastic tool strong enough. i actually used a plastic flathead that came with glass-replacement kit for my cell phone. when i tried to push the corner up, the tool actually snapped. i had another one...i pulled that enough that i got my finger hooked onto the edge. from there i literally pulled up and away until it popped off. i thought the OEM cover would have cracked but it's pretty strong. this is a pretty easy install.

#18
07-15-2014, 10:27 PM
Marco, are there three or four clips with the mirror caps? Just curious. I might try to remove mine (for the heck of it) this weekend to see how easy (or not) it is. As I'm eventually planning on replacing them with gray / black checkered ones anyway, I might not care if damaged during my fiddling with it.
There were no physical clips. The edge of the cap has about 8 total but I only pulled on one of them.
The first one took me 2 minutes because I was nervous... The second one popped off in 10 seconds once I knew what I was doing.
Let me also add that when I tried to loosen more than just the one clip I noticed the cap tightening around the mirror frame, thus why I only pulled on the one tab.
Last edited by MarcoPolo; 07-15-2014 at 10:36 PM.
#19
07-16-2014, 04:06 AM
1st Gear
Join Date: Jul 2014
Location: Western NY
Posts: 48
Likes: 0
Received 0 Likes
on
0 Posts
Marco, are there three or four clips with the mirror caps? Just curious. I might try to remove mine (for the heck of it) this weekend to see how easy (or not) it is. As I'm eventually planning on replacing them with gray / black checkered ones anyway, I might not care if damaged during my fiddling with it.
#20
07-16-2014, 07:53 AM

Former Vendor
Join Date: Dec 2010
Location: Plano, TX
Posts: 213
Likes: 0
Received 0 Likes
on
0 Posts
F56 Mirror Cap Removal
This method works on all F56, R55, R56, R57, R58, R59, R60 and R61:
Enjoy!
#21
07-16-2014, 08:05 AM
This method works on all F56, R55, R56, R57, R58, R59, R60 and R61:
http://youtu.be/WImzh5HY0Og
Enjoy!
http://youtu.be/WImzh5HY0Og
Enjoy!

Thanks for this, now I'm going to have to go to the parking lot at work here and try that.
#22
07-16-2014, 08:17 AM
Former Vendor
Join Date: Dec 2010
Location: Plano, TX
Posts: 213
Likes: 0
Received 0 Likes
on
0 Posts
#23
07-16-2014, 11:09 AM
1st Gear
Join Date: Jul 2014
Location: Western NY
Posts: 48
Likes: 0
Received 0 Likes
on
0 Posts
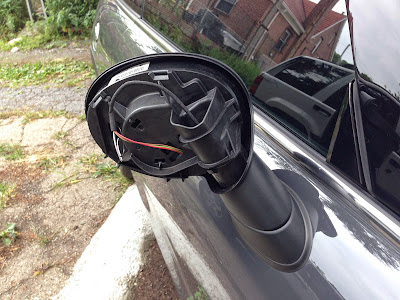
Thanks to Brandon at Sewell Parts for the E-mails (and the video posted earlier in this thread). I finally had success, but not by using the method of pulling the cap like in the video. I used some plastic trim removal tools (purchased cheap off of eBay), and started at the top edge closest to the door. It took a bit of finesse and patience, but by gently/firmly getting the tool edge under the mirror cap and wedging up (away from mirror base), I got that first tab to release. It did not just come completely off like in the 'Wing Mirror video".
Next, I placed one of the bent tip tools under that point to keep the tab from reconnecting, got a 2nd tool and gently worked it in beneath the cap and mirror base, sliding it outward (away from the door) until it was lined up with where the next tab is. You can see the oval hole behind the mirror (mentioned in my earlier post) to gauge where that is. Then, I again gently/firmly wedged up and away from the base until that tab released.
The bottom edge of the cap was still connected, and it didn't seem to want to release by flexing the cap. So, I repeated the above process, starting with the lower bottom edge closest to the door and working outward. After the inner bottom tab released, the mirror popped off. I had a towel on the ground to catch it, which I would recommend others do with this method.
So, now I feel OK with getting a new replacement set to install myself. I can put together a video and post it, if anyone's interested, when I install the new caps.
Thanks again to Sewell Parts...I appreciate it!
#24
07-16-2014, 05:48 PM
I tried, I failed...
 . I tried the method posted in the video and I got only one slight click from the passenger's side mirror, nothing from the driver's side mirror.
 How much strength was the man in the video actually using to wrangle the caps off the mirrors?
Last edited by sal1k; 07-16-2014 at 05:56 PM.
#25
07-16-2014, 08:32 PM
1st Gear
Join Date: Jul 2014
Location: Western NY
Posts: 48
Likes: 0
Received 0 Likes
on
0 Posts
Unfortunately I may not have the magic fingers / grip / hands / car that allows me to have a sense of accomplishment . I tried the method posted in the video and I got only one slight click from the passenger's side mirror, nothing from the driver's side mirror.
How much strength was the man in the video actually using to wrangle the caps off the mirrors?
. I tried the method posted in the video and I got only one slight click from the passenger's side mirror, nothing from the driver's side mirror. How much strength was the man in the video actually using to wrangle the caps off the mirrors?
A modification I think I might make to my process is using a long scribe tool to release the tabs from the oval openings behind the mirror. I have a hardcopy writeup for the R50/R52/R53 mirror cover removal (found online), and that is what is recommended. Now that I've had a chance to investigate the inside of the mirror caps, I see just how fragile the retention tabs are, and popping the tabs with a scribe tool seems less likely to break the tabs than even carefully using the trim removal tools.
My new set of caps (checkered) is on it's way...should be here by the middle of next week. I'll post my results (and possibly a video) after getting them installed.
Last edited by Dannno; 07-16-2014 at 08:33 PM. Reason: correct R52