When you click on links to various merchants on this site and make a purchase, this can result in this site earning a commission. Affiliate programs and affiliations include, but are not limited to, the eBay Partner Network.
The car went off for tuning and it didn't go to plan :( the trial prototype copper head gasket gave up meaning we could not finish the tune, we got 1 power run and made just over 200whp at 4000rpm but this is not really indicative of what the finial power will be - this I am still unsure of but with the new gasket in and now the smaller blower pulley on it should be interesting...
You can see cylinder 4 was just leaking out around the cylinder, also 1 and 3 were leaking too but I have gone back to the trusted multi layer gasket
The car went back to the body shop in October and has just made its way home. Really pleased with the results
Guide coats N' all that
Shiny shiny
Collection day
How else to tow your mini home? well use the other mini and wow it does tow well, then again its not a small car
Continued to be completely Wowed! Love this project... thanks for the update. Shiny-shiny indeed! Keep going. Hopefully the gasket issue will be resolved with the multi layered piece. Keep posting, please!
Continued to be completely Wowed! Love this project... thanks for the update. Shiny-shiny indeed! Keep going. Hopefully the gasket issue will be resolved with the multi layered piece. Keep posting, please!
Just read through all ten pages of this. This is glorious. I can't even fathom the amount of hard work and love that you put into this car. Bravo! Definitely looking forward to updates.
PS LOVE the F54! It's my first MINI but certainly won't be my last.
Not been in the mood to do much on the car but I had some free time and decided to follow the craze of changing LEDs to a different colour. I can't cope with white or blue etc so I just decided to go with the red. Have to say they look great and not sure why I didn't do them last time they were apart.
Photos were difficult to take but it basically looks like the stock brightness but its red not orange
A few of you may know after getting the car built up I decided to take it apart and fix all the little issues which did not work out as well as I would have liked...
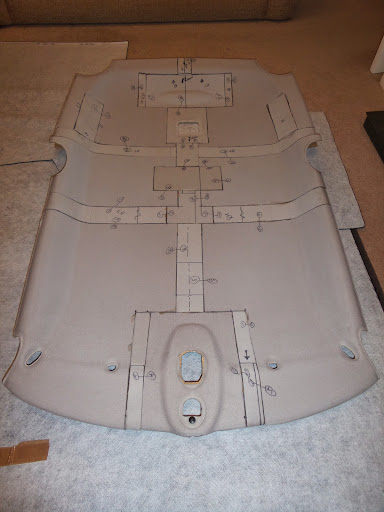
roof lining; When I made the first lining I made it out of a couple of roof linings. The problem with this was over the last couple of years the joins were showing though the lining and you could feel them. (The lining was trimmed after it was joined)
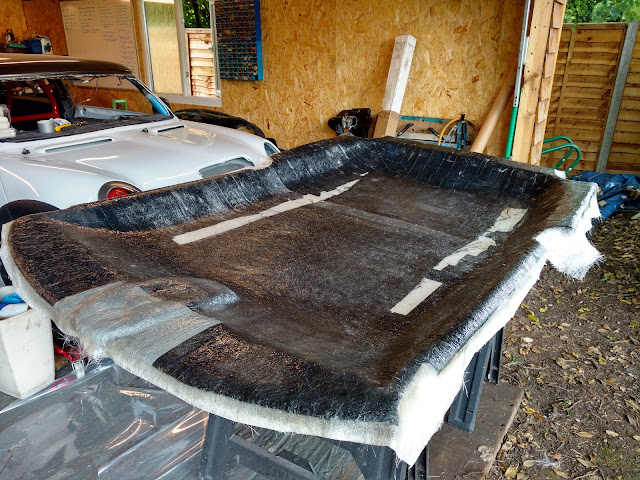
OK so this is a bit mad. I took the lining out, covered it in duct tape and release wax. The middle I did in carbon to give it a little more strength and the rest was done in a layer of 650 fibre glass
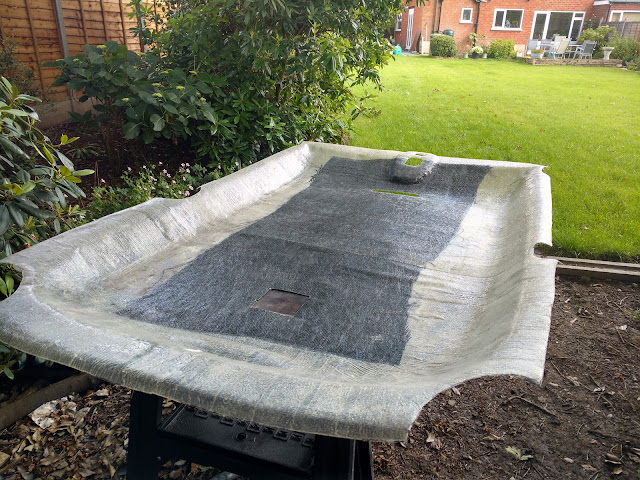
The broke it out the old lining which was much easier than I expected it to be, I then trimmed the grp to the correct size and cut all the holes in. Before trimming the lining I gave it a sand to remove all the rippes
Lastly with the lining all trimmed I fitted in back in the car and fitted it up. Got to say its perfect now and also a lot lighter than the original
I then went and did the pillar trims too so with that all done I am happy with the turn out and now on to fixing all the little snags on the list. I'd rather it be right
Interestingly I have fixed the idle issue with the engine, problem was the bypass valve spring was too week causing the boost to open the valve, blocked it off and it worked then I cobbled together an R53 bypass and that ran just lovely, revved and dropped just as it should and it sounded great.
So what to do now... Well... "strip it down"
Yep that is right I have decided to take it apart, clean it all and now change all the prototype parts with brand new machined parts rather than cut and shut fabrications. I will also paint and re-fresh everything with special consideration to the interior and under bonnet to start. Really loving doing this at the moment and I do not care when or if it will be done as it is relaxing
This is the CAD for the supercharger inlet which is currently being CNC machined from a big lump of aluminium
Then while I was doing a few things I have decided to carry the colour scheme over to the engine, decided to paint the rocker cover the same as the body, really pleased with the finish direct from the gun with no polishing and that is it dry not wet!
Next to paint will be the battery box, fuse box and then to make an alumnium coolant tank. Decided to also remove the crash intercooler as its too large and I have a barrel cooler and new all alloy radiator which will need fitting. Quite exciting
Then on the interior I decided that as I had butchered the carpet I would replace it and my gosh it fits so well it is lovely, I then went on the remove all the dash clean it and re-install.
I then installed the gauges with a little demo product from ORRANJE for the heater vents which make them look right and I really like them.
Finally you will see there is a nexus in progress which is more of a pain than I want to admit but I am getting there with it.
I'm on NAM every day . . and the main thread I always look for updates on is yours!!
Definitely more than one person in awe of this thread. Roof Chop Mini has to go on tour across Minidom when it gets done! One of the best builds I've seen. Everything is being done to such a high standard. It's totally worth staying tuned to this project!
Cheers guys, its been a big never ending project but I now need to finish it so there will be more updates to keep you entertained and maybe even some finished shots... only time will tell
After seeing your pic of the painted valve cover, you got me curious enough to go pop the mini tag off mine to see if it was the same underneath, I think the 1.6L 16 valve underneath looks way better than the mini sticker!
As the interior is coming back together very nicely I have been buying goodies, the first to be fitted is the OMP targa red edition wheel and I love it. Only disappointment was the horn button has yellow text on so I am making a new decal in red - I don't understand why they didn't go the extra inch and give the red horn button :(
Next I just need to keep tidying up the wires which can be seen in the photo which are all for the gauges and then on to fitting more goodies
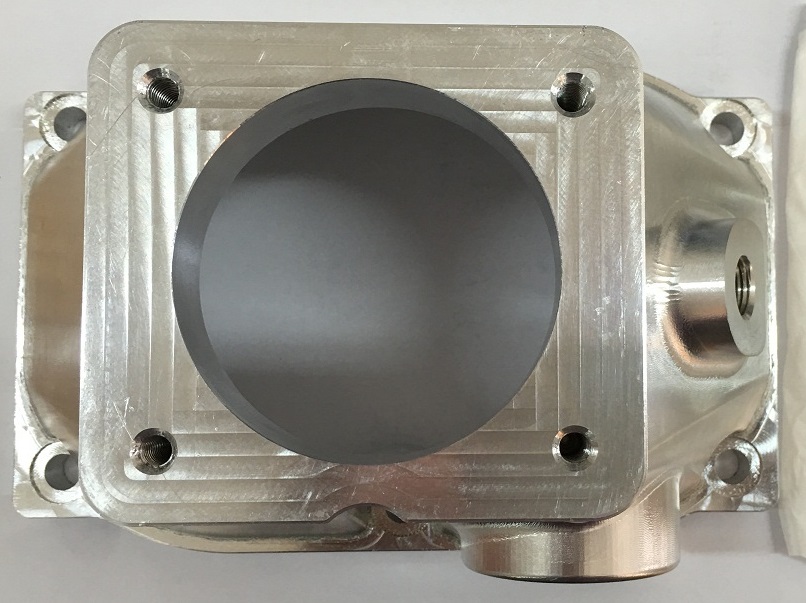
At the start of this month I drew up the inlet for the blower, at the moment I have a casting which I have cut and carved to make fit the car for trials, so this was the CAD for those who did not see it;
(Inlet)
20 odd days past and I now have the machined component, got to say I am really pleased with the quality of this block and hope that all the other parts I have drawn up soon start arriving, I have the outlet of the blower too being made
(Outlet)
Once all the parts arrive I plan to get the them fitted and get the engine ready for another tune - hoping that all the niggles have gone! Also really thinking about drawing a new inlet manifold as I would love that to be all custom
I just read all 10 pages of this and I can say that I'm thoroughly impressed. The craftsmanship and "professionalism" of this build is just beyond belief. I absolutely can't wait to see the finished product
i just read all 10 pages of this and i can say that i'm thoroughly impressed. The craftsmanship and "professionalism" of this build is just beyond belief. I absolutely can't wait to see the finished product
All the machined components are now ready for install and hopefully an easy install
Was painting some of my F54 parts and had some paint left over so decided to paint my 530 throttle, then installed it on the new manifold and it all looks like a nice job
Decided to go back to the butterfly valve for the bypass and made this adaptor to accept the R53 valve. Should work a little better than the piston type re-circulation valve I had before which was starving the engine on idle
Next I have decided to remove the cooper water pump with the mindset that I am going electric, I have seen some tat about and also read a lot of stories about pumps so I went with this piersburg BMW A48 water pump which is a PWM controlled pump which I plan to drive from the Vipec. Its nice and compact and I think it is going to be an alternative very good solution. I have already ran the pump and it appears to be good. Decided to start with a used unit first which only cost �40 delivered, I then sand blasted it to clean it up. We will see how it goes but it looks like its go potential.
It could be driven by putting 12v on the pwm line but that will not give full speed but the default fail recovers which is 80% speed. I want to have the full control over the pump so will wire it up correctly
I have been very busy working on the beetle and not had too much time to myself but I have been finding a little time here and there to get on with this project, truth be told I have had enough now and want to drive it and enjoy it after all these years.
After all the issues I had with the last build on the engine which was trial and error as I had the correct CNC parts turn up rather than the fabricated trial parts I set about welding it all together and working out the new routing which I am quite pleased about
Then with all this built I sent it off to the powder coating shop which came back very nice
Then with some excitement I installed it all loose, I still need to sort the water pump which is held on with cable ties...
Probably do some more this weekend though I know people will want me to do other things and I may not get any time on this car
I then spent some time on the CAD and drew up the adapter for the DRL lights in the headlight, will probably do the indicators in there too as the LEDs are full RGB
That is all for now, anyone who is wanting to know I will be selling a kit for the LED conversion next year, this is all fully controlable via bluetooth or a dedicated remote. I also have a micro controller to switch from DRL to indicators - lets see how much time I have to make a kit but it will probably be sold through Orranje
 04-06-2016, 12:13 PM