Electrical Spec-D Headlights with Projectors & Halos... some pics and info
#26
 08-13-2012, 08:48 AM


I'm definitely subscribing to this. I have the Spec D projectors for my R56s and my high beams won't stay on, and they're a pain in the *** to aim correctly. Let me know if you have either of these problems. I've yet to find an elegant way to aim them without removing the entire light. Let me know if I'm just a moron  .
.
.Hey do you think you could do me a huge favor and post a pic of your heads on at night like of the beam pattern I'm thinking about getting thee sw likes but want to know how they look. or if anyone else who has these could post some pics I would apreciate it.
#27
08-24-2012, 12:15 PM

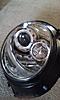
Spec-D Tuning Projector Replaced with Morimoto Items
I bought the Spec-D projectors for R55/56 because I liked the clear turn signal lenses (amber/chrome) and the angel eyes (I removed the wiring for the LEDS). The cutoff of the Spec-D lights for alignment were observed but were diffused by stray light and hotspots. The light pattern was also striated at the periphery. However, while highway driving, the lights illuminated much better than the OEM reflector halogens, and the cutoff lines looked reasonable, but closer inspection revealed the outlines of stray light and were distracting to me personally. Morimoto parts replaced all of the 'generic' electronics shipped with the Spec-D order.
I used sheet metal to fabricate (jigsaw and Dremel) a new projector bracket to fit Bi-xenon: Morimoto Mini H1 5.0 Projectors (The word 'Mini' does not indicate application for a "MINI Cooper"). I needed to use 3/4" metal spacers (Home Depot) between the projector and bracket since the Morimoto Mini H1's are that much shorter than the H11 Projectors supplied with Spec-D lights. I will post pictures of the back side of bracket, cutoff lines (I have a before version of cutoff) and road illumination to give an idea. I did not touch my camera phone during the assembly process, since my fingers were covered with either butyl rubber sealant, mineral spirits or metal shavings.
Overall, I am pleased with the cutoff line and the illumination of the new rebuild.
#28
08-24-2012, 12:23 PM

I bought the Spec-D projectors for R55/56 because I liked the clear turn signal lenses (amber/chrome) and the angel eyes (I removed the wiring for the LEDS). The cutoff of the Spec-D lights for alignment were observed but were diffused by stray light and hotspots. The light pattern was also striated at the periphery. However, while highway driving, the lights illuminated much better than the OEM reflector halogens, and the cutoff lines looked reasonable, but closer inspection revealed the outlines of stray light and were distracting to me personally. Morimoto parts replaced all of the 'generic' electronics shipped with the Spec-D order.
I used sheet metal to fabricate (jigsaw and Dremel) a new projector bracket to fit Bi-xenon: Morimoto Mini H1 5.0 Projectors (The word 'Mini' does not indicate application for a "MINI Cooper"). I needed to use 3/4" metal spacers (Home Depot) between the projector and bracket since the Morimoto Mini H1's are that much shorter than the H11 Projectors supplied with Spec-D lights. I will post pictures of the back side of bracket, cutoff lines (I have a before version of cutoff) and road illumination to give an idea. I did not touch my camera phone during the assembly process, since my fingers were covered with either butyl rubber sealant, mineral spirits or metal shavings.
Overall, I am pleased with the cutoff line and the illumination of the new rebuild.
I used sheet metal to fabricate (jigsaw and Dremel) a new projector bracket to fit Bi-xenon: Morimoto Mini H1 5.0 Projectors (The word 'Mini' does not indicate application for a "MINI Cooper"). I needed to use 3/4" metal spacers (Home Depot) between the projector and bracket since the Morimoto Mini H1's are that much shorter than the H11 Projectors supplied with Spec-D lights. I will post pictures of the back side of bracket, cutoff lines (I have a before version of cutoff) and road illumination to give an idea. I did not touch my camera phone during the assembly process, since my fingers were covered with either butyl rubber sealant, mineral spirits or metal shavings.
Overall, I am pleased with the cutoff line and the illumination of the new rebuild.
#29
08-24-2012, 08:30 PM

#30
08-25-2012, 07:22 PM
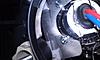
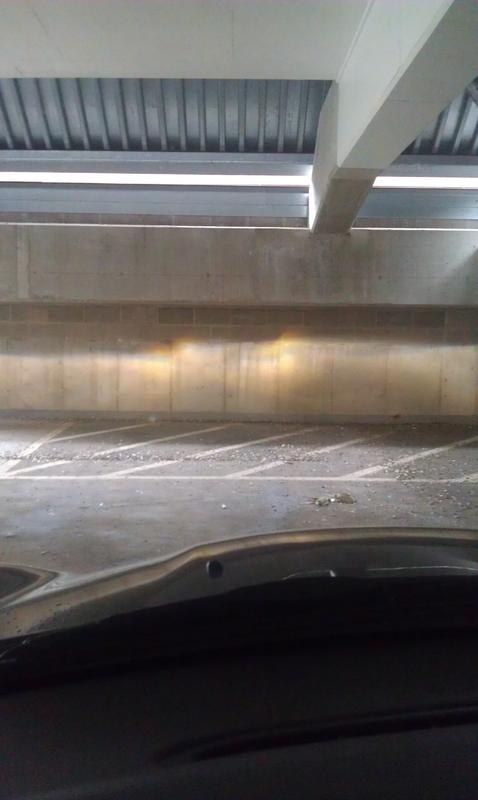
From this pic you can kind of see the scattered light and refracted coloration. Also, with the lights aimed as best I can aim them, there's a slight gap right in the middle of road where the cutoff is on the right light and the lights are angled from bottom left to top right (if that makes any sense).
The following users liked this post:
myleshailey (11-19-2019)
#31
08-26-2012, 06:30 AM
Spec-D Bracket Modification
As mentioned in an earlier post, I fabricated an new bracket for the Spec-D MINI 2007+ headlight frame and replaced ALL of the Spec-D components (except for the HU330 resistor) with those from Morimoto (The Retrofit Source).
Also, I did not have my camera phone with me during the assembly process as it generated a lot of metal shavings; consequently, there are no step-by-step instructions. Hopefully, there is enough information to provide an idea of what went on. Total assembly time (16 hrs: 4 hr each of 4 days)
Spec-D Projector Bracket (Angle 1)
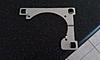
Spec-D Projector Bracket (Angle 2)
Cardboard Template Derived from Spec-D Light, But Made to Fit Bulb Housing of Morimoto H1 Projector
Also, I did not have my camera phone with me during the assembly process as it generated a lot of metal shavings; consequently, there are no step-by-step instructions. Hopefully, there is enough information to provide an idea of what went on. Total assembly time (16 hrs: 4 hr each of 4 days)
Spec-D Projector Bracket (Angle 1)

Spec-D Projector Bracket (Angle 2)

Cardboard Template Derived from Spec-D Light, But Made to Fit Bulb Housing of Morimoto H1 Projector

#32
08-26-2012, 06:43 AM
Spec-D Bracket Modification
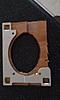
More Pictures
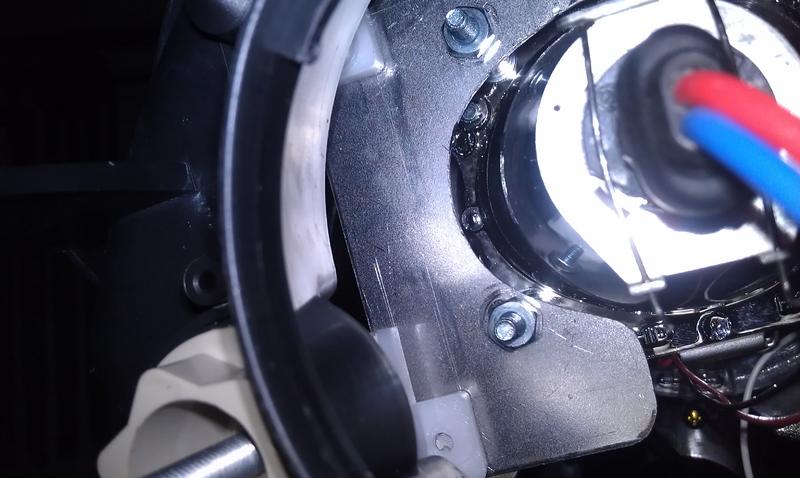
Lower plastic tab (white) is adjustment is vertical adjustment point. Rectangular holes seen in the Spec-D bracket need to be transferred to fabricated bracket for tight fit (no side to side movement of plastic tab in hole! Sheet metal of the approximate thickness as the Spec-D bracket was used.
Upper plastic (white) is the stationary pivot point for the horizontal and vertical adjustments. 3/4" metal spacers (Home Depot) can be seen (partially) between fabricated bracket and the Morimoto projector bracket (existing holes in Morimoto projector were used; no new holes needed). #8 Machine screws (1.5") were used
Additional Photo

Lower plastic tab (white) is adjustment is vertical adjustment point. Rectangular holes seen in the Spec-D bracket need to be transferred to fabricated bracket for tight fit (no side to side movement of plastic tab in hole! Sheet metal of the approximate thickness as the Spec-D bracket was used.

Upper plastic (white) is the stationary pivot point for the horizontal and vertical adjustments. 3/4" metal spacers (Home Depot) can be seen (partially) between fabricated bracket and the Morimoto projector bracket (existing holes in Morimoto projector were used; no new holes needed). #8 Machine screws (1.5") were used
Additional Photo


#34
08-26-2012, 07:30 AM
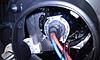
Spec-D Bracket Modification
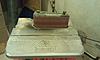
This Sander (Home Depot) (similar sander would be ideal too) was handy for smoothing rough edges and refining the fit around the bell housing of the Morimoto projector.
White (black was not available) butyl rubber sealant (Menards hardware) to reseal lights. A clean bead was impossible, but mineral spirits (available where paint products are sold) enabled removal of butyl from surfaces that mattered.
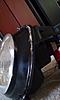
Finished product (Note: Spec-D projector lens is 3" while the Morimoto H1 projector is 2.5"). Adding the 3/4" spacers put the lens closer to the shroud and made up for the gap around slightly smaller dimension. I really like the finished product!
In time, I will provide daytime picture of lights in the car (for an inexpensive knockoff, they really look "tight"). More importantly(!) they provide (4300K bulb) ample light, and the alignment was excellent (it is key to make your fabricated bracket carefully, for this alignment to be spot on). After it gets dark, I will add pictures of the cutoffs (which look "textbook" by the way).

White (black was not available) butyl rubber sealant (Menards hardware) to reseal lights. A clean bead was impossible, but mineral spirits (available where paint products are sold) enabled removal of butyl from surfaces that mattered.

Finished product (Note: Spec-D projector lens is 3" while the Morimoto H1 projector is 2.5"). Adding the 3/4" spacers put the lens closer to the shroud and made up for the gap around slightly smaller dimension. I really like the finished product!

In time, I will provide daytime picture of lights in the car (for an inexpensive knockoff, they really look "tight"). More importantly(!) they provide (4300K bulb) ample light, and the alignment was excellent (it is key to make your fabricated bracket carefully, for this alignment to be spot on). After it gets dark, I will add pictures of the cutoffs (which look "textbook" by the way).
#35
08-26-2012, 09:56 AM
From this pic you can kind of see the scattered light and refracted coloration. Also, with the lights aimed as best I can aim them, there's a slight gap right in the middle of road where the cutoff is on the right light and the lights are angled from bottom left to top right (if that makes any sense).
Also, turning the horizontal adjusting screw (phillips head) at the back of the headlights will eliminate the gap between the cutoff inflection points (where the slope rises). As you may know, the 5/32" hex wrench (Sears) adjusting screw will adjust the vertical alignment.
In picture below (Spec-D projectors), as the top of the cutoff projected down the road into my lane, I could see the imperfections in the hotspots, and the schlieren lines were magnified at further distances: this was the "distracting" component of my experience. However, when I passed a wall at my side, the reflected cutoff lines were "textbook" flat (not shown). As night approaches, I will supply the cutoff for the retrofit.
#36
08-26-2012, 10:29 AM
http://www.theretrofitsource.com/pdf...1_Retrofit.pdf
I bought all of the parts I needed before embarking on this endeavor.
The metal cutting work: you should access the proper cutting tools. If you have access to water-jet cutter at a university machine shop or similar, time to design and cut the outline of your braces and square holes will be a few minutes. I did, but chose to cut them myself, since I did not know the shape I wanted in the end. After I had a working prototype for the first lamp (after 2 hr cutting/shaping) the second bracket was cut/shaped in under 30 min.
After the braces were cut and the projector mounting holes were drilled for horizontally parallel assembly, the addition of screws/washers/spacers and reassembly of the light housing each took about 45 min - 1 hr. Alignment took about 10 min. Wiring the Angel Eye to parking light wiring (30-45 min) (LEDs would splice into the same connector); I chose to solder in a removable 2-wire connector (for convenience) (Radio Shack) rather than use the blue splice clamps that come with the Spec-D order.
I mounted the ballast, CAN-BUS resistors, the HU330 Resistor to the walls of the headlight housing with 3M double sided mounting tape (Lowes) so the cables/components were fixed and more tidy.
#37
08-26-2012, 10:52 AM
From this pic you can kind of see the scattered light and refracted coloration. Also, with the lights aimed as best I can aim them, there's a slight gap right in the middle of road where the cutoff is on the right light and the lights are angled from bottom left to top right (if that makes any sense).

#38
08-27-2012, 06:25 AM
Your cutoff of the Spec-D lighting are actually better than mine; although, my rotational alignment was flatter, i.e., horizontal cutoff was flatter. I think you can fix this by loosening your headlight mounting screws and turning the entire headlight a few degrees until flat. If you overturn, then you headlights will look awkward after you close your hood.
Also, turning the horizontal adjusting screw (phillips head) at the back of the headlights will eliminate the gap between the cutoff inflection points (where the slope rises). As you may know, the 5/32" hex wrench (Sears) adjusting screw will adjust the vertical alignment.
In picture below (Spec-D projectors), as the top of the cutoff projected down the road into my lane, I could see the imperfections in the hotspots, and the schlieren lines were magnified at further distances: this was the "distracting" component of my experience. However, when I passed a wall at my side, the reflected cutoff lines were "textbook" flat (not shown). As night approaches, I will supply the cutoff for the retrofit.
Attachment 63885
Standard. No mods to these lights yet. I can't decide if I want to do the mod, or just buy the OEM lights and do a full conversion.
#39
08-27-2012, 07:35 AM
http://www.blindinghid.com/how-to-ad...id-headlights/
1) horizontal alignment should be made with your car close to a wall (garage door, etc).
2) The bright spot of the beam is then centered with the center of your projector (both horizontally and vertically centered)
3) Move away from wall (about 30 ft), then make your vertical adjustment so cutoff is 2-3 inches lower than projector beam when close to wall.
4) As you move further back, the bright spots will merge
In my experience, the only way to do this is to twist the projector. That is best done by disassembling the light. You could use your existing brackets and drill slightly larger mounting holes so that you could twist your projectors a few degrees. This would be very easy compared to the modification I did.
Bi-xenon: cutoff of Morimoto Mini H1 5.0 retrofit into Spec-D frame:

See "before" picture earlier in this post with Spec-D H11 projectors fitted with H11 HID bulbs
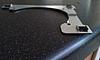
Projection distance

In car with halos on

#40
08-27-2012, 08:50 AM
I agree, aligning with the hood is the place to start; otherwise, your lights will be cockeyed if you first try to rotate them to their full stops to get the rotational just right.
Are you following the alignment method as per described:
http://www.blindinghid.com/how-to-ad...id-headlights/
1) horizontal alignment should be made with your car close to a wall (garage door, etc).
2) The bright spot of the beam is then centered with the center of your projector (both horizontally and vertically centered)
3) Move away from wall (about 30 ft), then make your vertical adjustment so cutoff is 2-3 inches lower than projector beam when close to wall.
4) As you move further back, the bright spots will merge
In my experience, the only way to do this is to twist the projector. That is best done by disassembling the light. You could use your existing brackets and drill slightly larger mounting holes so that you could twist your projectors a few degrees. This would be very easy compared to the modification I did.
Bi-xenon: cutoff of Morimoto Mini H1 5.0 retrofit into Spec-D frame:
Attachment 63898
See "before" picture earlier in this post with Spec-D H11 projectors fitted with H11 HID bulbs
Projection distance
Attachment 63900
In car with halos on
Attachment 63899
I'm thinking I'm going to start from scratch with the alignment. How long did this mod take you and what was the final price for all the parts?
Also, when the light/projector is apart, could you access the LEDs for the halo? My halo for the right headlight is significantly dimmer than the left, so I don't have them hooked up right now.
#41
08-28-2012, 05:46 AM
I recommend that you use a plug-in harness, rather than the blue splice clamps, to attach the wiring from your halo LEDs to your parking lights. This makes removal of your lights much easier.
#42
10-07-2012, 06:38 PM

I just got the spec-d projector/halo headlights but if I would've known this post existed I would've posted my pics and questions here.
So if someone could check out what I posted and tell me what I did right and wrong that would be great, also today "I just got them in the mail Friday" I lost or the unit that controls the halos fell out through the wheel hole "I guess the first owner decided to remove that fender plug" so it fell out and I can't find it. So does anyone one if they sell this part separate or what can I do to replace that part with another but details will be needed.
The thread I posted on is:
"R56 aftermarket/projector/halo headlights" under my user name: "seang252"
Appreciate the help guys,
Shaun
#44
11-05-2012, 08:11 PM

Neutral
Join Date: Sep 2011
Location: Fort Worth, TX
Posts: 4
Likes: 0
Received 0 Likes
on
0 Posts
I'm glad I found this thread, I'd like to shed some light (pardon the pun) on these Spec-D headlights and my retrofit. I had the Spec-D aftermarket headlights with built in 6000k HID's. They were really easy to instal, looked cool, but I didn't get nearly the light out put you guys are getting. Also when I got them in january there was no info about them, I didn't know they used H11 bulbs, Spec-D i called several times had no info on them. The light output was really scattered, no good visibility at all, plus I think the 6000k's were so blue that it made it worse.
I got fed up and returned them and spent the money on morimoto H1 Mini projector and HID kit. Here's the retrofit I did using the OEM halogen reflectors: http://imgur.com/a/X7ROR the Morimoto p-rojectors have a lot better light output and no scattered light.
Now I have a problem where my HID's will flicker randomly while driving, I've narrowed it down to the error eliminators that came with my HID kit. I'm so frustrated by the crappy spec-d lights and now my HID problem I'm just willing to go back to stock halogens and just give up with projectors and xenon bulbs until i can buy another MINI with real xenon's
#45
11-05-2012, 08:22 PM
Join Date: Feb 2012
Location: West Bloomfield, Michigan
Posts: 2,970
Likes: 0
Received 4 Likes
on
4 Posts
I have a question, I have those terrible standard lights with halogens of course, and I read that you swapped them with different projectors. But my question is, what if I bought the spec-d headlights to replace my halogens, do I need anything else? And how much were they?
Thank you for your future reply!
Thank you for your future reply!

#47
11-13-2012, 05:52 PM
2nd Gear
Join Date: Nov 2012
Location: New york
Posts: 111
Likes: 0
Received 0 Likes
on
0 Posts
Help me out
Hey all I am new to the forum and I want to do the same modification on my r56 with halogen lights as well. I was checking out these two HID http://Kitshttp://www.amazon.com/Ken...pr_product_top and http://http://www.theretrofitsource....ducts_id=12825 to pair up with the Spec-d Headlight, Would I have to get the Bi-xenon bulbs or is there another HID kit that would make a better pair and actually have the high beam work properly?
#48
11-21-2012, 04:51 PM

1st Gear
Join Date: Dec 2010
Location: Ct.-
Posts: 16
Likes: 0
Received 0 Likes
on
0 Posts
On the back of the light towards the outside, you'll see a longer, thin bolt sticking out. This adjusts the headlights up and down. It looks as if there isn't even a head on the bolt because it's only a 4mm head. On the inner back side of the light is a phillips screw that adjusts the lights left and right.
For the record, I hate these lights and I'm currently debating on doing the full OEM conversion. It's just so damn expensive! I need to start a fund raiser so I can afford them! In return, I'll make an awesome detailed how-to. NOW TAKING DONATIONS lol
For the record, I hate these lights and I'm currently debating on doing the full OEM conversion. It's just so damn expensive! I need to start a fund raiser so I can afford them! In return, I'll make an awesome detailed how-to. NOW TAKING DONATIONS
lolI took mine out, put the stock back in and put HID into them.
They werent focusable, and i couldnt see anything. Protuning lab totally gave me the run-around as well when one came with bad halo ring. The wires were ripped out... Very obvious. They then told me that there ISNT a halo ring on these units. So... what am i looking at? They responded with, I must be mistaken.
Also, after looking IN the unit, it seems that my horizontal adjuster may not have been engaged and inserted into the plastic fitting that pulls on the lamp... Im not sure, but the screw definitely doesnt connect to anything, and the ball on the end doesnt touch anything... I think i had a defective pair in that regard...
#49
11-21-2012, 05:28 PM
6th Gear
Join Date: Mar 2009
Location: Eastern Long Island, NY
Posts: 1,980
Likes: 0
Received 1 Like
on
1 Post
This is the second posting I've seen on the Spec-D's and nothing sounds good. Too bad since the idea of halos is awesome. I've decided to just replace my stock halogens with a set of Philips H3 Crystal Vision Ultras and I really like them. Nice pure white light and noticeably brighter than the halogens. And a lot less work than the Spec-D's. 
I also notice that the OP never posted back with pics after the install.
I also notice that the OP never posted back with pics after the install.
Last edited by Albiecrazy; 11-21-2012 at 05:42 PM.
#50
11-21-2012, 06:08 PM
Join Date: Jan 2012
Location: Pensacola, FL
Posts: 686
Likes: 0
Received 0 Likes
on
0 Posts
This is the second posting I've seen on the Spec-D's and nothing sounds good. Too bad since the idea of halos is awesome. I've decided to just replace my stock halogens with a set of Philips H3 Crystal Vision Ultras and I really like them. Nice pure white light and noticeably brighter than the halogens. And a lot less work than the Spec-D's.
I also notice that the OP never posted back with pics after the install.
I also notice that the OP never posted back with pics after the install.


