1990 Mayfair Project Car
#1
 09-07-2014, 05:47 PM


Mayfair Project Car
Hey all!
(Ok, project to me, who is a Computer Engineer, trying to learn how to work on cars. Not sure if the true enthusiast would call it a project, as it works, mostly)
New to the forums and new to owning a Classic mini. I've had a 2002 BMW mini in the family since March 22, 2002 and I started taking it over late 2009/2010.
On to the Mayfair:

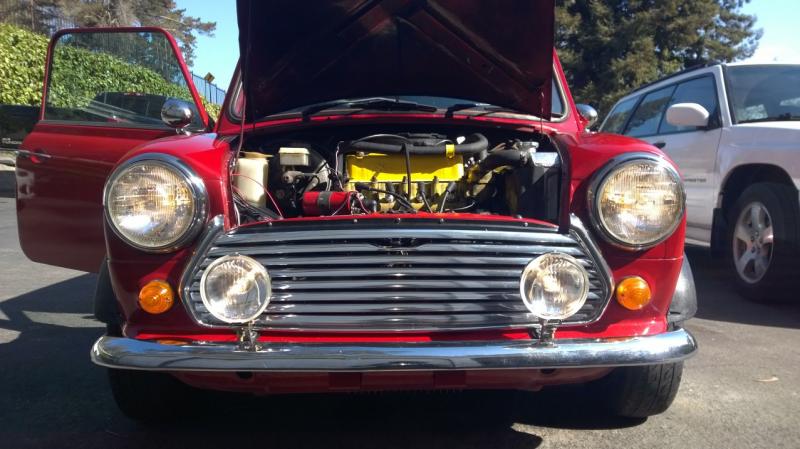
It is in pretty good condition from the outside, but the engine area needs a lot of work, mostly cleaning it up and making it look and run nice. The last owner didn't seem to have taken great care of it, just enough to get it running. The wiring is a mess, things not plugged in, lots of buildup on the engine block from some type of oil leak. I do plan on redoing the interior as well, but I'm going to focus on the engine for now.
I'll be posting questions in this thread so I don't keep making new ones, hopefully people will read it and help me out. I'll try to use the search function as much as I can and re-post what I found and how it helped out.
More pictures if requested, as well as any progress pictures.
Edit: Pictures of where I'm starting off would probably be nice
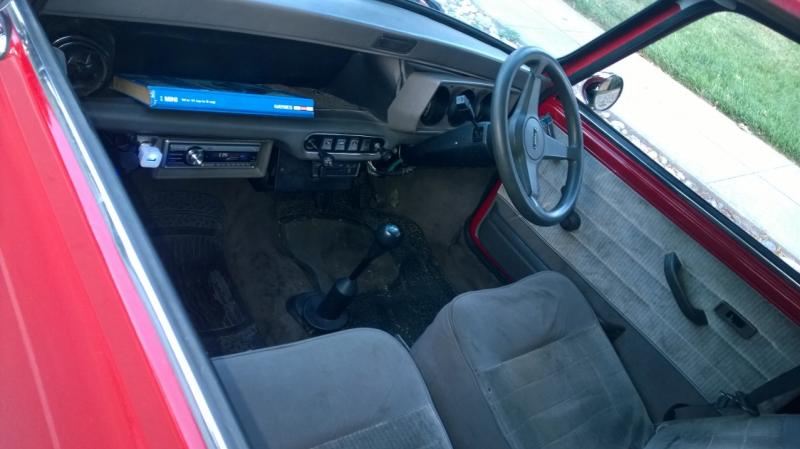
Interior:
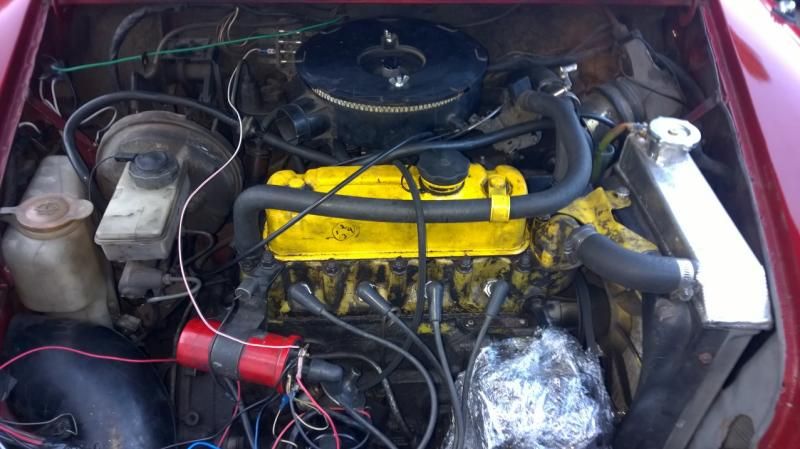
Engine:
I started to saran wrap the electric components because I attempted to clean off the engine the few millimeters of whatever is on it. I didn't get a picture of it post cleaning, while it does look better its no where near where I want it to be.
(Ok, project to me, who is a Computer Engineer, trying to learn how to work on cars. Not sure if the true enthusiast would call it a project, as it works, mostly)
New to the forums and new to owning a Classic mini. I've had a 2002 BMW mini in the family since March 22, 2002 and I started taking it over late 2009/2010.
On to the Mayfair:
It is in pretty good condition from the outside, but the engine area needs a lot of work, mostly cleaning it up and making it look and run nice. The last owner didn't seem to have taken great care of it, just enough to get it running. The wiring is a mess, things not plugged in, lots of buildup on the engine block from some type of oil leak. I do plan on redoing the interior as well, but I'm going to focus on the engine for now.
I'll be posting questions in this thread so I don't keep making new ones, hopefully people will read it and help me out. I'll try to use the search function as much as I can and re-post what I found and how it helped out.
More pictures if requested, as well as any progress pictures.
Edit: Pictures of where I'm starting off would probably be nice
Interior:
Engine:
I started to saran wrap the electric components because I attempted to clean off the engine the few millimeters of whatever is on it. I didn't get a picture of it post cleaning, while it does look better its no where near where I want it to be.
Last edited by Tatsugen; 09-08-2014 at 10:39 PM. Reason: There should be pictures now...

#4
09-09-2014, 10:20 AM
I definitely need to get it tuned up. I'm going to look up guides on how to do that, if I could even do it myself.
I haven't found much rust at all. There is an oil leak where the selector shaft goes into the engine (I heard that was a common one) and I haven't had a good look around there because of all the grime that I need to clean off. The rest of the body looks good.
The last owner said that it was in an accident and the passenger side fender got replaced and you can't really tell on the outside, unless you look real hard, but you can see a bit easier with the bonnet up.
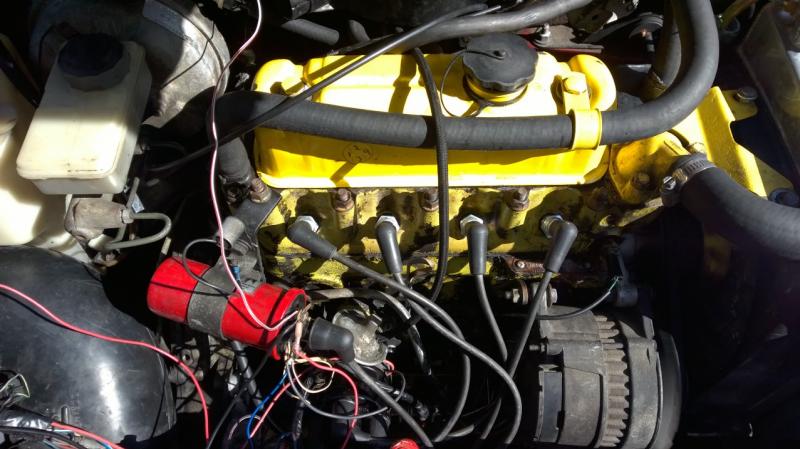
You can't really see it well in those pictures either, but a lot of the cabling for the choke/heater/gas pedal need to get tightened down. In the below picture you can see that there was an extra engine brace put in, but the cabling for the mentioned things are not fixed down. Plus part of a beer can used as a heat shied and a coke bottle used for an overflow for the radiator.
I haven't found much rust at all. There is an oil leak where the selector shaft goes into the engine (I heard that was a common one) and I haven't had a good look around there because of all the grime that I need to clean off. The rest of the body looks good.
The last owner said that it was in an accident and the passenger side fender got replaced and you can't really tell on the outside, unless you look real hard, but you can see a bit easier with the bonnet up.
You can't really see it well in those pictures either, but a lot of the cabling for the choke/heater/gas pedal need to get tightened down. In the below picture you can see that there was an extra engine brace put in, but the cabling for the mentioned things are not fixed down. Plus part of a beer can used as a heat shied and a coke bottle used for an overflow for the radiator.
#5
09-10-2014, 01:34 PM

#6
09-10-2014, 02:02 PM
Do you by chance have a link to it? I'm not exactly sure what the other site is.
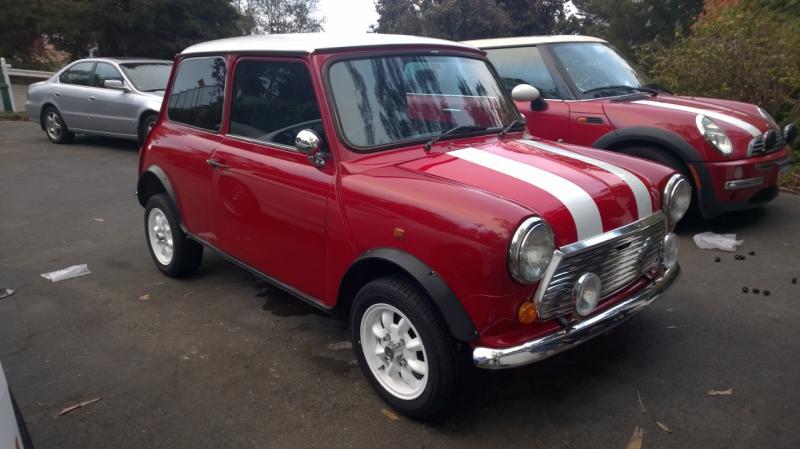
On a side note: I did put some Wipac driving lamps on the front. I'll get a picture of that sometime. Also, my new Minilite wheels and tires came in! I'm getting them powder coated white, they should be done next week. The tires are Falken Ziex ze912s, 165/60r12s. I have the r15's on my r50 and I am quite fond of them.
On a side note: I did put some Wipac driving lamps on the front. I'll get a picture of that sometime. Also, my new Minilite wheels and tires came in! I'm getting them powder coated white, they should be done next week. The tires are Falken Ziex ze912s, 165/60r12s. I have the r15's on my r50 and I am quite fond of them.
#7
09-10-2014, 04:15 PM
Trending Topics
#8
09-14-2014, 10:46 AM

The car belongs to me, I'd post the link but that's not allowed here, in fact I'm surprised the name was allowed in the post above, but if you go to that site and go to the classic mini section, it's easy to find by that title..
The one thing I would warn you about in this situation is project creep. You start with a good cleaning, then you decide you need to paint this and that, and now those parts you didn't paint look tatty and the next thing you know you've dropped the subframe, painted the engine compartment, rebuilt the front suspension, motor, transmission, redid the wiring and, and, and .............it's hard to find a place to stop! :-)
The one thing I would warn you about in this situation is project creep. You start with a good cleaning, then you decide you need to paint this and that, and now those parts you didn't paint look tatty and the next thing you know you've dropped the subframe, painted the engine compartment, rebuilt the front suspension, motor, transmission, redid the wiring and, and, and .............it's hard to find a place to stop! :-)
#9
09-14-2014, 12:38 PM
I did find the post and read through most of it, at least the first 10 or so pages. I'll definitely be using it when I get stuck! Thanks for the info 00Mini and MINIdave. I did get a few ideas of more things to do, like replace the fire/noise wall and repaint it etc.
I was looking at the car yesterday and did exactly that, started to look at my horrible wiring, then I wanted to track down why my tachometer sometimes works, then I wanted to pull the instruments out, etc.
The only problem I have though, I don't have access to any car or engine block lifts, etc, so, I have to do most everything with a bottle jack and 2 ( I could get more) jack stands.
Updates:
I had put them on for a while, but put driving lamps on. I ordered stone guards to put on them, just gotta figure out how to do that when I get them.
I also tried to clean the engine by myself last weekend. I don't know how long that crud has been on the engine, but after 2 passes of purple power and water and brushing, some came off. I think I'm going to take it to a professional place that steam cleans the whole bay and underneath.
Priorities:
Fix oil leak on selector shaft and anywhere else there is. Kinda want to get the engine clean first.
Fix up my rats nest of wiring. Not sure if I want to order a wiring harness or try and replace bad looking wires. Which there are a lot of.
Figure out how to bolt down all the cabling, gas pedal, clutch, heater. All somewhat loose (no threat of coming apart or off).
Wheels came in! I got some 12x5 (oops not 15) Minilites! They are silver, but I took them to a shop to get powder coated white (to match my 2002 mini, which has white wheels as well). Got some Falken Ziex ze912s to put on. Same tires as my 02 as well, I don't plan on going crazy on a track... yet...
Last edited by Tatsugen; 09-14-2014 at 02:29 PM.

#12
09-14-2014, 03:03 PM

there are some relatively inexpensive home steam cleaners out there .... very handy for an annual touchup under the bonnet on a 'classic'
what's the history of the car? (technically a 1990 isn't yet a legal import ... 25 year rule . . . close but .... )
yep - you do seem to have wires all over the place!
Two suggestions for a newbie:
1. Have you greased the suspension? There aren't many grease fittings in the suspension but the Mini IS a car that still needed to be greased. When I first put a grease gun to mine I couldn't get new grease to flow because the stuff that was in there was so old and dried out .... once I broke things loose the car rode MUCH differently.
2. Have you subscribed to MiniWorld yet? .... you want to. Very good technical q&a every month as well as 'how to' and just pictures of what others have done. NOT CHEAP since it must come from the UK (with the death of big book stores, good luck finding it on the rack but if you do expect to pay $10 or more per issue).
http://www.miniworld.co.uk/
PM me a snail mail address and I'll send you a couple of random back issues. I scan the stuff I want to save from the tech articles and then give away the mag's at car shows . . . I hate throwing them away (but don't want to save them either)
**************
MS fm dept of Computer Science, PURDUE, 1982 . . . . TCP/IP was still being tweaked and Bell labs had donated a truckload of VAX minicomputers to support "networking' research. A few people had home terminals with acoustic coupler 300 baud modems so they could access the campus computers from home. Campus machines were huge CDC 64 bit machines. I started on punched cards. Eventually wide area network manager for a government agency . . . and ship captain!
Last edited by Capt_bj; 09-14-2014 at 03:15 PM.
#13
09-14-2014, 06:43 PM
I'll look into maybe getting a steam cleaner. I'll probably get some oil leaks in the future, but the first clean I'm trying to do is just overwhelming. Long way to go till I get what I want it to look like.
All I know about the history is it is from GB, and it was in an accident involving the passenger side fender. Every time I asked about the history he trailed off. I guess that isn't too good of a thing... I kinda just jumped into it. Probably won't do that again.
Thanks for the greasing tip. I could look into that tonight. The suspension is extremely stiff, can feel everything it goes over. That's probably my case, the last owner didn't seem to take that great care of it, oil was nice and thick, as well as air filter. He was also pitting 87 gas into it. I replaced all the above, put 91 and some Lucas fuel treatment and it runs so much better.
I'll send you a PM sometime. I could always use some more reading material. I'll scan what seems to be useful and send them off to the next person.
Thanks!
#14
09-22-2014, 10:01 AM
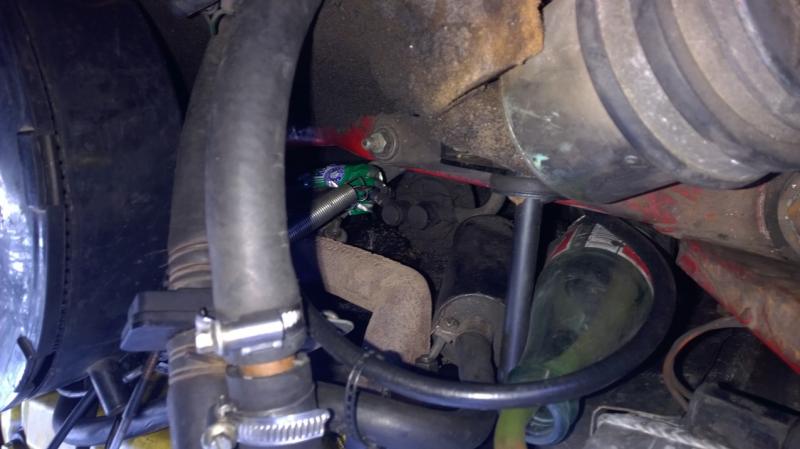
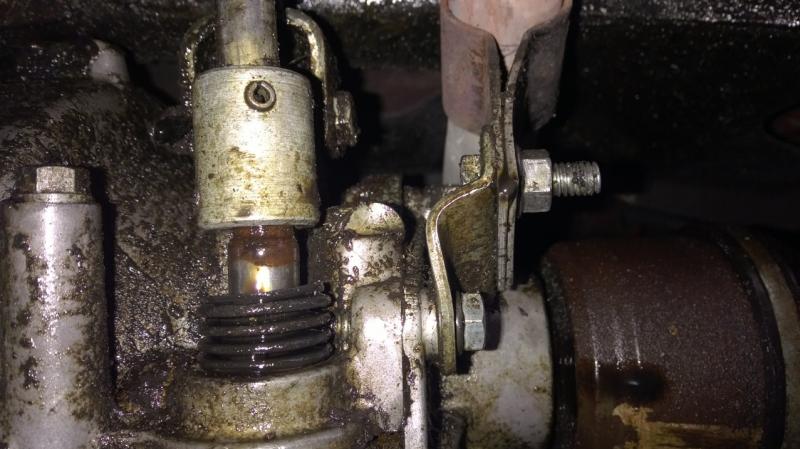
I think I've tracked down to what has been leaking oil. I think it is the CV pot joints (MiniMania part DAM667) and the selector shaft (MiniMania part MSSK050). I'm not 100% sure if they are the actual parts, but they are somewhat common apparently. I'll hopefully be getting it cleaned soon and actually find out, but the picture is below.
Another small problem I've been having is my tachometer has sometimes been working. I'll have to research more into why that isn't working, but it sometimes works when I turn the car on, sometimes it doesn't.
New wheels got powder coated and I finally was able to get the tires on and balanced and mounted. Yes the back wheel looks lifted, but that was because the (I'm not sure what it really is called) last resort bumper on the frame stuck out a couple mm too far and was resting on the inside wheel. Got that fixed, but forgot to take a picture afterwards.
#15
09-22-2014, 01:37 PM
(I'm not sure what it really is called) last resort bumper on the frame stuck out a couple mm too far
bump stop?
Another small problem I've been having is my tachometer has sometimes been working. I'll have to research more into why that isn't working, but it sometimes works when I turn the car on, sometimes it doesn't.
It's electrical .... there's a loose wire ... or one making bad contact. HELLLLLOOOOO Mr Lucas!!!!

Last edited by Capt_bj; 09-22-2014 at 01:51 PM.
#16
09-22-2014, 02:21 PM
There's a shifter seal kit that has an aluminum bushing that goes in before the seal, that stabilizes the rod's motion and lets the seal last a lot longer - they're easy to put in and all the major Mini parts suppliers carry them. In your pic that accordion boot is just to keep the dirt out of the seal, it's not the seal itself.
it's also a good time to replace the axle seals, since you'll have all the oil out of the sump (you do remember you have to drain the oil, right?)
While you have the axles out it's a great time to repack the grease in the pot joints and CV's and replace the boots, chances are if they aren't cracked now, they will be soon - it's just good preventive maintenance. It's also a good time to inspect and shim the ball joints if they're loose....and check the steering rack boots - it's far easier to replace them now while you have it all apart......
When I pulled my upper control arms out, even tho they moved freely, the bearings were toast and the shaft was galled - kits aren't expensive but once you're that far in you're going to do everything. Here's what mine looked like....

If yours were stiff and got better when you greased them, chances are the little rollers are toast and the shaft looks like this one.
it's also a good time to replace the axle seals, since you'll have all the oil out of the sump (you do remember you have to drain the oil, right?)
While you have the axles out it's a great time to repack the grease in the pot joints and CV's and replace the boots, chances are if they aren't cracked now, they will be soon - it's just good preventive maintenance. It's also a good time to inspect and shim the ball joints if they're loose....and check the steering rack boots - it's far easier to replace them now while you have it all apart......
When I pulled my upper control arms out, even tho they moved freely, the bearings were toast and the shaft was galled - kits aren't expensive but once you're that far in you're going to do everything. Here's what mine looked like....
If yours were stiff and got better when you greased them, chances are the little rollers are toast and the shaft looks like this one.
Last edited by MINIdave; 09-22-2014 at 02:39 PM.
#17
09-22-2014, 02:34 PM

#18
09-23-2014, 08:42 AM
@Capt_bj
Yes! The bump stop. It was sticking out a little far. And I'll try and retrace the wires for the tachometer. I was looking in the manual for the actual color of the wire or the trace in general, but couldn't seem to match up anything.
@MINIdave
Here is a better picture of just the CV Pot Joint:
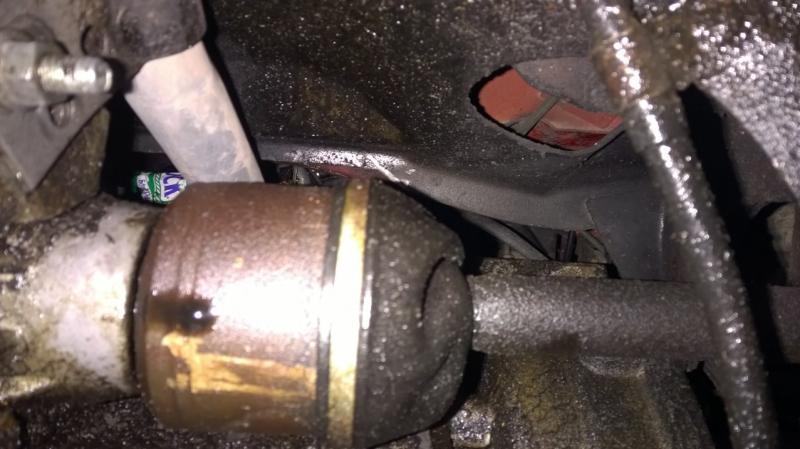
(had to slide phone under the car and just take an array of pictures, some turned out decent, others, not so much)
The last owner did say that the selector shaft was leaking before he handed it over to me, and I'm just guessing that these need to get looked at as well. It probably won't be for another couple weeks before I get a good look at underneath the car, but I'll make a checklist of what needs to get inspected and then a grocery list made.
And I need to make sure my control arm doesn't look like that.
And I know to drain the oil, I do that so well, I even forget to put the drain plug back on so the oil just keep draining when I try to fill it again... Yeah, that won't happen again. I'm sure flushing the engine oil wasn't too bad for it....
@Angib
I never looked at it that way, but I do plan on keeping better care of it than the last owner and be a little proactive in corrosion prevention.
Yes! The bump stop. It was sticking out a little far. And I'll try and retrace the wires for the tachometer. I was looking in the manual for the actual color of the wire or the trace in general, but couldn't seem to match up anything.
@MINIdave
Here is a better picture of just the CV Pot Joint:
(had to slide phone under the car and just take an array of pictures, some turned out decent, others, not so much)
The last owner did say that the selector shaft was leaking before he handed it over to me, and I'm just guessing that these need to get looked at as well. It probably won't be for another couple weeks before I get a good look at underneath the car, but I'll make a checklist of what needs to get inspected and then a grocery list made.
And I need to make sure my control arm doesn't look like that.
And I know to drain the oil, I do that so well, I even forget to put the drain plug back on so the oil just keep draining when I try to fill it again... Yeah, that won't happen again. I'm sure flushing the engine oil wasn't too bad for it....
@Angib
I never looked at it that way, but I do plan on keeping better care of it than the last owner and be a little proactive in corrosion prevention.
#19
09-23-2014, 12:50 PM
And I'll try and retrace the wires for the tachometer. I was looking in the manual for the actual color of the wire or the trace in general, but couldn't seem to match up anything.
Which diagram are you using? if yours is a 90 with a carb then I think you want diagram 18 - note the key is on the page BEFORE !!! Looks like the trigger wire between the dizzy and the tach is W/BK (white with black "tracer" aka stripe)
Which diagram are you using? if yours is a 90 with a carb then I think you want diagram 18 - note the key is on the page BEFORE !!! Looks like the trigger wire between the dizzy and the tach is W/BK (white with black "tracer" aka stripe)
#20
09-24-2014, 11:40 AM
#21
10-04-2014, 09:07 PM
Been moving, haven't been able to do anything on the car the past couple weekends.
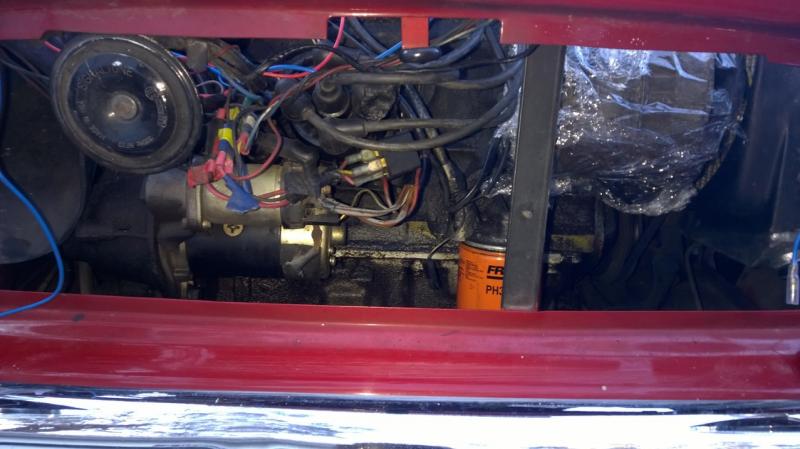
It is wiring diagram 18 in my Haynes manual. Doesn't help when the previous owner made some repairs just to get it working. Like in the picture below... just a random wire, hanging across the engine. No idea what it was supposed to replace...
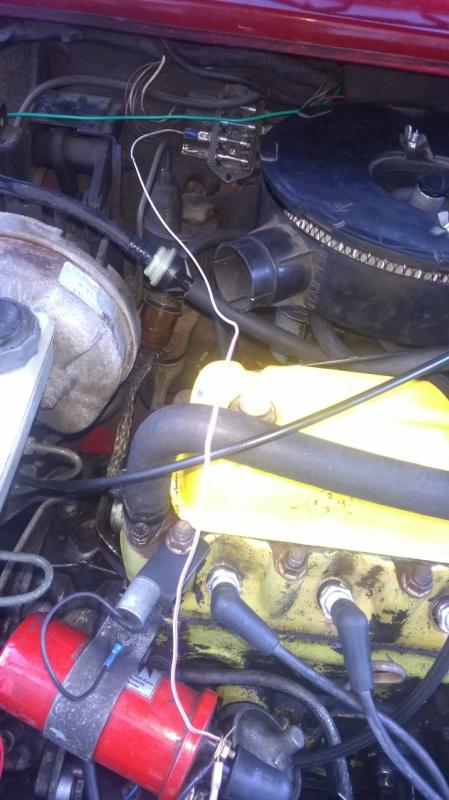
That wire was the problem (that white one, in the middle of the picture, going across the whole bay). I tinkered with it one last time before I turn in and that was supplying power to the wiper motors and tach (which in turn, makes them not work O.o). I removed it completely and my electrical is back to working condition.
I did order a new wiring harness. I'm going to be glad I did. In troubleshooting the tach problem, I got my instrumentation panel out and saw the wiring behind that, should have taken a picture, but, there seems to be a lot of repairs for some reason. There is still a W/Bk wire that wiring diagram says its supposed to be plugged into the distributor just hanging around... No idea what that is for. Along with a few of these cylindrical things with wires coming out. You can see one right above the ignition coil, yet I can't find what they are in the manual. Maybe someone knows? :D
@MINIdave
I browsed through your post about your project, it is turning out quite nicely. Hopefully mine will get to that condition someday too. When I get the pot joints out, I'll look at the bearings to see if they are alight.
I ordered a pair of new C/V pot joints and a selector shaft seal kit. Is there another seal within the axel that I would have to replace? Or just the pot joints be ok? Is it possible to remove those with out taking the whole axel? I found a youtube video of a guy just popping them out with everything still attached (
), but it seems he didn't have a plan to remove them from the axel, just pulling the engine out. I'll look into it more.
It is wiring diagram 18 in my Haynes manual. Doesn't help when the previous owner made some repairs just to get it working. Like in the picture below... just a random wire, hanging across the engine. No idea what it was supposed to replace...
That wire was the problem (that white one, in the middle of the picture, going across the whole bay). I tinkered with it one last time before I turn in and that was supplying power to the wiper motors and tach (which in turn, makes them not work O.o). I removed it completely and my electrical is back to working condition.
I did order a new wiring harness. I'm going to be glad I did. In troubleshooting the tach problem, I got my instrumentation panel out and saw the wiring behind that, should have taken a picture, but, there seems to be a lot of repairs for some reason. There is still a W/Bk wire that wiring diagram says its supposed to be plugged into the distributor just hanging around... No idea what that is for. Along with a few of these cylindrical things with wires coming out. You can see one right above the ignition coil, yet I can't find what they are in the manual. Maybe someone knows? :D
@MINIdave
I browsed through your post about your project, it is turning out quite nicely. Hopefully mine will get to that condition someday too. When I get the pot joints out, I'll look at the bearings to see if they are alight.
I ordered a pair of new C/V pot joints and a selector shaft seal kit. Is there another seal within the axel that I would have to replace? Or just the pot joints be ok? Is it possible to remove those with out taking the whole axel? I found a youtube video of a guy just popping them out with everything still attached (
Last edited by Tatsugen; 10-04-2014 at 10:11 PM. Reason: Posted before finishing typing?
#23
10-05-2014, 08:16 PM
The round cylindrical thing on top of the coil is a condensor, used usually for ignition noise suppression for the radio. I doubt you need it, but then I don't have a radio in my car - can't hear it anyway!
I'm not sure what you're asking on the axles, I always remove mine completely, I don't think they'll come out enough with the outside end still attached, but like I say I haven't tried it.
You need pot joint seals (part # ADU5738) on both sides, and the shift seal kit (SSK001) for sure, other than that I can't say. But I'd do those for sure then see where you're at. Oh, and you need to replace the inner pot joint boots too, the one in the pic is all twisted and looks torn - so you'll need to repack the grease inside the pot joints too - that's why I suggested you remove the axles and just replace the outer boots too. It's much easier to do them all at once and while the axle is out of the car.
Last edited by MINIdave; 10-05-2014 at 08:38 PM.
#24
10-05-2014, 11:37 PM
(I hate the stupid back space going back to the previous web page, wiped out my entire post... Sorry if I sound not enthusiastic or something)
So... 6.5 hours later... got the seal replaced. Was a little tricky to get the pin out, I think reverse gear was the best for me. The nylon bushing was completely dried out, it was crumbling when I was trying to get it out. The inner aluminum seal I got out thanks to a British Mini site. They said to very carefully drill a small hole, enough for a screw to grab hold and pull it out. I can get that post to someone if they want it. Got the new seals in no problem, the hardest part was to get the pin back in the shaft. Picture below (top) is the after picture of the new seal. I got the car up to temperature and drove it down and up the hill that is my driveway. The bottom portion of the picture is the seal kit. Pretty destroyed (mostly by me)
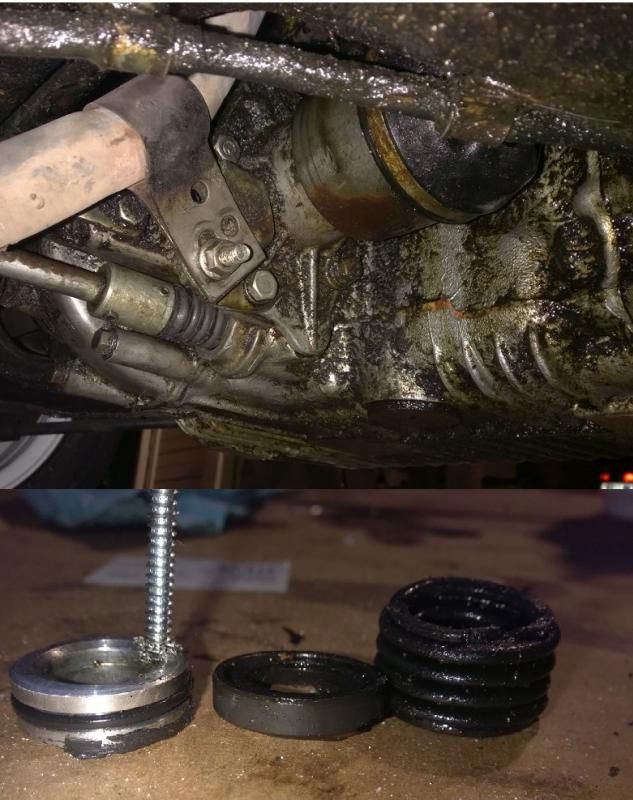
When I was filling the oil back into the engine, it decided to leave through a hole in the rocker cover (says the Haynes Manual butmaybe known as a valve cover?) gasket. Pulled that off and it wasn't even sealed properly. It looks like it was held in with some silicon... So, got a "make your own gasket" kit from the auto store and put that in.
@MINIdave
I think I was trying to ask if it was possible to remove the C/V pot joints from the axel and engine without taking the axel from the car. I don't think that is possible though. As well as, are there other seals around the pot joints that I need to get replaced as well, which you did supply me part #s.
I misread your post and got brand new inner pot joints instead of just the boot... That is good and bad to me, bad: my fault for not paying attention closely and they cost more than just the boot. Good: I don't have to buy grease for them and they will look much nicer than the ones on there now.
What site are you using for the SSK001 shaft seal kit? I can't seem to find that (maybe a mistype?)... I found the ADU5738s, I'll get those on order tomorrow, hopefully get the axels done... sometime. Is the outer boot just part 18G9029? They don't look to be in bad condition and I don't have a picture of them at the moment, but I do like preventative maintenance.
@Angib
I'm not sure what it was for. Last owner has a lot of jury rigged things in the engine bay... Its out and everything seems to be working for now. Beside me turning on the driving lamps I installed and it shutting off the car, but I'll take a look at that some other time... Just gotta keep them off for now.
Thanks again for your guy's help :D Hopefully I'll be able to do the same to someone else.
So... 6.5 hours later... got the seal replaced. Was a little tricky to get the pin out, I think reverse gear was the best for me. The nylon bushing was completely dried out, it was crumbling when I was trying to get it out. The inner aluminum seal I got out thanks to a British Mini site. They said to very carefully drill a small hole, enough for a screw to grab hold and pull it out. I can get that post to someone if they want it. Got the new seals in no problem, the hardest part was to get the pin back in the shaft. Picture below (top) is the after picture of the new seal. I got the car up to temperature and drove it down and up the hill that is my driveway. The bottom portion of the picture is the seal kit. Pretty destroyed (mostly by me)
When I was filling the oil back into the engine, it decided to leave through a hole in the rocker cover (says the Haynes Manual butmaybe known as a valve cover?) gasket. Pulled that off and it wasn't even sealed properly. It looks like it was held in with some silicon... So, got a "make your own gasket" kit from the auto store and put that in.
@MINIdave
I think I was trying to ask if it was possible to remove the C/V pot joints from the axel and engine without taking the axel from the car. I don't think that is possible though. As well as, are there other seals around the pot joints that I need to get replaced as well, which you did supply me part #s.
I misread your post and got brand new inner pot joints instead of just the boot... That is good and bad to me, bad: my fault for not paying attention closely and they cost more than just the boot. Good: I don't have to buy grease for them and they will look much nicer than the ones on there now.
What site are you using for the SSK001 shaft seal kit? I can't seem to find that (maybe a mistype?)... I found the ADU5738s, I'll get those on order tomorrow, hopefully get the axels done... sometime. Is the outer boot just part 18G9029? They don't look to be in bad condition and I don't have a picture of them at the moment, but I do like preventative maintenance.
@Angib
I'm not sure what it was for. Last owner has a lot of jury rigged things in the engine bay... Its out and everything seems to be working for now. Beside me turning on the driving lamps I installed and it shutting off the car, but I'll take a look at that some other time... Just gotta keep them off for now.
Thanks again for your guy's help :D Hopefully I'll be able to do the same to someone else.
#25
10-06-2014, 07:42 PM
SSK001 was the shifter seal kit from Somerford UK, and you already have that, so no worries....
All you need are the axle seals, nothing else. Make sure the pot joints have grease in them, they may be dry....
I think the only way the pot joints will come out is if you release the lower ball joint, but if you're going to replace the outer boots and the pot joints anyway you may as well take the axle out so you can work on it on the bench, it will be much easier that way.
And while you have it out.....
check the hub bearings, chances are they need repacking - and you will need seals - inner and outer - for those too - 4 seals all together.
See what I mean about project creep!
I use 7 Enterprises for parts, they're a great resource for info too as is MiniMania......