1990 Mayfair Project Car


#27
 10-15-2014, 08:58 PM

MINIdave, mk1leg
Thanks for the advice. I'll be getting the oil seals, a couple gaskets, and some CV grease on order. Been trying to think what else I can get replaced and haven't thought of anything else at the moment. I did use the selector shaft seal kit with the aluminum bushing. If this doesn't last that long, I'll try doubling up on the seals.
Replaced the throttle spring as well, the last one (well, there were actually two) were kind of destroyed. The original was stretched out and the larger one was slipped over it. The throttle is very stiff now, just gotta get used to it a little.
Now, I have a completely different problem now... The car won't start. I'm going to take a multimeter to parts this weekend to see what the exact thing isn't working. When I turn the key, all of the electronics come on, the internal lights come on, but when the key turns to the final position, the car does not start and I don't hear anything at all. Doesn't even sound like the ignition coil or the starter moved. I thought the battery could be low for some reason, so I attempted to jump it, but it still didn't do anything. Hopefully more details to come this weekend.
EDIT: Just talked with my co-worker, he said it could be wiring or my starter solenoid. I thought I had everything plugged in correctly for my wiring, but something could have come loose when I was driving around. And as for my start solenoid, I'm looking into how to test if that is the problem.
Last edited by Tatsugen; 10-16-2014 at 11:47 AM.
#28
10-16-2014, 03:59 PM
Check the earth strap from engine to baulkhead then check the starter solinoid either on L/H inner wing when looking into engine bay with fat black battery cables...or if a pre engaged starter its on top......also if engine turnes over then it could be the condensor in side the distributoe next to points......
#29
10-17-2014, 05:07 AM

Check the earth strap from engine to baulkhead then check the starter solinoid either on L/H inner wing when looking into engine bay with fat black battery cables...or if a pre engaged starter its on top......also if engine turnes over then it could be the condensor in side the distributoe next to points......
yes, an loose engine ground strap caused this for me ....
this is usually a braided metal strap that runs along the same path as the engine steady on the clutch end of the engine.
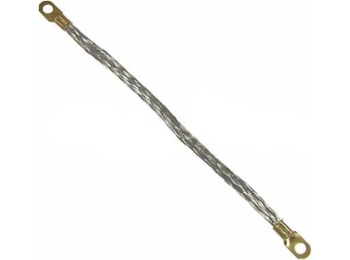
One end is connected to the block bracket holding the steady, and the other end connects to the bolt holding the steady to the firewall bracket. (thee strap is needed because the bushings on the steady make it electrically isolated. NOTE, that on my car this is a vertical bolt with the nut on the bottom ... and the strap was connect on the bottom - the bolt end. This nut was loose ... the steady was fine as the bolt was sitting in the bushing snugly, but with the nut loose the ground strap was intermittent. If the strap was in a good position there was sufficient contact for a complete circuit and the starter turned strong. An if not, nuthin'! Slamming the car door could change this. So for the first month I owned the car ... sometimes it started great and sometimes nuthin ... no pattern. Note that once it WAS running, the vibration kept enuf contact commin and goin that everything else appeared fine
ALTHO ... come to think of it .. the car always did start with a jump in this condition so yours probably IS solenoid or ignition wire/switch ... didn't one of your extra wires get possibly identified as a 'hot start' wire?
#30
10-17-2014, 02:49 PM

1st Gear
Join Date: Jun 2013
Location: Jamaica Queens, NY
Posts: 13
Likes: 0
Received 0 Likes
on
0 Posts
I've been lurking but never post
I'm on my second "running project"mini as I like to call it. I've learned a lot through various forums but mostly through trial and error. Nothing more rewarding that working on these mini, then going for a ride and watching the smiles. Keep posting and I'll try to participate more often.
#31
10-17-2014, 08:51 PM
Thanks only01time! I'll post my progress and I get things done to it! So far, the few guys that have posted have been really helpful. Hopefully I can repay the forums back sometime.
As for starting my mini... I checked all the wire connections and everything was secure. I checked the braided strap and the bolts securing it was tight, though it was a bit dirty. After scrubbing it a bit with a wire brush on both ends, and jumped the car again (voltage was only 9V out of the battery), and it turned over it turned on! So, not entirely sure what happened to it. I will be picking up a trickle charger.
And I'm going to start looking into getting a new alternator. I think with the new driving lamps, the old one on there doesn't supply enough power to power all of the lights by itself, I think...
But, first, I still want to replace the differential oil seals, gaskets, inner pot joints, and repack the grease in the out pot joints. And check the bearings. Then I can get the engine professionally cleaned... and the paint spot fixed on the roof and get a decal that will use more power.... etc etc.


#33
10-18-2014, 12:15 PM
As for starting my mini... I checked all the wire connections and everything was secure. I checked the braided strap and the bolts securing it was tight, though it was a bit dirty. After scrubbing it a bit with a wire brush on both ends, and jumped the car again (voltage was only 9V out of the battery), and it turned over it turned on! So, not entirely sure what happened to it. I will be picking up a trickle charger.
if that's the case, do the same to the ground connection in the boot ... and find the solenoid and pull those wires off (one by one) and wire brush everything there too . . .
if that's the case, do the same to the ground connection in the boot ... and find the solenoid and pull those wires off (one by one) and wire brush everything there too . . .


#35
10-21-2014, 05:00 AM
And I'm going to start looking into getting a new alternator. I think with the new driving lamps, the old one on there doesn't supply enough power to power all of the lights by itself, I think...
100% probable ... and Seven has 'em on special this month . .
http://www.7ent.com/products/alterna...t-gxe2276.html
$140 with no core exchange
100% probable ... and Seven has 'em on special this month . .
http://www.7ent.com/products/alterna...t-gxe2276.html
$140 with no core exchange
#36
10-21-2014, 04:21 PM
Thanks for the input. The ground connection from the battery in the boot wasn't in the greatest of conditions, I got that replaced with a newer, cleaner one and cleaned the battery lead and point where it secures to the chassis.
I chose a very easy car to begin with. Most of it is replacing oil seals. The car runs slightly better than when I first got it but that was just oil change and filters. Most of the work that I want to get done to is it aesthetic. Cleaning, redoing the upholstery of the cabin, working on the botched spot on the roof because last owner left a rag of solvent that ruined the paint.
Ooo! Something on sale, that's always nice. I could get that on order with the oil seals and gaskets I need. Was holding off of that just in case I needed that solenoid... which I don't any more!
#37
10-27-2014, 07:58 AM

How often will you have all the lights on at once? Unless you're on a rally or live where there are no other cars, you will rarely have any of the driving lights on in city conditions,
While it doesn't hurt to have more amperage available, 99% of the time you don't need it.....
If the alternator isn't working at all, that's a different story. My point is buy the parts you need, don't just see what parts you can buy. If you double the amperage output of the alternator, you need to increase the wire size from the back of the alt to the solenoid -the std wire might be too small to carry the extra current.
#39
10-27-2014, 01:13 PM
I do tend to get ahead of myself sometimes. It's great to have people that remind me to rethink things. Bear with my, ooo I should get this. I'll come to realize that I don't actually need it, eventually, after putting off getting it.
I originally thought my alternator wasn't charging my car very much or at all. But, I don't have that much of an area to drive it right now. Batteries take a little while to charge, and with my constant turning the car on and off and not driving it more than the 200 ft my driveway is (and accidentally leaving lights on once), drained the battery.
Not too many changes recently. Need to get the oil seals on order... still. And some C/V grease (Anyone know how much to use for 1 joint? Minimania has a 30 ml pack, not sure how much 2 outer joints would need). Wiring harness should be in. Won't have all of the twisted and electrical taped together.
Thanks for the input.
#40
11-22-2014, 09:42 PM
Overdue update.
I finally managed to change out my inner pot joints and the oil seals. Primarily results so no oil leaks. We'll see how long that holds out.
So, using a few different guides around, I compiled the way I did it below.
Tools required:
1 5/16" socket
14 mm socket
11/16" socket
Something to use those sockets with in addition to a
Torque wrench (I have 2, one that goes up to 75 and one to 250)
A breaker bar or cheater bar might be helpful if a nut is on very tightly
Jack stands
OEM Jack
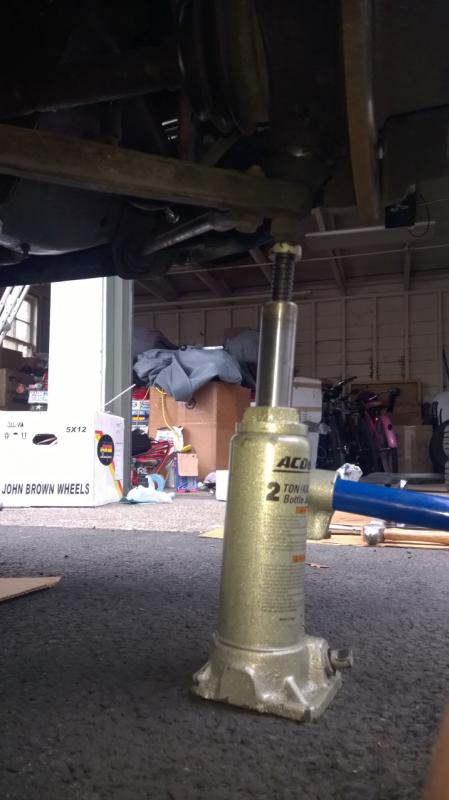
Some type of other jack (I have a bottle jack that worked perfectly)
Some type of Solid packing piece (I used a spare metal piece I had around)
A philips screwdriver
A flat head screwdriver
CV Pot Joint Removal tool
Hammer
If you need it, Ball joint removal tool (to remove it from the arm, part #07-035 on MiniMania)
This is the method I used. It does ruin a CV Boot. so, have a new one ready (I replaced the whole CV joint, more expensive, but you don't need to if your CV joint is in good condition)
FIRMLY PLACE PARKING BREAK ON. And put something behind the back wheels to have it from moving back. Drain oil from the engine, or place an oil pan under the CV joint. I'm not sure how much oil would come out if you leave it in.
Step 1: You can do a couple different things on the first part, depends on how many people you have.
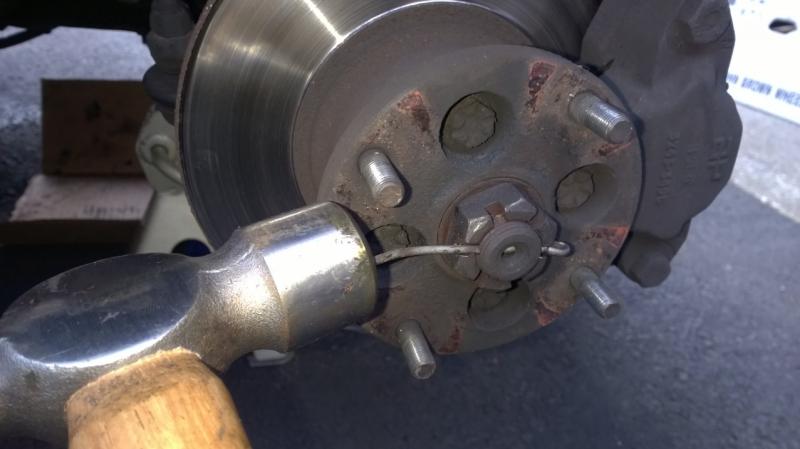
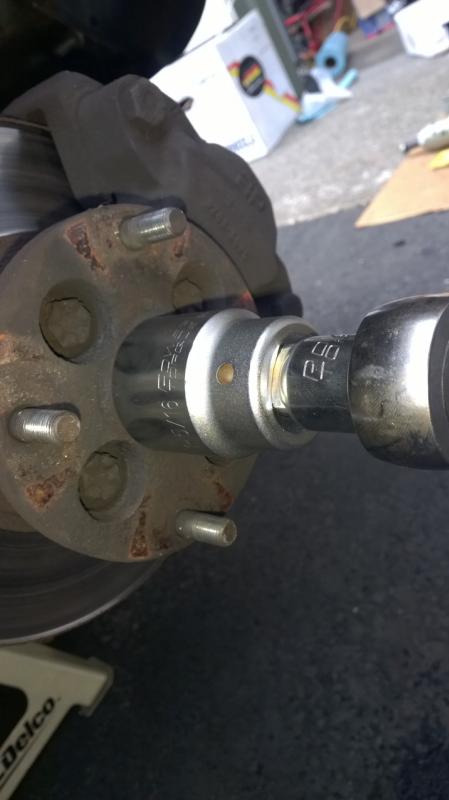
If you have someone helping you, you can jack up the car and put them on the jack stands. Remove the wheels and the cotter pin. in the hub nut. When you have the car on the stands, have the other person press on the breaks firmly. Use the cheater or breaker bar and remove the hub nut.
If you do not have someone else to help, it will take a little more time. Jack up the car, remove the wheel. Remove the cotter pin. Put the wheel back on and lower the car. Remove the hub nut. Jack up the car and place them on the jack stands.
Step 2: Place the jack under the lower ball joint and jack the axle up. Remove the bump stop and place the solid packing piece in there. Lower and remove jack.

Step 3: Remove the steering arm ball joint. Use the Ball joint removal tool if it doesn't slide off. If you don't have a removal tool, put the nut back on and spin it 3 times. Use a hammer and sharply strike the nut. It would be good to replace the nut with a new one if you use this method.
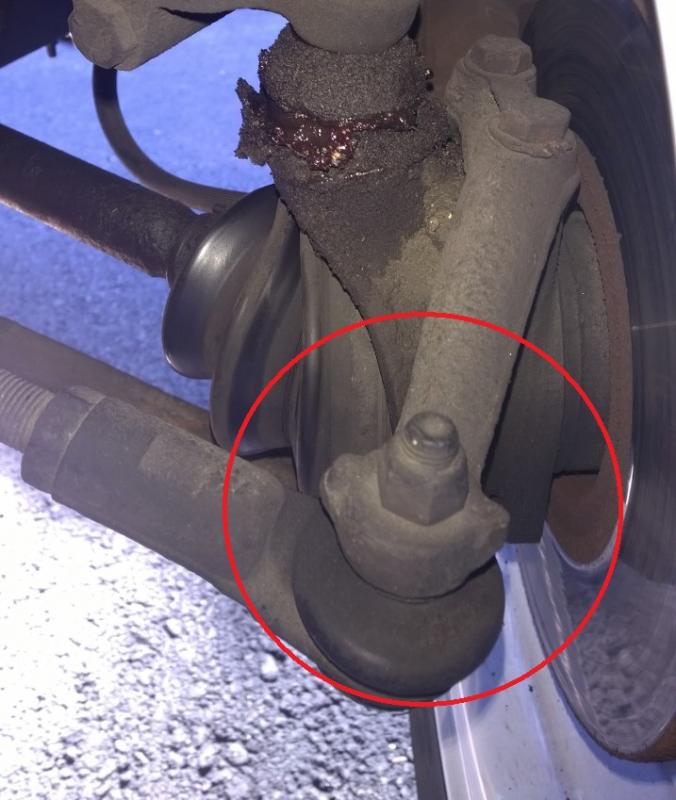
Step 4: Remove the Upper ball joint. Use the Ball joint removal tool if it does not slide out. Any other method I used did not work. (Someone else might have suggestions)

Step 5: Cut the inner CV joint boot. You won't be able to cut all the way through, but make as deep as you can. Now, pull the axle our of the inner joint and then angle it up. Pull the axle from the out hub and pull it out.
Step 6: Use the CV pot joint removal tool (Or 2 long flat head screwdrivers) and pop out the CV joint.
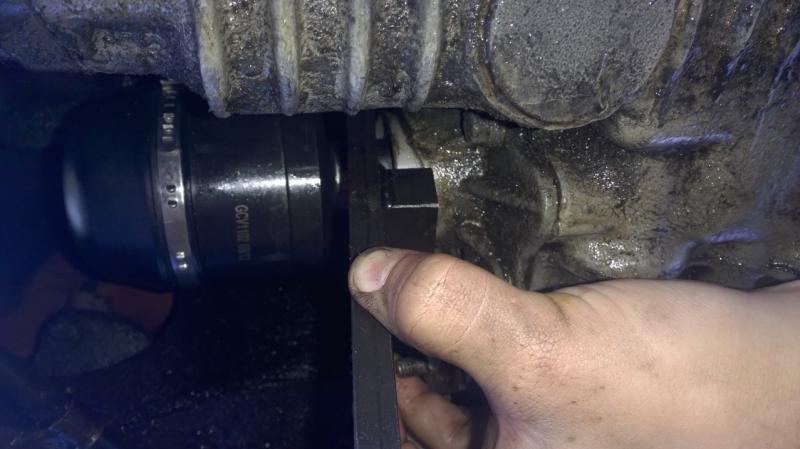
Step 7: Use a flat head screwdriver to remove old oil seal. Clean as good as you can any excess junk.
Step 8: Use the 1 5/16" socket and the hammer to evenly place the new oil seal in.
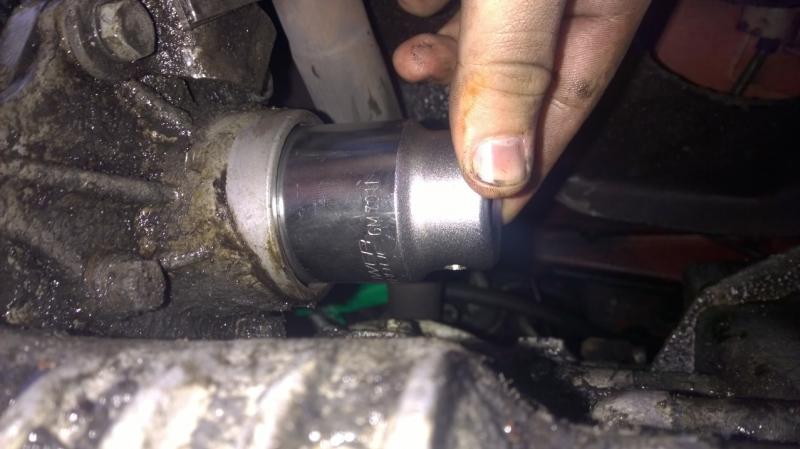
Step 9: Place the new pot joint (or old one with the new boot. If you replaced the boot, make sure you cleaned out the old grease and put new high quality CV grease back in)
Step 10: Clean the ends of the axles if they are dirty. Mine were a bit rusty, nothing a little WD-40, a wire brush and some paper towels couldn't handle. I used a little general purpose grease on each end. Helps move them back into the CV and hub joint.
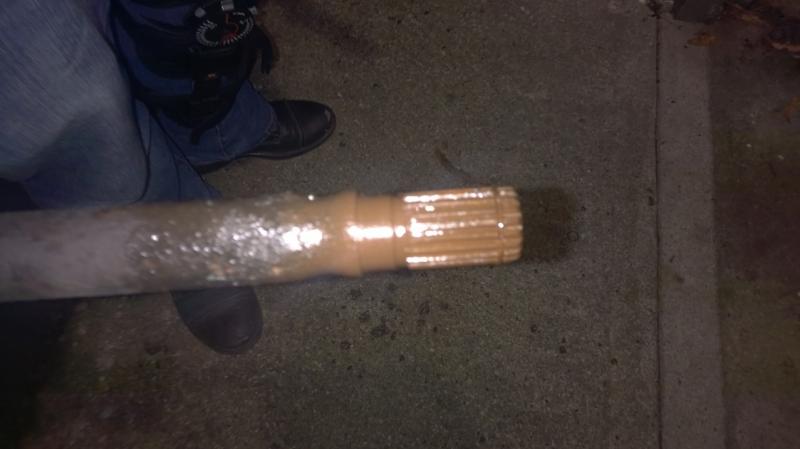
Step 11: Place the outer part of the axle in first and then very carefully slide the inner part of the axle back into the inner CV Boot. (My right side was much tighter to get back in compared to my left)
Step 12: Put the upper ball joint back into the correct hold and put the nut back on. My manual says to tighten it to 40 ft/lbs.
Step 13: Put the control arm back together. Tighten the nut down to 22 ft/lbs.
Step 14: Use the jack stand and jack up the axle by placing it under the lower ball joint. Remove the packing piece and place the bump stop back in.
Step 15: To put the hub nut back on, do step 1 backwards. Use new cotter pins. Tighten the nut to above 188 ft/lbs. Doesn't have an exact number because you need to align the hole so you can place the cotter pin back in.
Hopefully this guide will help other people. I had to use 2 or 3 different bits and pieces people have posted on other forums.
If anyone sees any mistakes (most likely there will be some) please let me know and I'll correct them.
I finally managed to change out my inner pot joints and the oil seals. Primarily results so no oil leaks. We'll see how long that holds out.
So, using a few different guides around, I compiled the way I did it below.
Tools required:
1 5/16" socket
14 mm socket
11/16" socket
Something to use those sockets with in addition to a
Torque wrench (I have 2, one that goes up to 75 and one to 250)
A breaker bar or cheater bar might be helpful if a nut is on very tightly
Jack stands
OEM Jack
Some type of other jack (I have a bottle jack that worked perfectly)
Some type of Solid packing piece (I used a spare metal piece I had around)
A philips screwdriver
A flat head screwdriver
CV Pot Joint Removal tool
Hammer
If you need it, Ball joint removal tool (to remove it from the arm, part #07-035 on MiniMania)
This is the method I used. It does ruin a CV Boot. so, have a new one ready (I replaced the whole CV joint, more expensive, but you don't need to if your CV joint is in good condition)
FIRMLY PLACE PARKING BREAK ON. And put something behind the back wheels to have it from moving back. Drain oil from the engine, or place an oil pan under the CV joint. I'm not sure how much oil would come out if you leave it in.
Step 1: You can do a couple different things on the first part, depends on how many people you have.
If you have someone helping you, you can jack up the car and put them on the jack stands. Remove the wheels and the cotter pin. in the hub nut. When you have the car on the stands, have the other person press on the breaks firmly. Use the cheater or breaker bar and remove the hub nut.
If you do not have someone else to help, it will take a little more time. Jack up the car, remove the wheel. Remove the cotter pin. Put the wheel back on and lower the car. Remove the hub nut. Jack up the car and place them on the jack stands.
Step 2: Place the jack under the lower ball joint and jack the axle up. Remove the bump stop and place the solid packing piece in there. Lower and remove jack.
Step 3: Remove the steering arm ball joint. Use the Ball joint removal tool if it doesn't slide off. If you don't have a removal tool, put the nut back on and spin it 3 times. Use a hammer and sharply strike the nut. It would be good to replace the nut with a new one if you use this method.
Step 4: Remove the Upper ball joint. Use the Ball joint removal tool if it does not slide out. Any other method I used did not work. (Someone else might have suggestions)
Step 5: Cut the inner CV joint boot. You won't be able to cut all the way through, but make as deep as you can. Now, pull the axle our of the inner joint and then angle it up. Pull the axle from the out hub and pull it out.
Step 6: Use the CV pot joint removal tool (Or 2 long flat head screwdrivers) and pop out the CV joint.
Step 7: Use a flat head screwdriver to remove old oil seal. Clean as good as you can any excess junk.
Step 8: Use the 1 5/16" socket and the hammer to evenly place the new oil seal in.
Step 9: Place the new pot joint (or old one with the new boot. If you replaced the boot, make sure you cleaned out the old grease and put new high quality CV grease back in)
Step 10: Clean the ends of the axles if they are dirty. Mine were a bit rusty, nothing a little WD-40, a wire brush and some paper towels couldn't handle. I used a little general purpose grease on each end. Helps move them back into the CV and hub joint.
Step 11: Place the outer part of the axle in first and then very carefully slide the inner part of the axle back into the inner CV Boot. (My right side was much tighter to get back in compared to my left)
Step 12: Put the upper ball joint back into the correct hold and put the nut back on. My manual says to tighten it to 40 ft/lbs.
Step 13: Put the control arm back together. Tighten the nut down to 22 ft/lbs.
Step 14: Use the jack stand and jack up the axle by placing it under the lower ball joint. Remove the packing piece and place the bump stop back in.
Step 15: To put the hub nut back on, do step 1 backwards. Use new cotter pins. Tighten the nut to above 188 ft/lbs. Doesn't have an exact number because you need to align the hole so you can place the cotter pin back in.
Hopefully this guide will help other people. I had to use 2 or 3 different bits and pieces people have posted on other forums.
If anyone sees any mistakes (most likely there will be some) please let me know and I'll correct them.
#41
11-23-2014, 02:58 PM
Been moving, haven't been able to do anything on the car the past couple weekends.
It is wiring diagram 18 in my Haynes manual. Doesn't help when the previous owner made some repairs just to get it working. Like in the picture below... just a random wire, hanging across the engine. No idea what it was supposed to replace...
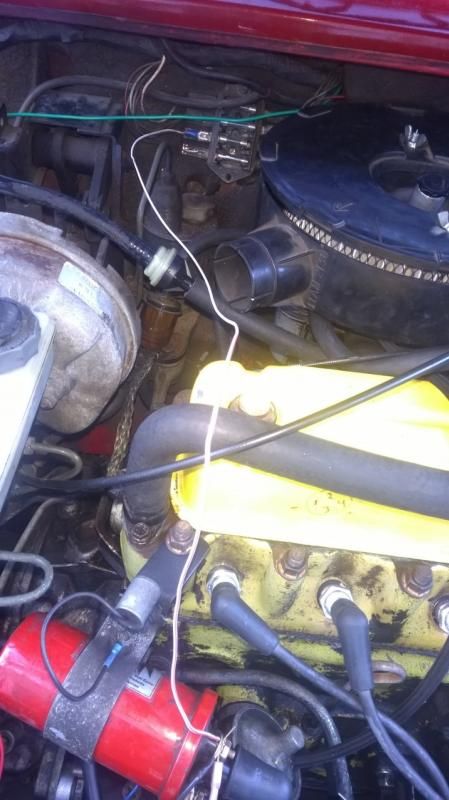
That wire was the problem (that white one, in the middle of the picture, going across the whole bay). I tinkered with it one last time before I turn in and that was supplying power to the wiper motors and tach (which in turn, makes them not work O.o). I removed it completely and my electrical is back to working condition.
I did order a new wiring harness. I'm going to be glad I did. In troubleshooting the tach problem, I got my instrumentation panel out and saw the wiring behind that, should have taken a picture, but, there seems to be a lot of repairs for some reason. There is still a W/Bk wire that wiring diagram says its supposed to be plugged into the distributor just hanging around... No idea what that is for. Along with a few of these cylindrical things with wires coming out. You can see one right above the ignition coil, yet I can't find what they are in the manual. Maybe someone knows? :D
@MINIdave
I browsed through your post about your project, it is turning out quite nicely. Hopefully mine will get to that condition someday too. When I get the pot joints out, I'll look at the bearings to see if they are alight.
I ordered a pair of new C/V pot joints and a selector shaft seal kit. Is there another seal within the axel that I would have to replace? Or just the pot joints be ok? Is it possible to remove those with out taking the whole axel? I found a youtube video of a guy just popping them out with everything still attached ( Disconnecting the shift linkage and axles on a rod-change Mini Cooper - YouTube ), but it seems he didn't have a plan to remove them from the axel, just pulling the engine out. I'll look into it more.
It is wiring diagram 18 in my Haynes manual. Doesn't help when the previous owner made some repairs just to get it working. Like in the picture below... just a random wire, hanging across the engine. No idea what it was supposed to replace...
That wire was the problem (that white one, in the middle of the picture, going across the whole bay). I tinkered with it one last time before I turn in and that was supplying power to the wiper motors and tach (which in turn, makes them not work O.o). I removed it completely and my electrical is back to working condition.
I did order a new wiring harness. I'm going to be glad I did. In troubleshooting the tach problem, I got my instrumentation panel out and saw the wiring behind that, should have taken a picture, but, there seems to be a lot of repairs for some reason. There is still a W/Bk wire that wiring diagram says its supposed to be plugged into the distributor just hanging around... No idea what that is for. Along with a few of these cylindrical things with wires coming out. You can see one right above the ignition coil, yet I can't find what they are in the manual. Maybe someone knows? :D
@MINIdave
I browsed through your post about your project, it is turning out quite nicely. Hopefully mine will get to that condition someday too. When I get the pot joints out, I'll look at the bearings to see if they are alight.
I ordered a pair of new C/V pot joints and a selector shaft seal kit. Is there another seal within the axel that I would have to replace? Or just the pot joints be ok? Is it possible to remove those with out taking the whole axel? I found a youtube video of a guy just popping them out with everything still attached ( Disconnecting the shift linkage and axles on a rod-change Mini Cooper - YouTube ), but it seems he didn't have a plan to remove them from the axel, just pulling the engine out. I'll look into it more.
http://www.minispares.com/product/Cl...ck%20to%20shop
and this will stop you damageing the diff covers
http://www.minispares.com/product/Cl...ck%20to%20shop
#42
11-25-2014, 06:52 PM
@mk1leg
Oh man! I wish I saw that linkage for the selector shaft sooner! I would have put that on!
I do already have that tool to get the CV pots off. It was very useful. Made that part less stressful, compared to a couple of other hurdles I had to get over.
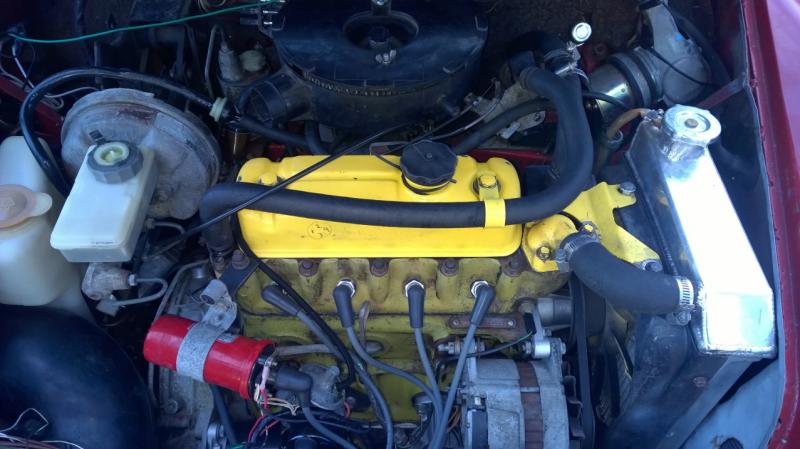
Finally took my car to get the engine steam cleaned.
Before: (close up shot, trying to track down other zoomed out picture)

After!
Haven't seen any oil leaking out at all yet, we'll see how long the seals hold. Going to look at the whole car good over the break and see if there are any other small problems with the engine.
Oh man! I wish I saw that linkage for the selector shaft sooner! I would have put that on!
I do already have that tool to get the CV pots off. It was very useful. Made that part less stressful, compared to a couple of other hurdles I had to get over.
Finally took my car to get the engine steam cleaned.
Before: (close up shot, trying to track down other zoomed out picture)
After!
Haven't seen any oil leaking out at all yet, we'll see how long the seals hold. Going to look at the whole car good over the break and see if there are any other small problems with the engine.
#43
12-12-2014, 06:13 AM

#44
12-12-2014, 12:25 PM
Thanks! I'm surprised I got the work done myself (with some help from my Dad and older bro who was a mechanic in the military).
The steam clean cost $200, that was the whole front bottom half and engine compartment and front suspension. There are some hard to get areas and everything behind the foam firewall that I need to get cleaned. I want to replace the foam with some better sound proofing/firewall material though. I'm probably going to look into doing the rest of the bottom myself and then do some type of rugged liner for rust prevention.
I thought the CV joint were going to be too much, but I managed to get them done. Here is a list of things that I need and want to get done and if I think I can do it myself:
Possible:
Outer C/V Joints
Firewall
New wiring harness
Speakers
Interior Redesign (Still thinking of how I want it to look)
Boot cleaning
Check the Manifold gaskets, engine is very loud, might be a leak
Carburetor tune (maybe attempt this weekend, runs really rich)
Probably can't do (i.e. get pro help):
2nd gear keeps popping out of gear when decelerating (It still works and I can hold the lever in place, but don't know what that would be to fix)
Ball joints
Engine swap (crossed my mind, but can't afford it anytime soon, still depends on what I want to do with the car)
Drum brake replacement (either renewal or do disk conversion kit)
Paint
Suspension (was looking into springs)
Roll cage
#45
12-13-2014, 07:36 PM
A better pic of the carb would help to tell you how to adjust it....
If it's an HIF (horizontal interior float) to lean it out you screw the adjustment screw out - which runs contrary to most carbs. If it's an earlier SU, you run the main jet nut upwards to lean it out.
Take a pic without the air cleaner and I can tell you more.
Fixing the synchro will require removing the engine, and splitting the trans off of it - not job for a novice.
However, changing out the cones for springs is not too bad. The only "hard" part there is getting an alignment shop to set the ride height and align it properly.
#46
12-15-2014, 05:43 AM
is there any specific instructions you'd want to provide to the shop when aligning the car? I'm interested in swapping cones for springs on my mini van as well so this info would be great.
#47
12-18-2014, 12:39 PM
Swapping out the springs is no biggy, but you really need a set of hi-lows to take advantage and set the ride height, then a set of adjustable lower control arms and rods lets you dial in the front perfectly, and a set of the camber/toe plates for the rear lets you get it correct too.
All that is a lot of work for the alignment shop to adjust, I don't know that the average tire store will bother with it, but they might. Setting the ride height is fiddly, you have to remove the tires, adjust it, put the tire back on, then bounce it a bit to settle it again, measure it - lather , rinse, repeat till you get it right. Also, my springs settled down quite a bit in the first few hundred miles, and I had to raise it up again quite a bit.
Once you have it all installed and at least "close enough" to drive, it's not too bad a job for them to do.
As for settings, 1/2 degree camber in the back, and a tiny bit of toe in. In the front 1/2 degree of camber, 3-4* of caster and a tiny bit of toe out. Some people set the left caster at 3 and the right at 3.5 to make the car track better on our crowned roads.
#48
12-25-2014, 05:38 PM
MiniDave:
Here are the pictures of my carburetor:
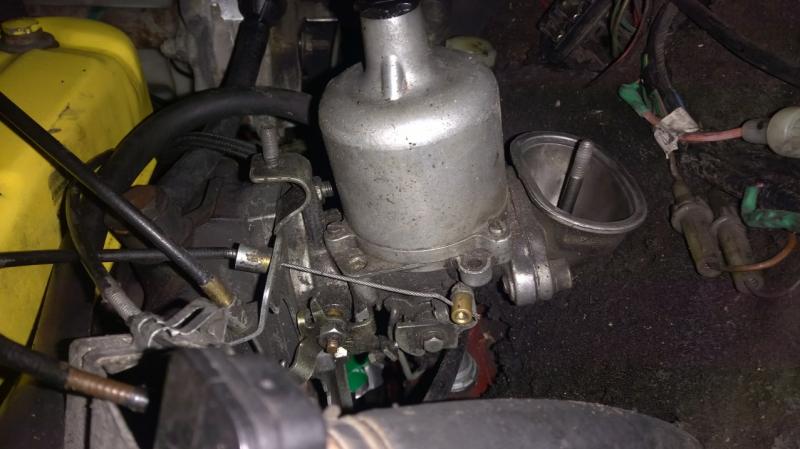

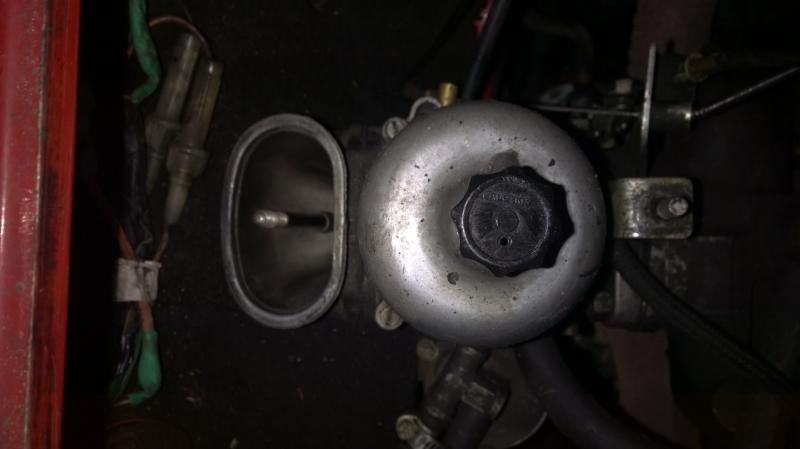
Let me know if you need a specific view. I think this is the HS4. There is a section in the Haines on it.
Thanks for the info on the spring conversion too. I'm not sure when I'll do that, but it does seem to be a bit larger project than replacing a couple CV joints.
I'm working on cleaning the interior and boot, getting the firewall material replaced, putting better speakers in.
Here are the pictures of my carburetor:
Let me know if you need a specific view. I think this is the HS4. There is a section in the Haines on it.
Thanks for the info on the spring conversion too. I'm not sure when I'll do that, but it does seem to be a bit larger project than replacing a couple CV joints.
I'm working on cleaning the interior and boot, getting the firewall material replaced, putting better speakers in.
#49
12-26-2014, 08:12 AM

Ahh, that easily-accessible carburettor.
One recommended option is to train a young child to do the tuning for you, since they can get their little hands on the carburettor. I believe the Austin draughtsman who managed to get the carburettor main jet so close to the exhaust manifold won an automotive manufacturers' award for all the burnt hands he caused.
The better option is to admit that you have an obsession and treat yourself to the right tools for the job - I see Minimania sell them - and it is the Christmas season so you are entitled by law to buy yourself the presents that all your careless friends and family failed to give.
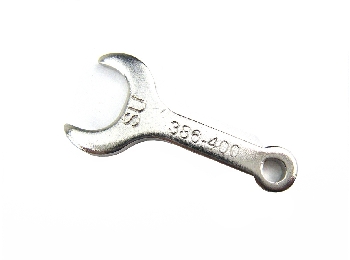
- A tiny $5 SU main jet spanner looks like a toy until you find out that it fits in the space available like nothing else, including your finger ends, does
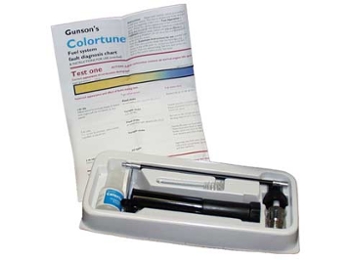
- Setting the mixture on an SU should be done rarely - more than once per decade and you are indulging yourself unnaturally - but a $85 Colortune is a lovely simple device for doing this. It's basically a glass-centred spark plug and by looking at the combustion colour it allows you to set the mixture right. Works on any carburettor engine.
It is not necessary to do a pagan dance before using a Colortune, or even to wear a strange carburettor-adjuster's hat, but I find it adds to the fun.
One recommended option is to train a young child to do the tuning for you, since they can get their little hands on the carburettor. I believe the Austin draughtsman who managed to get the carburettor main jet so close to the exhaust manifold won an automotive manufacturers' award for all the burnt hands he caused.
The better option is to admit that you have an obsession and treat yourself to the right tools for the job - I see Minimania sell them - and it is the Christmas season so you are entitled by law to buy yourself the presents that all your careless friends and family failed to give.
- A tiny $5 SU main jet spanner looks like a toy until you find out that it fits in the space available like nothing else, including your finger ends, does
- Setting the mixture on an SU should be done rarely - more than once per decade and you are indulging yourself unnaturally - but a $85 Colortune is a lovely simple device for doing this. It's basically a glass-centred spark plug and by looking at the combustion colour it allows you to set the mixture right. Works on any carburettor engine.
It is not necessary to do a pagan dance before using a Colortune, or even to wear a strange carburettor-adjuster's hat, but I find it adds to the fun.
#50
12-27-2014, 02:49 PM
Angib is spot on, and that tool is a great addition to any Mini owner's tool box. That said, I do usually just use my fingertips to set the mixture unless the nut is too tight.
Remember, you need everything else right before you mess with the carb - point gap, timing, valve adjustment, condition and gap of the plugs, good plug wires, cap and rotor - THEN and only then do you mess with the mix. You 'll want to pull the suction dome off and make sure the piston and dome are clean and the piston slides smoothly in the bore. Also, make sure the throttle shaft bores aren't worn too badly, if they are you'll never get it exactly right no matter what tools you use.
Oh and don't forget to top off the oil in the carb, under that black cap. Some people use 20w, I use ATF. Not to the top of the carb, but to the top of the smaller tube inside that bore under the cap.
Last edited by MINIdave; 12-27-2014 at 02:56 PM.