Carnage - The aftermath of a TOB gone IED
#1
 04-25-2012, 07:35 AM


Carnage - The aftermath of a TOB gone IED
My car had 82k on her before I started to feel a vibration in the clutch pedal. These were the symptoms leading to the throwout bearing explosion (there's no other word for it):
- Vibrating clutch pedal
- "Scraping" noise under acceleration
- Inconsistent pedal feel (I think this was more related to the dead clutch slave )
)
I should also add at this point that my dual-mass flywheel seems okay ... But there is a possibility it was going bad (which explains the clutch pedal vibration). The clutch, while worn, also looked to be okay. The wear on the disc seemed normal.
I decided to just replace the whole thing with an Exedy flywheel and clutch kit. Here are some pictures of this past weekend's tear-down.
Picture 1 - Pulled the transmission out of the car and was greeted by a mangled TOB. Note the ball bearings concentrated on one side of the bearing! The metal piece and rivets holding the sleeve onto the bearing must have just gone to pieces. By doing so, shrapnel was bounced around the bellhousing, leaving everything in it looking like it was shot by a 12 gauge. Some of the bellhousing support ribs were chipped off as well. I had a pile of metal sitting at the bottom of the bellhousing.
Picture 2 - This, however caught my eye ... Was this just a deep gouge, or did something actually pierce the bellhousing?
Picture 3 - Separation of the gear case to install an LSD confirmed that whatever flew off the TOB assembly punched right through the diff housing and hit the factory open diff! No wonder I was getting a transmission oil leak!
More pictures as the story develops.
- Vibrating clutch pedal
- "Scraping" noise under acceleration
- Inconsistent pedal feel (I think this was more related to the dead clutch slave
)I should also add at this point that my dual-mass flywheel seems okay ... But there is a possibility it was going bad (which explains the clutch pedal vibration). The clutch, while worn, also looked to be okay. The wear on the disc seemed normal.
I decided to just replace the whole thing with an Exedy flywheel and clutch kit. Here are some pictures of this past weekend's tear-down.
Picture 1 - Pulled the transmission out of the car and was greeted by a mangled TOB. Note the ball bearings concentrated on one side of the bearing! The metal piece and rivets holding the sleeve onto the bearing must have just gone to pieces. By doing so, shrapnel was bounced around the bellhousing, leaving everything in it looking like it was shot by a 12 gauge.
Some of the bellhousing support ribs were chipped off as well. I had a pile of metal sitting at the bottom of the bellhousing.Picture 2 - This, however caught my eye ... Was this just a deep gouge, or did something actually pierce the bellhousing?
Picture 3 - Separation of the gear case to install an LSD confirmed that whatever flew off the TOB assembly punched right through the diff housing and hit the factory open diff! No wonder I was getting a transmission oil leak!
More pictures as the story develops.
#2
04-25-2012, 08:06 AM

#3
04-25-2012, 09:20 AM
Ugh. Having this happen on the highway sounds dangerous. I feared being stranded miles from home, so I'd left the car at my parents' place in the suburbs to work on it at a future date and explicitly told them NOT to drive it. Turns out my brother took it out to pick up his girlfriend and the TOB flew apart a half mile away from my parents' house. He limped it home and denies any wrongdoing. I should have just kept the damn keys ...
So, aside from plans to go medieval on my sibling, I have to install my clutch/flywheel kit.
Here's what the old clutch looked like:
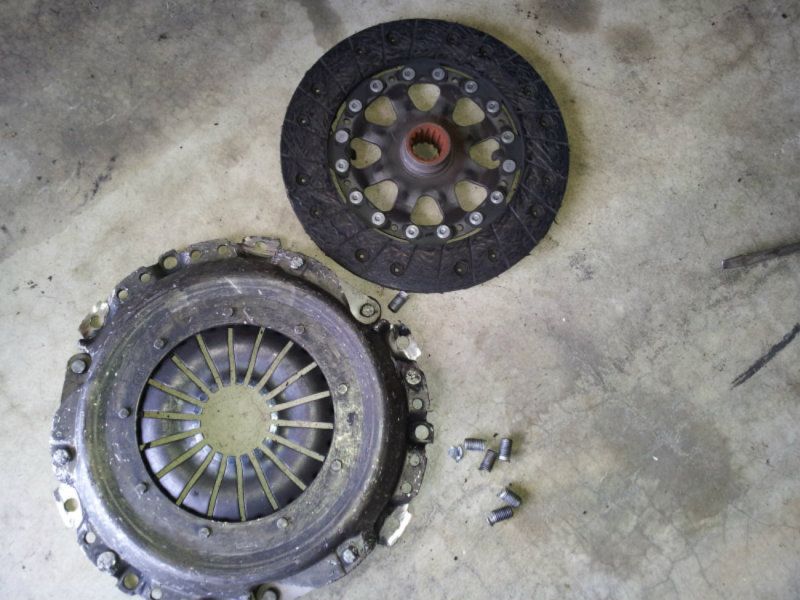
Thanks to some impromptu shot-peening of the pressure plate, the torx-head pressure plate bolts were completely rounded off. Solution: get out the grinder, and off with their heads!
The funny thing is, with the bolt heads cut and the pressure plate off, the bolt stems threaded out of the flywheel with no effort at all.
Oh, the joys of MINI ownership!
He limped it home and denies any wrongdoing. I should have just kept the damn keys ...So, aside from plans to go medieval on my sibling, I have to install my clutch/flywheel kit.
Here's what the old clutch looked like:
Thanks to some impromptu shot-peening of the pressure plate, the torx-head pressure plate bolts were completely rounded off. Solution: get out the grinder, and off with their heads!
The funny thing is, with the bolt heads cut and the pressure plate off, the bolt stems threaded out of the flywheel with no effort at all.
Oh, the joys of MINI ownership!

#5
05-01-2012, 09:23 PM

#6
05-02-2012, 07:37 AM
Here's what the bearing actually looked like when I pulled the transmission.
I've never seen anything like this. It's a good thing the bearing stayed in (mostly) one piece, though. I can't imagine what would have happened if the ball bearings actually flew out of there at 7000 RPM.
As an update, one of my father's friends has a TIG welder, thus, he patched up the hole in the diff housing for free (I apparently owe him a case of Hoegaarden for that ...). I cleaned up the weld, and made sure everything was right (even cleaned up some of the casting flash inside the transmission case). Just waiting on a new transmission input shaft seal (~$13 without shipping from MINI Peabody in MA). Might as well put a new one in since my throwout bearing guide tube was heavily scored and had heat marks from when my brother rode the clutch to get the car back on the driveway. That's getting replaced as well.
It's finals week for me, so like many law school students, I'm living underneath a stack of books, getting a nice tan from my computer screen courtesy of Westlaw. It's a miracle my boss allowed me some days off to study, but this also means I won't be working on the car for the next two weeks or so.  That also means I'm missing out on the first few events this autocross season ...
I've never seen anything like this. It's a good thing the bearing stayed in (mostly) one piece, though. I can't imagine what would have happened if the ball bearings actually flew out of there at 7000 RPM.
As an update, one of my father's friends has a TIG welder, thus, he patched up the hole in the diff housing for free (I apparently owe him a case of Hoegaarden for that ...). I cleaned up the weld, and made sure everything was right (even cleaned up some of the casting flash inside the transmission case). Just waiting on a new transmission input shaft seal (~$13 without shipping from MINI Peabody in MA). Might as well put a new one in since my throwout bearing guide tube was heavily scored and had heat marks from when my brother rode the clutch to get the car back on the driveway.
That's getting replaced as well.It's finals week for me, so like many law school students, I'm living underneath a stack of books, getting a nice tan from my computer screen courtesy of Westlaw.
It's a miracle my boss allowed me some days off to study, but this also means I won't be working on the car for the next two weeks or so. That also means I'm missing out on the first few events this autocross season ...
#7
05-03-2012, 07:23 AM


Trending Topics
#8
05-03-2012, 04:45 PM
FFFFFFFFFFFFFFFFFFFFFFFFFFUU--
Jeez, I would imagine a hole that massive would require a new bellhousing. How on earth did you fix that (if you didn't chuck the bellhousing into the dumpster first)?
Here are some pictures from last weekend.
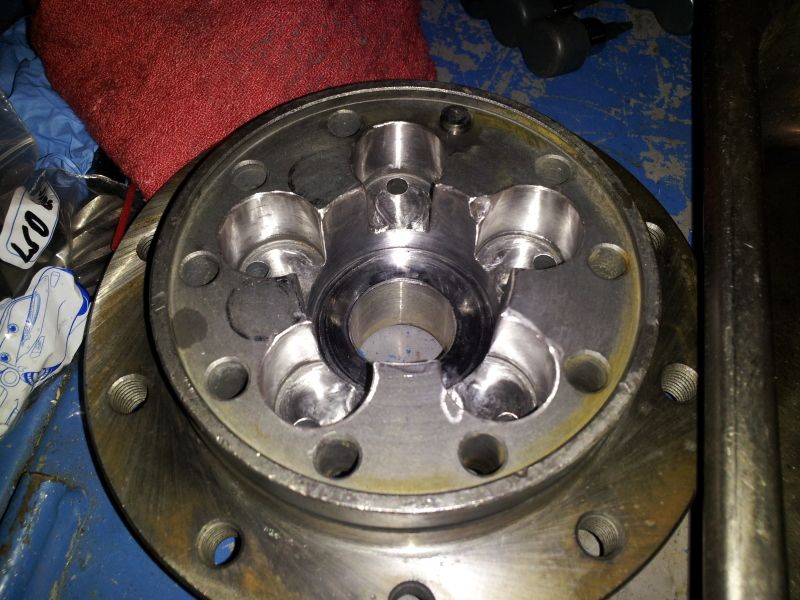
I may have mentioned this before, but since the transmission gear case needed to be pulled apart to fix the hole left behind by the TOB, I decided to throw in a limited slip differential. I opted to order and rebuild an OBX helical unit, as so many have done before. Here's the final product of about a day's work sanding away burrs and sharp edges and polishing load-bearing surfaces.
Excuse the messy workbench ... My father and I are planning on building a bigger one this summer.
I stole the "Cars" baggies from my cousins. It's imperative I keep all those nuts and bolts in one place!
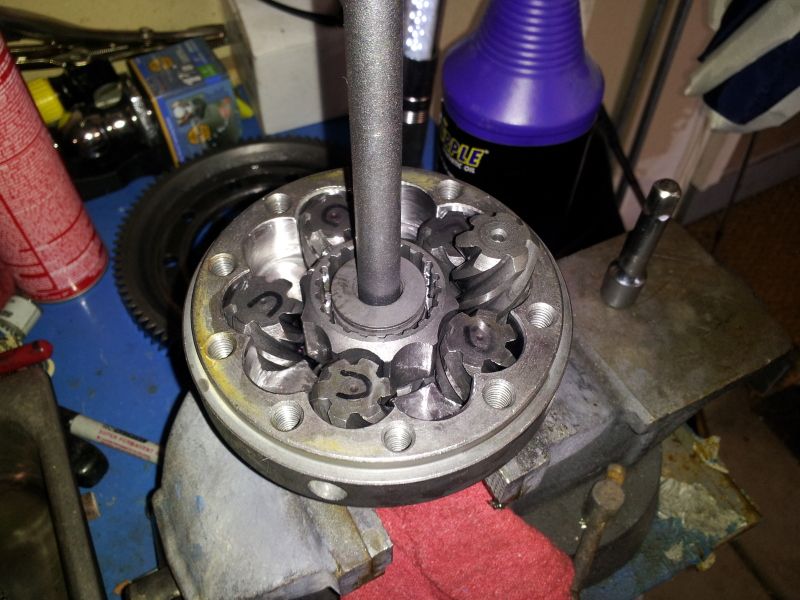
I had to use a long 3/8 extension to keep the belleville springs aligned. This didn't work out very well, so I used the handle of a cheap 3/8 drive ratchet. It fit snugly and kept the bellevilles aligned as I torqued down the diff.
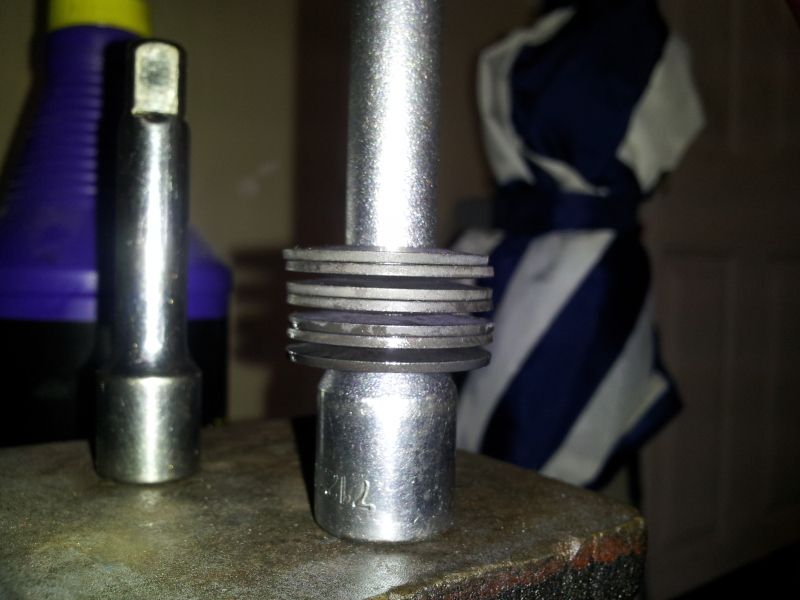
Proper arrangement of the bellevilles per Rich Bryant's suggestion.
After giving each part a blast of brake cleaner and compressed air to clean it all up, I lubed each part with some Royal Purple (I have two quarts of Redline MTL ready to go in after break in. I had some extra Royal Purple laying around from the last time I did a transmission flush), put blue loctite on the new bolts, torqued each of them to 32 ft/lbs, and pressed the Timken bearings on (with my new harbor freight shop press! ).
).
So the diff's ready for the car, now I've got to put it in the transmission, replace the input shaft seal, throw it all back together and put it back in the car.
... Oh right, finals.
Jeez, I would imagine a hole that massive would require a new bellhousing. How on earth did you fix that (if you didn't chuck the bellhousing into the dumpster first)?
Here are some pictures from last weekend.
I may have mentioned this before, but since the transmission gear case needed to be pulled apart to fix the hole left behind by the TOB, I decided to throw in a limited slip differential. I opted to order and rebuild an OBX helical unit, as so many have done before. Here's the final product of about a day's work sanding away burrs and sharp edges and polishing load-bearing surfaces.
Excuse the messy workbench ... My father and I are planning on building a bigger one this summer.
I stole the "Cars" baggies from my cousins.
It's imperative I keep all those nuts and bolts in one place!I had to use a long 3/8 extension to keep the belleville springs aligned. This didn't work out very well, so I used the handle of a cheap 3/8 drive ratchet. It fit snugly and kept the bellevilles aligned as I torqued down the diff.
Proper arrangement of the bellevilles per Rich Bryant's suggestion.
After giving each part a blast of brake cleaner and compressed air to clean it all up, I lubed each part with some Royal Purple (I have two quarts of Redline MTL ready to go in after break in. I had some extra Royal Purple laying around from the last time I did a transmission flush), put blue loctite on the new bolts, torqued each of them to 32 ft/lbs, and pressed the Timken bearings on (with my new harbor freight shop press!
).So the diff's ready for the car, now I've got to put it in the transmission, replace the input shaft seal, throw it all back together and put it back in the car.
... Oh right, finals.
#9
05-03-2012, 07:34 PM
Nice.
Your post was the push I needed to take care of my TOB so I ordered my clutch kit from Way today. Unfortunately, their entire shop is playing at the dragon instead of shipping my orders like all good shops should, so I'll be delayed in putting things back together. Tear down begins this Sunday after the monthly car show here in Colorado Springs. Fun times ahead...
Your post was the push I needed to take care of my TOB so I ordered my clutch kit from Way today. Unfortunately, their entire shop is playing at the dragon instead of shipping my orders like all good shops should, so I'll be delayed in putting things back together. Tear down begins this Sunday after the monthly car show here in Colorado Springs. Fun times ahead...
#10
05-03-2012, 11:25 PM
Ah wel...

#11
05-04-2012, 12:47 PM
Nice.
Your post was the push I needed to take care of my TOB so I ordered my clutch kit from Way today. Unfortunately, their entire shop is playing at the dragon instead of shipping my orders like all good shops should, so I'll be delayed in putting things back together. Tear down begins this Sunday after the monthly car show here in Colorado Springs. Fun times ahead...
Your post was the push I needed to take care of my TOB so I ordered my clutch kit from Way today. Unfortunately, their entire shop is playing at the dragon instead of shipping my orders like all good shops should, so I'll be delayed in putting things back together. Tear down begins this Sunday after the monthly car show here in Colorado Springs. Fun times ahead...
We threw together a turbo "kit" using my OEM TD04H-14B turbo from my AWD Talon, a Megan Racing manifold, Paxton FMU and exhaust tubing (it was around ~$800 total). At 10 PSI, the car was fast enough to waste my buddy's '05 WRX with bolt-ons, and the clutch held together, even when the car was making roughly double it's stock output and used for drifting (my brother was an unabashed clutch kicker).
I've heard good things about the Valeo kit, but not enough on the Exedy. I got mine for $317 shipped from Amazon, and it was shipped directly from an Exedy supplier in the US, so it was a lot cheaper.
I'm definitely taking my time on this project due to personal commitments (not to mention I'm tackling other things like the supercharger PTO drive box, water pump, timing chain tensioner, oil pressure gauge sending unit, power steering hose replacement and power steering fluid flush, etc.
), but there's no reason it couldn't be done in the span of a weekend with the help of an assistant.
#12
05-04-2012, 02:35 PM
Did you order the Valeo kit? I went with Exedy, based on the other clutch jobs I've done in the past. The last time I put an Exedy OEM clutch in a car, it was my brother's turbocharged Miata.
We threw together a turbo "kit" using my OEM TD04H-14B turbo from my AWD Talon, a Megan Racing manifold, Paxton FMU and exhaust tubing (it was around ~$800 total). At 10 PSI, the car was fast enough to waste my buddy's '05 WRX with bolt-ons, and the clutch held together, even when the car was making roughly double it's stock output and used for drifting (my brother was an unabashed clutch kicker).
I've heard good things about the Valeo kit, but not enough on the Exedy. I got mine for $317 shipped from Amazon, and it was shipped directly from an Exedy supplier in the US, so it was a lot cheaper.
I'm definitely taking my time on this project due to personal commitments (not to mention I'm tackling other things like the supercharger PTO drive box, water pump, timing chain tensioner, oil pressure gauge sending unit, power steering hose replacement and power steering fluid flush, etc.), but there's no reason it couldn't be done in the span of a weekend with the help of an assistant.
We threw together a turbo "kit" using my OEM TD04H-14B turbo from my AWD Talon, a Megan Racing manifold, Paxton FMU and exhaust tubing (it was around ~$800 total). At 10 PSI, the car was fast enough to waste my buddy's '05 WRX with bolt-ons, and the clutch held together, even when the car was making roughly double it's stock output and used for drifting (my brother was an unabashed clutch kicker).
I've heard good things about the Valeo kit, but not enough on the Exedy. I got mine for $317 shipped from Amazon, and it was shipped directly from an Exedy supplier in the US, so it was a lot cheaper.
I'm definitely taking my time on this project due to personal commitments (not to mention I'm tackling other things like the supercharger PTO drive box, water pump, timing chain tensioner, oil pressure gauge sending unit, power steering hose replacement and power steering fluid flush, etc.
), but there's no reason it couldn't be done in the span of a weekend with the help of an assistant.
#13
05-04-2012, 05:49 PM
Yep. I don't know how much lighter it is compared to the stock one, but I've seen some sellers advertise the flywheel as being chro-moly steel. Seems like a regular old steel one to me. I'll try weighing it using the weigh-yourself-then-yourself-holding-the-item method. I've had a chro-moly flywheel on my Talon before (JUN Auto), and it lasted 15,000 miles before it warped. I replaced it with a Fidanza 8 lb., and boy, is the car a pain to drive around a parking lot.
I used the money I saved to buy a transmission jack, though the transmission itself is light enough to use the "bench press" method to get it back on the engine, I wouldn't recommend it ... I have a scar on my eyebrow from when that went wrong ...
I used the money I saved to buy a transmission jack, though the transmission itself is light enough to use the "bench press" method to get it back on the engine, I wouldn't recommend it ... I have a scar on my eyebrow from when that went wrong ...
#14
05-04-2012, 06:26 PM
Yep. I don't know how much lighter it is compared to the stock one, but I've seen some sellers advertise the flywheel as being chro-moly steel. Seems like a regular old steel one to me. I'll try weighing it using the weigh-yourself-then-yourself-holding-the-item method. I've had a chro-moly flywheel on my Talon before (JUN Auto), and it lasted 15,000 miles before it warped. I replaced it with a Fidanza 8 lb., and boy, is the car a pain to drive around a parking lot.
I used the money I saved to buy a transmission jack, though the transmission itself is light enough to use the "bench press" method to get it back on the engine, I wouldn't recommend it ... I have a scar on my eyebrow from when that went wrong ...
I used the money I saved to buy a transmission jack, though the transmission itself is light enough to use the "bench press" method to get it back on the engine, I wouldn't recommend it ... I have a scar on my eyebrow from when that went wrong ...
I'm not even going to try the bench press method.
 I'll either bum a transmission jack or pick one up from harbor freight.
#15
05-04-2012, 07:30 PM
#16
05-04-2012, 08:09 PM
#18
05-04-2012, 11:00 PM
The 450 lb. capacity Harbor Freight tranny jack worked really well for me. The ratchet strap that came with it is pretty useless (it wraps widthwise), but I was able to hold the transmission securely to the jack using an extra ratchet strap positioned lengthwise underneath the tray. It's a screw-type jack, so I was able to use my 1/2" impact gun to raise/lower it quickly.
I think I picked it up for $80 with one of those "save an extra 20%" coupons for Inside Track members.
#19
05-08-2012, 02:23 PM

It won't be for a bit I am sure, but let me know how it goes - my clutch on my 03 started slipping earlier this year and I think it's starting to get worse. 114k miles on the ODO.
#20
05-08-2012, 04:31 PM
#21
05-09-2012, 02:02 AM

Funny you say that because I actually started working on mine already. Not in a big rush to pull the parts off as my clutch won't be here until the end of the week or early next week. Subframe is out and I'm going to replace my LCA bushing while it's out. Dropping the transmission tomorrow.

#22
05-12-2012, 08:26 AM
My clutch arrived yesterday afternoon and had the transmission and subframe back on by 7. Only problem is, my clutch pedal doesn't catch pressure until it hits the bottom so the slave barely pushes the fork. Did you have to bleed your slave after a clutch install? I did replace my brake lines while it was on jack stands and have not bled the system yet. I know the clutch shares reservoirs with the brakes so I'm thinking it might have affected it. Going to bleed the system today.
#23
05-13-2012, 05:07 PM
#24
05-13-2012, 06:24 PM
BTW - I expected lining up the transmission on the engine to be more of a fight but it went it after 10min of lining everything up. I found that having the transmission jack lifting the transmission and a hydraulic jack under the engine made it very simple to line them up as I was able to adjust both the transmission and the engine. Might be useful to anyone planning on working on their clutch.
Last edited by Evasive; 05-13-2012 at 08:23 PM.
#25
05-14-2012, 10:18 AM
