How To Maintenance :: Cooper Serpentine Belt Replacement
#1
 10-04-2010, 10:43 PM


Maintenance :: Cooper Serpentine Belt Replacement
Here's a guide for replacing the serpentine belt in your R 50 or R 52 Cooper. I found lots of guides for the "S" model but none for our Coopers, so here goes:
First, you need the special tool. Apparently a 3/8" drive socket wrench will do in a pinch, but I only had the Crafstman ratcheting type, and it would not fit between the tensioner and the frame (UPDATE: I went and got the "breaker bar" style of 3/8" drive wrench. Still kind of fat, but I was able to take it apart, slide the 3/8" square thing in the square hole and reassemble it- it was held together with a bolt. It does fit, but I was not able to get any leverage on it to move the tensioner arm. So I'm going to say you'd probably have to get the special tool to do the job). Here's some pictures of the tool courtesy of promini.com, where I got mine for $49.95 plus shipping. Shop around; at least one MINI parts supplier that shall remain nameless is selling it for $359.95 on a "Special Order" basis:
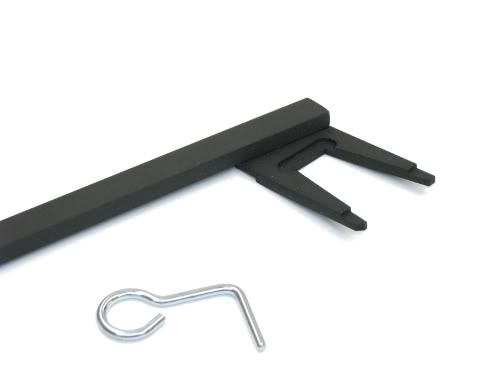
Closeup of business end of tool
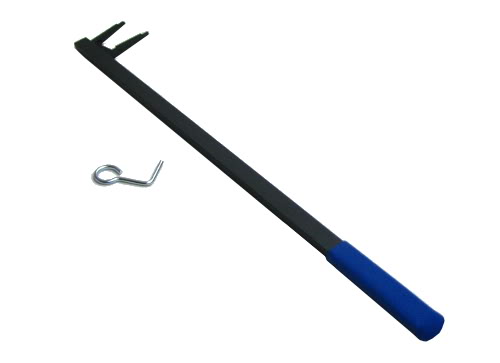
Full view of tool
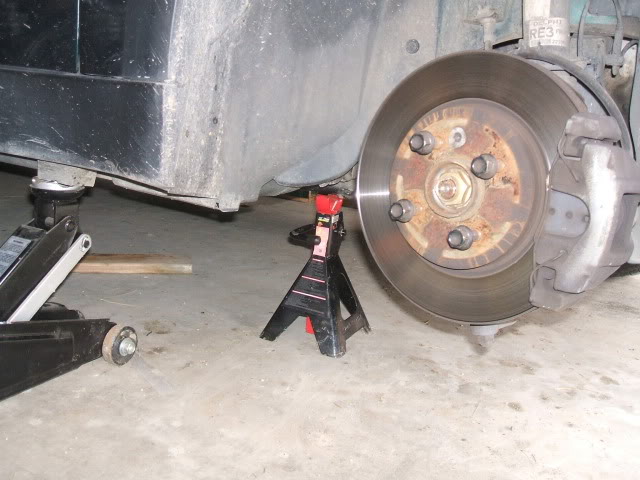
First, jack your car up and put a suitable jack stand under the frame:
You'll have to remove eight clips and three Philips head screws to get the inner fender liner off. Here's the location of some of them:
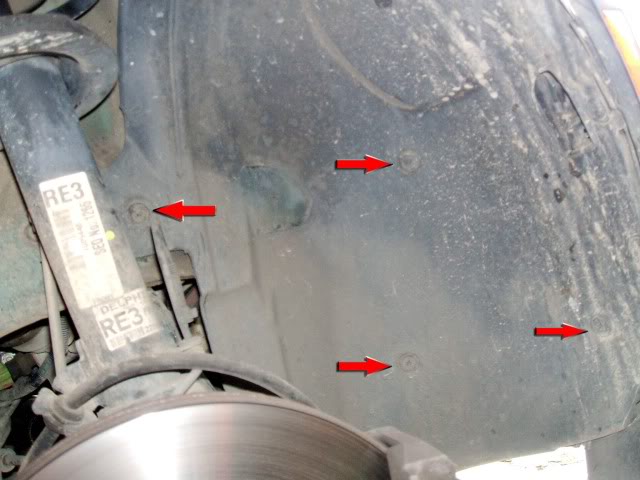
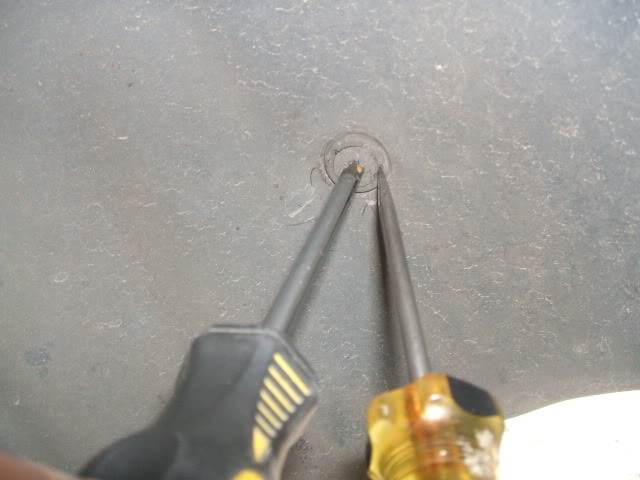
For the plastic clips, you may need to hold them in place with a flat screwdriver so the entire thing doesn't turn:
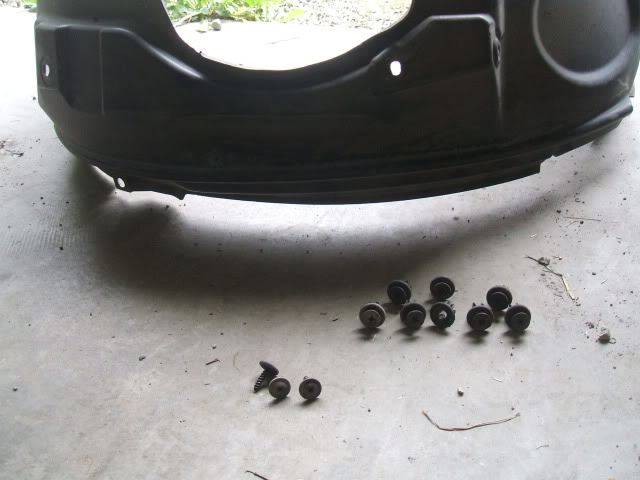
Here's the fender liner, screws and plastic clips out. If you break a clip or two it's a good reason to go to the MINI dealer, get your part and look around a bit. One How-To on the "S" model recommended taking out only some of the clips and bending the fender liner back; I found it just as easy to remove the whole thing:
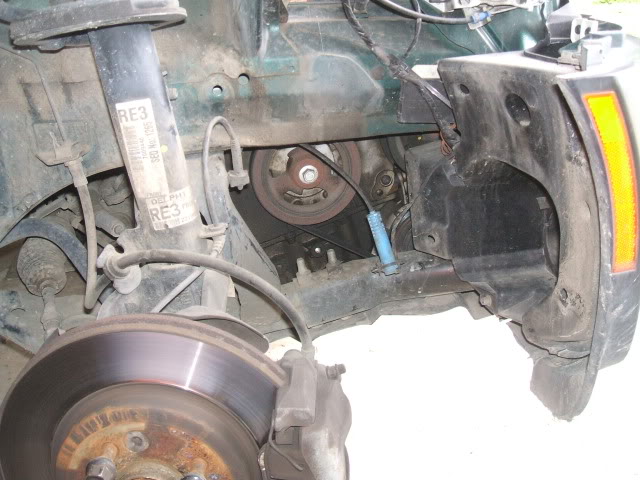
Here's what you see when you pull the fender liner out. Be aware that your brake sensor wire tends to catch the liner on it's way out:
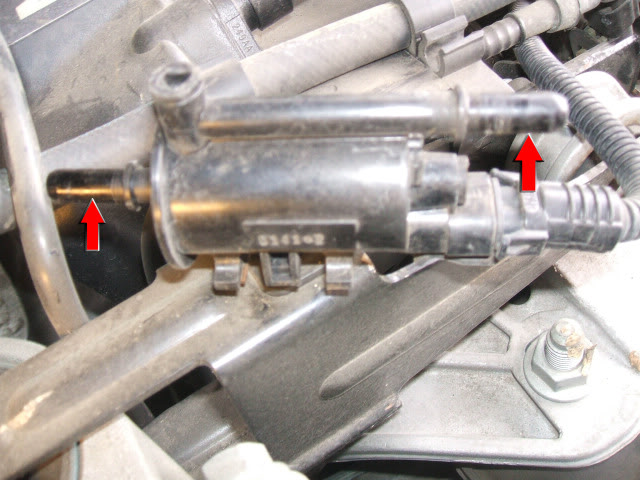
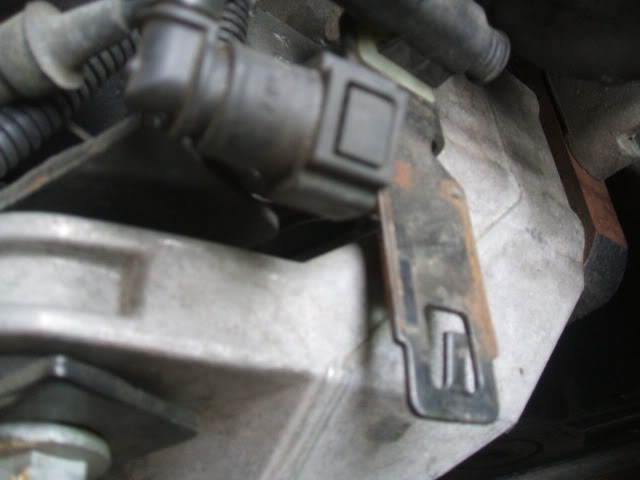
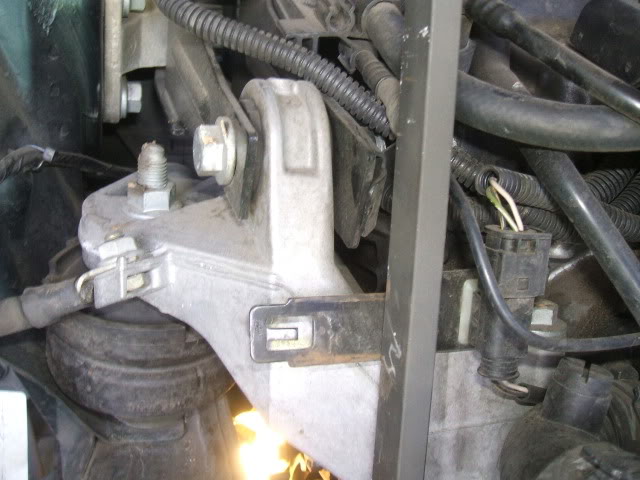
There's a black cylinder (it's the fuel tank vent valve!) that I felt would be a good idea (the Bentley manual recommends it!) to remove to allow better access for the tensioner tool. I pulled the vacuum hoses off (see arrows) and then slightly bent the metal clip thing in the middle of the second photo to allow the vacuum cylinder thing to pull off of the holder:
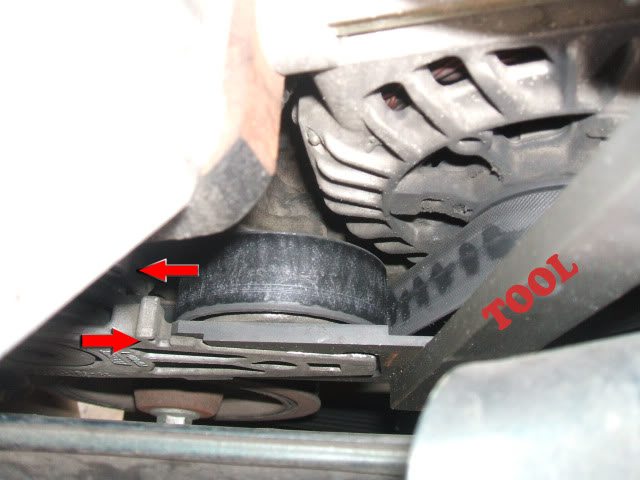
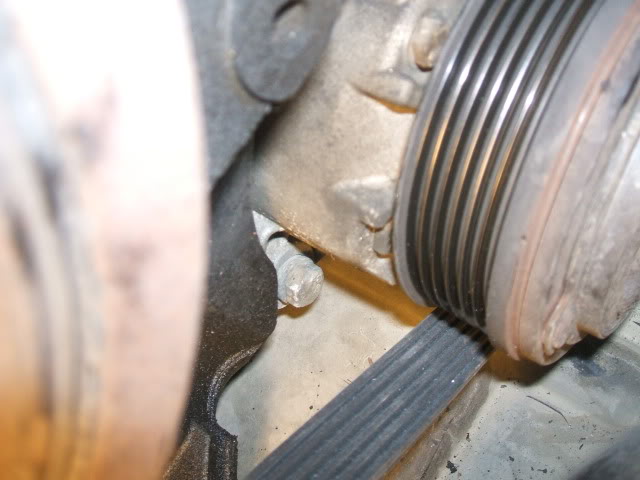
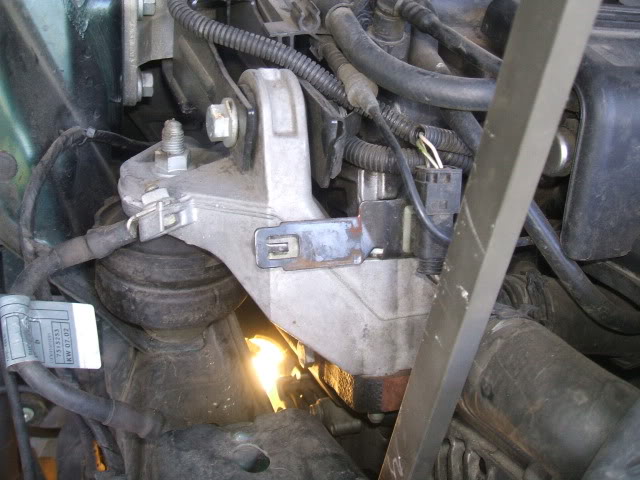
Here's the tool in place ready to release the tension. Arrows point to where the clip goes into the tensioner and the hole it slides into. You can see that there is quite a bit of movement involved, but the tool gives you plenty of leverage and the tensioner is easy to move:
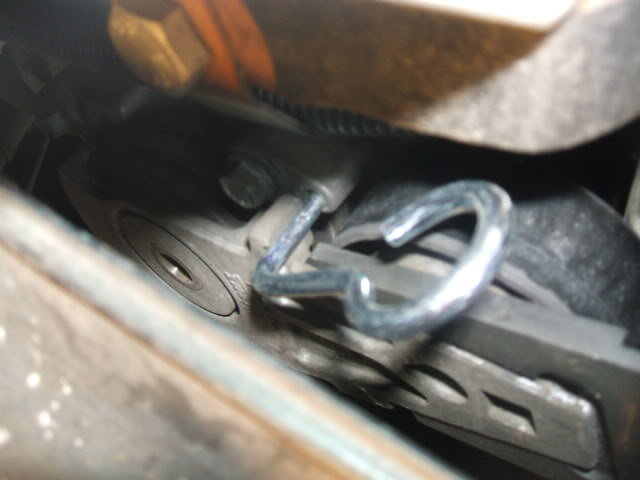
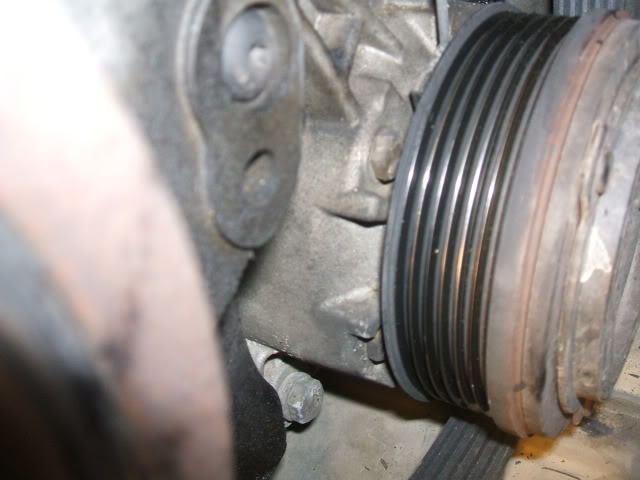
Here is the clip in place, holding the tensioner out of the way. You can see the tool is still on, about to be removed:
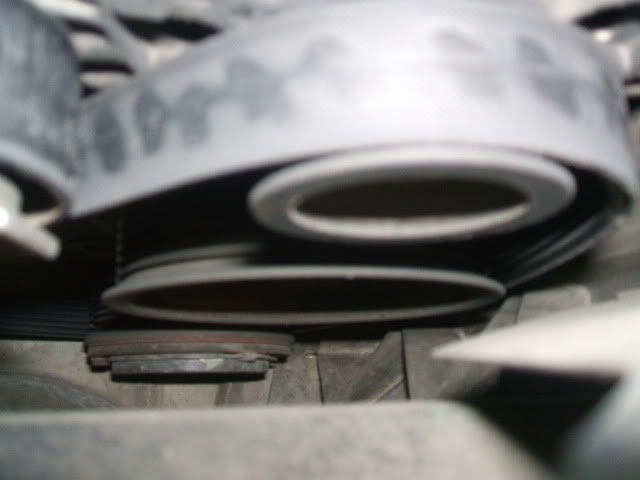
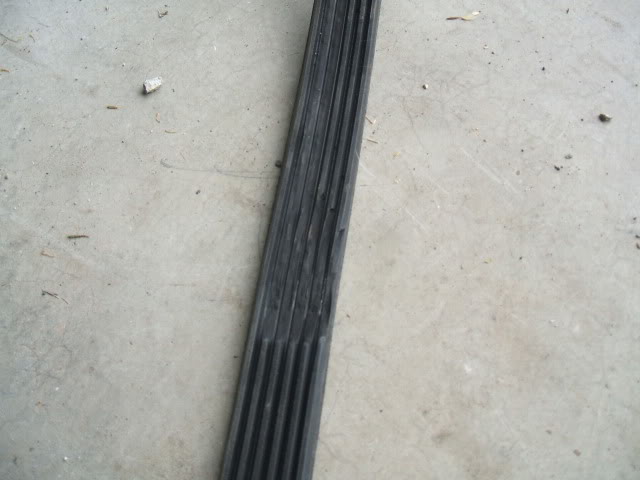
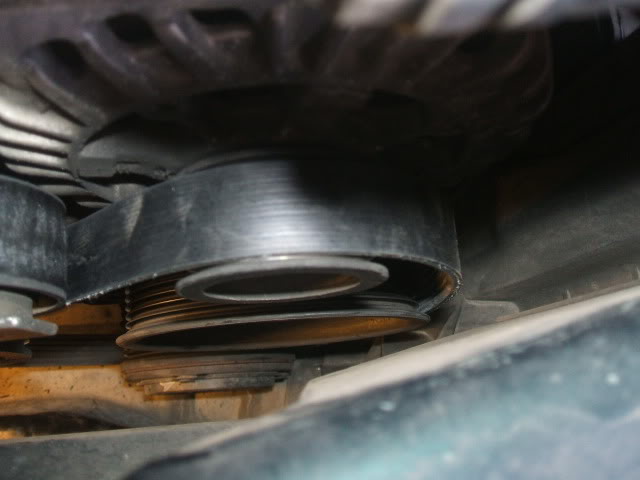
Here's how loose the belt gets when you remove tension. The belt goes around the outside of the three pulleys you see, around the front engine pulley and "under" the tensioner wheel:
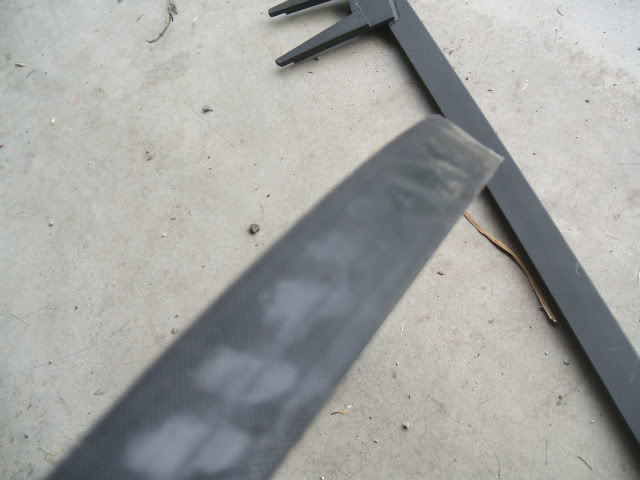
The belt is easy to remove when the tension is released. You can see from these two pictures that mine had considerable wear and damage. I suspect that the cut across the ribs were from the belt being pulled on with a screwdriver but it could be just wear, too. You can see that the backside of the belt is being worn unevenly from the tensioner wheel. That will be a job for another day; a worn tensioner won't leave me stranded like a broken belt will:
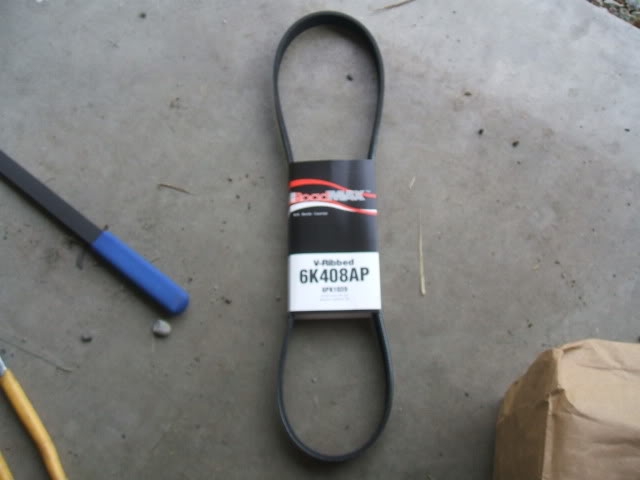
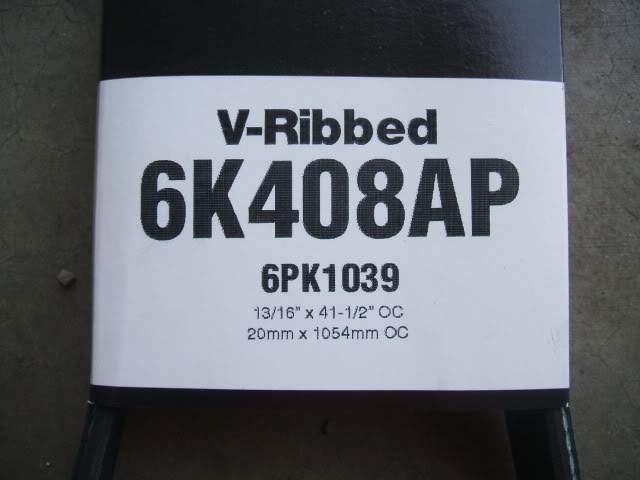
The locally owned parts store actually had the right size in stock. I brought mine in and they were able to match it to the correct size "Road Max"- now that I know the size I will get a Gates next time. Listings I have found on line show two sizes but it's not real clear which one is correct. One of the two listed belts is shorter by an inch and I suspect that's for European models without A/C; the correct belt for North American cars that have A/C as standard equipment is 41.5 inches:
The new belt was stiffer and I had a little trouble getting it around the bottom (AC?) pulley correctly. The top picture shows the ribs one "off" and the second picture shows the ribs on correctly:
Here's the new belt on correctly- loose like the old belt indicating that it is the right size:
Here's a couple showing the movement of the tensioner tool as the tensioner was put back into position- as you can see it's 3 or 4 inches of movement:
Tension off
Tension on
Re-assembly of the car is the reverse- don't forget to put the vacuum hoses on the black cylinder thing and remember to slide it back on the holder. Re-install your fender liner, and remember to tighten your lug nuts down properly.
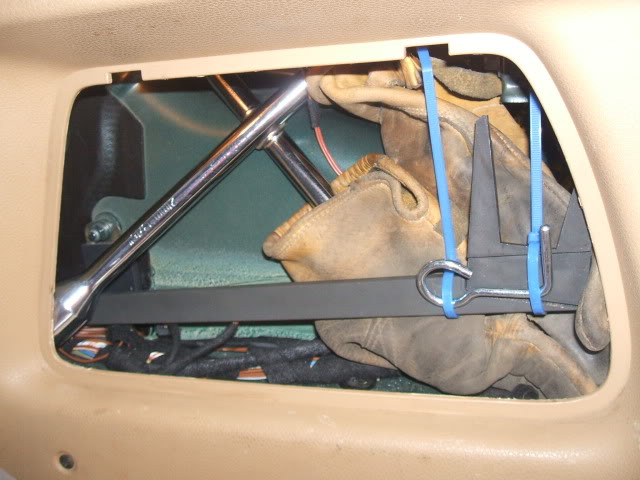
My car was much quieter with the new belt. As you can see, the tool will store in the boot opening along with your old belt if it wasn't shredded. This would be an easy side of the road fix, so you can be the hero the next time somebody shreds or tosses a belt on a long club drive:
Val
First, you need the special tool. Apparently a 3/8" drive socket wrench will do in a pinch, but I only had the Crafstman ratcheting type, and it would not fit between the tensioner and the frame (UPDATE: I went and got the "breaker bar" style of 3/8" drive wrench. Still kind of fat, but I was able to take it apart, slide the 3/8" square thing in the square hole and reassemble it- it was held together with a bolt. It does fit, but I was not able to get any leverage on it to move the tensioner arm. So I'm going to say you'd probably have to get the special tool to do the job). Here's some pictures of the tool courtesy of promini.com, where I got mine for $49.95 plus shipping. Shop around; at least one MINI parts supplier that shall remain nameless is selling it for $359.95 on a "Special Order" basis:
Closeup of business end of tool
Full view of tool
First, jack your car up and put a suitable jack stand under the frame:
You'll have to remove eight clips and three Philips head screws to get the inner fender liner off. Here's the location of some of them:
For the plastic clips, you may need to hold them in place with a flat screwdriver so the entire thing doesn't turn:
Here's the fender liner, screws and plastic clips out. If you break a clip or two it's a good reason to go to the MINI dealer, get your part and look around a bit. One How-To on the "S" model recommended taking out only some of the clips and bending the fender liner back; I found it just as easy to remove the whole thing:
Here's what you see when you pull the fender liner out. Be aware that your brake sensor wire tends to catch the liner on it's way out:
There's a black cylinder (it's the fuel tank vent valve!) that I felt would be a good idea (the Bentley manual recommends it!) to remove to allow better access for the tensioner tool. I pulled the vacuum hoses off (see arrows) and then slightly bent the metal clip thing in the middle of the second photo to allow the vacuum cylinder thing to pull off of the holder:
Here's the tool in place ready to release the tension. Arrows point to where the clip goes into the tensioner and the hole it slides into. You can see that there is quite a bit of movement involved, but the tool gives you plenty of leverage and the tensioner is easy to move:
Here is the clip in place, holding the tensioner out of the way. You can see the tool is still on, about to be removed:
Here's how loose the belt gets when you remove tension. The belt goes around the outside of the three pulleys you see, around the front engine pulley and "under" the tensioner wheel:
The belt is easy to remove when the tension is released. You can see from these two pictures that mine had considerable wear and damage. I suspect that the cut across the ribs were from the belt being pulled on with a screwdriver but it could be just wear, too. You can see that the backside of the belt is being worn unevenly from the tensioner wheel. That will be a job for another day; a worn tensioner won't leave me stranded like a broken belt will:
The locally owned parts store actually had the right size in stock. I brought mine in and they were able to match it to the correct size "Road Max"- now that I know the size I will get a Gates next time. Listings I have found on line show two sizes but it's not real clear which one is correct. One of the two listed belts is shorter by an inch and I suspect that's for European models without A/C; the correct belt for North American cars that have A/C as standard equipment is 41.5 inches:
The new belt was stiffer and I had a little trouble getting it around the bottom (AC?) pulley correctly. The top picture shows the ribs one "off" and the second picture shows the ribs on correctly:
Here's the new belt on correctly- loose like the old belt indicating that it is the right size:
Here's a couple showing the movement of the tensioner tool as the tensioner was put back into position- as you can see it's 3 or 4 inches of movement:
Tension off
Tension on
Re-assembly of the car is the reverse- don't forget to put the vacuum hoses on the black cylinder thing and remember to slide it back on the holder. Re-install your fender liner, and remember to tighten your lug nuts down properly.
My car was much quieter with the new belt. As you can see, the tool will store in the boot opening along with your old belt if it wasn't shredded. This would be an easy side of the road fix, so you can be the hero the next time somebody shreds or tosses a belt on a long club drive:
Val
Last edited by valvashon; 06-11-2011 at 08:31 AM. Reason: Added update.
The following users liked this post:
markthegrea (12-04-2023)
#2
11-30-2010, 10:02 AM

Great write-up. Did this a week or two ago.
So glad you took a picture of the replacement belt packaging. Interestingly, BOTH the Goodyear belts listed as replacements for my R50 at my local parts store were the wrong size. In fact, the listing is even incorrect on Goodyear's site.
Thanks to that picture I knew the right size would be 6PK1039. Ended up getting a 6PK1040 which is just slightly larger and still works great.

#4
01-14-2011, 08:18 AM
Thanks for posting this. Do you have a link for the reference?
I'm about to replace the tensioner and might throw a new belt on while I'm at it. I'm getting three squeaks after putting it into Reverse or Drive upon cold start in the morning, but that's the only time I get squeaks. It's either the belt or tensioner. Tensioner has 113k miles on it, so I figured it wouldn't hurt to replace anyway.
I'm about to replace the tensioner and might throw a new belt on while I'm at it. I'm getting three squeaks after putting it into Reverse or Drive upon cold start in the morning, but that's the only time I get squeaks. It's either the belt or tensioner. Tensioner has 113k miles on it, so I figured it wouldn't hurt to replace anyway.
#5
01-14-2011, 08:21 AM
6pk1033 is the right size:
http://www.realoem.com/bmw/showparts...90&hg=11&fg=18
I don't think the belt size was there when I changed mine a few months ago. Maybe a recent addition...or maybe I overlooked it!
http://www.realoem.com/bmw/showparts...90&hg=11&fg=18
I don't think the belt size was there when I changed mine a few months ago.
Maybe a recent addition...or maybe I overlooked it!
Last edited by gknorr; 06-11-2011 at 09:14 AM.
#7
06-11-2011, 05:45 AM

Trending Topics
#8
04-03-2012, 04:03 AM

I took apart the front end of my mini for observations, note taking and planning for future repairs. This write up helped a ton!
Quick question, when you loosen the belt and add tension to the belt with the tool, its just a set standard by the tension device on the car right ? like only 2 modes ? or does the belt tension tool let you apply the amount of tension ? From what I understood from this write up was that it was 'loose and tension' modes. Thanks for the write up!!!
Quick question, when you loosen the belt and add tension to the belt with the tool, its just a set standard by the tension device on the car right ? like only 2 modes ? or does the belt tension tool let you apply the amount of tension ? From what I understood from this write up was that it was 'loose and tension' modes. Thanks for the write up!!!
#9
04-03-2012, 07:52 AM
I took apart the front end of my mini for observations, note taking and planning for future repairs. This write up helped a ton!
Quick question, when you loosen the belt and add tension to the belt with the tool, its just a set standard by the tension device on the car right ? like only 2 modes ? or does the belt tension tool let you apply the amount of tension ? From what I understood from this write up was that it was 'loose and tension' modes. Thanks for the write up!!!
Quick question, when you loosen the belt and add tension to the belt with the tool, its just a set standard by the tension device on the car right ? like only 2 modes ? or does the belt tension tool let you apply the amount of tension ? From what I understood from this write up was that it was 'loose and tension' modes. Thanks for the write up!!!
#10
04-03-2012, 08:04 AM

Join Date: Dec 2010
Location: Central CT
Posts: 982
Likes: 0
Received 0 Likes
on
0 Posts
Great writeup, and photos. I've done this a few times, and can say that the liner doesn't have to come out. I think that's a great move for someone who doesn't work on cars often, as you can see SO much better with it out. But I've just rolled mine on ramps and had at it. I actually made my tensioner tool, and use an allen wrench to lock out the tensioner. But I was in a hurry the first time I did it, and my generic 3/8" square drive serpentine tool wasn't "clocked" right to fully untension the belt. So I used my trolley jack and a strip of plywood to remove tension from the bottom so I could lock it out. The little belly pan needs to come off this way so you can slip the wood strip up there, but that's super easy. I'm not condoning this hack method, but if it saves your butt on the side of the road sometime, it might be good to know.
#11
04-03-2012, 08:17 AM
Great writeup, and photos. I've done this a few times, and can say that the liner doesn't have to come out. I think that's a great move for someone who doesn't work on cars often, as you can see SO much better with it out. But I've just rolled mine on ramps and had at it. I actually made my tensioner tool, and use an allen wrench to lock out the tensioner. But I was in a hurry the first time I did it, and my generic 3/8" square drive serpentine tool wasn't "clocked" right to fully untension the belt. So I used my trolley jack and a strip of plywood to remove tension from the bottom so I could lock it out. The little belly pan needs to come off this way so you can slip the wood strip up there, but that's super easy. I'm not condoning this hack method, but if it saves your butt on the side of the road sometime, it might be good to know.
#12
04-03-2012, 07:25 PM
Blackbomber is correct- the inner fender liner does not have to come out to do this, but that's how I wrote it up after seeing one of the writeups on how to change out an "S" belt; the Bentley manual may have removing the liner in their instructions as well. This weekend I did some work on my wife's '03 and changed the belt while the car was up on ramps and did not remove the fender liner. I had the front of the car in "service mode" so there was a bit more room to work than usual but if you are experienced with how to change the belt or on the side of a busy highway you could easily change it from the top/bottom. Taking off the bottom splash guard if you could would be a big help.
Lizandrooo- gknorr is correct in the assessment about the belt movement. Take a second look at my pictures and you will see how much movement the tensioner tool has. Sort of mis-named, the tensioner tool takes away the belt tension caused by the tensioner.
Update- according to my independent parts place (hooray for Roxbury Auto Supply!) the Road Max belt is made by Gates so I will keep using them. The price is nice there and they are always in stock, although I don't plan to need another one anytime soon.
Also- there is a generic tensioner tool thing at Harbor Freight Tools but a quick look did not reveal how it could be used with a MINI. Has anybody else seen this?
Val
#13
04-03-2012, 07:45 PM
Update- according to my independent parts place (hooray for Roxbury Auto Supply!) the Road Max belt is made by Gates so I will keep using them. The price is nice there and they are always in stock, although I don't plan to need another one anytime soon.
Also- there is a generic tensioner tool thing at Harbor Freight Tools but a quick look did not reveal how it could be used with a MINI. Has anybody else seen this?
Val
Also- there is a generic tensioner tool thing at Harbor Freight Tools but a quick look did not reveal how it could be used with a MINI. Has anybody else seen this?
Val
The generic tensioner tool from Harbor Freight is the same one that blackbomber and I tried to use and doesn't allow you to move the tensioner enough to insert the the pin, so it's a no-go. You could use a 3/8" breaker bar if the head is thin enough to put in the tensioner though...
#14
04-07-2012, 04:03 PM
Here's a cut and paste from my original post for anybody who missed it:
First, you need the special tool. Apparently a 3/8" drive socket wrench will do in a pinch, but I only had the Crafstman ratcheting type, and it would not fit between the tensioner and the frame (UPDATE: I went and got the "breaker bar" style of 3/8" drive wrench. Still kind of fat, but I was able to take it apart, slide the 3/8" square thing in the square hole and reassemble it- it was held together with a bolt. It does fit, but I was not able to get any leverage on it to move the tensioner arm. So I'm going to say you'd probably have to get the special tool to do the job). Here's some pictures of the tool courtesy of promini.com, where I got mine for $49.95 plus shipping. Shop around; at least one MINI parts supplier that shall remain nameless is selling it for $359.95 on a "Special Order" basis.
So my conclusion is that you can't use a 3/8" breaker bar because you can't get any leverage. I'd like to hear from anybody who has moved the tensioner this way.
Val
#15
04-07-2012, 06:27 PM
Here's a cut and paste from my original post for anybody who missed it:
First, you need the special tool. Apparently a 3/8" drive socket wrench will do in a pinch, but I only had the Crafstman ratcheting type, and it would not fit between the tensioner and the frame (UPDATE: I went and got the "breaker bar" style of 3/8" drive wrench. Still kind of fat, but I was able to take it apart, slide the 3/8" square thing in the square hole and reassemble it- it was held together with a bolt. It does fit, but I was not able to get any leverage on it to move the tensioner arm. So I'm going to say you'd probably have to get the special tool to do the job). Here's some pictures of the tool courtesy of promini.com, where I got mine for $49.95 plus shipping. Shop around; at least one MINI parts supplier that shall remain nameless is selling it for $359.95 on a "Special Order" basis.
So my conclusion is that you can't use a 3/8" breaker bar because you can't get any leverage. I'd like to hear from anybody who has moved the tensioner this way.
Val
First, you need the special tool. Apparently a 3/8" drive socket wrench will do in a pinch, but I only had the Crafstman ratcheting type, and it would not fit between the tensioner and the frame (UPDATE: I went and got the "breaker bar" style of 3/8" drive wrench. Still kind of fat, but I was able to take it apart, slide the 3/8" square thing in the square hole and reassemble it- it was held together with a bolt. It does fit, but I was not able to get any leverage on it to move the tensioner arm. So I'm going to say you'd probably have to get the special tool to do the job). Here's some pictures of the tool courtesy of promini.com, where I got mine for $49.95 plus shipping. Shop around; at least one MINI parts supplier that shall remain nameless is selling it for $359.95 on a "Special Order" basis.
So my conclusion is that you can't use a 3/8" breaker bar because you can't get any leverage. I'd like to hear from anybody who has moved the tensioner this way.
Val
I'm with you - the special tool is probably the easiest way to lift the tensioner (and a sure way to prevent multiple trips to the tool store!). The next time I have to do this, I'll likely be buying it. eBay has quite a few listed, all for about $50 too.
#16
04-19-2012, 11:33 AM

1st Gear
Join Date: Jul 2011
Location: Tillamook, OR
Posts: 13
Likes: 0
Received 0 Likes
on
0 Posts
#17
04-19-2012, 12:06 PM
If you can wait for shipping, Partsgeek.com has the OEM Contitech belt for about $20 shipped. If I was switching mine today, that's what I would use.
#18
05-09-2012, 08:02 AM
I've put the 1039 belt on both of the MINIs in the family and haven't had any slipping problems. I went with that because I couldn't find a good measurement or online site with the original belt, so I just brought it in and had it measured. If the correct one has the length of 1033 I will go with that next time.
Val
Val
#19
05-09-2012, 08:17 AM
The 1040mm one I had on only slipped a little when first putting the old CVT automatic into "drive" on cold mornings.
My guess is with a manual, this would never happen - as you've experienced.
Also, realoem.com and penskeparts.com are great references for finding parts and specs. That's where I was finally able to verify 6PK1033 is the OEM size.
My guess is with a manual, this would never happen - as you've experienced.
Also, realoem.com and penskeparts.com are great references for finding parts and specs. That's where I was finally able to verify 6PK1033 is the OEM size.

Thread
Thread Starter
Forum
Replies
Last Post
igzekyativ
MINIs & Minis for Sale
34
07-16-2020 12:54 PM
igzekyativ
MINIs & Minis for Sale
28
12-23-2015 10:36 AM
ECSTuning
Interior/Exterior Products
2
08-07-2015 09:51 AM
ECSTuning
Vendor Classifieds
0
08-07-2015 08:10 AM

