How To Interior/Exterior :: How to Mount a Spare Tire on Your Cooper S
#1
 04-23-2011, 01:39 PM


Join Date: Apr 2008
Posts: 24
Likes: 0
Received 0 Likes
on
0 Posts
Interior/Exterior :: How to Mount a Spare Tire on Your Cooper S
Overview:
In this project I will provide instructions for the relocation of the muffler to provide space to mount a compact spare tire for about $100 in materials including a wheel/tire and new muffler.
Background:
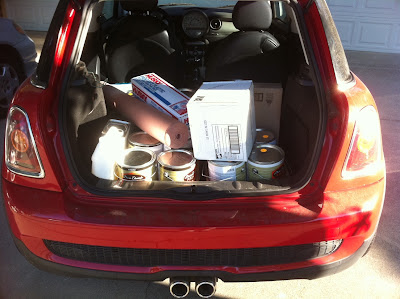
Why do I need a spare tire? Well, back in August of 08' one of my run-flats was punctured by a piece of metal that I ran over on the freeway, it was unrepairable. I had 17,500 miles on the clock and there was still tread left on the run-flat tires but I was tired of the harsh ride and road noise. I bought four Hankook H714's for $405.87. One replacement run-flat would have cost me $283.93
Fast forward to May of 2010: This is what will happen if you don't have a spare tire: I punctured the sidewall when I hit a curb making a u-turn at 10:00 at night. I called my sister to pick me up and I removed the offending tire while waiting for her. I had to rest the car on a rock that I found in someones front yard (very heavy rock-had to carry it 1/2 a mile) and abandon it (the Mini) while I had a new tire mounted the next day after jury duty, had to drive my pick-up. I am just glad the Mini was parked in a nice residential neighborhood overnight and I'm glad this didn't happen on the way to Las Vegas. I still have the rock and it now sits in the grass on the side of the house.
I took the car to the local muffler shop and asked how much it would cost to relocate the muffler. They put the Mini on the elevator to have a look. The mechanic said that there was not enough room to relocate the stock muffler and that an after-market muffler that is small enough to fit would be way too loud. Well, he was wrong!
I have since mounted a spare tire and here is how I did it:
Part I - removal of stock muffler and mounting of new muffler
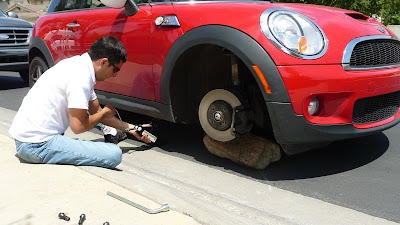
1. Place the car on four jack-stands

2. Pull off the two rubber muffler hangers on either side of the muffler, doing this will allow the muffler and pipe to drop down an inch or so to facilitate the cutting of the pipe just in front of the muffler. As you can see in the photo - the cut does not have to be perfect.

I cut the pipe with a 4-1/2 inch angle grinder that my brother in law gave me for Christmas. You can buy one for $21.99 from Harbor Fright Tools. While you are under the car with the grinder, cut off and grind flush two small (6mm) screws that protrude from the underside of the tray where the jack and tire iron are housed. There are three other screws that are situated around the "D" shaped rubber grommet that are not in the way of anything so I didn't touch them.
3. You can now remove the heat shield that was sitting above the muffler by unscrewing two bolts where the exhaust tunnel ends. Also un-bolt the muffler hanger brackets and discard.
4. The stock muffler is too big so you can buy a Cherry Bomb Turbo II Muffler for $19.99. They sound the same during normal driving and are only a little bit raspy if you put your foot on the gas hard.
5. You must now fabricate two new "hanger brackets". I made these from 1-1/2 X 1/8 mild steel for the base and 3/8 re-bar (materials were left over from previous projects). They will be attached to bolts that are already in place (the mounting location for the non "S" mufflers)
7. I used a Lincoln Weld Pac 3200 Wire Feed Welder to weld up the brackets. This welder is very easy to use (if you are new to welding) and runs on 110 normal house current. You could find a used one for $200.00

8. Next step is to make a pair of brackets and attach them to your new Turbo II muffler. A 3/8 bolt was welded to the end of the brackets that will slide into the rubber muffler hangers. Before you weld, you must remove the aluminum coating from the muffler where the welding will take place. These new muffler brackets will attach to the "hanger brackets" using the old rubber muffler hangers.

9. Buy one 90 degree elbow pipe $6.25 and one 45 degree elbow pipe $6.25 and weld them together to your muffler (before welding, remove the galvanized coat from the areas of pipe to be welded). A 2-1/4 $2.59 exhaust clamp will attach the whole kit and caboodle to the pipe you cut earlier.

Make sure to raise the exhaust pipe by inserting a spacer (piece of wood) between the pipe and the bracket (located at center of car) that bridges the tunnel that the pipe sits in and then tighten the exhaust clamp so that it cinches the 90 degree elbow tightly around the pipe.

The tail pipe sticking out from the muffler should be modified so that the exhaust gasses exit down towards the pavement.

I made a shield from 16 gauge aluminum backed with Dynamat to protect the bumper and trim from the hot exhaust gasses.

The shield is held in place by one pre-existing bolt (seen directly above the last rivet on the right) and three 3/16 aluminum blind rivets that go through the bottom of the bumper trim and cannot be seen unless you stick your big head under the car. The photo shows what a rivet gun and rivet look like. Very useful and inexpensive tool.

The original heat shield that was removed earlier should be re-reformed around the new muffler (bends very easily) and attached with a couple of rivets to the undercarriage. The original heat shield should be attached to the new one with a couple of rivets as seen on either side of the exhaust pipe in the image above.

I used a Pneumatic (compressed air powered) grinder ($20.00 at Harbor Freight) to remove excess material from the center hole of the compact spare wheel.
10. Go to a salvage yard and buy a used compact spare wheel/tire (I paid $50.00) from a Honda Civic. This wheel will require that some material be removed from the center hole so that it will fit on the Mini's rear hub.

11. Use a tungsten carbide cutting bit in the pneumatic grinder, also $20.00. You will need a source of compressed air. Don't bother trying to stick the cutting bit in a drill - doesn't turn fast enough and will take forever. Prime and paint the wheel where the excess metal was removed to avoid rust.
Part II: Mounting the Tire
1. Pop the rear hatch and remove the black styro-foam tray that houses the jack and tire-iron.

2. Inside the bottom of the depression where the tray sits, pop the "D" shaped rubber grommet out thus exposing a "D" shaped hole. I used a piece of 3/16 aluminum plate that I drilled in three corners. It slips over the three existing bolts. The nuts/washers were originally used to secure the heat shield that is now held in place by rivets.

A hole large enough to accommodate a 3/4 bolt must be drilled in the aluminum plate so that it lines up with the center of the "D" shaped hole.
Fabricating the wheel hanger:
1. I used a 4" X 4" X 3/16" piece of steel and welded a 3/4" bolt $2.99 to it. I drilled a hole in the top of the bolt with my drill press (#7 drill bit $3.89 or 13/64) and then cut threads in it with a 1/4-20 tap $4.39.

You will then need to buy a threaded rod 1/4 X 36" $6.99 (I cut it down to fit into the foam tool tray and used a piece of rubber tube to protect the first couple of inches of thread). I drilled and tapped a 1/2 piece of re-bar to use as a handle and secured it to the threaded rod with a tack from my welder.

You can now place a 3/4" nut and lock-washer onto the threaded rod and then stick the threaded rod through the hole in the aluminum plate and screw it into the 3/4" bolt head by turning it with the re-bar handle

With one hand grasping the re-bar handle, pull up allowing the 3/4 bolt to slide through the hole in the aluminum plate then use your other hand to thread the nut onto the bolt.

Now you must make a bracket to keep the tire from coming into contact with the rear suspension as well as to keep the tire stable in its new position

Here we see the bracket as it holds the tire level and away from the suspension arm
Next step is the removal of the stock exhaust pipe tips with an Allen wrench. I made the heat shield and the exhaust tip bracket and brace with my box and pan brake.

I made a bracket from 16 gauge sheet metal and attached the pipe tips with a couple of stainless steel 3/16 rivets.

Stainless rivets are much stronger than the aluminum rivets and I want to be sure that these tips will not fall off.

Here is the bracket as seen from under the car. I welded a couple of tabs to a piece of metal that runs under the car parallel to the bumper then attached the tip bracket with some 1/4-20 nuts and bolts. I also made a brace to keep the bracket from moving back and forth and attached it with self taping sheet metal screws.


Here is the car with the non-functional tail pipes. Now you know what the materials cost and what tools and skills are necessary to perform this modification. If you can't do it yourself, you need to go to a muffler shop and find a sheet metal fabricator and show them this post.
Good Luck!
In this project I will provide instructions for the relocation of the muffler to provide space to mount a compact spare tire for about $100 in materials including a wheel/tire and new muffler.
Background:
Why do I need a spare tire? Well, back in August of 08' one of my run-flats was punctured by a piece of metal that I ran over on the freeway, it was unrepairable. I had 17,500 miles on the clock and there was still tread left on the run-flat tires but I was tired of the harsh ride and road noise. I bought four Hankook H714's for $405.87. One replacement run-flat would have cost me $283.93
Fast forward to May of 2010: This is what will happen if you don't have a spare tire: I punctured the sidewall when I hit a curb making a u-turn at 10:00 at night. I called my sister to pick me up and I removed the offending tire while waiting for her. I had to rest the car on a rock that I found in someones front yard (very heavy rock-had to carry it 1/2 a mile) and abandon it (the Mini) while I had a new tire mounted the next day after jury duty, had to drive my pick-up. I am just glad the Mini was parked in a nice residential neighborhood overnight and I'm glad this didn't happen on the way to Las Vegas. I still have the rock and it now sits in the grass on the side of the house.
I took the car to the local muffler shop and asked how much it would cost to relocate the muffler. They put the Mini on the elevator to have a look. The mechanic said that there was not enough room to relocate the stock muffler and that an after-market muffler that is small enough to fit would be way too loud. Well, he was wrong!
I have since mounted a spare tire and here is how I did it:
Part I - removal of stock muffler and mounting of new muffler
1. Place the car on four jack-stands
2. Pull off the two rubber muffler hangers on either side of the muffler, doing this will allow the muffler and pipe to drop down an inch or so to facilitate the cutting of the pipe just in front of the muffler. As you can see in the photo - the cut does not have to be perfect.
I cut the pipe with a 4-1/2 inch angle grinder that my brother in law gave me for Christmas. You can buy one for $21.99 from Harbor Fright Tools. While you are under the car with the grinder, cut off and grind flush two small (6mm) screws that protrude from the underside of the tray where the jack and tire iron are housed. There are three other screws that are situated around the "D" shaped rubber grommet that are not in the way of anything so I didn't touch them.
3. You can now remove the heat shield that was sitting above the muffler by unscrewing two bolts where the exhaust tunnel ends. Also un-bolt the muffler hanger brackets and discard.
4. The stock muffler is too big so you can buy a Cherry Bomb Turbo II Muffler for $19.99. They sound the same during normal driving and are only a little bit raspy if you put your foot on the gas hard.
5. You must now fabricate two new "hanger brackets". I made these from 1-1/2 X 1/8 mild steel for the base and 3/8 re-bar (materials were left over from previous projects). They will be attached to bolts that are already in place (the mounting location for the non "S" mufflers)
7. I used a Lincoln Weld Pac 3200 Wire Feed Welder to weld up the brackets. This welder is very easy to use (if you are new to welding) and runs on 110 normal house current. You could find a used one for $200.00
8. Next step is to make a pair of brackets and attach them to your new Turbo II muffler. A 3/8 bolt was welded to the end of the brackets that will slide into the rubber muffler hangers. Before you weld, you must remove the aluminum coating from the muffler where the welding will take place. These new muffler brackets will attach to the "hanger brackets" using the old rubber muffler hangers.
9. Buy one 90 degree elbow pipe $6.25 and one 45 degree elbow pipe $6.25 and weld them together to your muffler (before welding, remove the galvanized coat from the areas of pipe to be welded). A 2-1/4 $2.59 exhaust clamp will attach the whole kit and caboodle to the pipe you cut earlier.
Make sure to raise the exhaust pipe by inserting a spacer (piece of wood) between the pipe and the bracket (located at center of car) that bridges the tunnel that the pipe sits in and then tighten the exhaust clamp so that it cinches the 90 degree elbow tightly around the pipe.
The tail pipe sticking out from the muffler should be modified so that the exhaust gasses exit down towards the pavement.
I made a shield from 16 gauge aluminum backed with Dynamat to protect the bumper and trim from the hot exhaust gasses.
The shield is held in place by one pre-existing bolt (seen directly above the last rivet on the right) and three 3/16 aluminum blind rivets that go through the bottom of the bumper trim and cannot be seen unless you stick your big head under the car. The photo shows what a rivet gun and rivet look like. Very useful and inexpensive tool.
The original heat shield that was removed earlier should be re-reformed around the new muffler (bends very easily) and attached with a couple of rivets to the undercarriage. The original heat shield should be attached to the new one with a couple of rivets as seen on either side of the exhaust pipe in the image above.
I used a Pneumatic (compressed air powered) grinder ($20.00 at Harbor Freight) to remove excess material from the center hole of the compact spare wheel.
10. Go to a salvage yard and buy a used compact spare wheel/tire (I paid $50.00) from a Honda Civic. This wheel will require that some material be removed from the center hole so that it will fit on the Mini's rear hub.
11. Use a tungsten carbide cutting bit in the pneumatic grinder, also $20.00. You will need a source of compressed air. Don't bother trying to stick the cutting bit in a drill - doesn't turn fast enough and will take forever. Prime and paint the wheel where the excess metal was removed to avoid rust.
Part II: Mounting the Tire
1. Pop the rear hatch and remove the black styro-foam tray that houses the jack and tire-iron.
2. Inside the bottom of the depression where the tray sits, pop the "D" shaped rubber grommet out thus exposing a "D" shaped hole. I used a piece of 3/16 aluminum plate that I drilled in three corners. It slips over the three existing bolts. The nuts/washers were originally used to secure the heat shield that is now held in place by rivets.
A hole large enough to accommodate a 3/4 bolt must be drilled in the aluminum plate so that it lines up with the center of the "D" shaped hole.
Fabricating the wheel hanger:
1. I used a 4" X 4" X 3/16" piece of steel and welded a 3/4" bolt $2.99 to it. I drilled a hole in the top of the bolt with my drill press (#7 drill bit $3.89 or 13/64) and then cut threads in it with a 1/4-20 tap $4.39.
You will then need to buy a threaded rod 1/4 X 36" $6.99 (I cut it down to fit into the foam tool tray and used a piece of rubber tube to protect the first couple of inches of thread). I drilled and tapped a 1/2 piece of re-bar to use as a handle and secured it to the threaded rod with a tack from my welder.
You can now place a 3/4" nut and lock-washer onto the threaded rod and then stick the threaded rod through the hole in the aluminum plate and screw it into the 3/4" bolt head by turning it with the re-bar handle
With one hand grasping the re-bar handle, pull up allowing the 3/4 bolt to slide through the hole in the aluminum plate then use your other hand to thread the nut onto the bolt.
Now you must make a bracket to keep the tire from coming into contact with the rear suspension as well as to keep the tire stable in its new position
Here we see the bracket as it holds the tire level and away from the suspension arm
Next step is the removal of the stock exhaust pipe tips with an Allen wrench. I made the heat shield and the exhaust tip bracket and brace with my box and pan brake.
I made a bracket from 16 gauge sheet metal and attached the pipe tips with a couple of stainless steel 3/16 rivets.
Stainless rivets are much stronger than the aluminum rivets and I want to be sure that these tips will not fall off.
Here is the bracket as seen from under the car. I welded a couple of tabs to a piece of metal that runs under the car parallel to the bumper then attached the tip bracket with some 1/4-20 nuts and bolts. I also made a brace to keep the bracket from moving back and forth and attached it with self taping sheet metal screws.
Here is the car with the non-functional tail pipes. Now you know what the materials cost and what tools and skills are necessary to perform this modification. If you can't do it yourself, you need to go to a muffler shop and find a sheet metal fabricator and show them this post.
Good Luck!
Last edited by onionjello; 07-24-2011 at 09:01 AM.


#3
04-24-2011, 12:16 PM
Join Date: Apr 2008
Posts: 24
Likes: 0
Received 0 Likes
on
0 Posts

#4
05-05-2011, 08:03 PM
Join Date: Apr 2008
Posts: 24
Likes: 0
Received 0 Likes
on
0 Posts
Warning!!!
I drove the mini to San Francisco from Los Angeles (800 miles round trip) and kept the speedo just under three figures for extended periods on the I-5. The heat shield did not protect the rear bumper trim and it melted a little bit. It's one of those things that you wouldn't notice unless it was pointed out so I think I can live with it. You can see it in the last photo in the post.
Last edited by onionjello; 07-24-2011 at 09:02 AM.
#5
05-25-2011, 10:41 PM
3rd Gear
Join Date: Jan 2010
Location: Plattsmouth, NE
Posts: 276
Likes: 0
Received 0 Likes
on
0 Posts

#7
07-28-2011, 03:22 PM

Trending Topics
#9
07-28-2011, 03:44 PM
Join Date: Apr 2008
Posts: 24
Likes: 0
Received 0 Likes
on
0 Posts
#11
09-09-2011, 07:28 PM

An audacious solution. I can't stand the idea of no spare and having your experience with a catastrophic blow out. My idea was of a much more expensive route. Basically converting the underneath and rear bumper cover back to the Cooper style using all OEM parts, preferably wrecking yard sourced. The only clue would be dual exhaust tips poking out the passenger side on a Borla or some such muffler. Well done just the same.
#12
09-13-2011, 08:40 AM


#14
04-09-2012, 05:08 AM

#15
05-02-2012, 01:03 PM

#16
05-29-2012, 07:51 AM

2nd Gear
#17
05-29-2012, 08:54 AM
No idea on the year of the wheel. I simply went to the junkyard looking for this spec: 4x100 pattern, and 56.1mm hub size. Asked junk yard dogs for a Civic spare, and measured hub hole.
Took it home, bolted on and test drove around the block.
It didn't rub on the front or rear brake rotors, so WIN!
Took it home, bolted on and test drove around the block.
It didn't rub on the front or rear brake rotors, so WIN!
#18
08-22-2012, 03:27 AM

#19
08-22-2012, 04:53 AM
3rd Gear
Join Date: Jan 2010
Location: Plattsmouth, NE
Posts: 276
Likes: 0
Received 0 Likes
on
0 Posts
#20
08-22-2012, 06:12 PM

#21
10-01-2012, 07:48 PM

4th Gear
Join Date: Sep 2012
Location: SE Wyoming
Posts: 385
Likes: 0
Received 0 Likes
on
0 Posts
As a motorcycle rider I too hate not being able to fix a flat. So I got one of these, and I have used it, and the plug has been in the tire for about 1,000 miles so far.
http://www.jpcycles.com/product/246-073
You can plug your tire with the tire on the wheel. This will work for holes, but not a tear, or sidewall problem.... but neither will Slime. :-)
http://www.jpcycles.com/product/246-073
You can plug your tire with the tire on the wheel. This will work for holes, but not a tear, or sidewall problem.... but neither will Slime. :-)

Thread
Thread Starter
Forum
Replies
Last Post
igzekyativ
MINIs & Minis for Sale
34
07-16-2020 12:54 PM
ClayTaylorNC
R50/R53 :: Hatch Talk (2002-2006)
6
08-10-2015 09:19 PM