How To Interior/Exterior :: How to Remove Door Panels
#1
 05-16-2008, 07:43 AM


Join Date: Apr 2008
Posts: 24
Likes: 0
Received 0 Likes
on
0 Posts
Interior/Exterior :: How to Remove Door Panels
After much searching, i could not find any info regarding the removal of door panels for my 07 s coup. i removed the door panels so that i could install sound damping material on the inside of the doors. here is how i did it: (this procedure is time consuming and some what difficult (three of the screws are hard to reach) so relax and go easy...
1. use a flathead screwdriver to remove the plastic pin from the bottom side of the trim ring that surrounds the door opener handle:mini trim ring.jpg
2. remove the door arm rest by putting the palms of both hands on the pad and using your finger tips to pry the top side up (to clear the tabs) and towards you. then disconnect the light connection with a very small screw driver:various 042.jpg
3. The panels are in two parts, the first part to be removed is in the shape of a "C". it can be removed using only your hands if they are strong or you can use a large flathead screwdriver to pry the panel off of the door. the panel is secured by a series of plastic pin snaps:various 040.jpg
Last edited by onionjello; 05-16-2008 at 11:19 AM. Reason: typo
#2
05-16-2008, 07:59 AM
Join Date: Apr 2008
Posts: 24
Likes: 0
Received 0 Likes
on
0 Posts
how to remove door panels part 2
4. disconnect the bottom door light in the "C" shaped panel that was removed in step 3:mini door light.jpg
5. disconnect the three electrical connections as indicated in the image:mini connections.jpg
6. using a torx wrench, unscrew the speaker (bottom right on door) and disconnect the electrical connection. remove the speaker and put in a safe place. using a torx wrench, unscrew the screws as indicated by the red arrows in the image, note, i may have missed a screw so make sure you unscrew all of themmini door screws 1.jpg
#3
05-16-2008, 08:12 AM
Join Date: Apr 2008
Posts: 24
Likes: 0
Received 0 Likes
on
0 Posts
how to remove door panels part 3
7. remove the two round rubber plugs from the bottom side of the door:various 043.jpg
8. shine a flashlignt into the hole from which you removed the rubber plug and you will see a screw that goes into hole of the bracket in the image. unscrew this screw and then unscrew the other one :various 037.jpg
9. now you should be able to gently pry the bottom of the door panel away from the bottom of the door. at a certian point you will feel some resistance. this is due to a screw that goes through a piece of black styro-foam at the bottom of the door. this screw is held in place by a washer on the other side of the foam. you must pull the washer through the foam. this will effectivley destroy the function of the washer but it can be fixed later durring installation with some silicone sealant. the image shows the foam, screw and washer, as well as the bracket that is attached to the door panel that is screwed to the bracket that is attached to the door mini black foam.jpg
Last edited by onionjello; 05-16-2008 at 08:24 AM. Reason: more info
#4
05-16-2008, 08:51 AM
Join Date: Apr 2008
Posts: 24
Likes: 0
Received 0 Likes
on
0 Posts
how to remove door panels part 4
10. you will need a torx wrench to unscrew the three screws (see third image, two of the screws are circled in green) that hold the top side of the door panel onto the door. my torx set was purchased at Pep Boys Automotive. i used a standard box end wrench to turn the torx bit and used some electrical tape to keep the bit from sliding up and down in the wrench. you could also use a 1/4" rachet and torx bit if you have one (would be easier than my setup). in order to get at the screws, you will need to lie on your back on the ground. slide your hand up between the bottom of the door panel and the door, extend your arm and use your finger tips to feel around for the head of the torx screw in the locations indicated by the red arrows in the image. unscrew the three screws. if you are a big person, get a skinny friend with long arms and small hands to do this for you. installation is the reverse of removal. happy trails various 034.jpg
Last edited by onionjello; 05-16-2008 at 11:20 AM. Reason: more info
#5
05-20-2008, 10:33 AM

3rd Gear
Join Date: Jul 2007
Location: Atlanta,GA
Posts: 171
Likes: 0
Received 0 Likes
on
0 Posts
#6
05-21-2008, 03:07 PM
Join Date: Apr 2008
Posts: 24
Likes: 0
Received 0 Likes
on
0 Posts
#7
05-25-2008, 08:53 PM
2nd Gear
Join Date: Apr 2007
Location: upstate New York
Posts: 84
Likes: 0
Received 0 Likes
on
0 Posts
Trending Topics

#9
10-08-2008, 10:54 AM

6th Gear
Join Date: May 2007
Location: Sacramento, Ca
Posts: 1,442
Likes: 0
Received 0 Likes
on
0 Posts
so is the sound damping noticeable from the door panels?
I just did the whole rear section but now since i have so much extra material want to do the doors. I noticed from the outside that when i play music, you can hear so much noise coming through the doors...
also, im assuming this method doesnt require you to remove the windows? I was worried about this because i didnt want any alignment issues in the future with the window.
#10
10-15-2008, 05:06 PM

4th Gear
Join Date: Aug 2008
Location: Corona De Tucson,AZ
Posts: 321
Likes: 0
Received 0 Likes
on
0 Posts

#12
11-02-2008, 09:34 PM
Join Date: Apr 2008
Posts: 24
Likes: 0
Received 0 Likes
on
0 Posts
#13
11-02-2008, 10:12 PM
6th Gear
Join Date: May 2007
Location: Sacramento, Ca
Posts: 1,442
Likes: 0
Received 0 Likes
on
0 Posts
#14
11-03-2008, 05:16 PM
Join Date: Apr 2008
Posts: 24
Likes: 0
Received 0 Likes
on
0 Posts
Runflats
This past Sunday, one of my runflats was punctured by a piece of metal that I ran over on the freeway and was unrepairable. I have 17500 miles on the car and there was still a good amount of tread left on the other tires but I was just tired of the harsh ride and road noise. I purchased a set of four Hankook H714 from PepBoys Automotive for $405.87 including tax, hazard warranty & balancing. One replacement runflat would have cost $283.93.
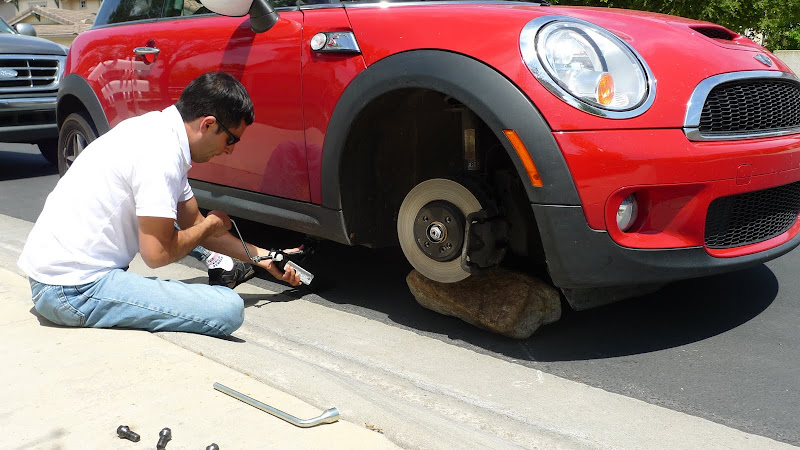
Fast forward to May of 2010: This is what will happen if you don't have a spare tire: I punctured the sidewall when I hit a curb making a u-turn. I called my sister to pick me up and I removed the offending tire while waiting for her. I had to rest the car on a rock and abandon it while I had a new tire mounted the next day after jury duty (I have a truck too) I am just glad it was parked in a nice residential neighborhood overnight. I'm glad this didn't happen on the way to Las Vegas.
I have since mounted a spare tire.
Last edited by onionjello; 04-23-2011 at 02:07 PM.
#15
11-21-2008, 08:20 PM

1st Gear
Join Date: Oct 2007
Location: Southern California
Posts: 31
Likes: 0
Received 0 Likes
on
0 Posts
#16
11-28-2008, 03:37 AM
Thanks for the great information. I am starting my own sound dampening install this weekend on my 07' MCS and your write-up was just what the doctor ordered. (Next on the list is ditching runflats...)
Have you noticed a significant decrease in noise after installing the sound dampening material? Which product(s) did you choose?
Have you noticed a significant decrease in noise after installing the sound dampening material? Which product(s) did you choose?
#17
11-28-2008, 01:48 PM
1st Gear
Join Date: Oct 2007
Location: Southern California
Posts: 31
Likes: 0
Received 0 Likes
on
0 Posts
Noise Reduction
I noticed a significant reduction in noise for each stage of my effort. First was the boot and rear side panels. Second was the front doors behind the speakers only. Next was the front wheel wells. Then, thanks to this thread, I did the entire front doors. Each step had a noticeable reduction in road noise. Probably the most surprising for me was the wheel wells - big noise reduction. I used Dynamat Extreme for each effort. It is easy to apply and sticks really well to the metal. I have read good things about the "Damplifier" product but have not used it.
Regards
Regards
#18
12-01-2008, 12:42 AM
6th Gear
Join Date: May 2007
Location: Sacramento, Ca
Posts: 1,442
Likes: 0
Received 0 Likes
on
0 Posts
#19
12-01-2008, 07:08 PM
1st Gear
Join Date: Oct 2007
Location: Southern California
Posts: 31
Likes: 0
Received 0 Likes
on
0 Posts
#20
12-02-2008, 04:37 PM

#21
12-02-2008, 06:23 PM

now that i'm finishing up my latest obession, my carpc install, i fear that i will have to try out this sound dampening in the wheel wells first and inevitably end up doing it all and finishing off with onionjello's excellent diy write-up.
#22
12-13-2008, 04:40 PM

I'm trying to get this internal door panel off so I can get my door lock rod back in its clip (when I pulled off the outer door trim, the door lock was up, and it seems I pulled the door lock rod out of it's clip).
So, I'm having trouble reaching up the door to get to the three screws in step 10. Is there any way to remove the aluminum plate instead from the door such that door panel stays attached to the three screws and the two pieces move together?
All I'm trying to do is gain access to door lock side so I can see what I am doing to get the door lock rod back in place.
Argh!!!
#23
12-14-2008, 01:52 AM
3 Screws
You have my sympathy. I recently did a sound proofing project (CANNOT SAY ENOUGH GOOD THINGS ABOUT ANTHONY @ SECOND SKIN AUDIO. PRODUCTS AND SERVICE WHERE UNBELIEVABLE!).
It took my dad and I about 1.5 hrs to wrestle them out. There is no trick, just patience, grasshopper. Needless to say, after installation of the Damplifier to the door sheet metal we ditched the three screws upon re-installation and simply used one central, short sheetmetal screw to secure the top edge.
You could try removing the window and support beam as a unit/sub-assembly...you will need an extra set of hands or two. Good luck!
#24
12-15-2008, 09:18 AM
Ok, after discussing with car buddy at work, I plan to leave glass in place.
I will find where blind screws come into inner door molding (I think it's obvious from the little bumps in the inner door panel) and will "drill out" the screws such that I can just pull the panel off (either a drill slightly larger than the screws or a hole saw just a little bigger than the screws).
Then I will take the screws out of the aluminum cross piece, drill the holes out a little so that I put pem nuts in, then I will use a screw with an appropriate shoulder or a screw and washer to attach the panel from the front side into the pem nuts.
Of course this is all predicated by the location of the three blind screws being covered by the outer door panel...
Last edited by aafflyer; 12-15-2008 at 11:00 AM.
#25
12-22-2009, 05:52 AM
